


之前公司的上传都是用的基于Vue的插件,直到最近一次需要多文件上传才发现,事情不是那么简单。
多文件上传:
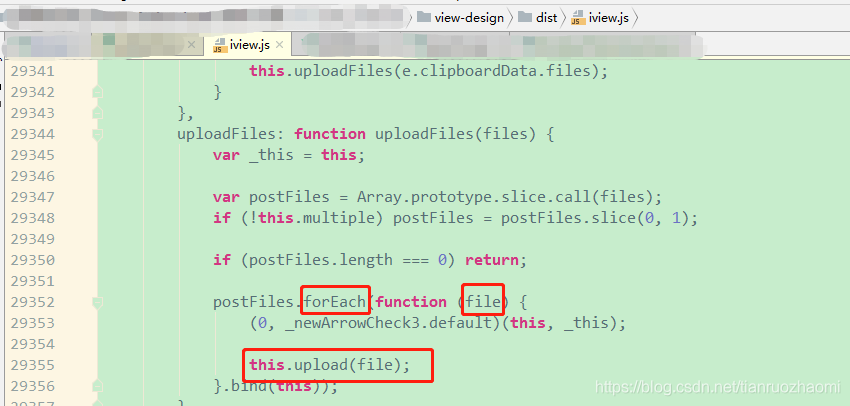
虽然操作你看着是一次选中了多个文件,其实!!!在前端它还是循环一次一个文件上传到后台的!!!
不适用于我新项目的需求:后台一次接受多个文件进行处理。
所以,用了原生去写,没想到就寥寥几行代码搞定!!!
前端
<template  lang="pug">
    Form(:label-width='80')
       input(type="file" id="uploadFile" multiple="multiple"  @change="uploadDataFile" )
       Spin(fix
        size="large"
        v-if="loading"
       )
</template>

----下面是带样式的上传按钮:
<template  lang="pug">
    Form(:label-width='80')
        Button(
         type="primary"
        ).file-btn
            b  选择文件
            input(type="file" id="uploadFile" multiple="multiple"  @change="uploadDataFile" )
        Spin(fix
            size="large"
            v-if="loading"
        )
</template>
<style scoped lang="less">
    .file-btn{
        position: relative;
        input{
            position: absolute;
            height: 100%;
            width: 100%;
            top: 0;
            left: 0;
            opacity: 0.001;
        }
    }
</style>


<script>
    import {baseURL} from "src/const/config";
    var xhr;
    export default {
        name: "MultipartFileUpload",
        data(){
            return {
                loading:false
            }
        },
        props: {
            tag: {
                type: [Number,String],
                default: 0
            },
            writeDatetime: {
                type: [String,Date],
                default: ''
            },
            action:{
                type: String,
                default: ''
            }
        },
        methods:{
            uploadDataFile(e) {
                let m = this;
                if(!m.writeDatetime){
                    m.$Message.error('请输入时间!');
                    m.clearFileInput();
                    return
                }
                debugger
                // let files = e.target.files || []
                // if (files.length != 3) {
                //     m.$error('文件个数不对,仅支持(风速.txt、风向.txt、高度场.txt)!');
                //     return
                // }
                var url = baseURL + "meteorology/import"; // 接收上传文件的后台地址
                var formData = new FormData();
                var fileDOM = document.getElementById("uploadFile")
                for (var i = 0; i < fileDOM.files.length; i++) {
                    formData.append("file", fileDOM.files[i]);
                }
                formData.append("writeDatetime", m.writeDatetime);
                debugger
                console.log(formData.getAll("file"));

                m.loading = true
                xhr = new XMLHttpRequest();  // XMLHttpRequest 对象
                xhr.open("post", url, true); //post方式,url为服务器请求地址,true 该参数规定请求是否异步处理
                xhr.onload = m.uploadComplete; //请求完成
                xhr.onerror = m.uploadFailed; //请求失败

                var ot;
                var oloaded;
                xhr.upload.onloadstart = function () {//上传开始执行方法
                    ot = new Date().getTime();   //设置上传开始时间
                    oloaded = 0;//设置上传开始时,以上传的文件大小为0
                };
                xhr.send(formData); //开始上传,发送form数据
            },
            //上传成功响应
            uploadComplete(evt) {
                //服务断接收完文件返回的结果
                let m = this;
                var resp = JSON.parse(evt.target.responseText);
                debugger
                if (resp.status === 0) {
                    m.$success(resp.data);
                } else {
                    m.$error(resp.msg);
                }
                m.loading = false
                m.clearFileInput();
            },
            //上传失败
            uploadFailed(evt) {
                let m = this;
                m.loading = false
                m.$error("上传失败!");
                m.clearFileInput();
            },
            clearFileInput(){
                debugger
                document.getElementById('uploadFile').value=''
            }

        }
    }
</script>
引用:
MultipartFileUpload(:writeDatetime="writeDatetime" action="xxx/import" tag=2)后台
    @ApiOperation(value = "导入-数据文件", notes = "导入-数据文件")
    @PostMapping("import")
    public ResponseEntity<Result> importData(Date writeDatetime, MultipartFile[] file) {
        if(BeanUtil.isEmpty(writeDatetime)){
            return ResponseUtil.ERROR("时间不可为空!");
        }
        long start = System.currentTimeMillis();
        ResponseEntity<Result> result = xxxService.importData(writeDatetime,file);
        long over = System.currentTimeMillis();
        logger.info("导入数据文件成功 used " + (float)(over - start) / 1000 / 60 + " min");
        System.out.println("导入数据文件成功 used " + (float)(over - start) / 1000 / 60 + " min");
        return result;
    }
更新:原生文件上传按钮的样式修改:
Button(
         type="primary"
        ).file-btn
            b  选择文件
            input(type="file" id="uploadFile" multiple="multiple"  @change="uploadDataFile" )

<style scoped lang="less">
    .file-btn{
        position: relative;
        input{
            position: absolute;
            height: 100%;
            width: 100%;
            top: 0;
            left: 0;
            opacity: 0.001;
        }
    }
</style>
单文件上传:
前端:
<Upload
                :data="params"
                type="drag"
                :action="action"
                :before-upload="beforeUpload"
                :on-progress="onProgress"
                :on-error="onError"
                :on-success="onSuccess"
                :show-upload-list="showUploadList"
                :headers="header">
                <div style="padding: 2px 0">
                    <Icon type="ios-add" size="48" style="color: #3399ff"></Icon>
                    <p>点击或者拖拽文件导入</p>
                </div>
            </Upload>


/*************************************************************************/
this.action = baseURL + "file/upload"
            this.headers={//method:"POST",
                "token": this.$store.state.token,
            }
            this.params= {tableId: id,tableName:'tb_prwg_values'}

beforeUpload(file){
            var m = this
            if(file.size/1024/1024>100){
                m.$error("附件不可超过100M!");
                return false
            }
          this.spinShow = true
        },
        cancle() {
            this.modal.visible = false
        },
        onProgress(event, file, fileList) {
            console.log(file)
        },
        // 导入成功后调用
        onSuccess(response, file, fileList) {
            this.spinShow = false
            this.getFileList()
        },
        onError(){
            var m = this
            m.$error("附件不可超过100M!");
            this.spinShow = false
        },
后台:
配置文件:
spring.servlet.multipart.max-file-size = 50MB
spring.servlet.multipart.max-request-size = 50MB
spring.servlet.multipart.resolve-lazily=true #设置为懒加载,不然依然会捕获不到异常
server.tomcat.max-swallow-size = 100MB # 最重要的是这一行,可设置为 -1 不作限制
也可以如下:
package com.trgis.reserveland.config;


import org.springframework.boot.web.servlet.MultipartConfigFactory;
import org.springframework.context.annotation.Bean;
import org.springframework.context.annotation.Configuration;
import org.springframework.util.unit.DataSize;

import javax.servlet.MultipartConfigElement;

@Configuration
public class MultipartConfig {
    @Bean
    public MultipartConfigElement multipartConfigElement(){
        MultipartConfigFactory factory = new MultipartConfigFactory();
        factory.setMaxFileSize(DataSize.parse("20MB"));
        factory.setMaxRequestSize(DataSize.parse("500MB"));
        return factory.createMultipartConfig();
    }
}
然后异常捕获:
package com.trgis.reserveland.config;

import com.trgis.reserveland.util.Result;
import org.springframework.stereotype.Controller;
import org.springframework.web.bind.annotation.ExceptionHandler;
import org.springframework.web.bind.annotation.RestController;
import org.springframework.web.bind.annotation.RestControllerAdvice;
import org.springframework.web.multipart.MultipartException;

@RestControllerAdvice(annotations = {Controller.class, RestController.class})
public class GlobalExceptionHandler {
    @ExceptionHandler(MultipartException.class)
    public Result uploadExcepttion(MultipartException e){
        return new Result().setError("上传文件过大,附件不可超过100M!");
    }
}
参考来源:记录使用Spring MultipartFile上传文件超过最大限制时,无法捕获MaxUploadSizeExceededException异常的问题 - 灰信网(软件开发博客聚合)


 1648
1648


 被折叠的 条评论
为什么被折叠?
被折叠的 条评论
为什么被折叠?
 到【灌水乐园】发言


