


http://www.cnblogs.com/lvsling/p/8672404.html
1 安装环境
Python 3.7.0

Anaconda3-5.3.1-Windows-x86_64.exe

下载地址:https://mirrors.tuna.tsinghua.edu.cn/anaconda/archive/
安装时勾选以下两个选项:

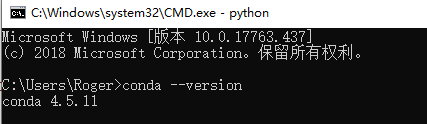
检验Anaconda安装成功:
2 安装Tensorflow
打开刚刚安装好的Anaconda中的 Anaconda Prompt
修改链接镜像的地址
conda config --add channels https://mirrors.tuna.tsinghua.edu.cn/anaconda/pkgs/free/
conda config --set show_channel_urls yes
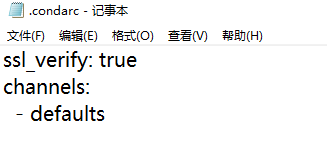
配置文件路径:C:\Users\Administrator中的.condarc文件
配置文件初始值:
输入命令:


安装Tensorflow
conda create -n tensorflow python=3.7.0


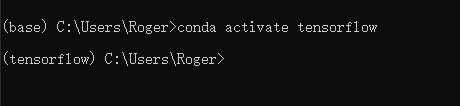
安装成功,激活tensorflow:conda activate tensorflow
查看镜像文件:
https://mirrors.tuna.tsinghua.edu.cn/tensorflow/windows/

安装对应的文件:
pip install -i https://pypi.tuna.tsinghua.edu.cn/simple/https://mirrors.tuna.tsinghua.edu.cn/tensorflow/windows/cpu/tensorflow-1.3.0rc0-cp36-cp36m-win_amd64.whl
(cp36-cp36m就是代表的python的版本是3.6)

镜像中没有对应的文件,尝试用以下命令安装:
pip install --upgrade --ignore-installed tensorflow
tensorflow-1.13.1-cp37-cp37m-win_amd64.whl


退出tensorflow后,重新输入命令,成功安装:


验证是否安装成功:
>>> import tensorflow as tf
>>> sess = tf.Session()
2019-04-25 01:02:06.326833: I tensorflow/core/platform/cpu_feature_guard.cc:141] Your CPU supports instructions that this TensorFlow binary was not compiled to use: AVX2
>>> hello = tf.constant('hello,tensorf')
>>> print(sess.run(hello))
b'hello,tensorf'


 1万+
1万+


 被折叠的 条评论
为什么被折叠?
被折叠的 条评论
为什么被折叠?
 到【灌水乐园】发言


