


通过SQLiteOpenHelper操作数据库
这一节通过SQLiteOpenHelper并采用直接执行sql语句的形式来操作数据库
同样还是先整个界面,有6个按钮界面如下:
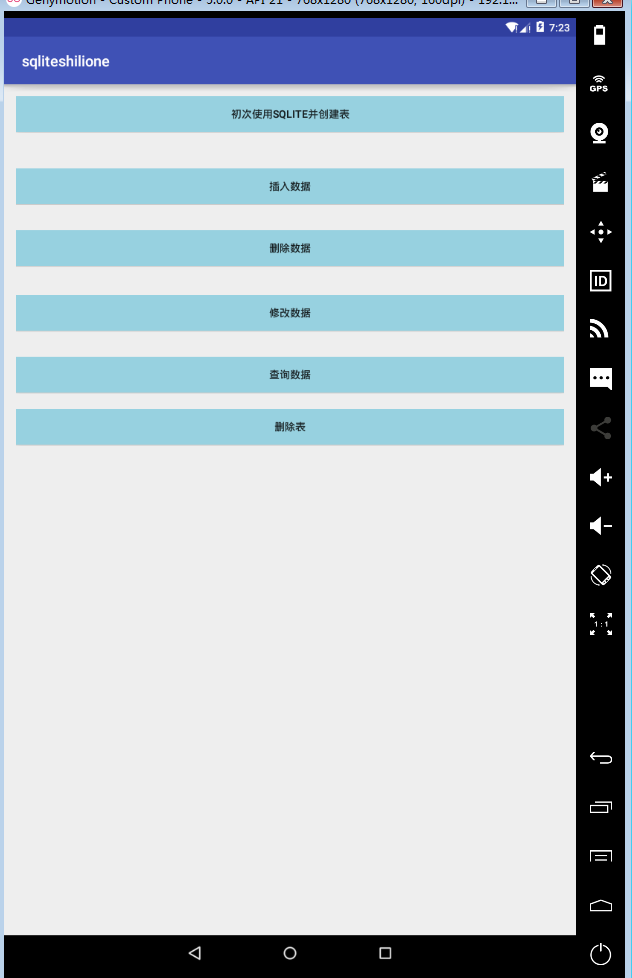
创建MySqlManger:
public class MySqlManger extends SQLiteOpenHelper{
            //构造函数,传递数据库名称即可,如果传入的数据库存在则直接打开,如果不存在则创建一个数据库
            public MyOpenHlper(Context context,string name,CusorFactory factory,int version){
                super(context,name,factory,version);

            }

            public void onCreat(SqlLiteDatabase db){
                //在这里首次创建数据库的时候会创建一张表:
                String sql="create table user(_id integer primary key autoincrement,username text,userpassword text)";
                db.execSql(sql);
            }


            public void onUpgrade(){
                //当数据库版本改变之后会执行此函数;通过这个函数可以很方便的应对app版本升级而导致的数据库更新问题;
                //在这里我们继续创建一张表
                 db.execSQL("drop table if exists user");
                String sql="create table loginfo(_id integer primary key autoincrement,username text,userpassword text)";
                db.execSql(sql);
            }

    }
创建MySqlManger的实例;
上节使用的是CURD操作,但是android同样也支持原声sql语句,因此本实例通过执行execsql()来操作数据库:
初始化SQLiteOpenHelper
在Activity的onCreat()方法中:
//创建MySqlManger的实例
MySqlManger mySqlManger = new MySqlManger(this,'userdb');
初次运行数据库,并创建表:
//通过MySqlManger获取只读的数据库连接
//在这里为了演示取第二种方法
SqlLiteDatabase mySqlite = mySqlManger.getReadableDatabase()

//通过MySqlManger获取可读写的数据库连接
SqlLiteDatabase mySqlite = mySqlManger.getWriteableDatabase()
Log.i("data", "creatTable success");
点击初次运行按钮,可以看到打印的结果:

插入数据
    private void insert(SQLiteDatabase db){
        //SQL语句
        String stu_sql="insert into user(username,userpassword) values('xiaoming','123456')";
        //执行SQL语句
        db.execSQL(sql);
            Log.i("data", "insert success");
    }
这是运行结果:

删除数据:
    private void delete(SQLiteDatabase db) {
        //SQL语句
        String sql = "delete from user where _id = 1";
        //执行SQL语句
        db.execSQL(sql);
    }
这是运行结果:

修改数据
private void update(SQLiteDatabase db) {
//SQL语句
String sql = "update user set userpassword = 888666 where id = 1";
//执行SQL
db.execSQL(sql);
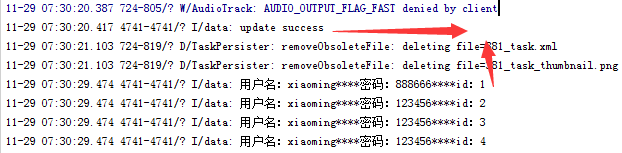
} 点击修改数据按钮;可以看到打印的结果:
查询数据:
private void query(SQLiteDatabase db) {
//查询获得游标,此处只为简单说明问题,不设置复杂的查询条件
Cursor cursor = db.execSQL(select * from user);
//判断游标是否为空
if(cursor.moveToFirst() {
//遍历游标
do{
//获得ID
int id = cursor.getInt(0);
//获得用户名
String username=cursor.getString(1);
//获得密码
String password=cursor.getString(2);
Log.i("data","用户名:"+username+"****"+"密码:"+password+"****id:"+id);
}while(cursor.moveToNext());
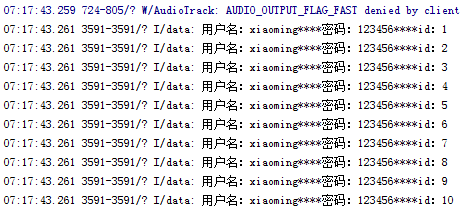
} ok,点击查询数据按钮,可以看到数据结果已经被打印出来:
删除表:
    private void drop(SQLiteDatabase db){
        //删除表的SQL语句
        String sql ="DROP TABLE user";
        //执行SQL
        db.execSQL(sql);
    }
点击删除表按钮,可以看到打印结果如下:

ok一切都是辣么完美,但是,当app升级之后,我们需要继续添加一张表:
在MySqlManger的onCreate()方法继续添加:
String sql="create table loginfo(_id integer primary key autoincrement,username text,userpassword text)";
db.execSql(sql);
然后再次运行代码,去数据库里面查看,是没有这张表的;原因在于;
onCreate()这个方法只会在数据库第一次运行的时候执行,此后将不会再得到执行,因此,这张表根本就没有创建;
但是必须创建这张表,此时就用到了onUpgrade()方法;
如果数据库版本提升了之后,这个函数就会得到运行,所以我们可以在创建MySqlManger实例的时候把最后一项的1改为2即可;
然后再次运行,就会发现表logInfo已经创建;
整体代码:
MainActivity.java:
package com.example.lk.sqliteshilione;

import android.content.ContentValues;
import android.database.Cursor;
import android.database.sqlite.SQLiteDatabase;
import android.support.v7.app.AppCompatActivity;
import android.os.Bundle;
import android.util.Log;
import android.view.View;
import android.widget.Button;

import java.io.File;

public class MainActivity extends AppCompatActivity  implements View.OnClickListener{
    Button buttonCreate;
    Button buttonInsert;
    Button buttonDelete;
    Button buttonUpdate;
    Button buttonQuery;
    Button buttonDrop;
    SQLiteDatabase db;
    MySqlManger msm;


    @Override
    protected void onCreate(Bundle savedInstanceState) {
        super.onCreate(savedInstanceState);
        setContentView(R.layout.activity_main);

         buttonCreate = (Button) findViewById(R.id.button);
         buttonInsert = (Button) findViewById(R.id.button2);
         buttonDelete = (Button) findViewById(R.id.button3);
         buttonUpdate = (Button) findViewById(R.id.button4);
         buttonQuery = (Button) findViewById(R.id.button5);
         buttonDrop = (Button) findViewById(R.id.button6);
        File file= this.getDatabasePath("ceshi.db").getParentFile();
        if(file.exists() == false){
            file.mkdirs();
            String path = file.getPath()+"/ceshitwo.db";
        }
        buttonCreate.setOnClickListener(this);
        buttonInsert.setOnClickListener(this);
        buttonDelete.setOnClickListener(this);
        buttonUpdate.setOnClickListener(this);
        buttonQuery.setOnClickListener(this);
        buttonDrop.setOnClickListener(this);

        //创建MySqlManger的实例,注意最后一个参数是版本号,在这里先传入1,下次我们传入2,就会发现,在MySqlManger中的onUpGrade()方法得当执行
         msm = new MySqlManger(this,"ceshitwo.db",null,2);

    }

    private void createTable(SQLiteDatabase db){
         db = msm.getWritableDatabase();
        Log.i("data", "create  success");
    }

    private void insert(SQLiteDatabase db){
            //SQL语句
            String sql="insert into infouser(username,userpassword) values('tom','123456')";
            //执行SQL语句
            db.execSQL(sql);
        Log.i("data", "insert success");
    }

    private void delete(SQLiteDatabase db) {
        //SQL语句
        String sql = "delete from infouser where _id = 1";
        //执行SQL语句
        db.execSQL(sql);

        Log.i("data", "delete success");
    }

    private void update(SQLiteDatabase db) {
        //SQL语句
        String sql = "update infouser set userpassword = 666666 where _id = 1";
        //执行SQL
        db.execSQL(sql);
        Log.i("data", "update success");
    }

    private void query(SQLiteDatabase db) {
        //查询获得游标,此处只为简单说明问题,不设置复杂的查询条件

       Cursor cursor = db.query("infouser",null,null,null,null,null,null);

        //判断游标是否为空
        if (cursor.moveToFirst()) {
            //遍历游标

               if(cursor.moveToFirst()){
                   do{
                   //获得ID
                   int id = cursor.getInt(0);
                   //获得用户名
                   String username = cursor.getString(1);
                   //获得密码
                   String password = cursor.getString(2);
                   Log.i("data","用户名:"+username+"****"+"密码:"+password+"****id:"+id);

                    } while(cursor.moveToNext());

               }
        }
    }


    private void drop(SQLiteDatabase db){
        //删除表的SQL语句
        String sql ="DROP TABLE infouser";
        //执行SQL
        db.execSQL(sql);
        Log.i("data", "drop success");
    }

    @Override
    public void onClick(View v) {
        int id = v.getId();
        switch(id){
            case R.id.button:
                createTable(db);
                break;
            case R.id.button2:
                insert(db);
                break;
            case R.id.button3:
                delete(db);
                break;
            case R.id.button4:
                update(db);
                break;
            case R.id.button5:
                query(db);
                break;
            case R.id.button6:
                drop(db);
                break;
        }
    }
}
activity_main.xml:
<?xml version="1.0" encoding="utf-8"?>
<RelativeLayout
    xmlns:android="http://schemas.android.com/apk/res/android"
    xmlns:tools="http://schemas.android.com/tools"
    android:layout_width="match_parent"
    android:layout_height="match_parent"
    android:paddingBottom="@dimen/activity_vertical_margin"
    android:paddingLeft="@dimen/activity_horizontal_margin"
    android:paddingRight="@dimen/activity_horizontal_margin"
    android:paddingTop="@dimen/activity_vertical_margin"
    tools:context="com.example.lk.sqliteshilione.MainActivity">

    <Button
        android:layout_width="match_parent"
        android:layout_height="wrap_content"
        android:text="初次使用sqlite并创建表"
        android:id="@+id/button"
        android:background="#97D1E0"
        android:layout_alignParentEnd="true"/>

    <Button
        android:layout_width="match_parent"
        android:layout_height="wrap_content"
        android:text="插入数据"
        android:id="@+id/button2"
        android:background="#97D1E0"
        android:layout_below="@+id/button"
        android:layout_alignParentEnd="true"
        android:layout_marginTop="49dp"/>

    <Button
        android:layout_width="match_parent"
        android:layout_height="wrap_content"
        android:text="删除数据"
        android:id="@+id/button3"
        android:background="#97D1E0"
        android:layout_below="@+id/button2"
        android:layout_alignParentStart="true"
        android:layout_marginTop="35dp"/>

    <Button
        android:layout_width="match_parent"
        android:layout_height="wrap_content"
        android:text="修改数据"
        android:id="@+id/button4"
        android:background="#97D1E0"
        android:layout_below="@+id/button3"
        android:layout_alignParentStart="true"
        android:layout_marginTop="39dp"/>

    <Button
        android:layout_width="match_parent"
        android:layout_height="wrap_content"
        android:text="查询数据"
        android:id="@+id/button5"
        android:background="#97D1E0"
        android:layout_centerHorizontal="true"
        android:layout_marginTop="350dp"/>

    <Button
        android:layout_width="match_parent"
        android:layout_height="wrap_content"
        android:text="删除表"
        android:id="@+id/button6"
        android:background="#97D1E0"
        android:layout_marginTop="420dp"/>
</RelativeLayout>
MySqlManger.java:
package com.example.lk.sqliteshilione;

import android.content.Context;
import android.database.sqlite.SQLiteDatabase;
import android.database.sqlite.SQLiteOpenHelper;
import android.util.Log;


public  class MySqlManger extends SQLiteOpenHelper {

    public MySqlManger(Context context,String name,SQLiteDatabase.CursorFactory factory,int version){
       super(context,name,factory,version);

    }

    public void onCreate(SQLiteDatabase sd){
        //在这里首次创建数据库的时候会创建一张表:
        String user_sql="create table infouser(_id integer primary key autoincrement,username text,userpassword text)";
        sd.execSQL(user_sql);
        Log.i("data","create ok");
    }


    public void onUpgrade(SQLiteDatabase db,int oldVersion,int newVersion){
        //当数据库版本改变之后会执行此函数;通过这个函数可以很方便的应对app版本升级而导致的数据库更新问题;
        String sql="create table loginfo(_id integer primary key autoincrement,username text,userpassword text)";
        db.execSQL(sql);
    }
}


 400
400

 被折叠的 条评论
为什么被折叠?
被折叠的 条评论
为什么被折叠?
 到【灌水乐园】发言


