


SimpleAdapter
Activity
主程序
listItem 中存放所有要显示的所有列数据,每 new 一个map,即 在显示的列表中 新建一行数据,Title (自定义)、Image(自定义) 只是别名,分别对应 每一行的布局 item_layout 中的 资源 ID , Title => R.id.item_text,Image => R.id.item_image。
- package com.michael.training;
- import java.util.ArrayList;
- import java.util.HashMap;
- import android.app.Activity;
- import android.os.Bundle;
- import android.util.Log;
- import android.view.Menu;
- import android.view.View;
- import android.widget.AdapterView;
- import android.widget.AdapterView.OnItemClickListener;
- import android.widget.ListView;
- import android.widget.SimpleAdapter;
- import android.widget.Toast;
- public class MainActivity extends Activity {
- @Override
- protected void onCreate(Bundle savedInstanceState) {
- super.onCreate(savedInstanceState);
- setContentView(R.layout.main_layout);
- ListView listView = (ListView)findViewById(R.id.mListView);
- ArrayList<HashMap<String, Object>> listItem = new ArrayList<HashMap<String, Object>>();
- HashMap<String, Object> map = new HashMap<String, Object>();
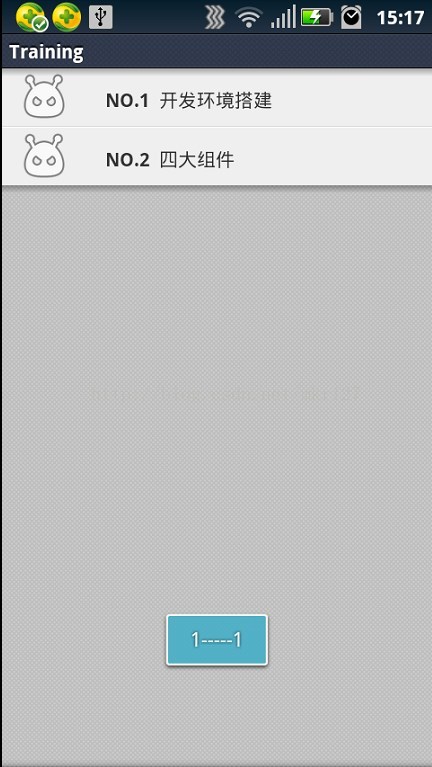
- map.put("Title", "NO.1 开发环境搭建");
- map.put("Image", R.drawable.item);
- listItem.add(map);
- map = null;
- map = new HashMap<String, Object>();
- map.put("Title", "NO.2 四大组件");
- map.put("Image", R.drawable.item);
- listItem.add(map);
- SimpleAdapter listAdapter = new SimpleAdapter( this,
- listItem,
- R.layout.item_layout,
- new String[] {"Title", "Image"},
- new int[] {R.id.item_text,R.id.item_img});
- listView.setAdapter(listAdapter);
- listView.setOnItemClickListener(listener);
- }
- OnItemClickListener listener=new OnItemClickListener() {
- @Override
- public void onItemClick(AdapterView<?> arg0, View arg1, int arg2,long arg3) {
- Toast.makeText(getApplicationContext(),((Integer)arg2).toString()+"-----"+((Integer)arg2).toString(), Toast.LENGTH_SHORT).show();
- }
- };
- @Override
- public boolean onCreateOptionsMenu(Menu menu) {
- // Inflate the menu; this adds items to the action bar if it is present.
- getMenuInflater().inflate(R.menu.main, menu);
- return true;
- }
- }
main_layout.xml
主页面布局
只放了个ListView。
- <RelativeLayout xmlns:android = "http://schemas.android.com/apk/res/android"
- xmlns:tools = "http://schemas.android.com/tools"
- android:layout_width = "match_parent"
- android:layout_height = "match_parent"
- tools:context = ".MainActivity" >
- <ListView
- android:id = "@+id/mListView"
- android:layout_width = "match_parent"
- android:layout_height = "match_parent" />
- </RelativeLayout>
item_layout.xml
item布局
即ListView中每一行显示的布局,我定义了一个图片和一个文本。
- <? xml version = "1.0" encoding = "utf-8" ?>
- <RelativeLayout xmlns:android = "http://schemas.android.com/apk/res/android"
- android:layout_width = "fill_parent"
- android:layout_height = "match_parent"
- android:layout_gravity = "center_vertical" xmlns:tools = "http://schemas.android.com/tools" tools:ignore = "HardcodedText" >
- <ImageView
- android:id = "@+id/item_img"
- android:layout_width = "wrap_content"
- android:layout_height = "wrap_content"
- android:layout_alignParentTop = "true"
- android:layout_marginLeft = "10dp"
- android:src = "@drawable/item"
- android:contentDescription = "imageflag" />
- <TextView
- android:id = "@+id/item_text"
- android:layout_width = "wrap_content"
- android:layout_height = "wrap_content"
- android:layout_alignBottom = "@+id/item_img"
- android:layout_alignParentRight = "true"
- android:layout_alignParentTop = "true"
- android:layout_marginTop = "4dp"
- android:layout_marginLeft = "24dp"
- android:layout_toRightOf = "@+id/item_img"
- android:gravity = "center_vertical"
- android:text = "环境搭建"
- android:textStyle = "bold" />
- </RelativeLayout>
成果
转载请注明出处!http://blog.csdn.net/mkrcpp/article/details/9792191


 2万+
2万+

 被折叠的 条评论
为什么被折叠?
被折叠的 条评论
为什么被折叠?
 到【灌水乐园】发言


