


一.LinearLayout(线性布局):
LinearLayout是一行或列只能放置一个控件的先行布局,现在看一个实例:
activity_main.xml :
- <LinearLayout xmlns:android="http://schemas.android.com/apk/res/android"
- android:layout_width="fill_parent"
- android:layout_height="fill_parent"
- android:orientation="vertical" >
- <TextView
- android:layout_width="wrap_content"
- android:layout_height="wrap_content"
- android:text="@string/hello_world"
- />
- <TextView
- android:layout_width="wrap_content"
- android:layout_height="wrap_content"
- android:text="@string/hello_world"
- />
- <TextView
- android:layout_width="wrap_content"
- android:layout_height="wrap_content"
- android:text="@string/hello_world"
- />
- </LinearLayout>
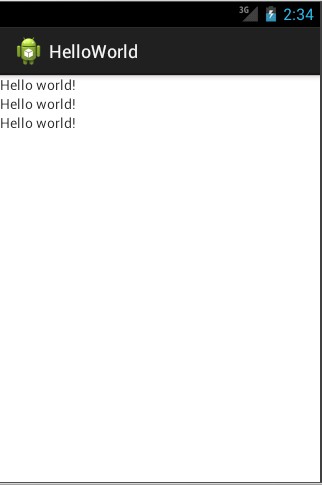
从上图可以看出控件是垂直排列的,我们通过android:orientation="vertical"来设定LinearLayout是垂直排列的。
讲解常用的公共属性:
android:layout_width 指定控件或视图组的宽度
android:layout_height 指定控件或视图组的高度
android:layout_marginTop 指定控件或视图组顶边额外的空间
android:layout_marginBottom 指定控件或视图组底边额外的空间
android:layout_marginLeft 指定控件或视图组左边的额外空间
android:layout_marginRight 指定控件或视图组右边额外空间
其中为讲解下layout_width和layout_height中设置属性的意思:
1).fill_parent:
设置一个构件的布局为fill_parent将强制性地使构件扩展,以填充布局单元内尽可能多的空间。这跟Windows控件的dockstyle属性大体一致。设置一个顶部布局或控件为fill_parent将强制性让它布满整个屏幕。
2).match_parent:
Android2.2中match_parent和fill_parent是一个意思 .两个参数意思一样,match_parent更贴切,于是从2.2开始两个词都可以用。那么如果考虑低版本的使用情况你就需要用fill_parent了
3).wrap_content:
设置一个视图的尺寸为wrap_content将强制性地使视图扩展以显示全部内容,布局元素将根据内容更改大小。设置一个视图的尺寸为wrap_content大体等同于设置Windows控件的Autosize属性为True。
当把上面布局中的android:orientation="vertical"改成android:orientation="horizontal",这就是水平布局:
例子(修改上面的布局文件):
- <LinearLayout xmlns:android="http://schemas.android.com/apk/res/android"
- android:layout_width="fill_parent"
- android:layout_height="fill_parent"
- android:orientation="horizontal"
- >
- <TextView
- android:layout_width="100dp"
- android:layout_height="wrap_content"
- android:text="@string/hello_world"
- android:background="#ffffff"
- />
- <TextView
- android:layout_width="160dp"
- android:layout_height="wrap_content"
- android:text="@string/hello_world"
- android:background="#ffd700"
- />
- <TextView
- android:layout_width="wrap_content"
- android:layout_height="wrap_content"
- android:text="@string/hello_world"
- android:background="#ffff00"
- />
- </LinearLayout>
运行图片:

我们从图可以看出当使用水平布局时,控件占据的是一列,
android:background 该属性是设置背景颜色。
android:layout_width 在设置该属性的时候我没有在使用给的三个属性值,而是自己定义的,这时候我们就需要了解下android的度量单位:
1).dp -- 与密度无关的像素,1dp相当于160dpi的屏幕上的1像素,在布局中当对控件指定尺寸时,推荐将dp作为度量单位。
2).sp -- 与比例无关的像素,与dp类似,推荐指定字体大小。
3).pt -- 磅,1磅等于1/72英寸(基于屏幕的物理尺寸)。
4).px -- 像素,对应屏幕上的实际尺寸,不建议使用此单位,因为您的应用程序会在不同屏幕尺寸的设备上可能不能正确显示。
二.RelativeLayout(相对布局):
在很多时候线性布局不能满足我们的要求,例如我们需要在一行显示多个控件,这时我们就需要RelativeLayout来进行相对布局,RelativeLayout允许子元素指定他们相对于其他元素或父元素的位置(通过ID指定)。
常用的属性:
android:layout_above 将该控件的底部至于给定ID的控件之上
android:layout_below 将该控件的顶部至于给定ID的控件之下
android:layout_toLeftOf 将该控件的右边缘和给定的ID的控件的左边缘对齐
android:layout_toRightOf 将该控件的左边缘和给定ID的控件的右边缘对齐
android:layout_alignRaseline 该控件的baseline和给定ID的控件的baseline对齐
android:layout_alignBottom 将该控件的底部边缘与给定ID控件的底部边缘
android:layout_alignLeft 将该控件的左边缘与给定的ID控件的左边缘对齐
android:layout_alignRight 将该控件的右边缘与给定ID控件的右边缘对齐
android:layout_alignTop 将给定控件的顶部边缘与给定ID控件的顶部对齐
android:layout_alignParentBottom 如果该值为true,则将该控件的底部和父控件的底部对齐
android:layout_alignParentLeft 如果该值为true,则将该控件的左边与父控件的左边对齐
android:layout_alignParentRight 如果该值为true,则将该控件的右边与父控件的右边对齐
android:layout_alignParentTop 如果该值为true,则将控件的顶部与父控件的顶部对齐
android:layout_centerHorizontal 如果值为真,该控件将被置于水平方向的中央。
android:layout_centerInParent 如果值为真,该控件将被置于父控件的水平方向和垂直方向的中央
android:layout_centerVertical 如果值为真,该控件被置于垂直方向的中央
android:layout_marginLeft 这是外边距。
android:layout_marginTop 上偏移的值;(相对于上边沿移动的值 xxdp)
android:layout_marginBottom 下偏移的值;
android:layout_marginLeft 左偏移的值;
android:layout_marginRight 右偏移的值;
实例演示:
- <RelativeLayout xmlns:android="http://schemas.android.com/apk/res/android"
- android:layout_width="fill_parent"
- android:layout_height="fill_parent" >
- <TextView
- android:id="@+id/textView1"
- android:layout_width="wrap_content"
- android:layout_height="wrap_content"
- android:layout_alignParentLeft="true"
- android:layout_alignParentTop="true"
- android:text="请输入内容" />
- <EditText
- android:id="@+id/editText1"
- android:layout_width="fill_parent"
- android:layout_height="wrap_content"
- android:layout_alignParentLeft="true"
- android:layout_below="@+id/textView1"
- >
- </EditText>
- <Button
- android:id="@+id/button1"
- android:layout_width="wrap_content"
- android:layout_height="wrap_content"
- android:layout_alignParentRight="true"
- android:layout_below="@+id/editText1"
- android:text="确定" />
- <Button
- android:id="@+id/button2"
- android:layout_width="wrap_content"
- android:layout_height="wrap_content"
- android:layout_alignBaseline="@+id/button1"
- android:layout_alignBottom="@+id/button1"
- android:layout_toLeftOf="@+id/button1"
- android:text="取消" />
- </RelativeLayout>
运行图片:
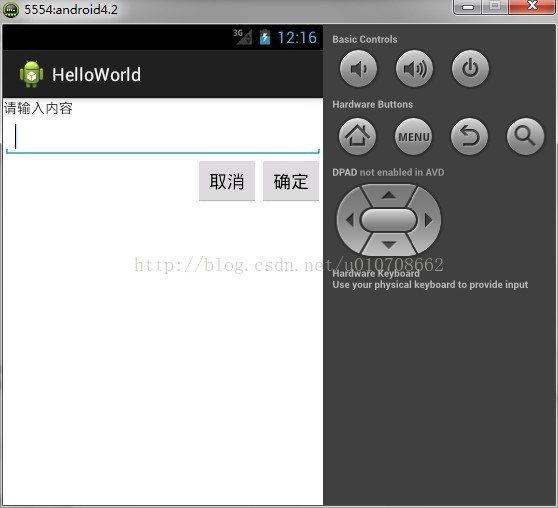
对于上面这个例子线性布局就是无法实现的,而使用相对布局则轻松实现。
三.TableLayout(表单布局):
TableLayout将子元素的位置分配到行或列。TableLayout是由许多个TableRow组成,其中放着0个或多个控件。
实例:
- <TableLayout xmlns:android="http://schemas.android.com/apk/res/android"
- android:layout_width="fill_parent"
- android:layout_height="fill_parent" >
- <TableRow
- android:id="@+id/tableRow1"
- android:layout_width="fill_parent"
- android:layout_height="wrap_content" >
- <TextView
- android:id="@+id/textView1"
- android:layout_width="100dp"
- android:layout_height="wrap_content"
- android:text="User Name:" />
- <EditText
- android:id="@+id/editText1"
- android:layout_width="220dp"
- android:layout_height="wrap_content"
- />
- </TableRow>
- <TableRow
- android:id="@+id/tableRow2"
- android:layout_width="fill_parent"
- android:layout_height="wrap_content" >
- <TextView
- android:id="@+id/textView2"
- android:layout_width="100dp"
- android:layout_height="wrap_content"
- android:text="Password:" />
- <EditText
- android:id="@+id/editText2"
- android:layout_width="220dp"
- android:layout_height="wrap_content"
- android:password="true"
- />
- </TableRow>
- <TableRow
- android:id="@+id/tableRow2"
- android:layout_width="fill_parent"
- android:layout_height="wrap_content" >
- <TextView />
- <Button
- android:id="@+id/button1"
- android:text="登陆"
- />
- </TableRow>
- </TableLayout>
运行图片:
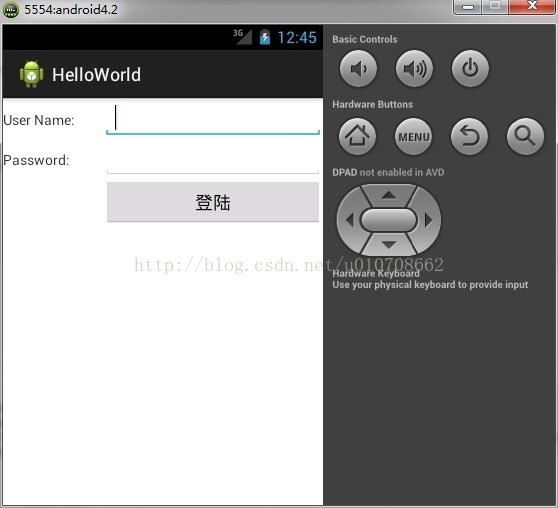
在位于Password TextView之下的单元格用<TextView />填充,当如果不这样做时,则登陆按钮将显示在Password TextView之下。
四. FrameLayout布局:
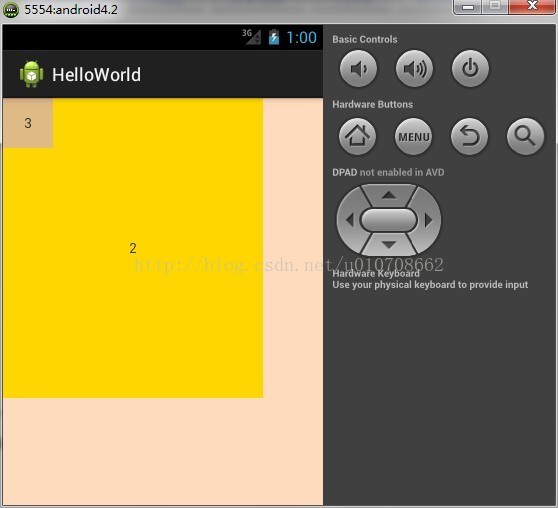
FrameLayout是最简单的一个布局,在这个布局中,整个界面被当成一块空白备用区域,所有的子元素都不能被指定放置的位置,它们统统放于这块区域的左上角,并且后面的子元素直接覆盖在前面的子元素之上,将前面的子元素部分和全部遮挡。
实例演示:
- <FrameLayout xmlns:android="http://schemas.android.com/apk/res/android"
- android:orientation="vertical"
- android:layout_width="fill_parent"
- android:layout_height="fill_parent">
- <TextView
- android:layout_width="fill_parent"
- android:layout_height="fill_parent"
- android:background="#ffdab9"
- android:gravity="center"
- android:text="1"/>
- <TextView
- android:layout_width="260dp"
- android:layout_height="300dp"
- android:background="#ffd700"
- android:gravity="center"
- android:text="2"/>
- <TextView
- android:layout_width="50dp"
- android:layout_height="50dp"
- android:background="#deb887"
- android:gravity="center"
- android:text="3"/>
- </FrameLayout>
运行图片:


 1375
1375

 被折叠的 条评论
为什么被折叠?
被折叠的 条评论
为什么被折叠?
 到【灌水乐园】发言


