


 本文详细介绍了Spring中@Configuration和@Component的区别,@Configuration用于声明配置类,而@Component用于声明Bean。@Configuration的@Bean方法会被Spring代理,确保单例。同时,文章讲解了@Service、@Controller与@Component的关系,它们是@Component的特化。还讨论了@ComponentScan注解,包括其属性、过滤规则以及如何自定义扫描过滤规则,并提到了@ComponentScans用于声明多个@ComponentScan。
@Configuration和@Component的区别
基于Java的配置我们通常使用@Configuration注解来声明Spring Bean
除此之外我们还能使用@Component声明Spring Bean
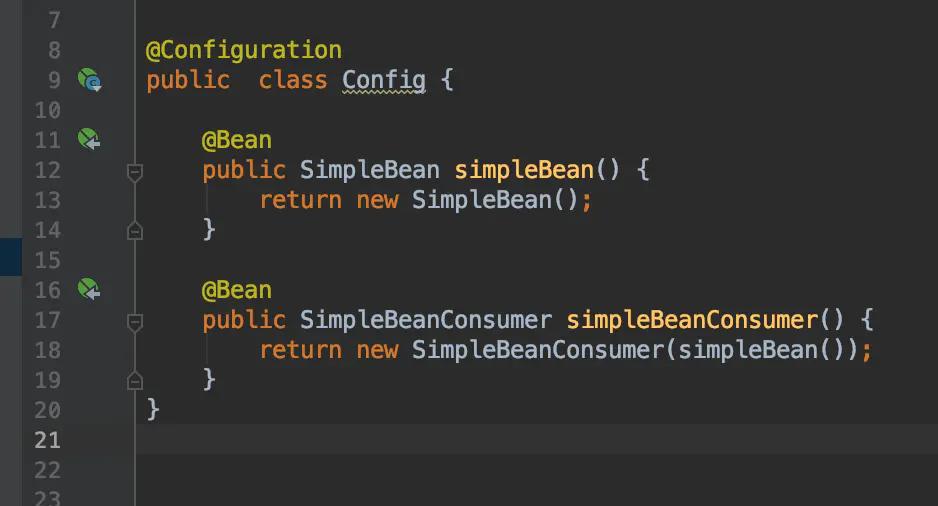
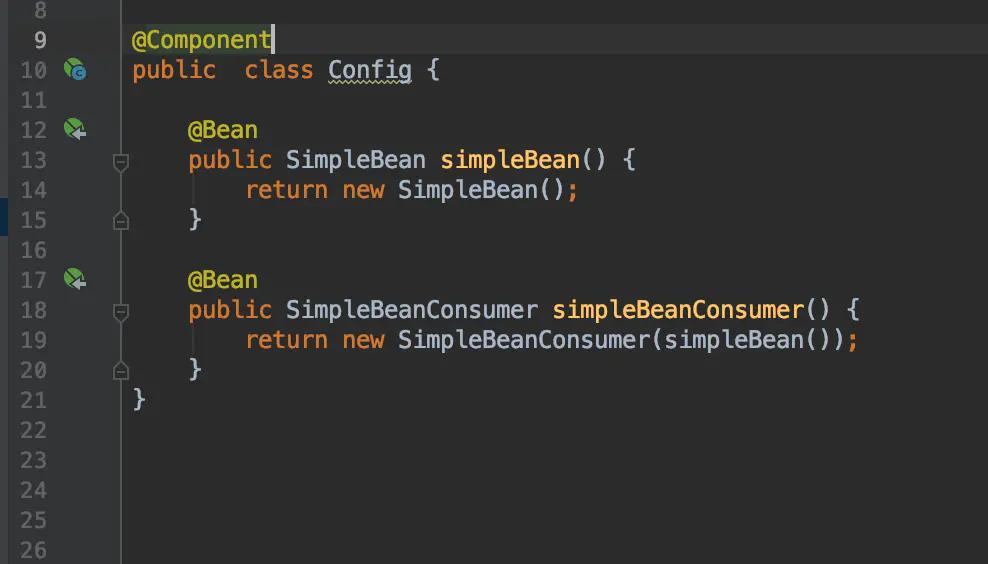
上面两段代码除Config类上的注解不同之外其他都相同,但Spring对两者的处理方式是完全不一样的。
第一段代码会像我们期望的一样正常运行,因为new SimpleBeanConsumer(simpleBean())这段代码中simpleBean()方法会由Spring代理执行,
Spring发现方法所请求的Bean已经在容器中,那么就直接返回容器中的Bean。所以全局只有一个SimpleBean对象的实例。
第二段代码在执行new SimpleBeanConsumer(simpleBean()) 时simpleBean()不会被Spring代理,会直接调用simpleBean()方法获取一个全新的SimpleBean对象实例
所以全局会有多个SimpleBean对象的实例
造成这种差异的原因如下:
如果使用@Configuration,所有用@Bean
标记的方法会被包装成CGLIB的wrapper其工作原理是:如果方式是首次被调用那么原始的方法体会被执行并且结果对象会被注册到Spring上下文中。
之后所有的对该方法的调用仅仅只是从Spring上下文中取回该对象返回给调用者。
在上面的第二段代码中,new SimpleBeanConsumer(simpleBean())只是纯JAVA方式的调用,多次调用该方法返回的是不同的对象实例。
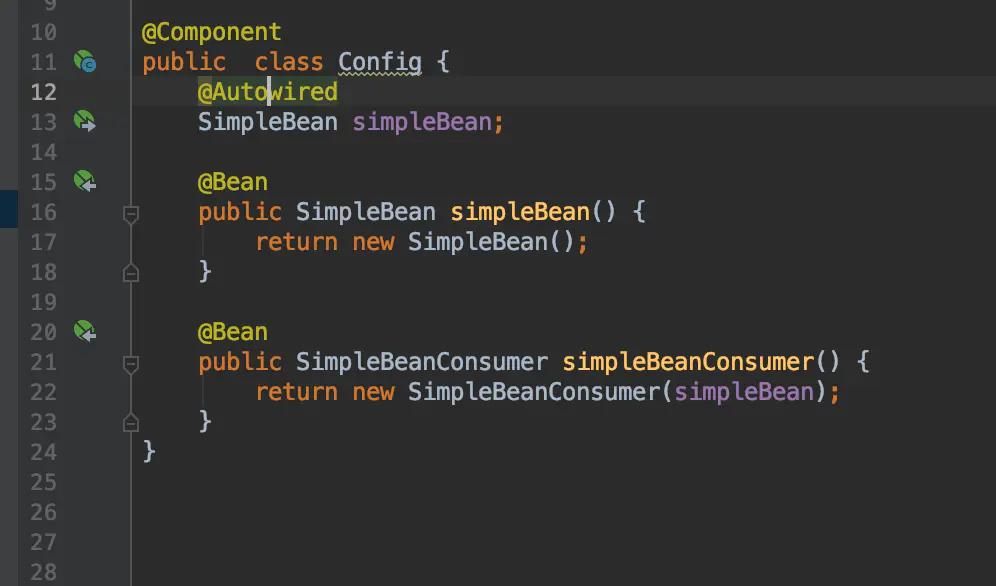
要修正第二段代码中的问题,可以使用@Autowired如下所示:
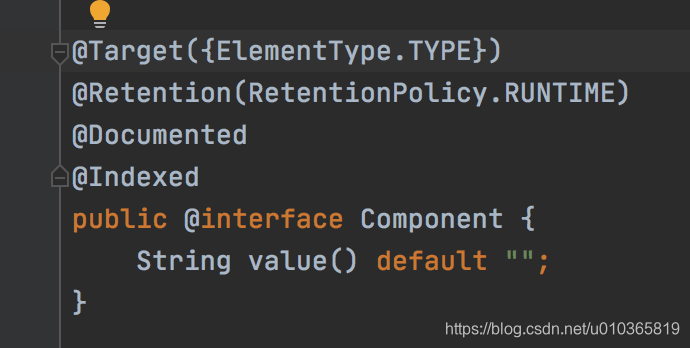
component注解中有一个@indexed
在应用中有大量使用@ComponentScan扫描的package包含的类越多的时候,Spring模式注解解析耗时就越长。
使用方法
在项目中使用的时候需要导入一个spring-context-indexer jar包,有Maven和Gradle 两种导入方式,具体可以看官网,我这里使用maven方式,引入jar配置如下:
<dependencies>
    <dependency>
        <groupId>org.springframework</groupId>
        <artifactId>spring-context-indexer</artifactId>
        <version>5.1.12.RELEASE</version>
        <optional>true</optional>
    </dependency>
</dependencies>
然后在代码中,对于使用了模式注解的类上加上@Indexed注解即可。如下:
@Indexed
@Controller
public class HelloController {

}
原理说明
摘自官网:
简单说明一下:在项目中使用了@Indexed之后,编译打包的时候会在项目中自动生成META-INT/spring.components文件。
当Spring应用上下文执行ComponentScan扫描时,META-INT/spring.components将会被CandidateComponentsIndexLoader 读取并加载,转换为CandidateComponentsIndex对象,这样的话@ComponentScan不在扫描指定的package,而是读取CandidateComponentsIndex对象,从而达到提升性能的目的。@EnableAutoConfiguration注解实现自动配置的原理和这个一样,也是直接把需要配置和加载的类写到了一个文件中,在启动的时候读取文件找到需要自动配置的类进行配置。
@Service、@Controller
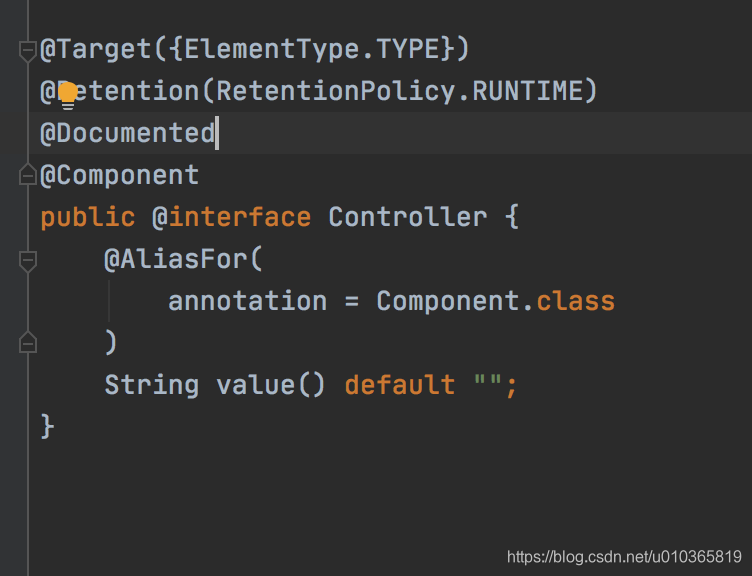
现在已经知道了@Component注释的作用,让我们看看@Service、@Controller和@Repository注释的作用。
它们只是特定情况下@Component注释的特殊形式。我们没有在Spring MVC的控制器类上使用@Component,而是使用@Controller,这样可读性更好,也更合适。
通过使用该注释,我们做了两件事,首先我们声明这个类是一个Spring bean,应该由Spring ApplicationContext创建和维护,但我们也指出它是MVC设置中的控制器。后一个属性被特定于web的工具和功能所使用。
例如,DispatcherServlet将在使用@Controller而不是@Component注释的类上寻找@RequestMapping。
这意味着@Component和@Controller在bean创建和依赖注入方面是相同的,但后者是前者的一种特殊形式。如果将@Controller注释替换为@Compoenent, Spring也可以自动检测并注册控制器类,但它在请求映射方面可能无法正常工作。
@Service和@Repository注释也是如此。它们是服务和持久层中@Component的特化。服务层中的Spring bean应使用@Service而不是@Component进行注释,且持久层中的spring bean应使用@Repository进行注释。
通过使用专门的注释,我们可以一举两得。首先,它们被视为Spring bean,其次,可以放置该层所需的特殊行为。
例如,@Repository不仅在基于注释的配置中提供了帮助,而且还捕获了平台特定的异常,并将其作为Spring统一的未检查异常重新抛出。
@ComponentScan,@ComponentScans
说明
与ComponentScan注解相对应的XML配置就是<context:component-scan/>, 根据指定的配置自动扫描package,将符合条件的组件加入到IOC容器中;
XML的配置方式如下:
<context:component-scan
base-package="com.yibai.spring.annotation" use-default-filters="false">
<context:include-filter type="custom"
expression="com.yibai.spring.annotation.filter.ColorBeanLoadFilter" />
<context:exclude-filter type="annotation"
expression="org.springframework.stereotype.Component" />
</context:component-scan>
2. @ComponentScan注解属性
@ComponentScan有如下属性:
value:指定要扫描的package;
includeFilters=Filter[]:指定只包含的组件
excludeFilters=Filter[]:指定需要排除的组件;
useDefaultFilters=true/false:指定是否需要使用Spring默认的扫描规则:被@Component, @Repository, @Service, @Controller或者已经声明过@Component自定义注解标记的组件;
在过滤规则Filter中:
FilterType:指定过滤规则,支持的过滤规则有
ANNOTATION:按照注解规则,过滤被指定注解标记的类;
ASSIGNABLE_TYPE:按照给定的类型;
ASPECTJ:按照ASPECTJ表达式;
REGEX:按照正则表达式
CUSTOM:自定义规则;
value:指定在该规则下过滤的表达式;
3. @ComponentScan过滤规则说明
规则表达式说明
1. 扫描指定类文件
@ComponentScan(basePackageClasses = Person.class)
2. 扫描指定包,使用默认扫描规则,即被@Component, @Repository, @Service, @Controller或者已经声明过@Component自定义注解标记的组件;
@ComponentScan(value = "com.yibai")
3. 扫描指定包,加载被@Component注解标记的组件和默认规则的扫描(因为useDefaultFilters默认为true)
@ComponentScan(value = "com.yibai", includeFilters = { @Filter(type = FilterType.ANNOTATION, value = Component.class) })
4. 扫描指定包,只加载Person类型的组件
@ComponentScan(value = "com.yibai", includeFilters = { @Filter(type = FilterType.ASSIGNABLE_TYPE, value = Person.class) }, useDefaultFilters = false)
5. 扫描指定包,过滤掉被@Component标记的组件
@ComponentScan(value = "com.yibai", excludeFilters = { @Filter(type = FilterType.ANNOTATION, value = Component.class) })
6. 扫描指定包,自定义过滤规则
@ComponentScan(value = "com.yibai", includeFilters = { @Filter(type = FilterType.CUSTOM, value = ColorBeanLoadFilter.class) }, useDefaultFilters = true)
4. 自定义扫描过滤规则
自定义规则实现类ColorBeanLoadFilter
/**
* Project Name:yibai-spring-annotation
* File Name:ColorBeanLoadFIlter.java
* Package Name:com.yibai.spring.annotation.filter
* Date:2019年1月5日下午12:15:54
* Copyright (c) 2019, www.windo-soft.com All Rights Reserved.
*
*/
package com.yibai.spring.annotation.filter;
import java.io.IOException;
import org.springframework.core.io.Resource;
import org.springframework.core.type.AnnotationMetadata;
import org.springframework.core.type.ClassMetadata;
import org.springframework.core.type.classreading.MetadataReader;
import org.springframework.core.type.classreading.MetadataReaderFactory;
import org.springframework.core.type.filter.TypeFilter;
import com.yibai.spring.annotation.bean.color.Color;
public class ColorBeanLoadFilter implements TypeFilter {
@Override
public boolean match(MetadataReader metadataReader, MetadataReaderFactory metadataReaderFactory)
throws IOException {
// 当前被扫描类的注解信息
@SuppressWarnings("unused")
AnnotationMetadata annotationMetadata = metadataReader.getAnnotationMetadata();
// 当前被扫描类信息
ClassMetadata classMetadata = metadataReader.getClassMetadata();
// 当前被扫描类资源信息
@SuppressWarnings("unused")
Resource resource = metadataReader.getResource();
try {
String className = classMetadata.getClassName();
Class<?> forName = Class.forName(className);
if (Color.class.isAssignableFrom(forName)) {
// 如果是Color的子类,就加载到IOC容器
return true;
}
} catch (ClassNotFoundException e) {
// e.printStackTrace();
}
return false;
}
}
@ComponentScans
可以一次声明多个@ComponentScan
@Retention(RetentionPolicy.RUNTIME)
@Target(ElementType.TYPE)
@Documented
@Repeatable(ComponentScans.class) //指定ComponentScan可以被ComponentScans作为数组使用
public @interface ComponentScan {
}
@Retention(RetentionPolicy.RUNTIME)
@Target(ElementType.TYPE)
@Documented
public @interface ComponentScans {
ComponentScan[] value();
}
@ComponentScans(value = { @ComponentScan(value = "com.yibai.spring.annotation"),
@ComponentScan(value = "com.yibai.spring.annotation", includeFilters = {
@Filter(type = FilterType.CUSTOM, value = ColorBeanLoadFilter.class) }) })
public class MainConfig {
@Bean(name = "pers", initMethod = "init", destroyMethod = "destory")
public Person person() {
return new Person();
}
}


 1356
1356

 被折叠的 条评论
为什么被折叠?
被折叠的 条评论
为什么被折叠?
 到【灌水乐园】发言


