


摘要:通过案例驱动的方式熟悉三层以及事务的操作,每一层的关键点都在下面代码写明,每行代码都有注释讲解,重点:JdbcUtils的使用,见下方有问题可以留言沟通!
代码及配置文件:https://download.csdn.net/download/u010452388/10406636
三层
1.web层:负责前端展示和用户请求的处理
2.service层:也称为业务逻辑层,实现核心业务逻辑,事务控制也在这一层实现。
3.dao层:重点负责数据库访问,完成持久化功能。
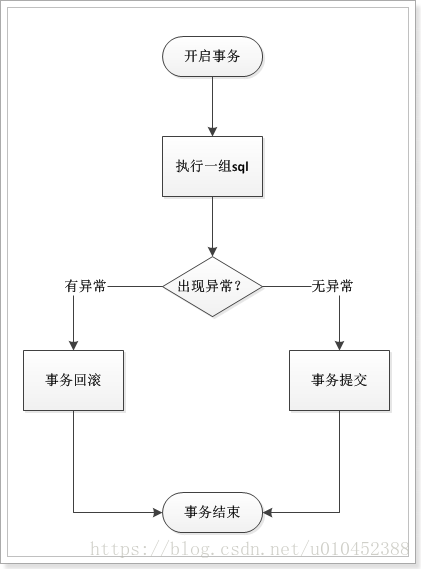
事务
逻辑上是一组操作,保证这组操作要么全部成功,要么全部失败。
例如:张三给李四转账100块钱,实际上的操作分为2步,第一步:张三账户里的钱扣除100,第二步:李四账户里的钱增加100。事务的作用就是要保证这两步要么全部成功,要么全部失败
文件准备
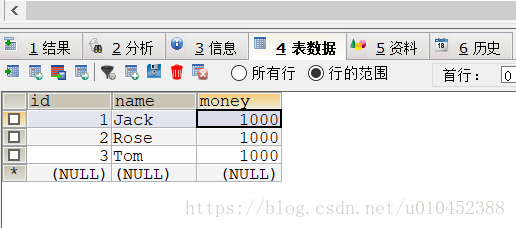
1-mysql数据表
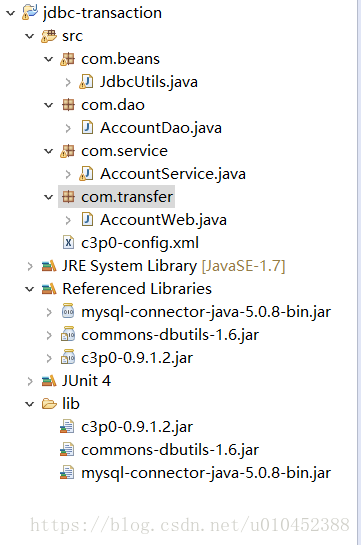
2-文件目录
代码编写
1-web层代码
import com.service.AccountService;

public class AccountWeb {

    public static void main(String[] args) {
        //转出者
        String outer = "Jack";
        //转入者
        String inner = "Rose";
        //转账金额
        int price = 100;
        //创建service层对象
        AccountService service = new AccountService();
        //将参数传入service层,如果转账成功,则返回true
        boolean result = service.transfer(outer, inner, price);
        if (result) {
            System.out.println("转账成功");
        } else {
            System.out.println("转账失败");
        }
    }

}
2-service层
此步骤中的关键点:
1.事务的操作:
先开启->提交或回滚
2.连接关闭:
不是关闭连接,是将连接放回到连接池,为什么?这里用的是c3p0的连接池,接口调用方法,执行的是实现对象重写的方法(多态)
3.单例模式:
通过jdbcutils工具类获取连接(运用了单例模式,保证service层和dao层获取的连接为同一个连接;连接还可以升级,详情看下面JdbcUtils工具类
import com.beans.JdbcUtils;
import com.dao.AccountDao;

public class AccountService {

    public boolean transfer(String outer, String inner, int price) {
        //创建dao层对象
        AccountDao dao = new AccountDao();
        //通过jdbcutils工具类获取连接(运用了单例模式,保证service层和dao层获取的连接为同一个连接
        Connection conn = JdbcUtils.getConnection();
        try {
            //事务开启
            conn.setAutoCommit(false);
            // 从outer账户里转出price的钱
            dao.out(outer, price);
            // 往inner账户里转入price的钱
            dao.in(inner, price);
            //事务提交,如果程序执行到这一步,那说明转账已经成功
            conn.commit();
            //这里不是关闭连接,是将连接放回到连接池,为什么?
            //这里用的是c3p0的连接池,接口调用方法,执行的是实现对象重写的方法(多态)
            conn.close();
            return true;
        } catch (SQLException e) {
            e.printStackTrace();
            if (conn != null) {
                try {
                    //事务回滚,说明前面转账过程出现问题,转出和转入的操作都不会执行
                    conn.rollback();
                } catch (SQLException e1) {
                    // TODO Auto-generated catch block
                    e1.printStackTrace();
                }
            }

        }
        return false;
    }
}
3-dao层
此步骤关键点:
1.获取连接:
通过jdbcutils工具类获取连接(运用了单例模式,保证service层和dao层获取的连接为同一个连接)连接还可以升级,详情看下面JdbcUtils工具类
2.创建QueryRunner对象
创建dbutils下的QueryRunner对象,里面不能传连接池参数进去(不能用new QueryRunner(JdbcUtils.getDataSource)),如果放了连接池,执行update的时候,会从连接池中获取连接,这样就会导致dao层和service层的连接不是同一个连接了
import java.sql.Connection;
import java.sql.PreparedStatement;
import java.sql.SQLException;

import org.apache.commons.dbutils.QueryRunner;

import com.beans.JdbcUtils;

public class AccountDao {

    public void out(String outer, int price) throws SQLException {
        //sql语句
        String sql = "update account set money=money-? where name=?";
        //通过jdbcutils工具类获取连接(运用了单例模式,保证service层和dao层获取的连接为同一个连接)
        Connection conn = JdbcUtils.getConnection();
        //创建dbutils下的QueryRunner对象,里面不能传连接池参数进去
        //如果放了连接池,执行update的时候,会从连接池中获取连接
        //这样就导致dao层和service层的连接不是同一个连接了
        QueryRunner runner = new QueryRunner();
        //数据库执行钱的扣除操作
        runner.update(conn, sql, price,outer);
    }

    public void in(String inner, int price) throws SQLException {
        //sql语句
        String sql = "update account set money=money+? where name=?";
        //通过jdbcutils工具类获取连接(运用了单例模式,保证service层和dao层获取的连接为同一个连接)
        Connection conn = JdbcUtils.getConnection();
        //创建sql语句预编译对象
        PreparedStatement statement = conn.prepareStatement(sql);
        //设置sql语句中的要增加的price
        statement.setInt(1, price);
        //设置sql语句中要增加price的name
        statement.setString(2, inner);
        //执行钱的增加操作
        statement.executeUpdate();
    }

}
JdbcUtils工具类
1.单例模式获取连接
确保service层和dao层获取的连接都是同一个连接,这样就不会导致事务失效了
import java.sql.Connection;
import java.sql.SQLException;

import javax.sql.DataSource;

import com.mchange.v2.c3p0.ComboPooledDataSource;

public class JdbcUtils {
    //单例模式(饿汉式单例)
    private static ComboPooledDataSource ds = new ComboPooledDataSource();
    //获取连接池方法
    public static DataSource getDataSource() {

        return ds;
    }
    // 1. 单例模式(懒汉式单例)
    //先声明一个连接对象conn;
    private static Connection conn;
    public static Connection getConnection() {
        //判断连接对象conn是否为空
        if (conn == null) {
            try {
                //如果第一次调用此方法,则会执行此步骤获取连接
                conn = ds.getConnection();
            } catch (SQLException e) {
                // TODO Auto-generated catch block
                e.printStackTrace();
            }
        }
        //如果是第二次调用获取连接方法,会直接返回第一次的连接
        //这样就确保service层和dao层的连接为同一个连接
        return conn;
    }
2.map获取连接
用map存储连接
    //这里一定要声明静态变量,因为静态方法下只能调用静态变量
    //声明一个map用来存储连接
    private static Map<Long, Connection> map = new HashMap<Long, Connection>();
    // 先声明一个连接对象conn;
    private static Connection conn;

    public static Connection getConnection() {
        //第一次从map中获取的连接肯定为null
        conn = map.get(1L);

        if (conn == null) {
            try {
                //第一次获取连接会执行此步骤
                conn = ds.getConnection();
                //将获取的连接存入到map中
                map.put(1L, conn);
            } catch (SQLException e) {
                // TODO Auto-generated catch block
                e.printStackTrace();
            }
        }
        //如果第二次调用此连接,则会返回map中的连接
        return conn;
    }
3.map及线程获取连接
上面两种连接存在几个问题:
1.连接池失去了意义,为什么?
每次都是只获取一个连接,连接池中放那么多连接没有意义
2.如果遇到多线程,会出现什么情况?
多线程进行数据库操作,全部都是用的同一个连接,会出现并发问题
下面这段代码可以即保留连接池的意义,又可以让线程解耦
//声明一个map用来线程id和连接
    private static Map<Long, Connection> map = new HashMap<Long, Connection>();
    private static Connection conn;

    public static Connection getConnection() {
        //根据当前线程id号获取连接
        conn = map.get(Thread.currentThread().getId());

        if (conn == null) {
            try {
                //如果当前线程id获取的连接不存在,则从连接池中获取一个连接
                conn = ds.getConnection();
                //并且将获取的线程id和连接存放到map中
                map.put(Thread.currentThread().getId(), conn);
            } catch (SQLException e) {
                // TODO Auto-generated catch block
                e.printStackTrace();
            }
        }
        //如果根据线程id找到了连接,直接返回
        return conn;
    }
4.ThreadLocal获取连接
ThreadLocal其本质就是Map集合
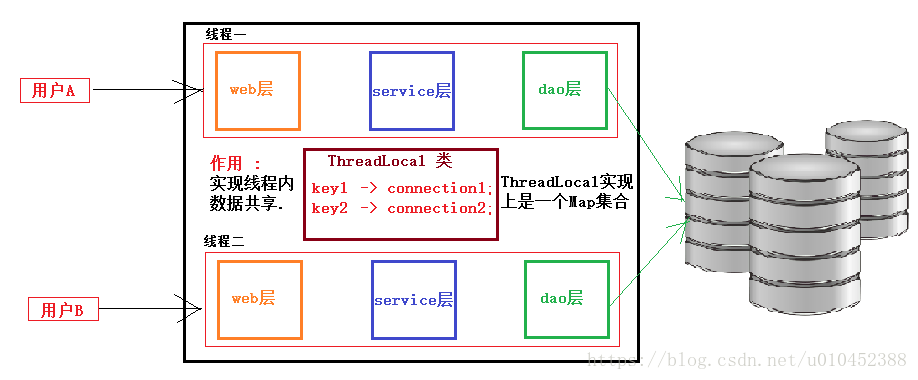
//创建ThreadLocal对象,其本质就是Map,只是底层封装好了,直接调用其set和get即可
    private static ThreadLocal<Connection> local = new ThreadLocal<Connection>();
    private static Connection conn;
    public static Connection getConnection() {
        //根据当前线程id获取连接
        conn = local.get();
        if (conn == null) {
            try {
                conn = ds.getConnection();
                //将当前线程id和连接存起来
                local.set(conn);
            } catch (SQLException e) {
                // TODO Auto-generated catch block
                e.printStackTrace();
            }
        }
        return conn;
    }


 169
169


 被折叠的 条评论
为什么被折叠?
被折叠的 条评论
为什么被折叠?
 到【灌水乐园】发言


