


Cxf入门小程序:
1. 搭建环境(加入jar包)
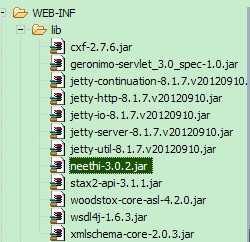
2. 接口编写
a) 如图

b) 编写接口
packagecom.cxf.server;

importjavax.jws.WebParam;
importjavax.jws.WebService;

@WebService(name= "helloService",
              targetNamespace ="http://impl.server.cxf.com")
public interfaceIHelloWorld {
       // @WebParam给参数命名,提高可代码可读性。此项可选
       public String sayHi(@WebParam(name ="text")String text);
}
c) 实现接口
packagecom.cxf.server.impl;

importjavax.jws.WebService;
importcom.cxf.server.IHelloWorld;

@WebService
public classHelloWorldImpl implements IHelloWorld {

       public String sayHi(String name) {
              System.out.println("sayHellois called by " + name);
              return "Hello " + name;
       }
}
3. 服务发布
packagecom.cxf.server;

importjavax.xml.ws.Endpoint;
importcom.cxf.server.impl.HelloWorldImpl;

public classServer {
       private Server() {
              //START SNIPPET: publish
        System.out.println("StartingServer");
        IHelloWorld implementor = newHelloWorldImpl();
        String address ="http://localhost:9000/helloWorld";
        Endpoint.publish(address, implementor);
        // END SNIPPET: publish
       };

       public static void main(String[] args)throws InterruptedException {
              // 启动服务端
              new Server();
              System.out.println("Serverready...");
              // 休眠一分钟,便于测试
              Thread.sleep(1000 * 60);
              System.out.println("Serverexit...");
              System.exit(0);
       }
}
4. 客户端调用
packagecom.cxf.client;

importorg.apache.cxf.interceptor.LoggingInInterceptor;
importorg.apache.cxf.interceptor.LoggingOutInterceptor;
importorg.apache.cxf.jaxws.JaxWsProxyFactoryBean;

importcom.cxf.server.IHelloWorld;

public classClient {

       private Client() {
       }

       public static void main(String[] args) {
              // 创建WebService客户端代理工厂
              JaxWsProxyFactoryBean factory =new JaxWsProxyFactoryBean();
              factory.getInInterceptors().add(newLoggingInInterceptor());
              factory.getOutInterceptors().add(newLoggingOutInterceptor());
              // 注册WebService接口
              factory.setServiceClass(IHelloWorld.class);
              // 设置WebService地址
              factory.setAddress("http://localhost:9000/helloWorld");
              IHelloWorld client = (IHelloWorld)factory.create();
              String reply =client.sayHi("Tom");
              System.out.println("Serversaid: " + reply);
              System.exit(0);
       }
}


 3563
3563

 被折叠的 条评论
为什么被折叠?
被折叠的 条评论
为什么被折叠?
 到【灌水乐园】发言


