


1.由于springboot集成了tomcat,所以打包的时候不再使用war,而是使用jar
-
<groupId>cn</groupId> -
<artifactId>back</artifactId> -
<version>0.0.1-SNAPSHOT</version> -
<packaging>jar</packaging>
2.将springboot启动类添加继承SpringBootServletInitializer,并且重写configure方法
-
public class BackApplication extends SpringBootServletInitializer{ -
public static void main(String[] args) { -
SpringApplication.run(BackApplication.class, args); -
} -
@Override//为了打包springboot项目 -
protected SpringApplicationBuilder configure( -
SpringApplicationBuilder builder) { -
return builder.sources(this.getClass()); -
} -
}
3.选中项目,右击选择Run As==>maven clean清空一下之前的jar
4.选中项目,右击选择Run As==>maven install安装打包
4.1. 在碰到maven install 发现报错,则按下面********中的方法解决:
***********************************************begin****************************************************
Failed to execute goal org.apache.maven.plugins:maven-compiler-plugin:3.2:compile (default-compile) on project autotest_fchtgl: Compilation failure
[ERROR] No compiler is provided in this environment. Perhaps you are running on a JRE rather than a JDK?
[ERROR] -> [Help 1]
[ERROR]
[ERROR] To see the full stack trace of the errors, re-run Maven with the -e switch.
[ERROR] Re-run Maven using the -X switch to enable full debug logging.
[ERROR]
[ERROR] For more information about the errors and possible solutions, please read the following articles:
[ERROR] [Help 1] http://cwiki.apache.org/confluence/display/MAVEN/MojoFailureException
分析:
对这个问题其实报错中已经说的很清楚了,看第一条最后的 Perhaps you are running on a JRE rather than a JDK?
就是说你可能编译在一个JRE而不是JDK上,maven 编译是要JDK的,可能你的编译器配置了一个jre路径。
解决:
1:在eclipse中,选择window→preference→java→Installed JREs 点add添加你的jdk路径,选jdk而不是jre,之前的报错原因就出在这里。

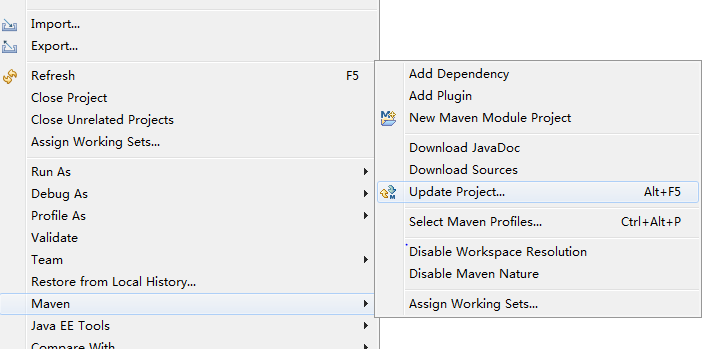
2:在eclipse的菜单中,进入 Window > Preferences > Java > Installed JREs > Execution Environments,选择JavaSE-1.7, 在右侧选择jdk.
然后右键你的maven工程,在maven中点击update project,然后maven clean,install 一下就好了。
**********************************************end************************************************************************
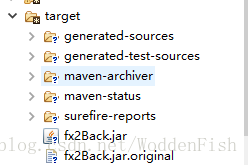
5.将项目中的target文件夹下的jar包复制出来即是您要的包
6.将jar上传到服务期上,(必须安装了jdk,并且开放了对应的端口)
7.进入该文件夹目录,执行命令 nohup java -jar fx2Back.jar & 使用nohup不挂机启动,然后便可以访问页面了。

8.如果要关闭服务可以直接查询到服务的进程号,然后kill.

参考地址1:https://blog.csdn.net/WoddenFish/article/details/80705895


 2万+
2万+


 被折叠的 条评论
为什么被折叠?
被折叠的 条评论
为什么被折叠?
 到【灌水乐园】发言


