


分析结构体 + 重要API = 理清楚了架构。
Redis是键值,内存缓冲系统。Memcached内部仅仅支持字符串,直接用一个hash表管理。但是Redis支持数据类型更多,因此内部肯定使用了更过的数据结构。
内部数据结构是Redis高效的基础,这里主要详解内部最基本的数据结构以及操作其最基本的API。例如跳跃表,详解其创建、插入、删除、查找API,其他功能封装这些API不做详细解答。
柔性数组说明
柔性数据的好处在于,结构体里面既可以包含空间大小,也可以使用标记直接访问分配的内存,内存空间不足,直接使用realloc(空间重分配、复制原数据、释放原空间、返回新空间首地址)。memcached,Item内部的data域也使用了柔性数组。
陈皓-酷壳柔性数组
维基-柔性数组
动态字符串
1、介绍
C字符串叫做字符串字面量,对于不需要修改的字符串,使用这种默认表示则很简单。那作者为什么还需要造轮子,搞个SDS(Simple Dynamic String)?
封装字符串修改、扩容、缩容、拼接等可能都需要手动重新分配内存的细节,让客户端仅仅专注于上层使用。好处在下面几点。
- 因为使用了sdshrd结构,内部存储了字符串长度以及使用内存信息,可以快速定位字符串长度O(1),避免了strlen的O(N)的遍历。
- 扩展字符串长度,需要动态分配内存,全部右sdshrd的API自动完成,避免了手动重新分配内存,然后memcpy的繁琐。实际上sdshrd内部也是按照这个完成。
- 将一个字符串拼接到一个字符串后面,对于sds绝对不会缓冲区溢出,因为拼接之前会进行内层检测。
- sds具有内存预分配的作用,避免重复多次进行内存分配工作。
- 二进制安全,因为sds有字符串length信息,所以不需要以’/0’为结尾区分字符串,使得Redis内部不仅仅可以保存文本信息也可以存储图片,视频等二进制数据信息。但是为了兼容string内部函数功能,Redis的sds还是默认以’/0’结尾。
2、结构体部分
总共有3种结构体,完全是为了节约存储len和alloc的内存而设计。作者绝对是嵌入式出生,这么爱节约内存。可见作者的功力深厚。结构体的选择会依据字符串的长度动态选择。总之就是分配一块连续的内存块管理字符串。
typedef char *sds;//可代表sdshdr首地址,然后通过地址类型转换访问连续内存块
//sds是为了兼容C字符串设计。
/* Note: sdshdr5 is never used, we just access the flags byte directly.
 * However is here to document the layout of type 5 SDS strings. */
struct __attribute__ ((__packed__)) sdshdr5 {
    unsigned char flags; /* 3 lsb of type, and 5 msb of string length */
    char buf[];
};
struct __attribute__ ((__packed__)) sdshdr8 {
    uint8_t len; /* used */
    uint8_t alloc; /* 数据区域分配的全部内存,除去了head和'/0'。excluding the header and null terminator */
    unsigned char flags; /* 高3位代表结构体存储len的数据类型,有了整个参数就可以通过buf正确访问len和alloc了。宏定义就是这样做的。3 lsb of type, 5 unused bits */
    char buf[];//柔性数组
};
struct __attribute__ ((__packed__)) sdshdr16 {
    uint16_t len; /* used */
    uint16_t alloc; /* excluding the header and null terminator */
    unsigned char flags; /* 3 lsb of type, 5 unused bits */
    char buf[];
};
struct __attribute__ ((__packed__)) sdshdr32 {
    uint32_t len; /* used */
    uint32_t alloc; /* excluding the header and null terminator */
    unsigned char flags; /* 3 lsb of type, 5 unused bits */
    char buf[];
};
struct __attribute__ ((__packed__)) sdshdr64 {
    uint64_t len; /* used */
    uint64_t alloc; /* excluding the header and null terminator */
    unsigned char flags; /* 3 lsb of type, 5 unused bits */
    char buf[];
};
//强迫症,以上仅仅是为了节约存储len和alloc的内存而设计。

#define SDS_TYPE_5  0
#define SDS_TYPE_8  1
#define SDS_TYPE_16 2
#define SDS_TYPE_32 3
#define SDS_TYPE_64 4
#define SDS_TYPE_MASK 7
#define SDS_TYPE_BITS 3
#define SDS_HDR_VAR(T,s) struct sdshdr##T *sh = (void*)((s)-(sizeof(struct sdshdr##T)));//宏定义连接符##了解下,变量
#define SDS_HDR(T,s) ((struct sdshdr##T *)((s)-(sizeof(struct sdshdr##T))))//找出sdshdr16的数据区域
#define SDS_TYPE_5_LEN(f) ((f)>>SDS_TYPE_BITS)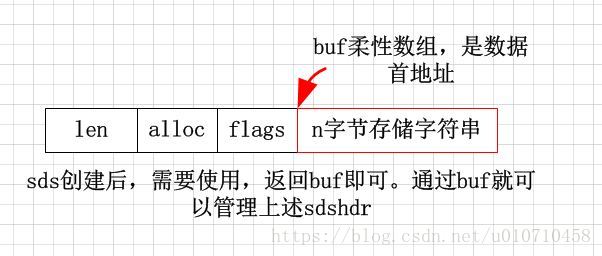
直接返回地址buf即可,因为可以通过buf访问前面的len、alloc、flags字节。作者这种玩内存和指针的方法,真是出神入化了。sds[-1]就可以访问flag参数了。地址在堆中总是动态增加。所以可以通过指针的加或者减访问内存块。这就是玩内存的方法了,很聪明哦。
3、创建一个sds字符串
根据传入的C字符串,选择合适的sdshdr__,然后malloc+memcpy即可。整个大体过程就是这样。
/* Create a new sds string starting from a null terminated C string. */
//通过c字符串,创建一个sds。将c字符串复制到sds中,并返回sdshrd中的buf。
sds sdsnew(const char *init) {
    size_t initlen = (init == NULL) ? 0 : strlen(init);//需求长度
    return sdsnewlen(init, initlen);//分配sdshrd,并返回其中的buf数据区域地址。
}

/* Create a new sds string with the content specified by the 'init' pointer
 * and 'initlen'.
 * If NULL is used for 'init' the string is initialized with zero bytes.
 *
 * The string is always null-termined (all the sds strings are, always) so
 * even if you create an sds string with:
 *
 * mystring = sdsnewlen("abc",3);
 *
 * You can print the string with printf() as there is an implicit \0 at the
 * end of the string. However the string is binary safe and can contain
 * \0 characters in the middle, as the length is stored in the sds header. */
sds sdsnewlen(const void *init, size_t initlen) {//创建SDS字符串,直接返回char即可,需要访问SDS,通过指针回溯即可
    void *sh;
    sds s;
    char type = sdsReqType(initlen);//根据输入字符串长度,选择合适的sdshrd,完全为了节约内存。
    /* Empty strings are usually created in order to append. Use type 8
     * since type 5 is not good at this. */
    if (type == SDS_TYPE_5 && initlen == 0) type = SDS_TYPE_8;
    int hdrlen = sdsHdrSize(type);//头结构体节点占用内存。
    unsigned char *fp; /* flags pointer. */

    sh = s_malloc(hdrlen+initlen+1);//分配=头结点+数据长度+结束符
    if (!init)
        memset(sh, 0, hdrlen+initlen+1);//将新分配的sh内存清空。因为malloc并不保证先前位置为空,所以必须设为0
    if (sh == NULL) return NULL;
    s = (char*)sh+hdrlen;//定位head中的数据区域
    fp = ((unsigned char*)s)-1;//sdshdr中的flags域
    switch(type) {
        case SDS_TYPE_5: {
            *fp = type | (initlen << SDS_TYPE_BITS);
            break;
        }
        case SDS_TYPE_8: {
            SDS_HDR_VAR(8,s);
            sh->len = initlen;
            sh->alloc = initlen;
            *fp = type;
            break;
        }
        case SDS_TYPE_16: {
            SDS_HDR_VAR(16,s);//通过数据域的地址,获取整个sdshrd的地址
            sh->len = initlen;//初始化
            sh->alloc = initlen;//初始化
            *fp = type;//结构体中类型
            break;'/0'
        }
        case SDS_TYPE_32: {
            SDS_HDR_VAR(32,s);
            sh->len = initlen;
            sh->alloc = initlen;
            *fp = type;
            break;
        }
        case SDS_TYPE_64: {
            SDS_HDR_VAR(64,s);
            sh->len = initlen;
            sh->alloc = initlen;
            *fp = type;
            break;
        }
    }
    if (initlen && init)
        memcpy(s, init, initlen);//将init数据全部拷贝到s数据区域
    s[initlen] = '\0';//结束符
    return s;//返回s
}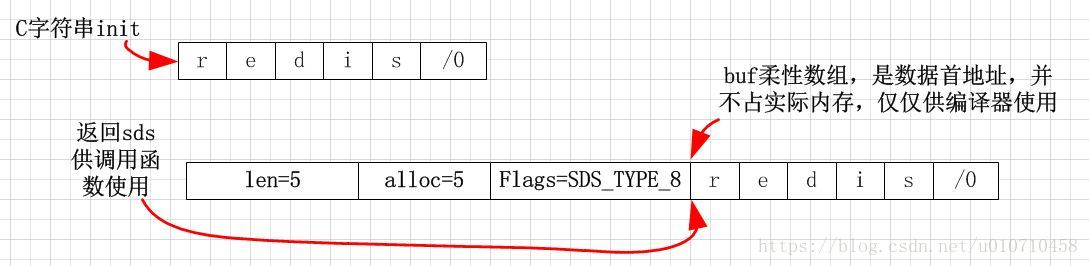
上述过程可以用简单的图表示,很容易理解,所以sds很简单,就不细说了。antirez
4、sdscat将一个字符串加到sds之后,不会内存溢出
整个过程很简单,绝对不会有内存溢出的问题。首先确定sds是否有足够的空间。假如空间足够则直接realloc+memcpy;假如空间不足,则依据总长度选择合适的类型,然后malloc(分配新内存)+free(释放旧内存)+memcpy(先拷贝旧字符串)+memcpy(再拷贝新字符串)即可。如果没有这个函数的封装,利用C字符串,也会是这样的一个过程。
/* Append the specified binary-safe string pointed by 't' of 'len' bytes to the
 * end of the specified sds string 's'.
 *
 * After the call, the passed sds string is no longer valid and all the
 * references must be substituted with the new pointer returned by the call. */
sds sdscatlen(sds s, const void *t, size_t len) {
    size_t curlen = sdslen(s);//获取s长度

    s = sdsMakeRoomFor(s,len);//扩容sds,若容量够,则直接拼接,防止溢出
    if (s == NULL) return NULL;
    memcpy(s+curlen, t, len);//将t直接拷贝到s+curlen位置处。很简单的memcpy。注意内存已分配,绝对不会造成重叠的问题。
    sdssetlen(s, curlen+len);//设置字符串长度
    s[curlen+len] = '\0';//末尾加上空
    return s;//返回s,s可能被修改,也可能没有被修改。
}

/* Enlarge the free space at the end of the sds string so that the caller
 * is sure that after calling this function can overwrite up to addlen
 * bytes after the end of the string, plus one more byte for nul term.
 *
 * Note: this does not change the *length* of the sds string as returned
 * by sdslen(), but only the free buffer space we have. */
sds sdsMakeRoomFor(sds s, size_t addlen) {
    void *sh, *newsh;
    size_t avail = sdsavail(s);//返回sds可用容量
    size_t len, newlen;
    char type, oldtype = s[-1] & SDS_TYPE_MASK;
    int hdrlen;

    /* Return ASAP if there is enough space left. */
    if (avail >= addlen) return s;//可用容量足够放下addlen长度字符串,直接返回

    /*
        不够则需要进行扩容加上搬移。
    */
    len = sdslen(s);//原来字符串长度
    sh = (char*)s-sdsHdrSize(oldtype);//找到结构体头部
    newlen = (len+addlen);//需要分配新的长度
    if (newlen < SDS_MAX_PREALLOC)//新的长度小于1M,则直接重新分配2倍,为以后使用避免重新分配内存
        newlen *= 2;
    else
        newlen += SDS_MAX_PREALLOC;//大于1M,则直接多分配1M

    type = sdsReqType(newlen);//获取相应的sdshrd的类型表示。

    /* Don't use type 5: the user is appending to the string and type 5 is
     * not able to remember empty space, so sdsMakeRoomFor() must be called
     * at every appending operation. */
    if (type == SDS_TYPE_5) type = SDS_TYPE_8;

    hdrlen = sdsHdrSize(type);//获取头类型字节数
    if (oldtype==type) {//类型一致,则当前sdshrd长度变量足够存储newlen,则realloc即可
        newsh = s_realloc(sh, hdrlen+newlen+1);//realloc并返回
        if (newsh == NULL) return NULL;
        s = (char*)newsh+hdrlen;
    } else {
    //不一致,则malloc + memcpy + free

    /* Since the header size changes, need to move the string forward,
         * and can't use realloc */
        newsh = s_malloc(hdrlen+newlen+1);//分配新的的内存
        if (newsh == NULL) return NULL;
        memcpy((char*)newsh+hdrlen, s, len+1);//将数据拷贝到新的内存
        s_free(sh);//释放老的内存块
        s = (char*)newsh+hdrlen;//s重新指向新的数据块
        s[-1] = type;//赋值类型,这种操作很明白,一看就懂了,往回退1字节,不愧是搞嵌入式的人。
        sdssetlen(s, len);//设置字符串长度,并没有strcat,所以长度不变
    }
    sdssetalloc(s, newlen);//设置分配的内容
    return s;
}
其余API都对应着类似的操作,整个我们已经可很清楚的看懂了。下面一幅图对应着
在sds.c中,几乎所有的函数所传的参数都是sds类型,而非表头sdshdr的地址,但是使用了通过sds指针运算从而求得表头的地址的技巧,因为sds是指向sdshdr结构buf成员,在堆中地址向上增长,所以可以通过指针的算术元算找到表头即可。
跳跃表
https://blog.csdn.net/ict2014/article/details/17394259
https://blog.csdn.net/men_wen/article/details/70040026
1、跳跃表(skiplist)介绍
跳跃表是一种有序数据结构,通过每个节点中维持多个指向其他节点的指针,从而达到快速访问节点的目的。其中节点中指针的数目是通过随机生成的,所以跳跃表是使用概率均衡技术而不是使用强制性均衡,因此,对于插入和删除结点比传统上的平衡树算法更为简洁高效。跳跃表支持平均O(LogN)、最坏O(N)复杂度的节点查找,还可以通过顺序性操作批处理节点,因此大部分情况下可以和平衡树媲美,其实现起来更为简单。
通过在每个节点中存放多个指向下一个不同节点的指针,实现跳跃的功能。类似于将一系列节点跳跃性的连接成多条有序链表,查找过程就是先从最高层开始,然后遍历所以层次,最后定位到节点。
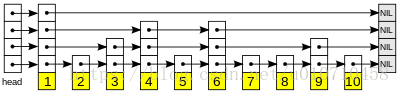
上图是一个4层的跳跃表。将处在相同层次的节点联结起来,于是类似于含有4条跳跃的链表。每个节点中层是随机生成的。随机生成函数可以自己写,
2、随机数生成函数
在redis中,返回一个随机层数值,随机算法所使用的幂次定律。
- 含义是:如果某件事的发生频率和它的某个属性成幂关系,那么这个频率就可以称之为符合幂次定律。
- 表现是:少数几个事件的发生频率占了整个发生频率的大部分, 而其余的大多数事件只占整个发生频率的一个小部分。
int zslRandomLevel(void) { //返回一个随机层数值
    int level = 1;
    //(random()&0xFFFF)只保留低两个字节的位值,其他高位全部清零,所以该值范围为0到0xFFFF
    while ((random()&0xFFFF) < (ZSKIPLIST_P * 0xFFFF))  //ZSKIPLIST_P(0.25)所以level+1的概率为0.25
        level += 1;         //返回一个1到ZSKIPLIST_MAXLEVEL(32)之间的值
    return (level<ZSKIPLIST_MAXLEVEL) ? level : ZSKIPLIST_MAXLEVEL;
}
#define ZSKIPLIST_MAXLEVEL 32 /* Should be enough for 2^32 elements */
#define ZSKIPLIST_P 0.25      /* Skiplist P = 1/4 */
2、Redis跳跃表
typedef struct zskiplistNode {
    sds ele;                            //保存成员对象动态字符串
    double score;                       //分值
    struct zskiplistNode *backward;     //后退指针,指向前一个节点,方便范围查找
    struct zskiplistLevel {
        struct zskiplistNode *forward;  //前进指针,指向下一个节点
        unsigned int span;              //跨度,此级跨越几个节点
    } level[];                          //层级,是柔型数组,根据随机数动态分配
} zskiplistNode;//跳跃表节点结构体

typedef struct zskiplist {
    struct zskiplistNode *header, *tail;
    unsigned long length;
    int level;
} zskiplist;//管理一个跳跃表,记录头部和尾部节点以及跳跃表长度。
通过ZADD操作之后,跳跃表的随机构成可能是下面结构,其中节点中层次是随机生成的。
127.0.0.1:6379> ZADD score 95.5 Mike 98 Li 96 Wang  //socre是一个有序集合键
(integer) 3
127.0.0.1:6379> ZRANGE score 0 -1 WITHSCORES//所有分数按从小到大排列,每一个成员都保存了一个分数
1) "Mike"
2) "95.5"
3) "Wang"
4) "96"
5) "Li"
6) "98"
127.0.0.1:6379> ZSCORE score Mike       //查询Mike的分值
"95.5"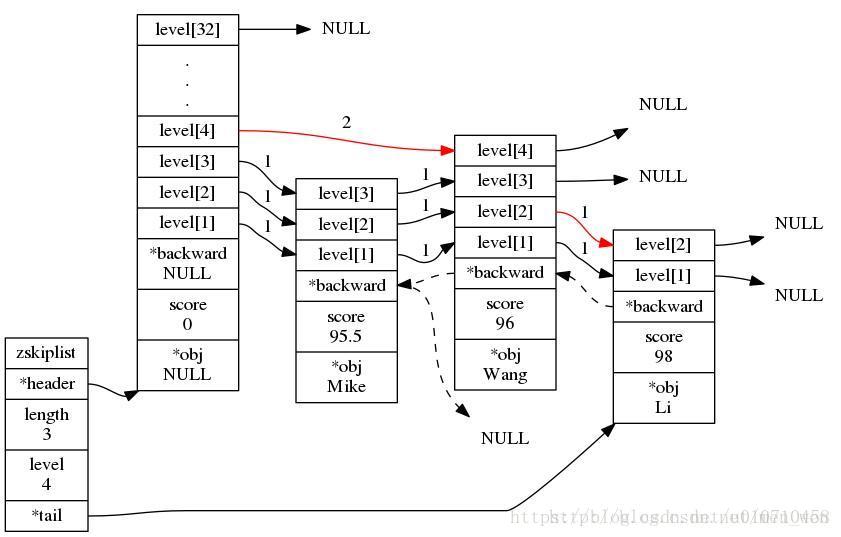
在level数组中,处于同一级的,就必须构造成链表,如上图。只要符合这一规则,那么就可以使用跳跃表了。根据上图,直接讲解Redis中跳跃表操作得API。
//创建一个新的跳跃表,管理跳跃表的结构体
/* Create a new skiplist. */
zskiplist *zslCreate(void) {
int j;
zskiplist *zsl;
zsl = zmalloc(sizeof(*zsl));//分配内存
zsl->level = 1;//层级初始化0
zsl->length = 0;//元素个数初始化0
zsl->header = zslCreateNode(ZSKIPLIST_MAXLEVEL,0,NULL);//创建一个头结点,可见头结点最高是32层,分数是0,元素是空,这个用来管理链表
for (j = 0; j < ZSKIPLIST_MAXLEVEL; j++) {
zsl->header->level[j].forward = NULL;
zsl->header->level[j].span = 0;
}//将header的下一个节点全部初始化为空且span为0
zsl->header->backward = NULL;//前节点为空
zsl->tail = NULL;//尾部为空
return zsl;//返回链表首地址
}
//创建一个跳跃表节点,实现很简单。
/* Create a skiplist node with the specified number of levels.
* The SDS string 'ele' is referenced by the node after the call. */
zskiplistNode *zslCreateNode(int level, double score, sds ele) {
zskiplistNode *zn =
zmalloc(sizeof(*zn)+level*sizeof(struct zskiplistLevel));
//柔性数组,可以看到分配的内存是连续的,很方便。
zn->score = score;//分数
zn->ele = ele;//元素
return zn;//返回节点地址。
//Redis作者写的代码,真的很符合我的口味,写的没有那么绕口,不愧是搞嵌入式出生的人。
}
//释放一个节点
/* Free the specified skiplist node. The referenced SDS string representation
* of the element is freed too, unless node->ele is set to NULL before calling
* this function. */
void zslFreeNode(zskiplistNode *node) {
sdsfree(node->ele);//先释放动态字符串内存。
zfree(node);//然后释放当前节点占用内存。
}
//随机获取1到32之间的数字,作为节点中level层级。
/* Returns a random level for the new skiplist node we are going to create.
* The return value of this function is between 1 and ZSKIPLIST_MAXLEVEL
* (both inclusive), with a powerlaw-alike distribution where higher
* levels are less likely to be returned. */
int zslRandomLevel(void) {
int level = 1;
while ((random()&0xFFFF) < (ZSKIPLIST_P * 0xFFFF))
level += 1;
return (level<ZSKIPLIST_MAXLEVEL) ? level : ZSKIPLIST_MAXLEVEL;
}
/*
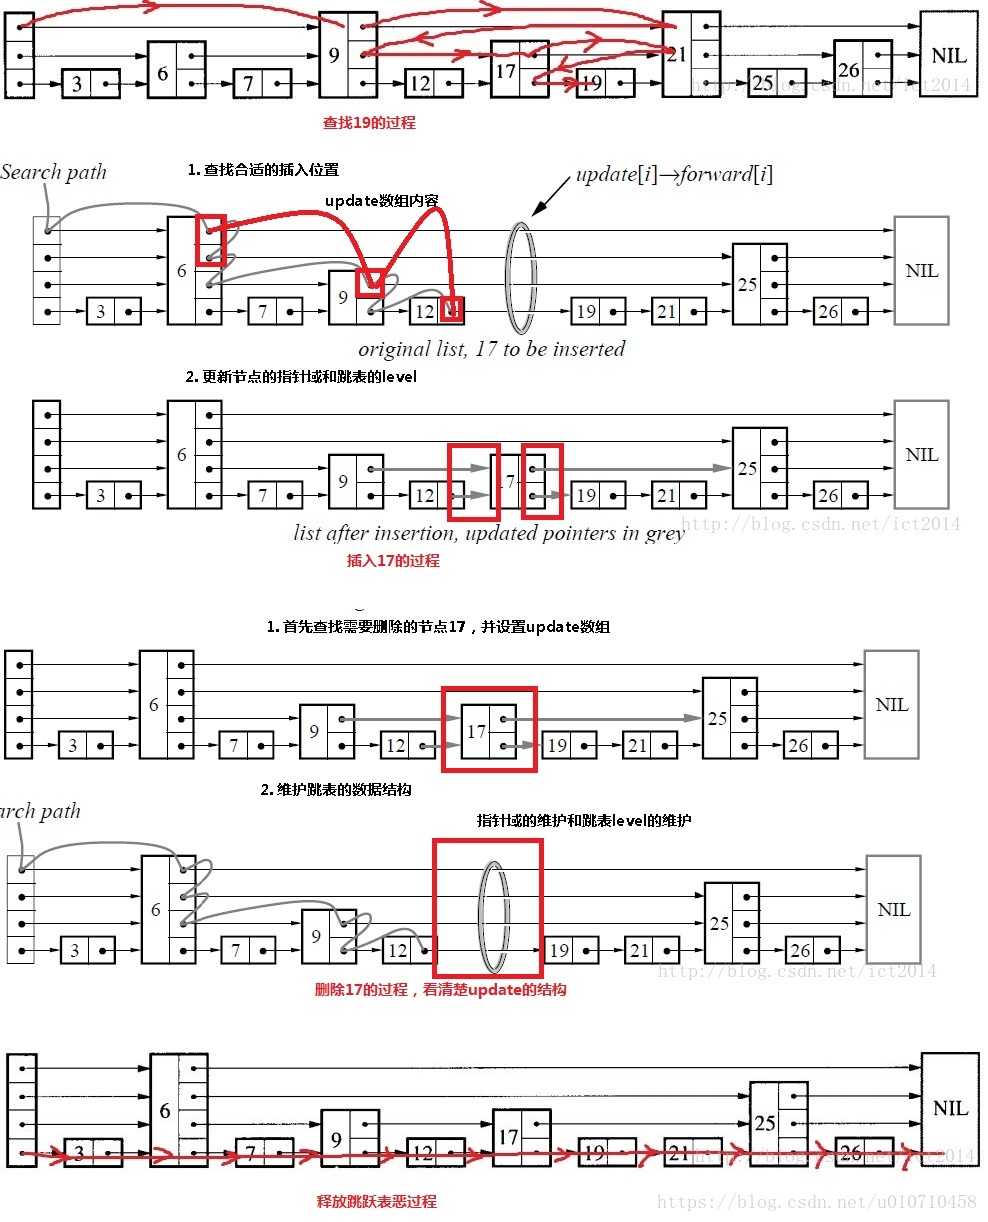
向跳跃表中插入一个节点:
1、先通过score定位,ele应该所处的位置,并通过update记录每层中节点转向的指针。
2、新键一个节点,并用传入的值初始化。
3、通过前面的update记录的节点信息,将新节点插入对应层次的单向链表。
*/
/* Insert a new node in the skiplist. Assumes the element does not already
* exist (up to the caller to enforce that). The skiplist takes ownership
* of the passed SDS string 'ele'. */
zskiplistNode *zslInsert(zskiplist *zsl, double score, sds ele) {
zskiplistNode *update[ZSKIPLIST_MAXLEVEL], *x;
unsigned int rank[ZSKIPLIST_MAXLEVEL];
int i, level;
serverAssert(!isnan(score));
x = zsl->header;
//相当于遍历level-1层链表,实现思路很容易
for (i = zsl->level-1; i >= 0; i--) {
/* store rank that is crossed to reach the insert position */
rank[i] = i == (zsl->level-1) ? 0 : rank[i+1];//更新rank[i]为i+1所跨越的节点数,但是最外一层为0
while (x->level[i].forward &&
(x->level[i].forward->score < score ||
(x->level[i].forward->score == score &&
sdscmp(x->level[i].forward->ele,ele) < 0)))//后一个节点存在,且分数小于sore,则在当前链表中前进一步。
{
rank[i] += x->level[i].span;//记录该层一共跨越了多少节点 加上 上一层遍历所跨越的节点数
x = x->level[i].forward;//更新并指向下一个节点
}
update[i] = x;
//记录遍历过程中每条链表中跳转的节点,用于分析
}
/* we assume the element is not already inside, since we allow duplicated
* scores, reinserting the same element should never happen since the
* caller of zslInsert() should test in the hash table if the element is
* already inside or not. */
level = zslRandomLevel();//获得一个随机的层数
if (level > zsl->level) {//如果大于当前所有节点最大的层数时
for (i = zsl->level; i < level; i++) {
rank[i] = 0; //将大于等于原来zsl->level层以上的rank[]设置为0
update[i] = zsl->header;//将大于等于原来zsl->level层以上update[i]指向头结点
update[i]->level[i].span = zsl->length;//update[i]已经指向头结点,将第i层的跨度设置为length
}
zsl->level = level;
}//如果随机层数大于跳跃表层,则更新跳跃表zsl
x = zslCreateNode(level,score,ele);//创建一个节点
for (i = 0; i < level; i++) {//遍历每一层,并更新每一层的链表
x->level[i].forward = update[i]->level[i].forward;
update[i]->level[i].forward = x;//将节点插入i层的链表,因为update记录了i层上一个节点信息,所以很容易实现。
/* update span covered by update[i] as x is inserted here */
x->level[i].span = update[i]->level[i].span - (rank[0] - rank[i]);//更新插入节点的跨度值
update[i]->level[i].span = (rank[0] - rank[i]) + 1;//更新插入节点前一个节点的跨度值
}
/* increment span for untouched levels */
for (i = level; i < zsl->level; i++) {//如果插入节点的level小于原来的zsl->level才会执行
update[i]->level[i].span++;//因为高度没有达到这些层,所以只需将查找时每层最后一个节点的值的跨度加1
}
//设置插入节点的后退指针,就是查找时最下层的最后一个节点,该节点的地址记录在update[0]中
//如果插入在第二个节点,也就是头结点后的位置就将后退指针设置为NULL
x->backward = (update[0] == zsl->header) ? NULL : update[0];
if (x->level[0].forward)//如果x节点不是最尾部的节点
x->level[0].forward->backward = x;//就将x节点后面的节点的后退节点设置成为x地址
else
zsl->tail = x;//否则更新表头的tail指针,指向最尾部的节点x
zsl->length++;//跳跃表节点计数器加1
return x;//返回x地址
}
//根据传入的update指针数组,更新跳跃表中每条链表
//被zslDelete, zslDeleteByScore and zslDeleteByRank使用的内部函数
void zslDeleteNode(zskiplist *zsl, zskiplistNode *x, zskiplistNode **update) {
int i;
//设置前进指针和跨度
for (i = 0; i < zsl->level; i++) { //遍历下标为0到跳跃表最大层数-1的层
if (update[i]->level[i].forward == x) { //如果找到该节点
update[i]->level[i].span += x->level[i].span - 1; //将前一个节点的跨度减1
update[i]->level[i].forward = x->level[i].forward;
//前一个节点的前进指针指向被删除的节点的后一个节点,跳过该节点
} else {
update[i]->level[i].span -= 1; //在第i层没找到,只将该层的最后一个节点的跨度减1
}
}
//设置后退指针
if (x->level[0].forward) { //如果被删除的前进节点不为空,后面还有节点
x->level[0].forward->backward = x->backward; //就将后面节点的后退指针指向被删除节点x的回退指针
} else {
zsl->tail = x->backward; //否则直接将被删除的x节点的后退节点设置为表头的tail指针
}
//更新跳跃表最大层数
while(zsl->level > 1 && zsl->header->level[zsl->level-1].forward == NULL)
zsl->level--;
zsl->length--; //节点计数器减1
}
//根据分数和元素删除元素
/* Delete an element with matching score/element from the skiplist.
* The function returns 1 if the node was found and deleted, otherwise
* 0 is returned.
*
* If 'node' is NULL the deleted node is freed by zslFreeNode(), otherwise
* it is not freed (but just unlinked) and *node is set to the node pointer,
* so that it is possible for the caller to reuse the node (including the
* referenced SDS string at node->ele). */
int zslDelete(zskiplist *zsl, double score, sds ele, zskiplistNode **node) {
zskiplistNode *update[ZSKIPLIST_MAXLEVEL], *x;
int i;
//查找位置
x = zsl->header;
for (i = zsl->level-1; i >= 0; i--) {
while (x->level[i].forward &&
(x->level[i].forward->score < score ||
(x->level[i].forward->score == score &&
sdscmp(x->level[i].forward->ele,ele) < 0)))
{
x = x->level[i].forward;
}
update[i] = x;
}
/* We may have multiple elements with the same score, what we need
* is to find the element with both the right score and object. */
x = x->level[0].forward;//获取当前节点
if (x && score == x->score && sdscmp(x->ele,ele) == 0) {//确实是这个元素
zslDeleteNode(zsl, x, update);//更新删除节点之后的跳跃表。
//zskiplistNode *update[ZSKIPLIST_MAXLEVEL]是数组,类型是zskiplistNode *,所以应该传入其地址,为zskiplistNode * * 类似于int a[12],形参类型是int *。
if (!node)
zslFreeNode(x);//释放当前节点信息
else
*node = x;
return 1;
}
return 0; /* not found */
}上述查找、插入、释放的过程。
其他API暂时先放放。
整数集合
整数集合(intset)是集合键底层实现之一,以有序、无重复的方式保存集合原色。集合键另一实现是值为空的哈希表(hash table),虽然使用哈希表对集合的加入删除元素,判断元素是否存在等等操作时间复杂度为O(1),但是当存储的元素是整型且元素数目较少时,如果使用散列表存储,就会比较浪费内存,因此整数集合(intset)类型因为节约内存而存在,直接使用柔性数组存储即可。
将元素有序的放在柔性数组中,并且当数据超过当前编码,则会进行数据类型升级并合理迁移先前元素,防止存储溢出,这种实现方式在数据量比较少的时候,很有用。
类型升级的特点
- 提升灵活性:因为C语言是静态类型的语言,通常在在数组中只是用一种类型保存数据,例如,要么只用
int16_t类型,要么只用int32_t类型。通过自动升级底层数组来适应不同类型的新元素,不必担心类型的错误。 - 节约内存:整数集合既可以让集合保存三种不同类型的值,又可以确保升级操作只在有需要的时候进行,这样就节省了内存。
- 不支持降级:一旦对数组进行升级,编码就会一直保存升级后的状态。
typedef struct intset {
    uint32_t encoding;//编码方式
    uint32_t length;//集合中元素数量
    int8_t contents[];//柔性数组,扩容通过realloc
    //从小到大存放元素,且不包含重复项
} intset;
//encoding可选范围
#define INTSET_ENC_INT16 (sizeof(int16_t))   //16位,2个字节,表示范围-32,768~32,767
#define INTSET_ENC_INT32 (sizeof(int32_t))   //32位,4个字节,表示范围-2,147,483,648~2,147,483,647
#define INTSET_ENC_INT64 (sizeof(int64_t))   //64位,8个字节,表示范围-9,223,372,036,854,775,808~9,223,372,036,854,775,807


/* Create an empty intset. */
intset *intsetNew(void) {
    intset *is = zmalloc(sizeof(intset));
    is->encoding = intrev32ifbe(INTSET_ENC_INT16);
    is->length = 0;
    return is;
}//创建空的intset集,默认是int16
1、往整数集中pos位置插入元素。
/* Set the value at pos, using the configured encoding. */
//根据集合is设置的编码方式,设置下标为pos的值为value,用指针操作很容易,直接强制转换,然后赋值。
//根据主机字节序用来做内存大小端的转换,主机字节序是大端,如果模板机器的小端,那么需要转换。
static void _intsetSet(intset *is, int pos, int64_t value) {
    uint32_t encoding = intrev32ifbe(is->encoding);

    if (encoding == INTSET_ENC_INT64) {
        ((int64_t*)is->contents)[pos] = value;//直接将地址转换成编码类型,然后通过指针智能设定。
        memrev64ifbe(((int64_t*)is->contents)+pos);//小端转大端存储。
    } else if (encoding == INTSET_ENC_INT32) {
        ((int32_t*)is->contents)[pos] = value;
        memrev32ifbe(((int32_t*)is->contents)+pos);//如果模板机器是小端,则需要小转大端存储。
    } else {
        ((int16_t*)is->contents)[pos] = value;
        memrev16ifbe(((int16_t*)is->contents)+pos);//如果模板机器是小端,则需要小转大端存储。
    }
}
2、类型升级操作
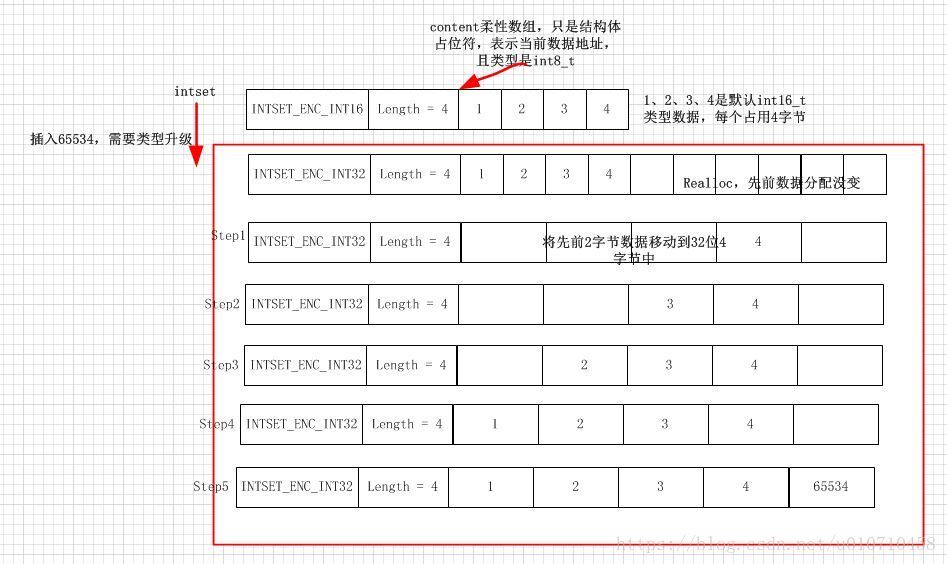
上图是需要升级的过程,如果不需要升级,则先扩容将元素通过有序二分查找找到合适的位置,然后在移动后面的元素,插入新的元素。
这种缺陷在于,每次插入元素都需要realloc,并且类型不匹配还需要升级和realloc。
复杂度很垃圾的。优点就在于可以节约内存,不知道为什么作者要使用这种骚东西,搞不明白。一个hash又浪费了多少空间了。
//当需要升级,或者不升级插入新元素,都需要扩容。注意使用的ralloc,这个在很多源代码使用很多。
//https://blog.csdn.net/u010710458/article/details/77274704#t2
//重置数组大小,依据新类型分配空间
static intset *intsetResize(intset *is, uint32_t len) {
    uint32_t size = len*intrev32ifbe(is->encoding);
    is = zrealloc(is,sizeof(intset)+size);//注意柔性数组通过ralloc重新分配。
    return is;
}

//往intset中加入元素.
//如果当前类型足够存储value,则不用升级,直接扩容
//不够存储,则直接升级-->移动元素-->存储
/* Insert an integer in the intset */
intset *intsetAdd(intset *is, int64_t value, uint8_t *success) {
    uint8_t valenc = _intsetValueEncoding(value);
    uint32_t pos;
    if (success) *success = 1;

    /* Upgrade encoding if necessary. If we need to upgrade, we know that
     * this value should be either appended (if > 0) or prepended (if < 0),
     * because it lies outside the range of existing values. */
    if (valenc > intrev32ifbe(is->encoding)) {//编码大,则升级插入
        /* This always succeeds, so we don't need to curry *success. */
        return intsetUpgradeAndAdd(is,value);
    } else {//否则找到合适位置,再移动插入。
        /* Abort if the value is already present in the set.
         * This call will populate "pos" with the right position to insert
         * the value when it cannot be found. */
        if (intsetSearch(is,value,&pos)) {//二分查找定位,如果value已经存在,intsetSearch返回1,如果不存在,pos保存value可以插入的位置
            if (success) *success = 0;//value存在,success设置为0,并返回
            return is;
        }

        //不存在,pos保存可插入位置。
        is = intsetResize(is,intrev32ifbe(is->length)+1);//重新分配足够的空间
        if (pos < intrev32ifbe(is->length)) intsetMoveTail(is,pos,pos+1);//不在末尾,则移动pos后面的元素
    }

    _intsetSet(is,pos,value);//新值插入pos
    is->length = intrev32ifbe(intrev32ifbe(is->length)+1);//返回长度
    return is;
}

//升级操作,下面用一副图片说明,扩容,然后升级
//首先,需要升级,则必然是当前类型容不下,
//要么太大,要么太小,所以必然存储在扩容之后的前或者尾部。
/* Upgrades the intset to a larger encoding and inserts the given integer. */
//根据value的编码方式,对整数集合is的编码格式升级
static intset *intsetUpgradeAndAdd(intset *is, int64_t value) {
    uint8_t curenc = intrev32ifbe(is->encoding);//先前encoded
    uint8_t newenc = _intsetValueEncoding(value);//当前encoded
    int length = intrev32ifbe(is->length);
    int prepend = value < 0 ? 1 : 0;//小于0,则肯定最小,大于0则肯定最大,必定放在头部或者尾部。

    /* First set new encoding and resize */
    is->encoding = intrev32ifbe(newenc);
    is = intsetResize(is,intrev32ifbe(is->length)+1);//根据新的编码方式重新设置内存空间大小

    /* Upgrade back-to-front so we don't overwrite values.
     * Note that the "prepend" variable is used to make sure we have an empty
     * space at either the beginning or the end of the intset. */
    while(length--)
        //_intsetGetEncoded(is,length,curenc)根据先前编码获取先前位置值,这个很容易,通过指针获取即可。
        _intsetSet(is,length+prepend,_intsetGetEncoded(is,length,curenc));//将先前元素插入新位置。
        //先放先前最大的,然后第二大的,最后最小的。

    /* Set the value at the beginning or the end. */
    if (prepend)//如果插入最小,则将值插入最前面
        _intsetSet(is,0,value);
    else
        _intsetSet(is,intrev32ifbe(is->length),value);//最大,插入后面
    is->length = intrev32ifbe(intrev32ifbe(is->length)+1);//长度+1
    return is;
}

//注意这里作者使用memmove,免去了没存重叠的叨扰,牛逼得很咯。
static void intsetMoveTail(intset *is, uint32_t from, uint32_t to) {
    void *src, *dst;
    uint32_t bytes = intrev32ifbe(is->length)-from;//从from到元素的个数
    uint32_t encoding = intrev32ifbe(is->encoding);

    if (encoding == INTSET_ENC_INT64) {
        src = (int64_t*)is->contents+from;
        dst = (int64_t*)is->contents+to;
        bytes *= sizeof(int64_t);
    } else if (encoding == INTSET_ENC_INT32) {
        src = (int32_t*)is->contents+from;//首地址
        dst = (int32_t*)is->contents+to;//目的地址
        bytes *= sizeof(int32_t);//个数*sizeof等于需要移动的全部字节
    } else {
        src = (int16_t*)is->contents+from;
        dst = (int16_t*)is->contents+to;
        bytes *= sizeof(int16_t);
    }
    //memmove可以保证在重叠的时候,将src指定地方复制到des。
    //https://blog.csdn.net/u010710458/article/details/78887755#t11 讲解了重叠问题
    memmove(dst,src,bytes);//将src开始地址的bytes字节,移动到des开始,des比大于src,所以不会发生覆盖问题。
}
其他API暂时不许解释,这些API已经将这个数据结构讲清楚了。
作者在inset.c里面也写了许多测试代码,哈哈,看来都是需要测试的,作者估计写了好久也测试了好久,才确认这个写得没有问题。主要在于玩指针,玩内存。


 6174
6174


 被折叠的 条评论
为什么被折叠?
被折叠的 条评论
为什么被折叠?
 到【灌水乐园】发言


