


1、使用生成器和列表解析
一个普遍被忽略的内存优化是生成器的使用。生成器让我们创建一个函数一次只返回一条记录,而不是一次返回所有的记录,如果你正在使用python2.x,这就是你为啥使用xrange替代range或者使用ifilter替代filter的原因。一个很好地例子就是创建一个很大的列表并将它们拼合在一起。
- import timeit
- import random
- def generate(num):
- while num:
- yield random.randrange(10)
- num -= 1
- def create_list(num):
- numbers = []
- while num:
- numbers.append(random.randrange(10))
- num -= 1
- return numbers
- print(timeit.timeit("sum(generate(999))", setup="from __main__ import generate", number=1000))
- print(timeit.timeit("sum(create_list(999))", setup="from __main__ import create_list", number=1000))
1.00842191191
0.933518458666
列表解析要比在循环中重新构建一个新的 list 更为高效,因此我们可以利用这一特性来提高运行的效率。
- from time import time
- t = time()
- list = ['a','b','is','python','jason','hello','hill','with','phone','test',
- 'dfdf','apple','pddf','ind','basic','none','baecr','var','bana','dd','wrd']
- total=[]
- for i in range(1000000):
- for w in list:
- total.append(w)
- print "total run time:"
- print time()-t
- for i in range(1000000):
- a = [w for w in list]
2、Ctypes的介绍
对于关键性的性能代码python本身也提供给我们一个API来调用C方法,主要通过 ctypes来实现,你可以不写任何C代码来利用ctypes。默认情况下python提供了预编译的标准c库,我们再回到生成器的例子,看看使用ctypes实现花费多少时间。
- import timeit
- from ctypes import cdll
- def generate_c(num):
- #Load standard C library
- #libc = cdll.LoadLibrary("libc.so.6") #Linux
- libc = cdll.msvcrt #Windows
- while num:
- yield libc.rand() % 10
- num -= 1
- print(timeit.timeit("sum(generate_c(999))", setup="from __main__ import generate_c", number=1000))
0.404974439902
仅仅换成了c的随机函数,运行时间减了大半!现在如果我告诉你我们还能做得更好,你信吗?
3、Cython的介绍
Cython 是python的一个超集,允许我们调用C函数以及声明变量来提高性能。尝试使用之前我们需要先安装Cython.
sudo pip install cython
Cython 本质上是另一个不再开发的类似类库Pyrex的分支,它将我们的类Python代码编译成C库,我们可以在一个python文件中调用。对于你的python文件使用.pyx后缀替代.py后缀,让我们看一下使用Cython如何来运行我们的生成器代码。
- #cython_generator.pyx
- import random
- def generate(num):
- while num:
- yield random.randrange(10)
- num -= 1
- from distutils.core import setup
- from distutils.extension import Extension
- from Cython.Distutils import build_ext
- setup(
- cmdclass = {'build_ext': build_ext},
- ext_modules = [Extension("generator", ["cython_generator.pyx"])]
- )
python setup.py build_ext
-
-
inplace
你应该可以看到两个文件cython_generator.c 文件和generator.so文件,我们使用下面方法测试我们的程序:
- import timeit
- print(timeit.timeit("sum(generator.generate(999))", setup="import generator", number=1000))
- >>> 0.835658073425
- #cython_generator.pyx
- cdef extern from "stdlib.h":
- int c_libc_rand "rand"()
- def generate(int num):
- while num:
- yield c_libc_rand() % 10
- num -= 1
>>>
0.033586025238
4、PyPy的介绍
PyPy 是一个Python2.7.3的即时编译器(JIT),通俗地说这意味着让你的代码运行的更快。Quora在生产环境中使用了PyPy。PyPy在它们的下载页面有一些安装说明,但是如果你使用的Ubuntu系统,你可以通过apt-get来安装。它的运行方式是立即可用的,因此没有疯狂的bash或者运行脚本,只需下载然后运行即可。让我们看看我们原始的生成器代码在PyPy下的性能如何。
- import timeit
- import random
- def generate(num):
- while num:
- yield random.randrange(10)
- num -= 1
- def create_list(num):
- numbers = []
- while num:
- numbers.append(random.randrange(10))
- num -= 1
- return numbers
- print(timeit.timeit("sum(generate(999))", setup="from __main__ import generate", number=1000))
- >>> 0.115154981613 #PyPy 1.9
- >>> 0.118431091309 #PyPy 2.0b1
- print(timeit.timeit("sum(create_list(999))", setup="from __main__ import create_list", number=1000))
- >>> 0.140175104141 #PyPy 1.9
- >>> 0.140514850616 #PyPy 2.0b1
5、进一步测试
为什么还要进一步研究?PyPy是冠军!并不全对。虽然大多数程序可以运行在PyPy上,但是还是有一些库没有被完全支持。而且,为你的项目写C的扩展相比换一个编译器更加容易。让我们更加深入一些,看看ctypes如何让我们使用C来写库。我们来测试一下归并排序和计算斐波那契数列的速度。下面是我们要用到的C代码(functions.c):
- /* functions.c */
- #include "stdio.h"
- #include "stdlib.h"
- #include "string.h"
- /* http://rosettacode.org/wiki/Sorting_algorithms/Merge_sort#C */
- inline
- void merge(int *left, int l_len, int *right, int r_len, int *out)
- {
- int i, j, k;
- for (i = j = k = 0; i < l_len && j < r_len; )
- out[k++] = left[i] < right[j] ? left[i++] : right[j++];
- while (i < l_len) out[k++] = left[i++];
- while (j < r_len) out[k++] = right[j++];
- }
- /* inner recursion of merge sort */
- void recur(int *buf, int *tmp, int len)
- {
- int l = len / 2;
- if (len <= 1) return;
- /* note that buf and tmp are swapped */
- recur(tmp, buf, l);
- recur(tmp + l, buf + l, len - l);
- merge(tmp, l, tmp + l, len - l, buf);
- }
- /* preparation work before recursion */
- void merge_sort(int *buf, int len)
- {
- /* call alloc, copy and free only once */
- int *tmp = malloc(sizeof(int) * len);
- memcpy(tmp, buf, sizeof(int) * len);
- recur(buf, tmp, len);
- free(tmp);
- }
- int fibRec(int n){
- if(n < 2)
- return n;
- else
- return fibRec(n-1) + fibRec(n-2);
- }
gcc
-
Wall
-
fPIC
-
c functions.c
gcc
-
shared
-
o libfunctions.so functions.o
使用ctypes, 通过加载”libfunctions.so”这个共享库,就像我们前边对标准C库所作的那样,就可以使用这个库了。这里我们将要比较Python实现和C实现。现在我们开始计算斐波那契数列:
- #functions.py
- from ctypes import *
- import time
- libfunctions = cdll.LoadLibrary("./libfunctions.so")
- def fibRec(n):
- if n < 2:
- return n
- else:
- return fibRec(n-1) + fibRec(n-2)
- start = time.time()
- fibRec(32)
- finish = time.time()
- print("Python: " + str(finish - start))
- #C Fibonacci
- start = time.time()
- x = libfunctions.fibRec(32)
- finish = time.time()
- print("C: " + str(finish - start))
- Python: 1.18783187866 #Python 2.7
- Python: 1.272292137145996 #Python 3.2
- Python: 0.563600063324 #PyPy 1.9
- Python: 0.567229032516 #PyPy 2.0b1
- C: 0.043830871582 #Python 2.7 + ctypes
- C: 0.04574108123779297 #Python 3.2 + ctypes
- C: 0.0481240749359 #PyPy 1.9 + ctypes
- C: 0.046403169632 #PyPy 2.0b1 + ctypes
正如我们预料的那样,C比Python和PyPy更快。我们也可以用同样的方式比较归并排序。
我们还没有深挖Cypes库,所以这些例子并没有反映python强大的一面,Cypes库只有少量的标准类型限制,比如int型,char数组,float型,字节(bytes)等等。默认情况下,没有整形数组,然而通过与c_int相乘(ctype为int类型)我们可以间接获得这样的数组。这也是代码第7行所要呈现的。我们创建了一个c_int数组,有关我们数字的数组并分解打包到c_int数组中
主要的是c语言不能这样做,而且你也不想。我们用指针来修改函数体。为了通过我们的c_numbers的数列,我们必须通过引用传递merge_sort功能。运行merge_sort后,我们利用c_numbers数组进行排序,我已经把下面的代码加到我的functions.py文件中了。
- #Python Merge Sort
- from random import shuffle, sample
- #Generate 9999 random numbers between 0 and 100000
- numbers = sample(range(100000), 9999)
- shuffle(numbers)
- c_numbers = (c_int * len(numbers))(*numbers)
- from heapq import merge
- def merge_sort(m):
- if len(m) <= 1:
- return m
- middle = len(m) // 2
- left = m[:middle]
- right = m[middle:]
- left = merge_sort(left)
- right = merge_sort(right)
- return list(merge(left, right))
- start = time.time()
- numbers = merge_sort(numbers)
- finish = time.time()
- print("Python: " + str(finish - start))
- #C Merge Sort
- start = time.time()
- libfunctions.merge_sort(byref(c_numbers), len(numbers))
- finish = time.time()
- print("C: " + str(finish - start))
- Python: 0.190635919571 #Python 2.7
- Python: 0.11785483360290527 #Python 3.2
- Python: 0.266992092133 #PyPy 1.9
- Python: 0.265724897385 #PyPy 2.0b1
- C: 0.00201296806335 #Python 2.7 + ctypes
- C: 0.0019741058349609375 #Python 3.2 + ctypes
- C: 0.0029308795929 #PyPy 1.9 + ctypes
- C: 0.00287103652954 #PyPy 2.0b1 + ctypes
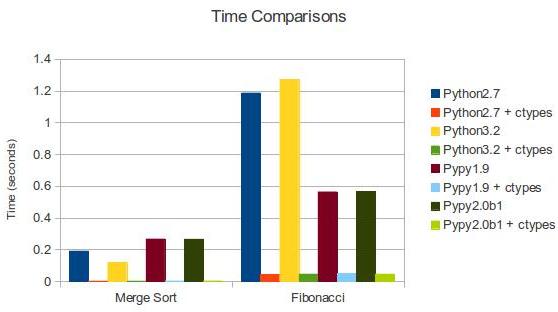
| Merge Sort | Fibonacci | |
|---|---|---|
| Python 2.7 | 0.191 | 1.187 |
| Python 2.7 + ctypes | 0.002 | 0.044 |
| Python 3.2 | 0.118 | 1.272 |
| Python 3.2 + ctypes | 0.002 | 0.046 |
| PyPy 1.9 | 0.267 | 0.564 |
| PyPy 1.9 + ctypes | 0.003 | 0.048 |
| PyPy 2.0b1 | 0.266 | 0.567 |
| PyPy 2.0b1 + ctypes | 0.003 | 0.046 |
代码优化能够让程序运行更快,它是在不改变程序运行结果的情况下使得程序的运行效率更高,根据 80/20 原则,实现程序的重构、优化、扩展以及文档相关的事情通常需要消耗 80% 的工作量。优化通常包含两方面的内容:减小代码的体积,提高代码的运行效率。
6、改进算法,选择合适的数据结构
一个良好的算法能够对性能起到关键作用,因此性能改进的首要点是对算法的改进。在算法的时间复杂度排序上依次是:
O(1) -> O(lg n) -> O(n lg n) -> O(n^2) -> O(n^3) -> O(n^k) -> O(k^n) -> O(n!)
因此如果能够在时间复杂度上对算法进行一定的改进,对性能的提高不言而喻。但对具体算法的改进不属于本文讨论的范围,读者可以自行参考这方面资料。下面的内容将集中讨论数据结构的选择。
● 字典 (dictionary) 与列表 (list)
Python 字典中使用了hash table,因此查找操作的复杂度为 O(1),而 list 实际是个数组,在 list 中,查找需要遍历整个 list,其复杂度为 O(n),因此对成员的查找访问等操作字典要比 list 更快。
清单 1. 代码 dict.py
- from time import time
- t = time()
- list = ['a','b','is','python','jason','hello','hill','with','phone','test',
- 'dfdf','apple','pddf','ind','basic','none','baecr','var','bana','dd','wrd']
- #list = dict.fromkeys(list,True)
- print list
- filter = []
- for i in range (1000000):
- for find in ['is','hat','new','list','old','.']:
- if find not in list:
- filter.append(find)
- print "total run time:"
- print time()-t
上述代码运行大概需要 16.09seconds。如果去掉行 #list = dict.fromkeys(list,True) 的注释,将 list 转换为字典之后再运行,时间大约为 8.375 seconds,效率大概提高了一半。因此在需要多数据成员进行频繁的查找或者访问的时候,使用 dict 而不是 list 是一个较好的选择。
● 集合 (set) 与列表 (list)
set 的 union, intersection,difference 操作要比 list 的迭代要快。因此如果涉及到求 list 交集,并集或者差的问题可以转换为 set 来操作。
清单 2. 求 list 的交集:
- from time import time
- t = time()
- lista=[1,2,3,4,5,6,7,8,9,13,34,53,42,44]
- listb=[2,4,6,9,23]
- intersection=[]
- for i in range (1000000):
- for a in lista:
- for b in listb:
- if a == b:
- intersection.append(a)
- print "total run time:"
- print time()-t
total run time:
 38.4070000648
清单 3. 使用 set 求交集
- from time import time
- t = time()
- lista=[1,2,3,4,5,6,7,8,9,13,34,53,42,44]
- listb=[2,4,6,9,23]
- intersection=[]
- for i in range (1000000):
- list(set(lista)&set(listb))
- print "total run time:"
- print time()-t
改为 set 后程序的运行时间缩减为 8.75,提高了 4 倍多,运行时间大大缩短。读者可以自行使用表 1 其他的操作进行测试。
表 1. set 常见用法
| 语法 | 操作 | 说明 |
|---|---|---|
| set(list1) | set(list2) | union | 包含 list1 和 list2 所有数据的新集合 |
| set(list1) & set(list2) | intersection | 包含 list1 和 list2 中共同元素的新集合 |
| set(list1) - set(list2) | difference | 在 list1 中出现但不在 list2 中出现的元素的集合 |
7、对循环的优化
对循环的优化所遵循的原则是尽量减少循环过程中的计算量,有多重循环的尽量将内层的计算提到上一层。 下面通过实例来对比循环优化后所带来的性能的提高。程序清单 4 中,如果不进行循环优化,其大概的运行时间约为 132.375。
清单 4. 为进行循环优化前
- from time import time
- t = time()
- lista = [1,2,3,4,5,6,7,8,9,10]
- listb =[0.1,0.2,0.3,0.4,0.5,0.6,0.7,0.8,0.9,0.01]
- for i in range (1000000):
- for a in range(len(lista)):
- for b in range(len(listb)):
- x=lista[a]+listb[b]
- print "total run time:"
- print time()-t
现在进行如下优化,将长度计算提到循环外,range 用 xrange 代替,同时将第三层的计算 lista[a] 提到循环的第二层。
清单 5. 循环优化后
- from time import time
- t = time()
- lista = [1,2,3,4,5,6,7,8,9,10]
- listb =[0.1,0.2,0.3,0.4,0.5,0.6,0.7,0.8,0.9,0.01]
- len1=len(lista)
- len2=len(listb)
- for i in xrange (1000000):
- for a in xrange(len1):
- temp=lista[a]
- for b in xrange(len2):
- x=temp+listb[b]
- print "total run time:"
- print time()-t
8、充分利用 Lazy if-evaluation 的特性
python 中条件表达式是 lazy evaluation 的,也就是说如果存在条件表达式 if x and y,在 x 为 false 的情况下 y 表达式的值将不再计算。因此可以利用该特性在一定程度上提高程序效率。
清单 6. 利用 Lazy if-evaluation 的特性
- from time import time
- t = time()
- abbreviations = ['cf.', 'e.g.', 'ex.', 'etc.', 'fig.', 'i.e.', 'Mr.', 'vs.']
- for i in range (1000000):
- for w in ('Mr.', 'Hat', 'is', 'chasing', 'the', 'black', 'cat', '.'):
- if w in abbreviations:
- #if w[-1] == '.' and w in abbreviations:
- pass
- print "total run time:"
- print time()-t
在未进行优化之前程序的运行时间大概为 8.84,如果使用注释行代替第一个 if,运行的时间大概为 6.17。
9、字符串的优化
python 中的字符串对象是不可改变的,因此对任何字符串的操作如拼接,修改等都将产生一个新的字符串对象,而不是基于原字符串,因此这种持续的 copy 会在一定程度上影响 python 的性能。对字符串的优化也是改善性能的一个重要的方面,特别是在处理文本较多的情况下。字符串的优化主要集中在以下几个方面:
1、在字符串连接的使用尽量使用 join() 而不是 +:在代码清单 7 中使用 + 进行字符串连接大概需要 0.125 s,而使用 join 缩短为 0.016s。因此在字符的操作上 join 比 + 要快,因此要尽量使用 join 而不是 +。
清单 7. 使用 join 而不是 + 连接字符串
- from time import time
- t = time()
- s = ""
- list = ['a','b','b','d','e','f','g','h','i','j','k','l','m','n']
- for i in range (10000):
- for substr in list:
- s+= substr
- print "total run time:"
- print time()-t
- s = ""
- for x in list:
- s += func(x)
- slist = [func(elt) for elt in somelist]
- s = "".join(slist)
2、当对字符串可以使用正则表达式或者内置函数来处理的时候,选择内置函数。如 str.isalpha(),str.isdigit(),str.startswith((‘x’, ‘yz’)),str.endswith((‘x’, ‘yz’))
3、对字符进行格式化比直接串联读取要快,因此要使用
- out = "%s%s%s%s" % (head, prologue, query, tail)
- out = "" + head + prologue + query + tail + ""
10、其他优化技巧
1、如果需要交换两个变量的值使用 a,b=b,a 而不是借助中间变量 t=a;a=b;b=t;
- >>> from timeit import Timer
- >>> Timer("t=a;a=b;b=t","a=1;b=2").timeit()
- 0.25154118749729365
- >>> Timer("a,b=b,a","a=1;b=2").timeit()
- 0.17156677734181258
- >>>
2、在循环的时候使用 xrange 而不是 range。使用 xrange 可以节省大量的系统内存,因为 xrange() 在序列中每次调用只产生一个整数元素。而 range() 將直接返回完整的元素列表,用于循环时会有不必要的开销。在 python3 中 xrange 不再存在,里面 range 提供一个可以遍历任意长度的范围的 iterator。
3、使用局部变量,避免”global” 关键字。python 访问局部变量会比全局变量要快得多,因 此可以利用这一特性提升性能。
4、if done is not None 比语句 if done != None 更快,读者可以自行验证;
5、在耗时较多的循环中,可以把函数的调用改为内联的方式;
6、使用级联比较 “x < y < z” 而不是 “x < y and y < z”;
7、while 1 要比 while True 更快(当然后者的可读性更好);
8、build in 函数通常较快,add(a,b) 要优于 a+b。
11、定位程序性能瓶颈
对代码优化的前提是需要了解性能瓶颈在什么地方,程序运行的主要时间是消耗在哪里,对于比较复杂的代码可以借助一些工具来定位,python 内置了丰富的性能分析工具,如 profile,cProfile 与 hotshot 等。其中 Profiler 是 python 自带的一组程序,能够描述程序运行时候的性能,并提供各种统计帮助用户定位程序的性能瓶颈。Python 标准模块提供三种 profilers:cProfile,profile 以及 hotshot。
profile 的使用非常简单,只需要在使用之前进行 import 即可。具体实例如下:
清单 8. 使用 profile 进行性能分析
- import profile
- def profileTest():
- Total =1;
- for i in range(10):
- Total=Total*(i+1)
- print Total
- return Total
- if __name__ == "__main__":
- profile.run("profileTest()")
- 1
- 2
- 6
- 24
- 120
- 720
- 5040
- 40320
- 362880
- 3628800
- 5 function calls in 0.015 seconds
- Ordered by: standard name
- ncalls tottime percall cumtime percall filename:lineno(function)
- 1 0.000 0.000 0.000 0.000 :0(range)
- 1 0.015 0.015 0.015 0.015 :0(setprofile)
- 1 0.000 0.000 0.000 0.000 <string>:1(<module>)
- 1 0.000 0.000 0.000 0.000 performance.py:2(profileTest)
- 1 0.000 0.000 0.015 0.015 profile:0(profileTest())
- 0 0.000 0.000 profile:0(profiler)
其中输出每列的具体解释如下:
●ncalls:表示函数调用的次数;
●tottime:表示指定函数的总的运行时间,除掉函数中调用子函数的运行时间;
●percall:(第一个 percall)等于 tottime/ncalls;
●cumtime:表示该函数及其所有子函数的调用运行的时间,即函数开始调用到返回的时间;
●percall:(第二个 percall)即函数运行一次的平均时间,等于 cumtime/ncalls;
●filename:lineno(function):每个函数调用的具体信息;
如果需要将输出以日志的形式保存,只需要在调用的时候加入另外一个参数。如 profile.run(“profileTest()”,”testprof”)。
对于 profile 的剖析数据,如果以二进制文件的时候保存结果的时候,可以通过 pstats 模块进行文本报表分析,它支持多种形式的报表输出,是文本界面下一个较为实用的工具。使用非常简单:
- import pstats
- p = pstats.Stats('testprof')
- p.sort_stats("name").print_stats()
其中 sort_stats() 方法能够对剖分数据进行排序, 可以接受多个排序字段,如 sort_stats(‘name’, ‘file’) 将首先按照函数名称进行排序,然后再按照文件名进行排序。常见的排序字段有 calls( 被调用的次数 ),time(函数内部运行时间),cumulative(运行的总时间)等。此外 pstats 也提供了命令行交互工具,执行 python – m pstats 后可以通过 help 了解更多使用方式。
对于大型应用程序,如果能够将性能分析的结果以图形的方式呈现,将会非常实用和直观,常见的可视化工具有 Gprof2Dot,visualpytune,KCacheGrind 等。
12、性能分析的基本思路
尽管并非每个你写的Python程序都需要严格的性能分析,但了解一下Python的生态系统中很多优秀的在你需要做性能分析的时候可以使用的工具仍然是一件值得去做的事。
分析一个程序的性能,最终都归结为回答4个基本的问题:
- 程序运行速度有多快?
- 运行速度瓶颈在哪儿?
- 程序使用了多少内存?
- 内存泄露发生在哪里?
使用time工具粗糙定时
首先,我们可以使用快速然而粗糙的工具:古老的unix工具time,来为我们的代码检测运行时间。
- $ time python yourprogram.py
- real 0m1.028s
- user 0m0.001s
- sys 0m0.003s
- real - 表示实际的程序运行时间
- user - 表示程序在用户态的cpu总时间
- sys - 表示在内核态的cpu总时间
通过sys和user时间的求和,你可以直观的得到系统上没有其他程序运行时你的程序运行所需要的CPU周期。
若sys和user时间之和远远少于real时间,那么你可以猜测你的程序的主要性能问题很可能与IO等待相关。
使用计时上下文管理器进行细粒度计时
我们的下一个技术涉及访问细粒度计时信息的直接代码指令。这是一小段代码,我发现使用专门的计时测量是非常重要的:
timer.py
- import time
- class Timer(object):
- def __init__(self, verbose=False):
- self.verbose = verbose
- def __enter__(self):
- self.start = time.time()
- return self
- def __exit__(self, *args):
- self.end = time.time()
- self.secs = self.end - self.start
- self.msecs = self.secs * 1000 # millisecs
- if self.verbose:
- print 'elapsed time: %f ms' % self.msecs
为了使用它,你需要用Python的with关键字和Timer上下文管理器包装想要计时的代码块。它将会在你的代码块开始执行的时候启动计时器,在你的代码块结束的时候停止计时器。
这是一个使用上述代码片段的例子:
- from timer import Timer
- from redis import Redis
- rdb = Redis()
- with Timer() as t:
- rdb.lpush("foo", "bar")
- print "=> elasped lpush: %s s" % t.secs
- with Timer() as t:
- rdb.lpop("foo")
- print "=> elasped lpop: %s s" % t.secs
我经常将这些计时器的输出记录到文件中,这样就可以观察我的程序的性能如何随着时间进化。
使用分析器逐行统计时间和执行频率
Robert Kern有一个称作line_profiler的不错的项目,我经常使用它查看我的脚步中每行代码多快多频繁的被执行。
想要使用它,你需要通过pip安装该python包:
- $ pip install line_profiler
一旦安装完成,你将会使用一个称做“line_profiler”的新模组和一个“kernprof.py”可执行脚本。
想要使用该工具,首先修改你的源代码,在想要测量的函数上装饰@profile装饰器。不要担心,你不需要导入任何模组。kernprof.py脚本将会在执行的时候将它自动地注入到你的脚步的运行时。
primes.py
- @profile
- def primes(n):
- if n==2:
- return [2]
- elif n<2:
- return []
- s=range(3,n+1,2)
- mroot = n ** 0.5
- half=(n+1)/2-1
- i=0
- m=3
- while m <= mroot:
- if s[i]:
- j=(m*m-3)/2
- s[j]=0
- while j<half:
- s[j]=0
- j+=m
- i=i+1
- m=2*i+3
- return [2]+[x for x in s if x]
- primes(100)
- kernprof.py -l -v fib.py
- Wrote profile results to primes.py.lprof
- Timer unit: 1e-06 s
- File: primes.py
- Function: primes at line 2
- Total time: 0.00019 s
- Line # Hits Time Per Hit % Time Line Contents
- ==============================================================
- 2 @profile
- 3 def primes(n):
- 4 1 2 2.0 1.1 if n==2:
- 5 return [2]
- 6 1 1 1.0 0.5 elif n<2:
- 7 return []
- 8 1 4 4.0 2.1 s=range(3,n+1,2)
- 9 1 10 10.0 5.3 mroot = n ** 0.5
- 10 1 2 2.0 1.1 half=(n+1)/2-1
- 11 1 1 1.0 0.5 i=0
- 12 1 1 1.0 0.5 m=3
- 13 5 7 1.4 3.7 while m <= mroot:
- 14 4 4 1.0 2.1 if s[i]:
- 15 3 4 1.3 2.1 j=(m*m-3)/2
- 16 3 4 1.3 2.1 s[j]=0
- 17 31 31 1.0 16.3 while j<half:
- 18 28 28 1.0 14.7 s[j]=0
- 19 28 29 1.0 15.3 j+=m
- 20 4 4 1.0 2.1 i=i+1
- 21 4 4 1.0 2.1 m=2*i+3
- 22 50 54 1.1 28.4 return [2]+[x for x in s if x]
程序使用了多少内存?
现在我们对计时有了较好的理解,那么让我们继续弄清楚程序使用了多少内存。我们很幸运,Fabian Pedregosa模仿Robert Kern的line_profiler实现了一个不错的内存分析器。
首先使用pip安装:
- $ pip install -U memory_profiler
- $ pip install psutil
(这里建议安装psutil包,因为它可以大大改善memory_profiler的性能)。
就像line_profiler,memory_profiler也需要在感兴趣的函数上面装饰@profile装饰器:
- @profile
- def primes(n):
- ...
- ...
- $ python -m memory_profiler primes.py
- Filename: primes.py
- Line # Mem usage Increment Line Contents
- ==============================================
- 2 @profile
- 3 7.9219 MB 0.0000 MB def primes(n):
- 4 7.9219 MB 0.0000 MB if n==2:
- 5 return [2]
- 6 7.9219 MB 0.0000 MB elif n<2:
- 7 return []
- 8 7.9219 MB 0.0000 MB s=range(3,n+1,2)
- 9 7.9258 MB 0.0039 MB mroot = n ** 0.5
- 10 7.9258 MB 0.0000 MB half=(n+1)/2-1
- 11 7.9258 MB 0.0000 MB i=0
- 12 7.9258 MB 0.0000 MB m=3
- 13 7.9297 MB 0.0039 MB while m <= mroot:
- 14 7.9297 MB 0.0000 MB if s[i]:
- 15 7.9297 MB 0.0000 MB j=(m*m-3)/2
- 16 7.9258 MB -0.0039 MB s[j]=0
- 17 7.9297 MB 0.0039 MB while j<half:
- 18 7.9297 MB 0.0000 MB s[j]=0
- 19 7.9297 MB 0.0000 MB j+=m
- 20 7.9297 MB 0.0000 MB i=i+1
- 21 7.9297 MB 0.0000 MB m=2*i+3
- 22 7.9297 MB 0.0000 MB return [2]+[x for x in s if x]
line_profiler和memory_profiler的IPython快捷方式
memory_profiler和line_profiler有一个鲜为人知的小窍门,两者都有在IPython中的快捷命令。你需要做的就是在IPython会话中输入以下内容:
- %load_ext memory_profiler
- %load_ext line_profiler
- In [1]: from primes import primes
- In [2]: %mprun -f primes primes(1000)
- In [3]: %lprun -f primes primes(1000)
内存泄漏在哪里?
cPython解释器使用引用计数做为记录内存使用的主要方法。这意味着每个对象包含一个计数器,当某处对该对象的引用被存储时计数器增加,当引用被删除时计数器递减。当计数器到达零时,cPython解释器就知道该对象不再被使用,所以删除对象,释放占用的内存。
如果程序中不再被使用的对象的引用一直被占有,那么就经常发生内存泄漏。
查找这种“内存泄漏”最快的方式是使用Marius Gedminas编写的objgraph,这是一个极好的工具。该工具允许你查看内存中对象的数量,定位含有该对象的引用的所有代码的位置。
一开始,首先安装objgraph:
pip install objgraph
- import pdb; pdb.set_trace()
最普遍的对象是哪些?
在运行的时候,你可以通过执行下述指令查看程序中前20个最普遍的对象:
- (pdb) import objgraph
- (pdb) objgraph.show_most_common_types()
- MyBigFatObject 20000
- tuple 16938
- function 4310
- dict 2790
- wrapper_descriptor 1181
- builtin_function_or_method 934
- weakref 764
- list 634
- method_descriptor 507
- getset_descriptor 451
- type 439
哪些对象已经被添加或删除?
我们也可以查看两个时间点之间那些对象已经被添加或删除:
- (pdb) import objgraph
- (pdb) objgraph.show_growth()
- .
- .
- .
- (pdb) objgraph.show_growth() # this only shows objects that has been added or deleted since last show_growth() call
- traceback 4 +2
- KeyboardInterrupt 1 +1
- frame 24 +1
- list 667 +1
- tuple 16969 +1
谁引用着泄漏的对象?
继续,你还可以查看哪里包含给定对象的引用。让我们以下述简单的程序做为一个例子:
- x = [1]
- y = [x, [x], {"a":x}]
- import pdb; pdb.set_trace()
- (pdb) import objgraph
- (pdb) objgraph.show_backref([x], filename="/tmp/backrefs.png")
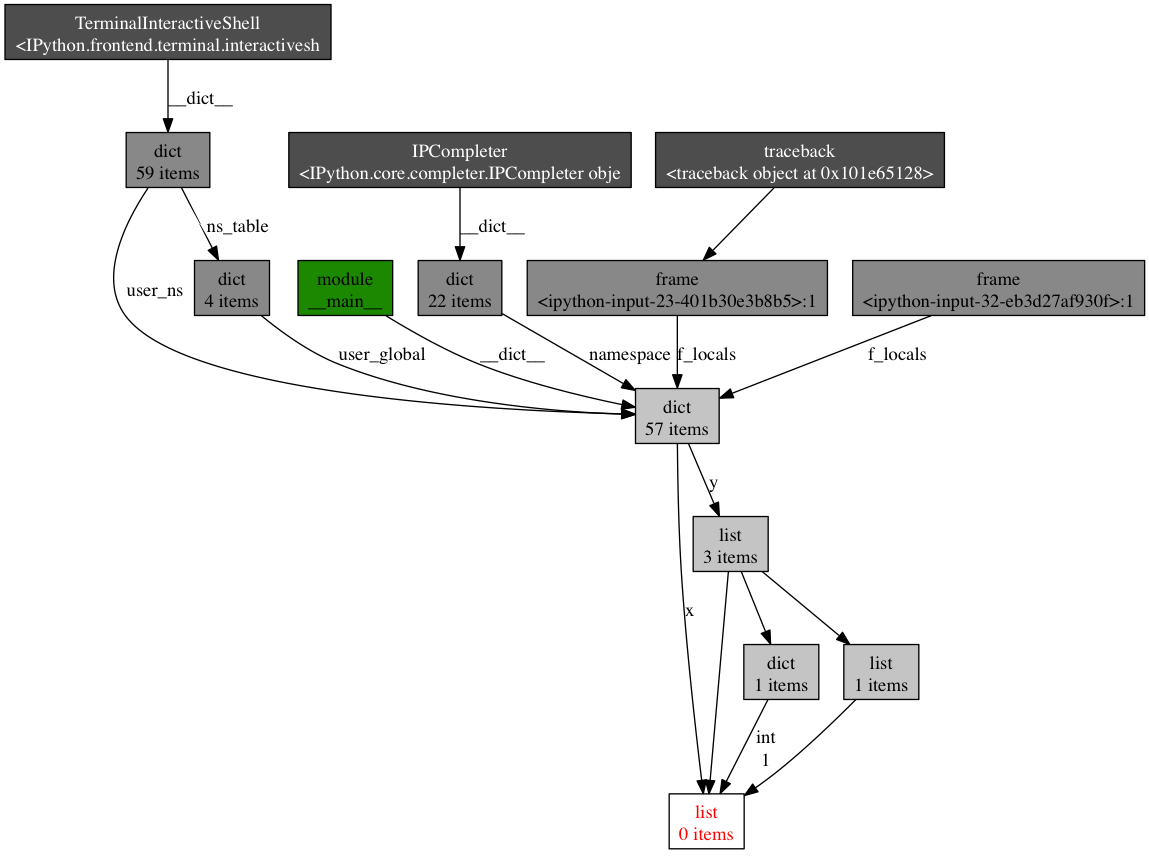
最下面有红字的盒子是我们感兴趣的对象。我们可以看到,它被符号x引用了一次,被列表y引用了三次。如果是x引起了一个内存泄漏,我们可以使用这个方法,通过跟踪它的所有引用,来检查为什么它没有自动的被释放。
回顾一下,objgraph 使我们可以:
- 显示占据python程序内存的头N个对象
- 显示一段时间以后哪些对象被删除活增加了
- 在我们的脚本中显示某个给定对象的所有引用
努力与精度
在本帖中,我给你显示了怎样用几个工具来分析python程序的性能。通过这些工具与技术的武装,你可以获得所有需要的信息,来跟踪一个python程序中大多数的内存泄漏,以及识别出其速度瓶颈。
对许多其他观点来说,运行一次性能分析就意味着在努力目标与事实精度之间做出平衡。如果感到困惑,那么就实现能适应你目前需求的最简单的解决方案。
参考文章:
http://maxburstein.com/blog/speeding-up-your-python-code/
https://www.ibm.com/developerworks/cn/linux/l-cn-python-optim/


 1593
1593

 被折叠的 条评论
为什么被折叠?
被折叠的 条评论
为什么被折叠?
 到【灌水乐园】发言


