


Angular 环境搭建
无论使用什么前端框架,都必然使用到NodeJS工具,Angular也不例外,Angular采用的是“全家桶”式的设计思路,因此@angular/cli脚手架工具集成了日常开发需要使用到的所有NodeJS模块,使用@angular/cli可以大幅降低搭建开发环境的难度。
安装@angular/cli脚手架工具
在安装@angular/cli之前,首先要安装相关的依赖环境。
- 安装NodeJS
- 下载地址:http://nodejs.org/en/download/
- 检查是否安装成功:cmd窗口下 (node -v 查看版本)
- 安装npm (node package management)node包管理工具
- 一般会跟着NodeJS一起安装 cmd窗口下 (npm -v 查看版本)
- 安装Python(Angular 也依赖Python)
python --version
- 安装 c++ 编译工具
npm install --global --production windows-build-tools
- 安装cnpm (npm的淘宝镜像,非必要)
npm i -g cnpm --registry=http://registry.npm.taobao.org
- 以上安装好的@angular/cli的依赖环境,开始安装@angular/cli
cnpm i -g @angular/cli
安装好后, ng --version 看版本
创建一个angular项目
ng new angular-demo(在当前目录下创建angular项目)
创建玩目录结构后,ctrl + c 打断安装,使用淘宝镜像安装各种依赖包
cd angular-demo(一定要切换到这个项目中)
cnpm install (安装依赖的包)
启动angular项目
cd angular-demo (进入到项目根目录中)
ng serve 或者 npm start 开启服务
输入网址访问页面
项目目录结构
├── e2e 端到端测试(暂且不关心)

├── node_modules npm安装的第三方包

├── src 存放业务源码

├── .angular-cli.json AngularCLI脚手架工具配置文件

├── .editorconfig 针对编辑器的代码风格约束

├── .gitignore Git仓库忽略配置项

├── karma.conf.js 测试配置文件(给karma用的,暂且不用关心)

├── package.json 项目包说明文件

├── protractor.conf.js 端到端测试配置文件(暂且不用关心)

├── README.md 项目说明文件

├── tsconfig.json TypeScript配置文件

└── tslint.json TypeScript代码风格校验工具配置文件(类似于 eslint)package.json配置文件中,npm scripts 介绍
"scripts": {
    "ng": "ng", 运行查看 Angular CLI 脚手架工具使用帮助
    "start": "ng serve", 运行开发模式
    "build": "ng build --prod", 运行项目打包构建(用于发布到生成环境)
    "test": "ng test", 运行karma单元测试
    "lint": "ng lint", 运行TypeScript代码校验
    "e2e": "ng e2e" 运行protractor端到端测试
  },
angular.json 文件是@angular/cli脚手架的配置文件
{
"$schema": "./node_modules/@angular/cli/lib/config/schema.json",
"project": {
"name": "my-app"
},
"apps": [
{
"root": "src", 源码根目录
"outDir": "dist", 打包编译结果目录
"assets": [ 存放静态资源目录
"assets",
"favicon.ico"
],
"index": "index.html", 单页面
"main": "main.ts", 模块启动入口
"polyfills": "polyfills.ts", 用以兼容低版本浏览器不支持的 JavaScript 语法特性
"test": "test.ts", 测试脚本
"tsconfig": "tsconfig.app.json",
"testTsconfig": "tsconfig.spec.json",
"prefix": "app", 使用脚手架工具创建组件的自动命名前缀
"styles": [ 全局样式文件
"styles.css"
],
"scripts": [], 全局脚本文件
"environmentSource": "environments/environment.ts",
"environments": {
"dev": "environments/environment.ts",
"prod": "environments/environment.prod.ts"
}
}
],
"e2e": { 端到端测试相关配置
"protractor": {
"config": "./protractor.conf.js"
}
},
"lint": [ TypeScript代码风格校验相关配置
{
"project": "src/tsconfig.app.json",
"exclude": "**/node_modules/**"
},
{
"project": "src/tsconfig.spec.json",
"exclude": "**/node_modules/**"
},
{
"project": "e2e/tsconfig.e2e.json",
"exclude": "**/node_modules/**"
}
],
"test": { karma单元测试相关配置
"karma": {
"config": "./karma.conf.js"
}
},
"defaults": { 默认后缀名
"styleExt": "css",
"component": {}
}
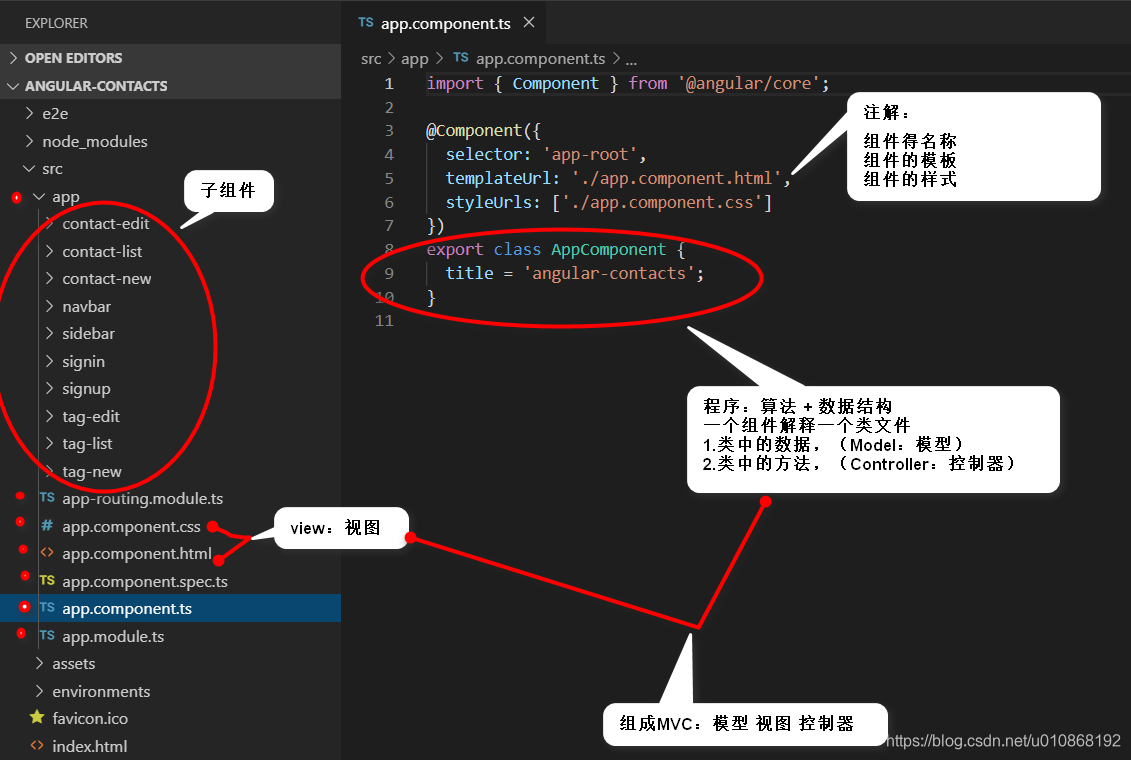
}angular中的组件
在angular中手动创建一个组件(就是一个类)
cd angular-demo 进入到目录文件
ng generate conponent foo ; 生成了一个子组件。
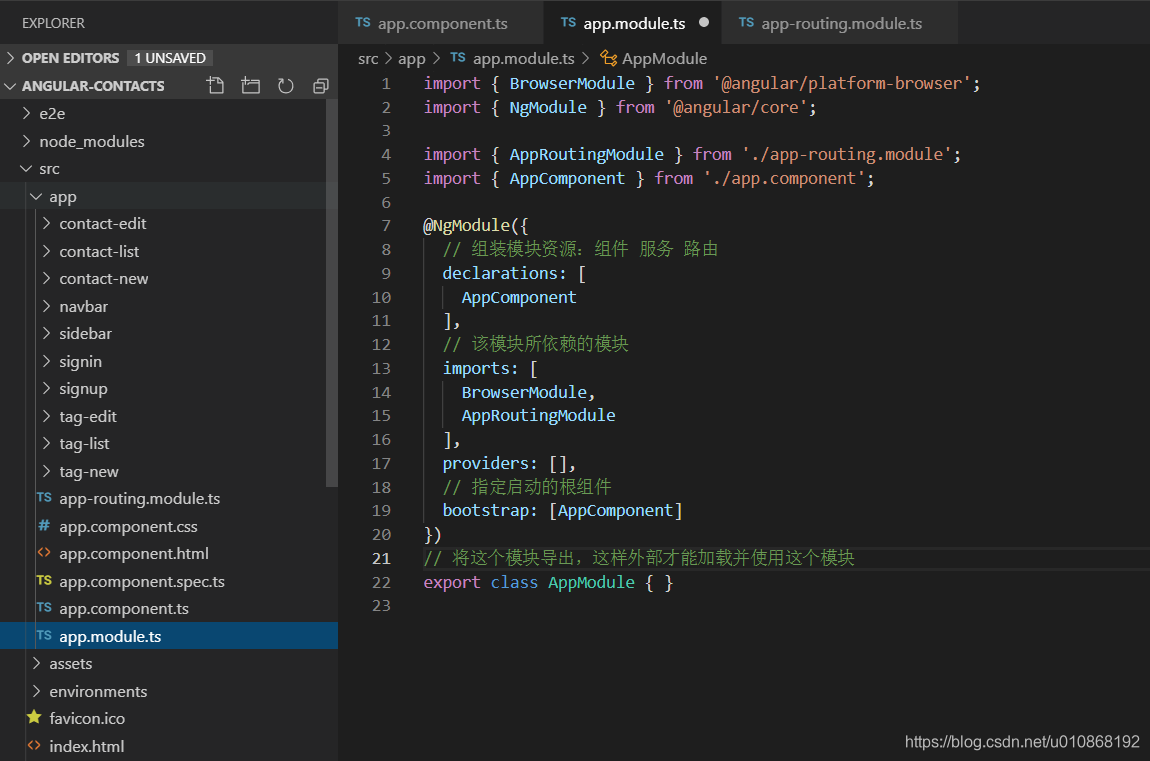
angular中的模块
NgModule (模块) 是组织业务代码的利器,按照自己的业务场景,把(组件、服务、路由、打包到模块里面)形成一个积木块,然后再利用积木搭建高楼大厦。
angular中的服务
针对某个单一或系统功能的封装,例如在angular核心包里面,Http服务。
angular中的路由
用于angular项目中单页面的跳转
1.用脚手架工具生成路由模块
cd 到工程所在目录
ng generate module app-rooting.module.ts
2.配置路由表,请求xxx路径时,导航到xxx组件。
const routes: Routes = [
{
    path: '',
    redirectTo: '/contacts', // 当请求根路径的时候,跳转到 contacts 联系人组件
    pathMatch: 'full' // 必须完全匹配到路径的时候才做重定向
},
{
// 当我们访问 contacts 的时候,会先把 LayoutComponent 组件渲染出来
// 然后把 children 中 path 为空的路由渲染到 LayoutComponent 组件中的路由出口
    path: 'contacts',
    component: LayoutComponent, // 布局组件的加载
    canActivate: [AuthGuard], // 在导航 contacts 之前会先进入路由守卫
    children: [
    	{
    		path: '',
    		component: ContactListComponent
    	},
    	{
    		path: 'new', // 这里的 new 的请求路径是  /contacts/new
    		component: ContactNewComponent
    	},
    	{
    		path: 'edit/:id', // 动态路径
    		component: ContactEditComponent
    	}
    ]
}
3.配置路由导航出口,根组件中,app.compoent.html
<router-outlet></router-outlet>


 1万+
1万+


 被折叠的 条评论
为什么被折叠?
被折叠的 条评论
为什么被折叠?
 到【灌水乐园】发言


