


前言:搭建个人博客也是心血来潮,很久之前就看到别人的博客很清新、简约、大气、时尚又装逼,嘿嘿。。。就想着自己折腾一个,奈何当时技术能力有限,连github都玩不转,当然以失败告终,最近又头脑发热,遂百度了n多资料,又开始了填(bei)坑(nue)之旅,而且能找到的资料大多仅仅就是搭建起来,作为一个强迫症患者,肯定不能忍受没有优化过的样子,所以本着搭建一个完整的博客并记录优化过程,如果你喜欢我博客的样子,参考此教程一定能够搭建起来差不多的样子。
我的博客:https://pythontaotao.github.io/
什么是hexo?
Hexo 是一个快速、简洁且高效的博客框架。Hexo 使用 Markdown(或其他渲染引擎)解析文章,在几秒内,即可利用靓丽的主题生成静态网页。
安装git
安装Node.js
下载地址:win 10下载v 14.4.0 win 7下载v 12.18.0
安装时,请勾选Add to PATH选项,其他步骤不明白可以百度安装教程

查询版本如上,说明安装OK
安装Hexo
npm install -g hexo-cli
npm是NodeJS包管理工具,类似于python的pip
在本地搭建个人站点
4.1、新建一个文件夹,位置和名称都没有限制,我们这里新建D:/hexo
4.2、使用git的命令行工具,初始化文件夹(选中hexo文件夹,右键Git Bash Here)
$ hexo init hexo
输出信息如下
INFO  Cloning hexo-starter https://github.com/hexojs/hexo-starter.git
Cloning into 'D:\hexo-new'...
remote: Enumerating objects: 165, done.
remote: Total 165 (delta 0), reused 0 (delta 0), pack-reused 165
Receiving objects: 100% (165/165), 31.30 KiB | 124.00 KiB/s, done.
Resolving deltas: 100% (79/79), done.
Submodule 'themes/landscape' (https://github.com/hexojs/hexo-theme-landscape.git) registered for path 'themes/landscape'
Cloning into 'D:/hexo-new/themes/landscape'...
remote: Enumerating objects: 4, done.
remote: Counting objects: 100% (4/4), done.
remote: Compressing objects: 100% (4/4), done.
remote: Total 1067 (delta 0), reused 0 (delta 0), pack-reused 1063
Receiving objects: 100% (1067/1067), 3.22 MiB | 27.00 KiB/s, done.
Resolving deltas: 100% (585/585), done.
Submodule path 'themes/landscape': checked out '73a23c51f8487cfcd7c6deec96ccc7543960d350'
INFO  Install dependencies
npm WARN deprecated urix@0.1.0: Please see https://github.com/lydell/urix#deprecated
npm WARN deprecated resolve-url@0.2.1: https://github.com/lydell/resolve-url#deprecated

> ejs@2.7.4 postinstall D:\hexo-new\node_modules\ejs
> node ./postinstall.js

Thank you for installing EJS: built with the Jake JavaScript build tool (https://jakejs.com/)

npm notice created a lockfile as package-lock.json. You should commit this file.
npm WARN optional SKIPPING OPTIONAL DEPENDENCY: fsevents@~2.1.2 (node_modules\chokidar\node_modules\fsevents):
npm WARN notsup SKIPPING OPTIONAL DEPENDENCY: Unsupported platform for fsevents@2.1.3: wanted {"os":"darwin","arch":"any"} (current: {"os":"win32","arch":"x64"})

added 253 packages from 450 contributors in 30.278s

5 packages are looking for funding
  run `npm fund` for details

INFO  Start blogging with Hexo!
.
├── .deploy #需要部署的文件
├── node_modules #Hexo插件
├── public #生成的静态网页文件
├── scaffolds #模板
├── source #博客正文和其他源文件, 404 favicon CNAME 等都应该放在这里
| ├── _drafts #草稿
| └── _posts #文章
├── themes #主题
├── _config.yml #全局配置文件
└── package.json
初始化完成后会看到有以上文件内容,就是我们博客的初始化文件
cd hexo
npm install

npm install=npm i。在git clone项目的时候,项目文件中并没有 node_modules文件夹,项目的依赖文件可能很大。直接执行,npm会根据package.json配置文件中的依赖配置下载安装
在 Hexo 中有两份主要的配置文件,其名称都是 _config.yml。 其中,一份位于站点根目录下,主要包含 Hexo 本身的配置;另一份位于主题目录下,这份配置由主题作者提供,主要用于配置主题相关的选项。
为了描述方便,在以下说明中,将前者称为 站点配置文件, 后者称为 主题配置文件。
4.3、在本地进行测试
$ hexo g
$ hexo s
Hexo is running at http://localhost:4000 . Press Ctrl+C to stop
在浏览器输入http://localhost:4000,可以看到hexo博客最原始的样子

4.4、hexo相关指令讲解(熟悉的小伙伴可以跳过这里)
a、init
$ hexo init [folder]
新建一个网站。如果没有设置 folder ,Hexo 默认在目前的文件夹建立网站。
b、new
$ hexo new [layout] <title>

$ hexo new "post title with whitespace"
新建一篇文章。如果没有设置 layout 的话,默认使用 _config.yml 中的 default_layout 参数代替。如果标题包含空格的话,请使用引号括起来。
c、 generate
$ hexo generate 生成静态文件。简写 $ hexo g
| 选项 | 描述 |
|---|---|
-d, --deploy | 文件生成后立即部署网站,简写 hexo d |
d、server
$ hexo server       启动服务器。默认情况下,访问网址为: http://localhost:4000/
                    简写 $ hexo  s
e、version
$ hexo version 显示Hexo 版本
修改配置文件,关联github上
5.1、先创建github的仓库,仓库名称前缀要和你的github名一样,忽略我这里的大小写问题,
[外链图片转存失败,源站可能有防盗链机制,建议将图片保存下来直接上传(img-Fv64QYvv-1593412817495)(https://i.loli.net/2020/06/29/q5CLzAfMDK6WFsa.png)]
新建成功后,复制仓库的ssh地址,后续修改配置文件需要使用

5.2、安装和切换主题,重点来了哦!!!
首先我们要找到自己喜欢的主题,在github上面搜索hexo-them,比较受欢迎的是Next和yilia这两个主题,以Next主题为例,如果你喜欢其他主题,也可以设置相对应的主题
$ cd hexo
$ git clone https://github.com/theme-next/hexo-theme-next themes/next
安装完成后可以看到themes文件夹下面多了一个ngxt的文件夹,这个就是我们下载的next主题
5.3、修改主题配置文件,需要懂一些yaml的语法知识,不懂得自行百度下
hexo/_config.yml     #这个文件是整个博客站点的配置文件

# Extensions
## Plugins: https://hexo.io/plugins/
## Themes: https://hexo.io/themes/
theme: next                            #使用next主题,这个相当于一个主题切换控制开关

# Deployment
## Docs: https://hexo.io/docs/deployment.html
deploy:                                #将我们本地的代码部署到刚刚创建的仓库中
  type: 'git'
  repository: "git@github.com:pythonTaotao/pythonTaotao.github.io.git"
  branch: master
修改后在本地先测试一下
hexo g
hexo s

激动人心的时刻到了,上面就是我们最原始的next主题的样子,这个博客在本地测试已经没有问题了,现在要把它部署到github上面
5.4、发布博客
npm install hexo-deployer-git --save
hexo g
hexo d
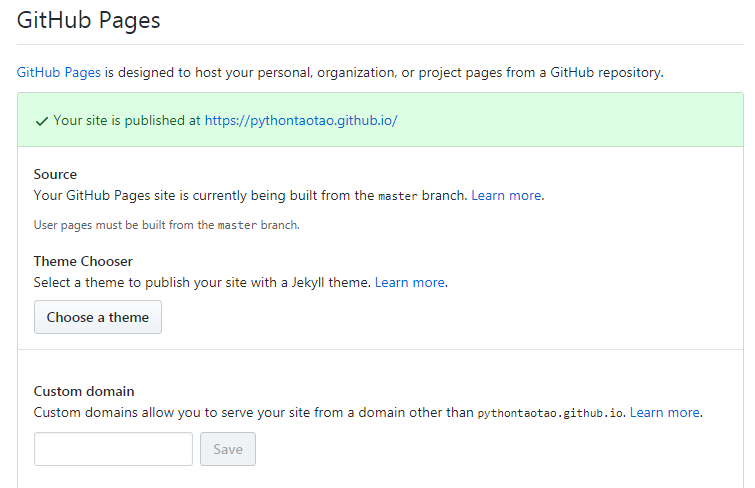
部署完成后,在github的setting中 可以看到自己的博客地址
最后
至于最后发布文章和自定义各种不同的主题,可自己去探索,至此所有的步骤都已经讲完,希望对你有所帮助。如遇到bug可留言。感谢阅读。下一节讲解如何美化我们搭建的hexo博客


 1477
1477

 被折叠的 条评论
为什么被折叠?
被折叠的 条评论
为什么被折叠?
 到【灌水乐园】发言


