环境:centos7+hadoop2.5.2+hive1.2.1+mysql5.6.22+indigo service 2
思路:hive加载日志→Hadoop分布式执行→需求数据进入MySQL
注意:hadoop日志分析系统网上资料很多,但是大多都有写小问题,无法顺利运行,但本文中都是经过亲自验证的,可以一气呵成。另外还包括可能遇到的异常的详细解释及相关解决方案。
1) 日志格式分析
首先分析 Hadoop 的日志格式, 此种日志格式是最简单的,一行一条, 日志格式可以依次描述为:日期、时间、类别、相关类和提示信息。如下所示:

2) hive存储表设计
rdate Time type rclass infor1 Infor2 Infor3
string array string string string string string
3) hive表定义
create table if not exists loginfo(
    rdate string,
    time array<string>,
    type string,
    relateclass string,
    information1 string,
    information2 string,
    information3 string)
row format delimited fields terminated by ' '
collection items terminated by ','
map keys terminated by  ':';
4) mysql表定义
drop table if exists  hadooplog;
create table hadooplog(
    id int(11) not null auto_increment,
    rdate varchar(50)  null,
    time varchar(50) default null,
    type varchar(50) default null,
    relateclass tinytext default null,
    information longtext default null,
    primary key (id)
) engine=innodb default charset=utf8;
5) mysql数据库操作
[root@master /]
[root@master bin]
Starting MySQL SUCCESS!
[root@master bin]
mysql> create database hive;
Query OK, 1 row affected (0.03 sec)
mysql> use hive
Database changed
mysql> source /usr/local/mysql/sql/hadooplog.sql
Query OK, 0 rows affected, 1 warning (0.05 sec)
Query OK, 0 rows affected (0.18 sec)
mysql> desc hadooplog;
6) DBHelper: 负责建立与 Hive 和 MySQL 的连接
package com.smq.hive;
import java.sql.Connection;
import java.sql.DriverManager;
import java.sql.SQLException;
public class DBHelper {
private static Connection connToHive = null;
private static Connection connToMySQL = null;
private DBHelper() {
}
public static Connection getHiveConn() throws SQLException {
if (connToHive == null) {
try {
Class.forName("org.apache.hive.jdbc.HiveDriver");
} catch (ClassNotFoundException err) {
err.printStackTrace();
System.exit(1);
}
connToHive = DriverManager.getConnection("jdbc:hive2://192.168.2.10:10000/default", "", "");
}
return connToHive;
}
public static Connection getMySQLConn() throws SQLException {
if (connToMySQL == null) {
try {
Class.forName("com.mysql.jdbc.Driver");
} catch (ClassNotFoundException err) {
err.printStackTrace();
System.exit(1);
}
connToMySQL = DriverManager.getConnection("jdbc:mysql://192.168.2.10:3306/hive",
"root", "xxxx");
}
return connToMySQL;
}
public static void closeHiveConn() throws SQLException {
if (connToHive != null) {
connToHive.close();
}
}
public static void closeMySQLConn() throws SQLException {
if (connToMySQL != null) {
connToMySQL.close();
}
}
public static void main(String[] args) throws SQLException {
System.out.println(getMySQLConn());
closeMySQLConn();
}
}
- 1
- 2
- 3
- 4
- 5
- 6
- 7
- 8
- 9
- 10
- 11
- 12
- 13
- 14
- 15
- 16
- 17
- 18
- 19
- 20
- 21
- 22
- 23
- 24
- 25
- 26
- 27
- 28
- 29
- 30
- 31
- 32
- 33
- 34
- 35
- 36
- 37
- 38
- 39
- 40
- 41
- 42
- 43
- 44
- 45
- 46
- 47
- 48
- 49
- 50
- 51
- 52
- 53
- 54
- 55
- 56
- 57
- 58
- 59
- 60
- 61
- 1
- 2
- 3
- 4
- 5
- 6
- 7
- 8
- 9
- 10
- 11
- 12
- 13
- 14
- 15
- 16
- 17
- 18
- 19
- 20
- 21
- 22
- 23
- 24
- 25
- 26
- 27
- 28
- 29
- 30
- 31
- 32
- 33
- 34
- 35
- 36
- 37
- 38
- 39
- 40
- 41
- 42
- 43
- 44
- 45
- 46
- 47
- 48
- 49
- 50
- 51
- 52
- 53
- 54
- 55
- 56
- 57
- 58
- 59
- 60
- 61
7) HiveUtil:工具类
package com.smq.hive
import java.sql.Connection
import java.sql.ResultSet
import java.sql.SQLException
import java.sql.Statement
public class HiveUtil {
// 创建表
public static void createTable(String sql) throws SQLException {
Connection conn = DBHelper.getHiveConn()
Statement stmt = conn.createStatement()
stmt.execute(sql)
}
// 依据条件查询数据
public static ResultSet queryData(String sql) throws SQLException {
Connection conn = DBHelper.getHiveConn()
Statement stmt = conn.createStatement()
ResultSet res = stmt.executeQuery(sql)
return res
}
// 加载数据
public static void loadData(String sql) throws SQLException {
Connection conn = DBHelper.getHiveConn()
Statement stmt = conn.createStatement()
stmt.execute(sql)
}
// 把数据存储到 MySQL 中
public static void hiveToMySQL(ResultSet res) throws SQLException {
Connection conn = DBHelper.getMySQLConn()
Statement stmt = conn.createStatement()
while (res.next()) {
String rdate = res.getString(1)
String time = res.getString(2)
String type = res.getString(3)
String relateclass = res.getString(4)
String information = res.getString(5) + res.getString(6) + res.getString(7)
StringBuffer sql = new StringBuffer()
sql.append("insert into hadooplog values(0,'")
sql.append(rdate + "','")
sql.append(time + "','")
sql.append(type + "','")
sql.append(relateclass + "','")
sql.append(information.replaceAll("\'", "\"") + "')")
System.out.println(sql)
stmt.executeUpdate(sql.toString())
}
}
}
- 1
- 2
- 3
- 4
- 5
- 6
- 7
- 8
- 9
- 10
- 11
- 12
- 13
- 14
- 15
- 16
- 17
- 18
- 19
- 20
- 21
- 22
- 23
- 24
- 25
- 26
- 27
- 28
- 29
- 30
- 31
- 32
- 33
- 34
- 35
- 36
- 37
- 38
- 39
- 40
- 41
- 42
- 43
- 44
- 45
- 46
- 47
- 48
- 49
- 50
- 51
- 52
- 53
- 1
- 2
- 3
- 4
- 5
- 6
- 7
- 8
- 9
- 10
- 11
- 12
- 13
- 14
- 15
- 16
- 17
- 18
- 19
- 20
- 21
- 22
- 23
- 24
- 25
- 26
- 27
- 28
- 29
- 30
- 31
- 32
- 33
- 34
- 35
- 36
- 37
- 38
- 39
- 40
- 41
- 42
- 43
- 44
- 45
- 46
- 47
- 48
- 49
- 50
- 51
- 52
- 53
8) AnalyszeHadoopLog:主类
package com.smq.hive
import java.sql.ResultSet
import java.sql.SQLException
public class AnalyszeHadoopLog {
public static void main(String[] args) throws SQLException {
StringBuffer sql = new StringBuffer()
// 第一步:在 Hive 中创建表
sql.append("create table if not exists loginfo( ")
sql.append("rdate string, ")
sql.append("time array<string>, ")
sql.append("type string, ")
sql.append("relateclass string, ")
sql.append("information1 string, ")
sql.append("information2 string, ")
sql.append("information3 string) ")
sql.append("row format delimited fields terminated by ' ' ")
sql.append("collection items terminated by ',' ")
sql.append("map keys terminated by ':'")
System.out.println(sql)
HiveUtil.createTable(sql.toString())
// 第二步:加载 Hadoop 日志文件
sql.delete(0, sql.length())
sql.append("load data local inpath ")
sql.append("'/usr/local/mysql/sql/hadoop-root-namenode-master.log'")
sql.append(" overwrite into table loginfo")
System.out.println(sql)
HiveUtil.loadData(sql.toString())
// 第三步:查询有用信息
sql.delete(0, sql.length())
sql.append("select rdate,time[0],type,relateclass,")
sql.append("information1,information2,information3 ")
sql.append("from loginfo where type='INFO'")
System.out.println(sql)
ResultSet res = HiveUtil.queryData(sql.toString())
// 第四步:查出的信息经过变换后保存到 MySQL 中
HiveUtil.hiveToMySQL(res)
// 第五步:关闭 Hive 连接
DBHelper.closeHiveConn()
// 第六步:关闭 MySQL 连接
DBHelper.closeMySQLConn()
}
}
- 1
- 2
- 3
- 4
- 5
- 6
- 7
- 8
- 9
- 10
- 11
- 12
- 13
- 14
- 15
- 16
- 17
- 18
- 19
- 20
- 21
- 22
- 23
- 24
- 25
- 26
- 27
- 28
- 29
- 30
- 31
- 32
- 33
- 34
- 35
- 36
- 37
- 38
- 39
- 40
- 41
- 42
- 43
- 44
- 45
- 46
- 47
- 48
- 49
- 50
- 1
- 2
- 3
- 4
- 5
- 6
- 7
- 8
- 9
- 10
- 11
- 12
- 13
- 14
- 15
- 16
- 17
- 18
- 19
- 20
- 21
- 22
- 23
- 24
- 25
- 26
- 27
- 28
- 29
- 30
- 31
- 32
- 33
- 34
- 35
- 36
- 37
- 38
- 39
- 40
- 41
- 42
- 43
- 44
- 45
- 46
- 47
- 48
- 49
- 50
9) eclipse操作步骤
a) 导入hive/lib下面的所有jar包
b) 导入mysql的jdbc驱动包
c) 启动hadoop、mysql服务
d) 启动hive远程服务:
]# hive –service hiveserver &
发生异常:
Exception in thread “main” Java.lang.ClassNotFoundException: org.apache.hadoop.hive.service.HiveServer
解决方案:
]# hive –service hiveserver2 &
e) 运行程序:run as → run on hadoop
发生异常1:
java.lang.ClassNotFoundException: org.apache.hadoop.hive.jdbc.HiveDriver
解决方案:
在hive1.2中,相关的目录结构有变化
“org.apache.hadoop.hive.jdbc.HiveDriver”;
改为
“org.apache.hive.jdbc.HiveDriver”;
如果采用hiveserver2的话,必须做如下改动:
“jdbc:hive://localhost:10002/default”, “”, “”;
改为
“jdbc:hive2://localhost:10002/default”, “”, “”
发生异常2:
Exception in thread “main” java.sql.SQLException: null, message from server: “Host ‘192.168.2.1’ is not allowed to connect to this MySQL server”
解决方案:
mysql> GRANT ALL PRIVILEGES ON . TO ‘myuser’@’%’ IDENTIFIED BY ‘mypassword’ WITH GRANT OPTION;
mysql> FLUSH PRIVILEGES;
f) 登录mysql查看:select * from table

10)异常统计
从中看出在学习hadoop期间,异常发生比例较低,学习过程比较顺利。

在下图中可以发现,datanode比namenode更容易发生异常

11)工作量统计

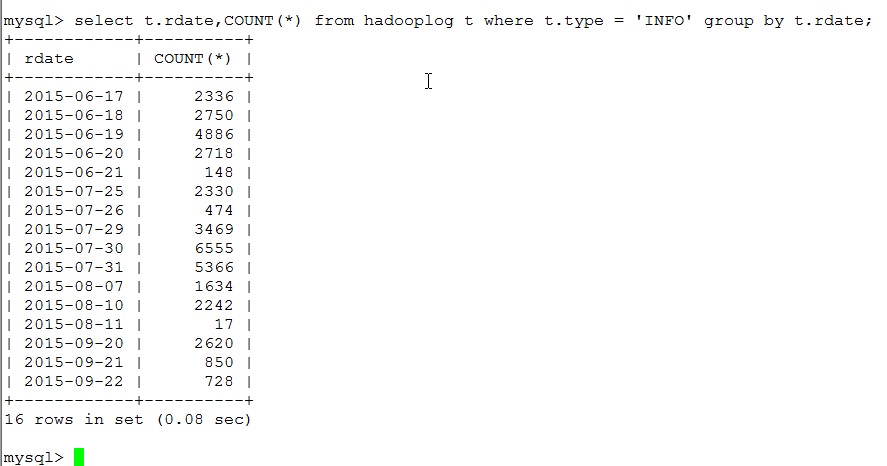
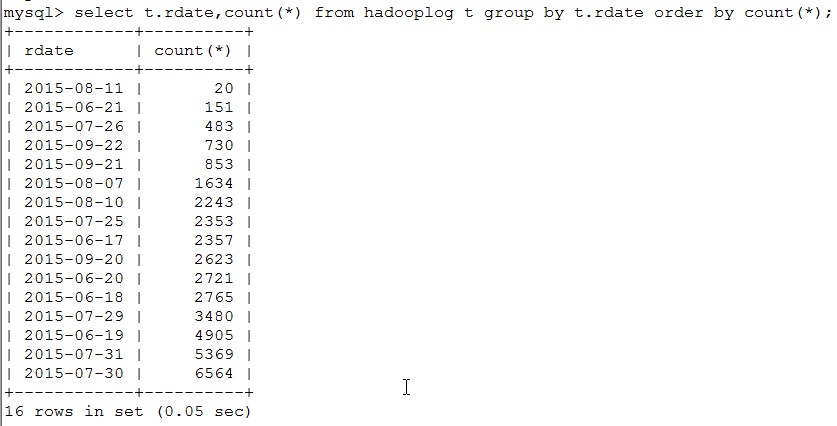
上下图都可以看出学习量最大的月份是6,7月

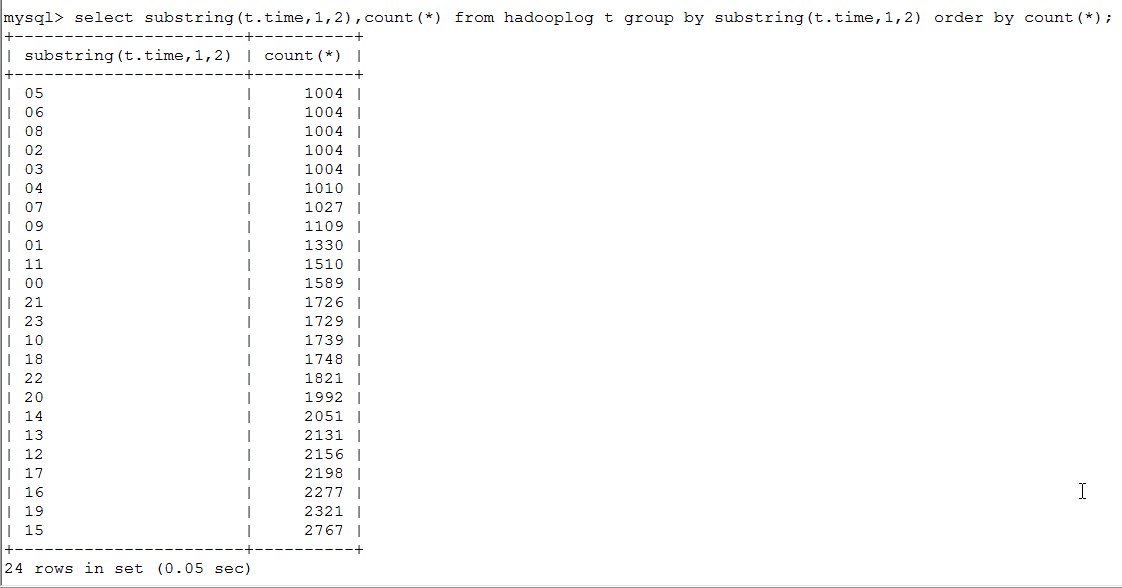
下图反应出,学习的时间主要在中午至凌晨,多出现于周末

转自:http://blog.csdn.net/thinkpadshi/article/details/48678473


 1万+
1万+

 被折叠的 条评论
为什么被折叠?


