


 本文介绍了如何配置Source Insight,包括设置字体、注释字体、添加多行注释功能以及添加代码格式化的详细步骤。通过调整这些设置,可以提升Source Insight的使用体验和工作效率。
设置字体
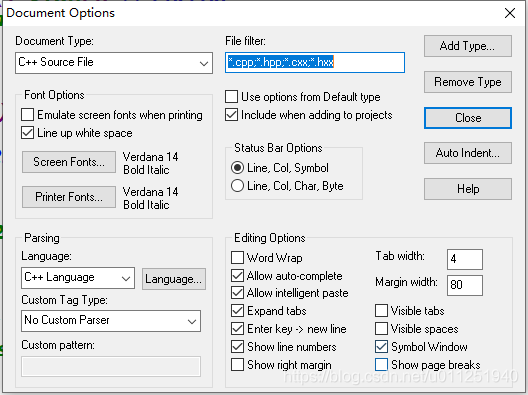
Options->Document Options->Screen Fonts和Printer Fonts
字体选择:Verdana 粗斜体 四号
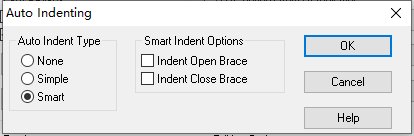
Auto Indent Type取消两个√
注释字体设置
选中注释字体右击选择Style Properties->Parent Style选择CDATA Section 或者选择 Comment Heading 3
行号:View 选择Line numbers
添加多行注释
复制下列代码到Base项目中的utils.em文件中保存,重新打开source insight将该文件添加到工程中,然后在options->KeyAssignments中你就可以看到这个宏了,宏的名字是MultiLineComments,然后我们为它分配快捷键“Ctrl+Shift+/”,然后保存就可以了
macro MultiLineComment()
{
    hwnd = GetCurrentWnd()
    selection = GetWndSel(hwnd)
    LnFirst =GetWndSelLnFirst(hwnd)      //取首行行号
    LnLast =GetWndSelLnLast(hwnd)      //取末行行号
    hbuf = GetCurrentBuf()
    if(GetBufLine(hbuf, 0) =="//magic-number:tph85666031"){
        stop
    }

    Ln = Lnfirst
    buf = GetBufLine(hbuf, Ln)
    len = strlen(buf)

    while(Ln <= Lnlast) {
        buf = GetBufLine(hbuf, Ln)  //取Ln对应的行
        if(buf ==""){                   //跳过空行
            Ln = Ln + 1
            continue
        }

        if(StrMid(buf, 0, 1) == "/"){       //需要取消注释,防止只有单字符的行
            if(StrMid(buf, 1, 2) == "/"){
                PutBufLine(hbuf, Ln, StrMid(buf, 2, Strlen(buf)))
            }
        }

        if(StrMid(buf,0,1) !="/"){          //需要添加注释
            PutBufLine(hbuf, Ln, Cat("//", buf))
        }
        Ln = Ln + 1
    }


    SetWndSel(hwnd, selection)
}
添加代码格式化
下载:https://sourceforge.net/projects/astyle/ 或是 https://download.csdn.net/download/u011251940/11125389
解压至source insight安装目录下 D:\Program Files (x86)\Source Insight 3\
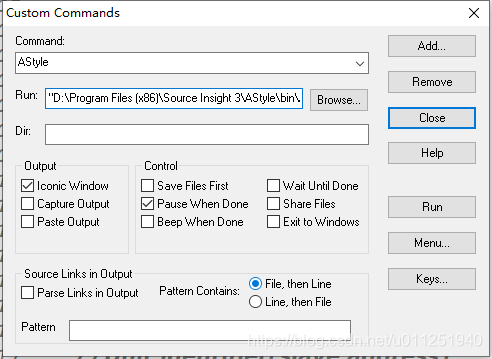
在SourceInsight菜单栏里,Options-->Custom Commands 界面上选择:Add 在弹出对话框写入命令名,在run中添加相应的命令。 (最终会出现在View下面)
1、在Run:中添加命令为:"D:\Program Files (x86)\Source Insight 3\AStyle\bin\Astyle.exe" --style=ansi -s4 -S -N -L -m0 -M40 --convert-tabs --suffix=.pre %f
2、Dir留空,将Iconic Window, File,then Line 两项前打上勾。(Capture Output会在界面中显示修改部分,Parse Links in OutPut会弹出黑窗口显示修改部分)
3、然后点对话框中右侧的按钮“Menu”, Menu--->Menu-->View--><end of menu>, 点击右侧Up至最高,然后Insert, OK.
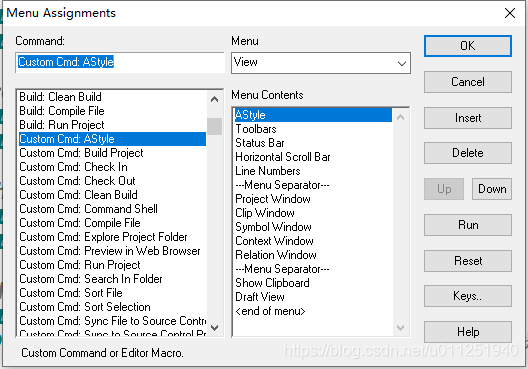
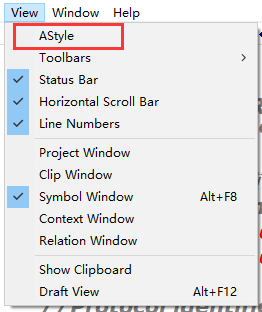
4、此时在SourceInsight中的View菜单下多了个Style的子菜单选项,可以用它来对单个C/C++文件进行格式化。(如下左图)
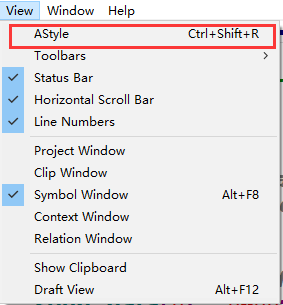
5、设置快捷键 Ctrl+Shift+r(如上右图)
- Option -> Key Assignments;
- 通过 Command 窗口查询出新增的 Astyle 指令;
- 点击 Assign New Key... 后,直接在键盘上按出Ctrl+Shift+r组合键即可;


 735
735

 被折叠的 条评论
为什么被折叠?
被折叠的 条评论
为什么被折叠?
 到【灌水乐园】发言


