


上一节我们了解到spring的一个核心之IOC控制反转(依赖注入),那么 我们接着聊一聊spring的另外一个核心aop(面向切面编程)
1、AOP概念及原理
1.1、什么是AOP
OOP:Object Oriented Programming面向对象编程AOP:Aspect Oriented Programming面向切面编程
我想直接说可能不懂。我们就从图片中读取信息吧。啥也不说,上图:
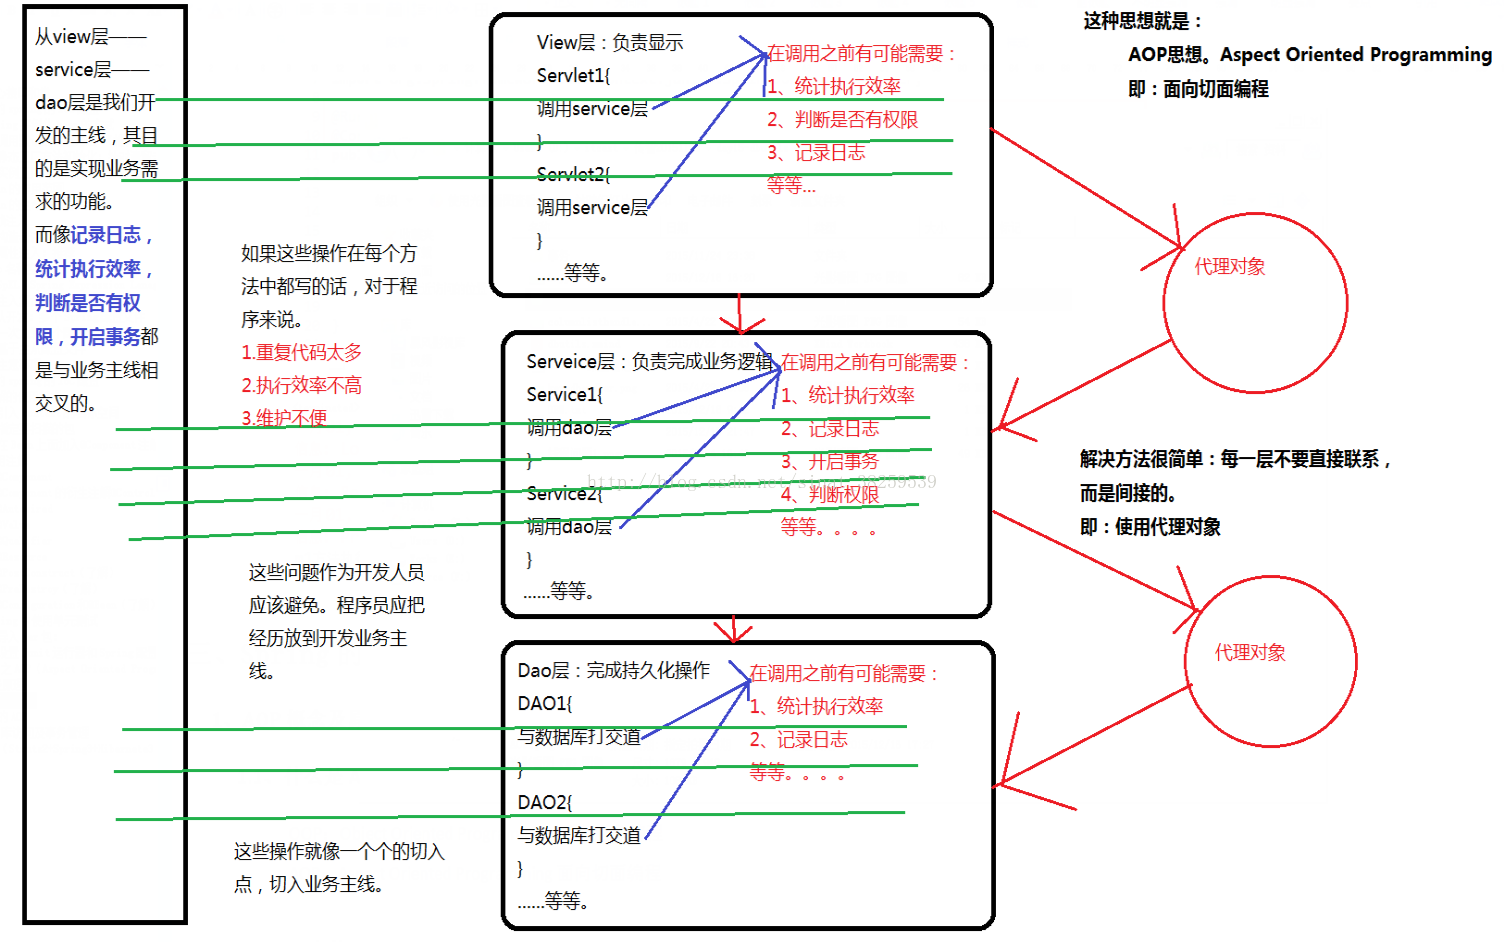
AOP:面向切面编程.AOP的出现不是替换OOP.解决OOP开发中一些问题.是OOP一个延伸一个扩展.
AOP采取横向抽取机制,取代了传统纵向继承体系重复性代码(性能监视、事务管理、安全检查、缓存)
AOP的底层原理 底层原理实质就是代理机制.
1.2、代理
充分理解:间接主要作用:拦截被代理对象执行的方法,同时对方法进行增强。
1.2.1、静态代理
特点:代理类是一个真实存在的类。装饰者模式就是静态代理的一种体现形式。1.2.2、动态代理
特点:字节码是随用随创建,随用随加载。是在运行期间生成的一个类。a、基于接口的动态代理
提供者:JDK官方的Proxy类。
要求:被代理类必须实现一个或多个接口。
b、基于子类的动态代理
提供者:第三方的CGLib,如果报asmxxxx异常,需要导入asm.jar。
要求:被代理类必须是一个子类(不能用final修饰的(最终类),其余类都没问题,因为都是Object的子类)。
注意:在spring中,框架会根据目标类是否实现了接口来决定采用哪种动态代理的方式。
Spring的AOP的底层采用两种代理机制:
- JDK的动态代理: 只能对实现了接口的类生成代理.
- CGLIB的动态代理: 可以对没有实现接口的类生成代理.(采用的是比较底层的字节码技术,对类生成一个子类对象.)
1.3、代理的总结:
Spring在运行期,生成动态代理对象,不需要特殊的编译器
Spring AOP的底层就是通过JDK动态代理或CGLib动态代理技术 为目标Bean执行横向织入
1.若目标对象实现了若干接口,spring使用JDK的java.lang.reflect.Proxy类代理。
2.若目标对象没有实现任何接口,spring使用CGLIB库生成目标对象的子类。
程序中应优先对接口创建代理,便于程序解耦维护
标记为final的方法,不能被代理,因为无法进行覆盖
JDK动态代理,是针对接口生成子类,接口中方法不能使用final修饰
CGLib 是针对目标类生产子类,因此类或方法 不能使final的
Spring只支持方法连接点,不提供属性连接
2、Spring中的AOP
2.1、基本概念(AOP的术语)
- Joinpoint(连接点):所谓连接点是指那些被拦截到的点。在spring中,这些点指的是方法,因为spring只支持方法类型的连接点.
- Pointcut(切入点):所谓切入点是指我们要对哪些Joinpoint进行拦截的定义.
- Advice(通知/增强):所谓通知是指拦截到Joinpoint之后所要做的事情就是通知.通知分为前置通知,后置通知,异常通知,最终通知,环绕通知(切面要完成的功能)
- Introduction(引介):引介是一种特殊的通知在不修改类代码的前提下, Introduction可以在运行期为类动态地添加一些方法或Field.
- Target(目标对象):代理的目标对象
- Weaving(织入):是指把增强应用到目标对象来创建新的代理对象的过程. spring采用动态代理织入,而AspectJ采用编译期织入和类装在期织入
- Proxy(代理):一个类被AOP织入增强后,就产生一个结果代理类
- Aspect(切面): 是切入点和通知(引介)的结合
2.2、具体配置
2.2.1、Spring中的AOP
a、开发阶段(我们做的)- 编写核心业务代码(开发主线):大部分程序员来做,要求熟悉业务需求。
- 把公用代码抽取出来,制作成通知。(开发阶段最后再做):AOP编程人员来做。
- 在配置文件中,声明切入点与通知间的关系,即切面。:AOP编程人员来做。
Spring框架监控切入点方法的执行。一旦监控到切入点方法被运行,使用代理机制,动态创建目标对象的代理对象,根据通知类别,在代理对象的对应位置,将通知对应的功能织入,完成完整的代码逻辑运行。
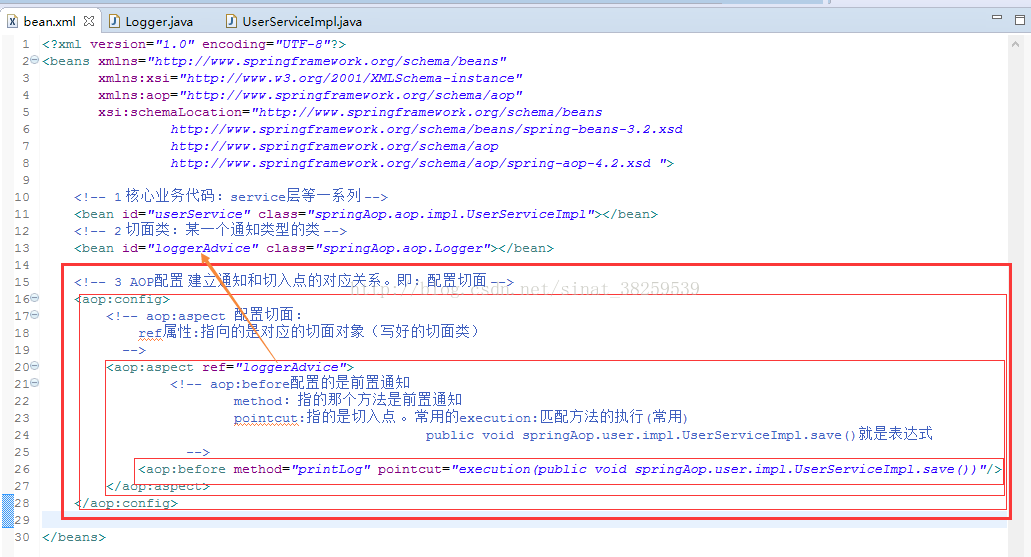
3 基于XML的配置(spring的xml开发)
3.1 AOP的基本配置
a、导入AOP相关的jar包(Spring的AOP是基于IoC的,所以IoC的jar也必须存在)AOP有关的jar包:4个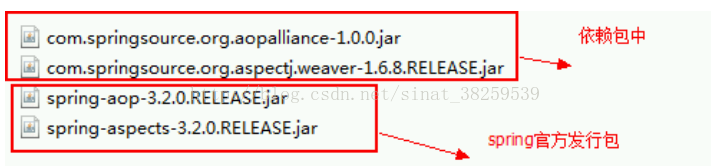
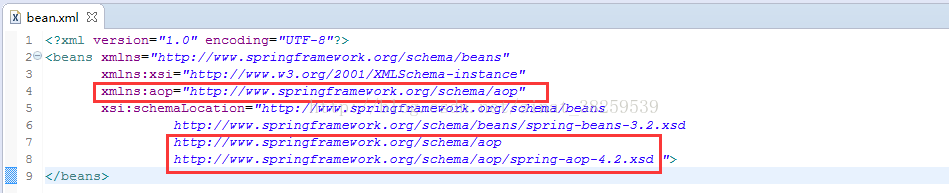
b、引入aop名称空间
c 编写核心业务代码必须交给spring容器

d 编写一个切面类:(某一个通知类型)也必须交给spring管理
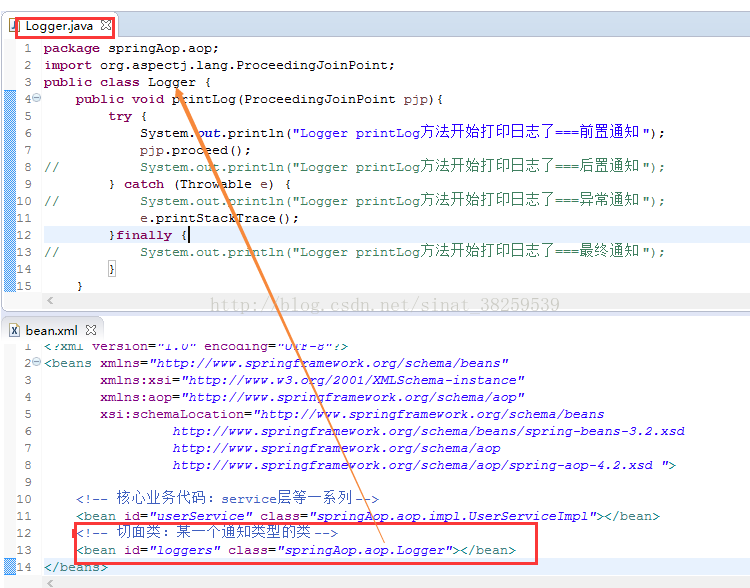
上图的logger类是后期做的。现在是用下面的,bean的配置一样不变
- package springAop.aop;
- public class Logger {
- //打印日志的公共方法
- //计划让其在业务核心代码(切入点方法)之前执行。 前置通知
- public void printLog(){
- System.out.println("Logger中的printLog方法开始输出日志了。。。。。");
- }
- }
package springAop.aop;
public class Logger {
	//打印日志的公共方法
	//计划让其在业务核心代码(切入点方法)之前执行。 前置通知
	public void printLog(){
		System.out.println("Logger中的printLog方法开始输出日志了。。。。。");
	}
}注意:通知类型稍后做详解
e 配置切面
注意:切入点表达式以及切入点的配置方式稍后做详解
f 测试:编写测试代码并测试
- package springAop.test;
- import org.springframework.context.support.ClassPathXmlApplicationContext;
- import springAop.user.UserService;
- public class Client {
- public static void main(String[] args) {
- //Spring容器的初始化
- ClassPathXmlApplicationContext ac = new ClassPathXmlApplicationContext("springAop/bean.xml");
- //获取资源
- // UserServiceImpl userService = (UserServiceImpl) ac.getBean("userServiceImpl");
- UserService userService = (UserService)ac.getBean("userServiceImpl");
- userService.save();
- }
- }
package springAop.test;

import org.springframework.context.support.ClassPathXmlApplicationContext;

import springAop.user.UserService;
public class Client {

	public static void main(String[] args) {
		//Spring容器的初始化
		ClassPathXmlApplicationContext ac = new ClassPathXmlApplicationContext("springAop/bean.xml");
		//获取资源
//		UserServiceImpl userService = (UserServiceImpl) ac.getBean("userServiceImpl");
		UserService userService = (UserService)ac.getBean("userServiceImpl");
		userService.save();
	}
}
结果:
- Logger中的printLog方法开始输出日志了。。。。。
- UserServiceImpl的save方法执行了。。。
Logger中的printLog方法开始输出日志了。。。。。
UserServiceImpl的save方法执行了。。。4 详解切入点表达式(优化上面的e步骤,配置切面)
execution:匹配方法的执行(常用) execution(public * *(..))基本语法:execution([修饰符] 返回值类型 包名.类名.方法名(参数))
- within:匹配包或子包中的方法(了解) within(springAop.aop..*)
- this:匹配实现接口的代理对象中的方法(了解) this(springAop.aop.user.UserDAO)
- target:匹配实现接口的目标对象中的方法(了解) target(springAop.aop.user.UserDAO)
- args:匹配参数格式符合标准的方法(了解) args(int,int)
- &&:要求连接点同时匹配两个切点表达式
- ||:要求连接点匹配至少一个切入点表达式
- !:要求连接点不匹配指定的切入点表达式
方式一:
- <?xml version="1.0" encoding="UTF-8"?>
- <beans xmlns="http://www.springframework.org/schema/beans"
- xmlns:xsi="http://www.w3.org/2001/XMLSchema-instance"
- xmlns:aop="http://www.springframework.org/schema/aop"
- xsi:schemaLocation="http://www.springframework.org/schema/beans
- http://www.springframework.org/schema/beans/spring-beans-3.2.xsd
- http://www.springframework.org/schema/aop
- http://www.springframework.org/schema/aop/spring-aop-4.2.xsd ">
- <!-- 1 核心业务代码:service层等一系列 -->
- <bean id="userServiceImpl" class="springAop.user.impl.UserServiceImpl"></bean>
- <!-- 2 切面类:某一个通知类型的类 -->
- <bean id="loggerAdvice" class="springAop.aop.Logger"></bean>
- <aop:config>
- <aop:aspect ref="loggerAdvice" >
- <!--表达式全匹配 <aop:before method="printLog" pointcut="execution(public void springAop.user.impl.UserServiceImpl.save())"/> -->
- <!--访问修饰符是可以省略的<aop:before method="printLog" pointcut="execution(void springAop.user.impl.UserServiceImpl.save()"/> -->
- <!--使用*来替换返回值类型,表明可以是任意返回值<aop:before method="printLog" pointcut="execution(* springAop.user.impl.UserServiceImpl.save())"/> -->
- <!--使用*来通配方法名称。可以直接使用*,也可以使用*+部分方法名称<aop:before method="printLog" pointcut="execution(* springAop.user.impl.UserServiceImpl.*User())"/> -->
- <!--使用*来替换包名,表明包的名称可以是任意名称<aop:before method="printLog" pointcut="execution(* springAop.*.*.UserServiceImpl.*())"/> -->
- <!--使用..来替换包名,..表明的是在当前包及其子包中 <aop:before method="printLog" pointcut="execution(* springAop.user..UserServiceImpl.*())"/> -->
- <!--使用*通配类的名称。 <aop:before method="printLog" pointcut="execution(* springAop.user..*.*())"/> -->
- <!--使用明确数据类型的参数。基本数据类型直接写:int,float等。引用类型:String可以直接写,也可以使用java.lang.String <aop:before method="printLog" pointcut="execution(* springAop.user..*.*(int))"/> -->
- <!--使用*通配任意类型的参数。要求是必须有一个参数 <aop:before method="printLog" pointcut="execution(* springAop.user..*.*(*))"/> -->
- <!--使用..表明有无参数都可以 <aop:before method="printLog" pointcut="execution(* springAop.user..*.*(..))"/> -->
- <aop:before method="printLog" pointcut="execution(* springAop.*.*.UserServiceImpl.*())"/>
- </aop:aspect>
- </aop:config>
- </beans>
<?xml version="1.0" encoding="UTF-8"?>
<beans xmlns="http://www.springframework.org/schema/beans"
       xmlns:xsi="http://www.w3.org/2001/XMLSchema-instance"
       xmlns:aop="http://www.springframework.org/schema/aop"
       xsi:schemaLocation="http://www.springframework.org/schema/beans
       			http://www.springframework.org/schema/beans/spring-beans-3.2.xsd
       			http://www.springframework.org/schema/aop
   				http://www.springframework.org/schema/aop/spring-aop-4.2.xsd ">

   	<!-- 1 核心业务代码:service层等一系列 -->
   	<bean id="userServiceImpl" class="springAop.user.impl.UserServiceImpl"></bean>
   	<!-- 2 切面类:某一个通知类型的类 -->
   	<bean id="loggerAdvice" class="springAop.aop.Logger"></bean>

   	<aop:config>
   		<aop:aspect ref="loggerAdvice" >

   		<!--表达式全匹配 <aop:before method="printLog" pointcut="execution(public void springAop.user.impl.UserServiceImpl.save())"/> -->
   		<!--访问修饰符是可以省略的<aop:before method="printLog" pointcut="execution(void springAop.user.impl.UserServiceImpl.save()"/> -->
   		<!--使用*来替换返回值类型,表明可以是任意返回值<aop:before method="printLog" pointcut="execution(* springAop.user.impl.UserServiceImpl.save())"/> -->
   		<!--使用*来通配方法名称。可以直接使用*,也可以使用*+部分方法名称<aop:before method="printLog" pointcut="execution(* springAop.user.impl.UserServiceImpl.*User())"/> -->
   		<!--使用*来替换包名,表明包的名称可以是任意名称<aop:before method="printLog" pointcut="execution(* springAop.*.*.UserServiceImpl.*())"/> -->
   		<!--使用..来替换包名,..表明的是在当前包及其子包中 <aop:before method="printLog" pointcut="execution(* springAop.user..UserServiceImpl.*())"/> -->
   		<!--使用*通配类的名称。 <aop:before method="printLog" pointcut="execution(* springAop.user..*.*())"/>  -->
   		<!--使用明确数据类型的参数。基本数据类型直接写:int,float等。引用类型:String可以直接写,也可以使用java.lang.String <aop:before method="printLog" pointcut="execution(* springAop.user..*.*(int))"/>  -->
   		<!--使用*通配任意类型的参数。要求是必须有一个参数 <aop:before method="printLog" pointcut="execution(* springAop.user..*.*(*))"/>  -->
   		<!--使用..表明有无参数都可以 <aop:before method="printLog" pointcut="execution(* springAop.user..*.*(..))"/>  -->

   			<aop:before method="printLog" pointcut="execution(* springAop.*.*.UserServiceImpl.*())"/>
   		</aop:aspect>
   	</aop:config>

</beans>方式二:
- <?xml version="1.0" encoding="UTF-8"?>
- <beans xmlns="http://www.springframework.org/schema/beans"
- xmlns:xsi="http://www.w3.org/2001/XMLSchema-instance"
- xmlns:aop="http://www.springframework.org/schema/aop"
- xsi:schemaLocation="http://www.springframework.org/schema/beans
- http://www.springframework.org/schema/beans/spring-beans-3.2.xsd
- http://www.springframework.org/schema/aop
- http://www.springframework.org/schema/aop/spring-aop-4.2.xsd ">
- <!-- 1 核心业务代码:service层等一系列 -->
- <bean id="userServiceImpl" class="springAop.user.impl.UserServiceImpl"></bean>
- <!-- 2 切面类:某一个通知类型的类 -->
- <bean id="loggerAdvice" class="springAop.aop.Logger"></bean>
- <aop:config>
- <aop:aspect ref="loggerAdvice" >
- <!-- 使用 配置切入点的方式,实现复用
- aop:pointcut 用于配置切入点,expression是切入点表达式,原来在pointcut属性中怎么写在这还怎么写
- 使用aop:before(或者其它通知)引入切点id
- -->
- <aop:pointcut expression="execution(* *..*.*(..))" id="pt1"/>
- <aop:before method="printLog" pointcut-ref="pt1" />
- </aop:aspect>
- </aop:config>
- </beans>
<?xml version="1.0" encoding="UTF-8"?>
<beans xmlns="http://www.springframework.org/schema/beans"
       xmlns:xsi="http://www.w3.org/2001/XMLSchema-instance"
       xmlns:aop="http://www.springframework.org/schema/aop"
       xsi:schemaLocation="http://www.springframework.org/schema/beans
       			http://www.springframework.org/schema/beans/spring-beans-3.2.xsd
       			http://www.springframework.org/schema/aop
   				http://www.springframework.org/schema/aop/spring-aop-4.2.xsd ">

   	<!-- 1 核心业务代码:service层等一系列 -->
   	<bean id="userServiceImpl" class="springAop.user.impl.UserServiceImpl"></bean>
   	<!-- 2 切面类:某一个通知类型的类 -->
   	<bean id="loggerAdvice" class="springAop.aop.Logger"></bean>

   	<aop:config>
   		<aop:aspect ref="loggerAdvice" >
   			<!-- 使用 配置切入点的方式,实现复用
   				aop:pointcut 用于配置切入点,expression是切入点表达式,原来在pointcut属性中怎么写在这还怎么写
   				使用aop:before(或者其它通知)引入切点id
   			-->
     		<aop:pointcut expression="execution(* *..*.*(..))" id="pt1"/>
   			<aop:before method="printLog" pointcut-ref="pt1" />
   		</aop:aspect>
   	</aop:config>
</beans>方式三:
- <?xml version="1.0" encoding="UTF-8"?>
- <beans xmlns="http://www.springframework.org/schema/beans"
- xmlns:xsi="http://www.w3.org/2001/XMLSchema-instance"
- xmlns:aop="http://www.springframework.org/schema/aop"
- xsi:schemaLocation="http://www.springframework.org/schema/beans
- http://www.springframework.org/schema/beans/spring-beans-3.2.xsd
- http://www.springframework.org/schema/aop
- http://www.springframework.org/schema/aop/spring-aop-4.2.xsd ">
- <!-- 1 核心业务代码:service层等一系列 -->
- <bean id="userServiceImpl" class="springAop.user.impl.UserServiceImpl"></bean>
- <!-- 2 切面类:某一个通知类型的类 -->
- <bean id="loggerAdvice" class="springAop.aop.Logger"></bean>
- <aop:config>
- <!-- 把切入点声明在外面,使切入点成为全局的,这样其它的切面也可以使用 -->
- <aop:pointcut expression="execution(* *..*.*(..))" id="pt1"/>
- <aop:aspect ref="loggerAdvice" >
- <aop:before method="printLog" pointcut-ref="pt1" />
- </aop:aspect>
- </aop:config>
- </beans>
<?xml version="1.0" encoding="UTF-8"?>
<beans xmlns="http://www.springframework.org/schema/beans"
       xmlns:xsi="http://www.w3.org/2001/XMLSchema-instance"
       xmlns:aop="http://www.springframework.org/schema/aop"
       xsi:schemaLocation="http://www.springframework.org/schema/beans
       			http://www.springframework.org/schema/beans/spring-beans-3.2.xsd
       			http://www.springframework.org/schema/aop
   				http://www.springframework.org/schema/aop/spring-aop-4.2.xsd ">

   	<!-- 1 核心业务代码:service层等一系列 -->
   	<bean id="userServiceImpl" class="springAop.user.impl.UserServiceImpl"></bean>
   	<!-- 2 切面类:某一个通知类型的类 -->
   	<bean id="loggerAdvice" class="springAop.aop.Logger"></bean>

   	<aop:config>
 		<!-- 把切入点声明在外面,使切入点成为全局的,这样其它的切面也可以使用 -->
   		<aop:pointcut expression="execution(* *..*.*(..))" id="pt1"/>
   		<aop:aspect ref="loggerAdvice" >
   			<aop:before method="printLog" pointcut-ref="pt1" />
   		</aop:aspect>
   	</aop:config>
</beans>
方式三只是将切入点表达式提到全局位置中。这样大家都可以引用到了。
OK、切入点表达式、和如何引用。讲完了。
5 通知类型
通知类型有5个如下:- <?xml version="1.0" encoding="UTF-8"?>
- <beans xmlns="http://www.springframework.org/schema/beans"
- xmlns:xsi="http://www.w3.org/2001/XMLSchema-instance"
- xmlns:aop="http://www.springframework.org/schema/aop"
- xsi:schemaLocation="http://www.springframework.org/schema/beans
- http://www.springframework.org/schema/beans/spring-beans-3.2.xsd
- http://www.springframework.org/schema/aop
- http://www.springframework.org/schema/aop/spring-aop-4.2.xsd ">
- <!-- 1 核心业务代码:service层等一系列 -->
- <bean id="userServiceImpl" class="springAop.user.impl.UserServiceImpl"></bean>
- <!-- 2 切面类:某一个通知类型的类 -->
- <bean id="loggerAdvice" class="springAop.aop.Logger"></bean>
- <aop:config>
- <!-- 把切入点声明在外面,使切入点成为全局的,这样其它的切面也可以使用 -->
- <aop:pointcut expression="execution(* *..*.*(..))" id="pt1"/>
- <aop:aspect ref="loggerAdvice" >
- <!-- 配置前置通知 :before是前置通知。永远在切入点方法(核心业务方法)执行之前执行。-->
- <!-- <aop:before method="printLog" pointcut-ref="pt1" /> -->
- <!-- 配置后置通知:after-retruning。当正常执行完成切入点方法之后执行。 如果切入点方法出现了异常则不会执行 -->
- <!-- <aop:after-returning method="printLog" pointcut-ref="pt1" /> -->
- <!-- 配置异常通知:after-throwing。当切入点方法出现异常时执行。如果切入点方法正常执行没有异常的话,则不会执行。-->
- <!-- <aop:after-throwing method="printLog" pointcut-ref="pt1" /> -->
- <!-- 配置最终通知 :after。无论切入点方法执行成功与否,最终通知都会执行。-->
- <!-- <aop:after mmethod="printLog" pointcut-ref="pt1" /> -->
- <!-- 配置环绕通知:配置环绕通知时,并没有调用核心业务方法(切入点方法)。-->
- <aop:around method="printLog" pointcut-ref="pt1"/>
- </aop:aspect>
- </aop:config>
- </beans>
<?xml version="1.0" encoding="UTF-8"?>
<beans xmlns="http://www.springframework.org/schema/beans"
       xmlns:xsi="http://www.w3.org/2001/XMLSchema-instance"
       xmlns:aop="http://www.springframework.org/schema/aop"
       xsi:schemaLocation="http://www.springframework.org/schema/beans
       			http://www.springframework.org/schema/beans/spring-beans-3.2.xsd
       			http://www.springframework.org/schema/aop
   				http://www.springframework.org/schema/aop/spring-aop-4.2.xsd ">

   	<!-- 1 核心业务代码:service层等一系列 -->
   	<bean id="userServiceImpl" class="springAop.user.impl.UserServiceImpl"></bean>
   	<!-- 2 切面类:某一个通知类型的类 -->
   	<bean id="loggerAdvice" class="springAop.aop.Logger"></bean>

   	<aop:config>
 		<!-- 把切入点声明在外面,使切入点成为全局的,这样其它的切面也可以使用 -->
   		<aop:pointcut expression="execution(* *..*.*(..))" id="pt1"/>
   		<aop:aspect ref="loggerAdvice" >
   			<!-- 配置前置通知 :before是前置通知。永远在切入点方法(核心业务方法)执行之前执行。-->
   			<!-- <aop:before method="printLog" pointcut-ref="pt1" /> -->
   			<!-- 配置后置通知:after-retruning。当正常执行完成切入点方法之后执行。 如果切入点方法出现了异常则不会执行 -->
   			<!-- <aop:after-returning method="printLog" pointcut-ref="pt1" /> -->
     		<!-- 配置异常通知:after-throwing。当切入点方法出现异常时执行。如果切入点方法正常执行没有异常的话,则不会执行。-->
     		<!--  <aop:after-throwing method="printLog" pointcut-ref="pt1" /> -->
     		<!-- 配置最终通知 :after。无论切入点方法执行成功与否,最终通知都会执行。-->
     		<!-- <aop:after mmethod="printLog" pointcut-ref="pt1" /> -->
     		<!-- 配置环绕通知:配置环绕通知时,并没有调用核心业务方法(切入点方法)。-->
     		<aop:around method="printLog" pointcut-ref="pt1"/>
   		</aop:aspect>
   	</aop:config>
</beans>
6 基于注解的配置
1 使用Spring注解进行AOP配置的前提
a、资源交给Spring管理(核心业务对象,通知对象均在类中添加注解)在此之前要开启扫描包
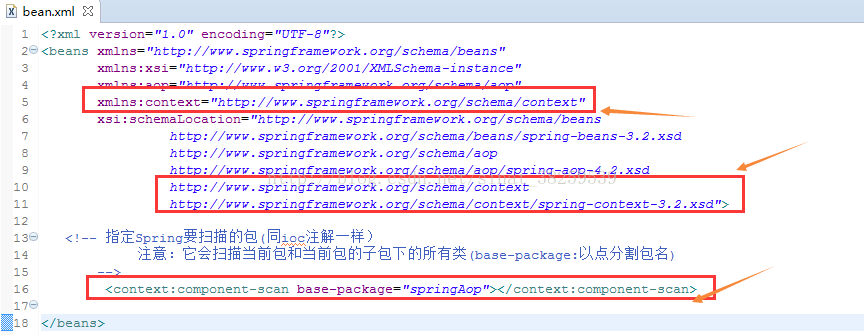
注意:代码中请使用@Compoment注解。
b、AOP有关的注解配置
开启Spring对@AspectJ注解的支持
- <?xml version="1.0" encoding="UTF-8"?>
- <beans xmlns="http://www.springframework.org/schema/beans"
- xmlns:xsi="http://www.w3.org/2001/XMLSchema-instance"
- xmlns:aop="http://www.springframework.org/schema/aop"
- xmlns:context="http://www.springframework.org/schema/context"
- xsi:schemaLocation="http://www.springframework.org/schema/beans
- http://www.springframework.org/schema/beans/spring-beans-3.2.xsd
- http://www.springframework.org/schema/aop
- http://www.springframework.org/schema/aop/spring-aop-4.2.xsd
- http://www.springframework.org/schema/context
- http://www.springframework.org/schema/context/spring-context-3.2.xsd">
- <!-- 指定Spring要扫描的包(同ioc注解一样)
- 注意:它会扫描当前包和当前包的子包下的所有类(base-package:以点分割包名)
- -->
- <context:component-scan base-package="springAop"></context:component-scan>
- <!-- 开启spring对 @Aspectj注解的支持-->
- <aop:aspectj-autoproxy></aop:aspectj-autoproxy>
- </beans>
<?xml version="1.0" encoding="UTF-8"?>
<beans xmlns="http://www.springframework.org/schema/beans"
       xmlns:xsi="http://www.w3.org/2001/XMLSchema-instance"
       xmlns:aop="http://www.springframework.org/schema/aop"
       xmlns:context="http://www.springframework.org/schema/context"
       xsi:schemaLocation="http://www.springframework.org/schema/beans
       			http://www.springframework.org/schema/beans/spring-beans-3.2.xsd
       			http://www.springframework.org/schema/aop
   				http://www.springframework.org/schema/aop/spring-aop-4.2.xsd
   				http://www.springframework.org/schema/context
   				http://www.springframework.org/schema/context/spring-context-3.2.xsd">

   <!-- 指定Spring要扫描的包(同ioc注解一样)
      		注意:它会扫描当前包和当前包的子包下的所有类(base-package:以点分割包名)
       -->
		<context:component-scan base-package="springAop"></context:component-scan>

	<!-- 开启spring对 @Aspectj注解的支持-->
	<aop:aspectj-autoproxy></aop:aspectj-autoproxy>
</beans>@Aspect 配置切面
@Before:前置通知
@AfterReturning:后置通知
@AfterThrowing:异常通知
@After:最终通知
@Around:环绕通知
d、配置一个前置通知的例子
第一步:编写通知类:并交给spring管理,并配置切面,并指定通知类型
- package springAop.aop;
- import org.aspectj.lang.annotation.Aspect;
- import org.aspectj.lang.annotation.Before;
- import org.springframework.stereotype.Component;
- /**
- * 注解spring开发
- * @author mch
- *
- */
- @Component //交给spring管理--扫描包的时候就会扫描
- @Aspect //配置切面
- public class Logger {
- //打印日志的公共方法
- //计划让其在业务核心代码(切入点方法)之前执行。 前置通知
- @Before("execution(* springAop.user.impl.UserServiceImpl.save())")
- public void printLog(){
- System.out.println("Logger中的printLog方法开始输出日志了。。。。。");
- }
- }
package springAop.aop;

import org.aspectj.lang.annotation.Aspect;
import org.aspectj.lang.annotation.Before;
import org.springframework.stereotype.Component;

/**
 * 注解spring开发
 * @author mch
 *
 */
@Component  //交给spring管理--扫描包的时候就会扫描
@Aspect     //配置切面
public class Logger {

	//打印日志的公共方法
	//计划让其在业务核心代码(切入点方法)之前执行。 前置通知
	@Before("execution(* springAop.user.impl.UserServiceImpl.save())")
	public void printLog(){
		System.out.println("Logger中的printLog方法开始输出日志了。。。。。");
	}
}- package springAop.user.impl;
- import org.springframework.stereotype.Component;
- /**
- * 注解spring的核心业务类
- * @author mch
- *
- */
- @Component //交给spring来管理
- public class UserServiceImpl {
- public void save(){
- System.out.println("UserServiceImpl的save方法执行了。。。");
- }
- public void update() {
- System.out.println("UserServiceImpl的update方法执行了。。。");
- }
- }
package springAop.user.impl;

import org.springframework.stereotype.Component;

/**
 * 注解spring的核心业务类
 * @author mch
 *
 */
@Component  //交给spring来管理
public class UserServiceImpl {
	public void save(){
		System.out.println("UserServiceImpl的save方法执行了。。。");
	}
	public void update() {
		System.out.println("UserServiceImpl的update方法执行了。。。");
	}
}
- <?xml version="1.0" encoding="UTF-8"?>
- <beans xmlns="http://www.springframework.org/schema/beans"
- xmlns:xsi="http://www.w3.org/2001/XMLSchema-instance"
- xmlns:aop="http://www.springframework.org/schema/aop"
- xmlns:context="http://www.springframework.org/schema/context"
- xsi:schemaLocation="http://www.springframework.org/schema/beans
- http://www.springframework.org/schema/beans/spring-beans-3.2.xsd
- http://www.springframework.org/schema/aop
- http://www.springframework.org/schema/aop/spring-aop-4.2.xsd
- http://www.springframework.org/schema/context
- http://www.springframework.org/schema/context/spring-context-3.2.xsd">
- <!-- 指定Spring要扫描的包(同ioc注解一样)
- 注意:它会扫描当前包和当前包的子包下的所有类(base-package:以点分割包名)
- -->
- <context:component-scan base-package="springAop"></context:component-scan>
- <!-- 开启spring对 @Aspectj注解的支持-->
- <aop:aspectj-autoproxy></aop:aspectj-autoproxy>
- </beans>
<?xml version="1.0" encoding="UTF-8"?>
<beans xmlns="http://www.springframework.org/schema/beans"
       xmlns:xsi="http://www.w3.org/2001/XMLSchema-instance"
       xmlns:aop="http://www.springframework.org/schema/aop"
       xmlns:context="http://www.springframework.org/schema/context"
       xsi:schemaLocation="http://www.springframework.org/schema/beans
       			http://www.springframework.org/schema/beans/spring-beans-3.2.xsd
       			http://www.springframework.org/schema/aop
   				http://www.springframework.org/schema/aop/spring-aop-4.2.xsd
   				http://www.springframework.org/schema/context
   				http://www.springframework.org/schema/context/spring-context-3.2.xsd">

   <!-- 指定Spring要扫描的包(同ioc注解一样)
      		注意:它会扫描当前包和当前包的子包下的所有类(base-package:以点分割包名)
       -->
		<context:component-scan base-package="springAop"></context:component-scan>

	<!-- 开启spring对 @Aspectj注解的支持-->
	<aop:aspectj-autoproxy></aop:aspectj-autoproxy>
</beans>- package springAop.test;
- import org.springframework.context.support.ClassPathXmlApplicationContext;
- import springAop.user.UserService;
- import springAop.user.impl.UserServiceImpl;
- public class Client {
- public static void main(String[] args) {
- //Spring容器的初始化
- ClassPathXmlApplicationContext ac = new ClassPathXmlApplicationContext("springAop/bean.xml");
- //获取资源
- UserServiceImpl userService = (UserServiceImpl) ac.getBean("userServiceImpl");
- userService.save();
- }
- }
package springAop.test;

import org.springframework.context.support.ClassPathXmlApplicationContext;

import springAop.user.UserService;
import springAop.user.impl.UserServiceImpl;
public class Client {

	public static void main(String[] args) {
		//Spring容器的初始化
		ClassPathXmlApplicationContext ac = new ClassPathXmlApplicationContext("springAop/bean.xml");
		//获取资源
		UserServiceImpl userService = (UserServiceImpl) ac.getBean("userServiceImpl");
		userService.save();
	}
}
- Logger中的printLog方法开始输出日志了。。。。。
- UserServiceImpl的save方法执行了。。。
Logger中的printLog方法开始输出日志了。。。。。
UserServiceImpl的save方法执行了。。。


 136
136


 被折叠的 条评论
为什么被折叠?
被折叠的 条评论
为什么被折叠?
 到【灌水乐园】发言


