


 本文介绍OpenResty在高并发Web应用中的使用,包括环境搭建、网关应用、组件功能及实例演示,如计算器与灰度发布。
OpenResty入门和使用实践
一、前言
- 环境:
LInux发行版: CentOS-7-x86_64-DVD-1804.iso
SSH工具:FinalShell
- 参考:
OpenResty:
http://openresty.org/cn/installation.html
CentOS 命令:https://blog.csdn.net/u011424614/article/details/94555916
nginx 中文官方文档:https://wizardforcel.gitbooks.io/nginx-doc/content/
redis 操作:https://blog.csdn.net/u011424614/article/details/100170313
二、正文
1.简介
通过 Lua 扩展 NGINX 实现的可伸缩的 Web 平台。
OpenResty® 是一个基于 Nginx 与 Lua 的高性能 Web 平台,其内部集成了大量精良的 Lua 库、第三方模块以及大多数的依赖项。用于方便地搭建能够处理超高并发、扩展性极高的动态 Web 应用、Web 服务和动态网关。
2.网关应用
- 按照服务组件进行统一抽象(功能模块请求网关)

- 针对不同的客户端,实现不同的API网关(前端服务请求网关)

3.下载和安装
- 下载(以下命令均使用 root 用户执行)
#-- 创建下载目录
# mkdir /root/download
# cd /root/download
#-- 创建安装目录
# mkdir /opt/openresty
#-- 安装开放库
# yum install pcre-devel openssl-devel gcc curl
#-- 网络下载
# wget ./ https://openresty.org/download/openresty-1.17.8.1.tar.gz
# tar -zxvf openresty-1.17.8.1.tar.gz
# cd openresty-1.17.8.1/
#-- 配置、编译、安装
# ./configure --prefix=/opt/openresty
# make && make install
- HelloWorld 例子
# cd /opt/openresty
# cp nginx/conf/nginx.conf nginx/conf/nginx-backup.conf
# vim nginx/conf/nginx.conf
- nginx.conf 编辑的内容如下:
worker_processes  1;
error_log logs/error.log;
events {
    worker_connections 1024;
}
http {
    server {
        listen 8080;
        location / {
            default_type text/html;
            content_by_lua_block {
                ngx.say("<p>hello, world</p>")
            }
        }
    }
}
- 启动 nginx
# ./nginx/sbin/nginx
# ps -ef|grep nginx
- 浏览器访问:IP + 端口(默认 80 可以不写)
4.组件
-
通过组件实现 鉴权、限流、分流、熔断、灰度发布、日志记录 等功能

-
灰度发布
百科:https://baike.baidu.com/item/%E7%81%B0%E5%BA%A6%E5%8F%91%E5%B8%83/7100322?fr=aladdin
例如:新版本发布后,先让20%的流量访问

5.应用例子
1)计算器
# cd /opt/openresty
# mkdir calc && mkdir calc/conf && mkdir calc/logs
# vim calc/conf/nginx.conf
- nginx.conf 配置内容:
worker_processes  1;
error_log logs/error.log;
events {
    worker_connections 1024;
}
http {
    server {
        listen 80;
        location /add {
        	content_by_lua_block {
        		# 获取请求参数
            	local args=ngx.req.get_uri_args()
				ngx.say(args.a+args.b)
        	}
        }
        location /sub {
            content_by_lua_block {
            	local args=ngx.req.get_uri_args()
            	ngx.say(args.a-args.b)
        	}
        }
    }
}
- 启动 openresty
#-- 停止
# ./nginx/sbin/nginx -s stop
#-- 启动
# ./nginx/sbin/nginx -p /opt/openresty/calc
#-- 或者指定配置启动
# ./nginx/sbin/nginx -c /opt/openresty/calc/conf/nginx.conf
- 浏览器访问路径:http://192.168.1.100/add?a=3&b=2
将 lua 脚本从 conf 配置文件中抽离出来,单独创建一个 lua 脚本,并且新增参数验证
# cd /opt/openresty
# mkdir /opt/openresty/calc/lua
# vim calc/lua/add.lua
# vim calc/lua/sub.lua
# vim calc/lua/params.lua
# vim calc/lua/check.lua
# vim calc/conf/nginx.conf
- add.lua 脚本:
local args=ngx.req.get_uri_args()
ngx.say(args.a+args.b)
- sub.lua 脚本:
local args=ngx.req.get_uri_args()
ngx.say(args.a-args.b)
- params.lua 脚本,检测参数是否合法:
-- 定义模块
local _M = {}

function _M.is_number(...)
    local arg={...};
    local num;
    for i,v in ipairs(arg) do
        num=tonumber(v);
        if nil == num then
            return false;
        end
    end
    return true;
end

return _M;
- check.lua 脚本:
-- 设置默认搜索lua模块的路径
package.path = '/opt/openresty/calc/lua/?.lua;';
-- 引入模块
local param=require("params");

local args=ngx.req.get_uri_args();

if not args.a or not args.b or not param.is_number(args.a,args.b) then
    ngx.exit(ngx.HTTP_BAD_REQUEST);
    return;
end
- nginx.conf 配置文件:
worker_processes  1;
error_log logs/error.log;
events {
    worker_connections 1024;
}
http {
	# 根据前缀加载lua核心模块, 代码中使用 package.path 指定搜索路径
	# lua_package_path '$prefix/lua/?.lua';
	# 关闭lua脚本缓存;更新脚本不需要重启
	lua_code_cache off;
    server {
        listen 80;
        # 正则匹配
        location ~ ^/api/([-_a-zA-Z0-9/]+) {
        	access_by_lua_file lua/check.lua;
        	content_by_lua_file lua/$1.lua;
        }
    }
}
- 启动 openresty
#-- 停止
# ./nginx/sbin/nginx -s stop
#-- 启动
# ./nginx/sbin/nginx -p /opt/openresty/calc
#-- 或者指定配置启动
# ./nginx/sbin/nginx -c /opt/openresty/calc/conf/nginx.conf
- 浏览器访问路径:http://192.168.1.100/api/add?a=3&b=2
2)灰度发布
- 灰度发布实现方式:白名单、地域、流量等方式
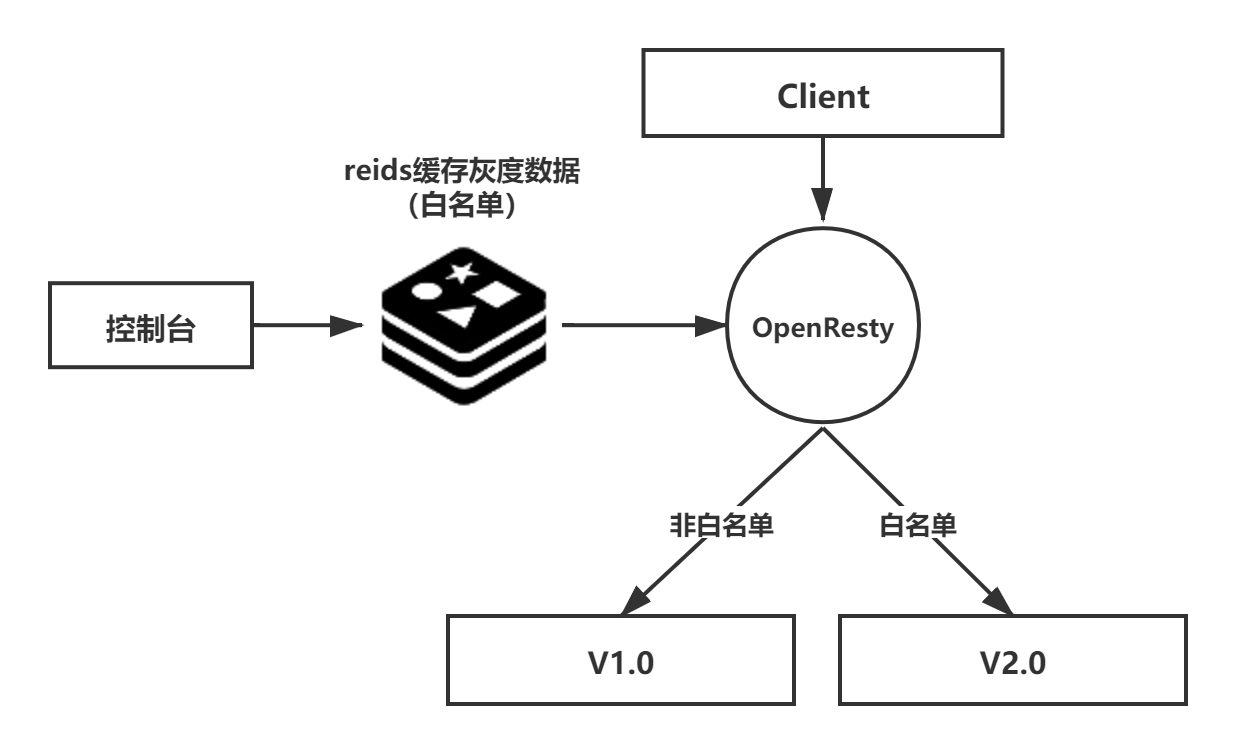
场景说明:当前例子使用白名单方式进行实现灰度发布,即只有IP添加到白名单中,才能访问新版本的系统。
- lua 连接 redis 获取白名单数据
- 根据白名单数据做逻辑判断
IP 说明:
192.168.1.100(OpenResty)
192.168.1.101(Tomcat)
192.168.1.102(Tomcat)
192.168.1.103(浏览器访问)
# cd /opt/openresty
# mkdir gray && mkdir gray/conf && mkdir gray/logs && mkdir gray/lua
# vim gray/conf/nginx.conf
# vim gray/lua/gray.lua
- nginx.conf 配置内容:
worker_processes  1;
error_log logs/error.log;
events {
    worker_connections 1024;
}
http {
	# 根据前缀加载lua核心模块, 代码中使用 package.path 指定搜索路径
	# ;; 表示默认路径下
	lua_package_path "$prefix/lualib/?.lua;;";
	# 加载库文件
	lua_package_cpath "$prefix/lualib/?.so;;";
	# 关闭lua脚本缓存;更新脚本不需要重启
	lua_code_cache off;

	# 不同版本服务地址
	upstream v1 {
		server 192.168.1.101:8080;
	}
	upstream v2 {
		server 192.168.1.102:8080;
	}

    server {
        listen 80;
        server_name 192.168.1.100;

        location / {
        	content_by_lua_file lua/gray.lua;
        }
        location @v1 {
        	proxy_pass http://v1;
        }
        location @v2 {
        	proxy_pass http://v2;
        }
    }
}
- gray.lua 脚本内容:
-- 引入redis模块
local redis=require("resty.redis");

local red=redis:new();
red:set_timeout(1000);

-- 连接 redis
local ok,err=red:connect("192.168.1.100","6379");
if not ok then
    ngx.say("faile to connect reids.");
end

-- 获取请求地址
local local_ip = ngx.req.get_headers()["X-REAL-IP"];
if local_ip == nil then
    -- 获取转发地址
    local_ip = ngx.req.get_headers()["X_FORWARDED_FOR"];
end

if local_ip == nil then
    -- 获取远程地址
    local_ip = ngx.var.remote_addr;
end

-- 判断请求路径是否在列表中
local ip_lists=red:get("gray");
if string.find(ip_lists,local_ip) == nil then
    ngx.exec("@v1");
else
    ngx.exec("@v2");
end

-- 关闭redis连接
local ok,err=red:close();
- 启动 openresty
#-- 停止
# ./nginx/sbin/nginx -s stop
#-- 根据启动命令执行停止操作,可通过 ps -ef|grep nginx 查看启动命令
# ./nginx/sbin/nginx -p /opt/openresty/gray -s stop
#-- 启动
# ./nginx/sbin/nginx -p /opt/openresty/gray
#-- 或者指定配置启动
# ./nginx/sbin/nginx -c /opt/openresty/gray/conf/nginx.conf
#-- 查看状态
# ,可通过 ps -ef|grep nginx 查看启动命令
- tomcat 启动
tomcat 操作:https://blog.csdn.net/u011424614/article/details/94610749
#-- 下载
# wget ./ https://mirrors.tuna.tsinghua.edu.cn/apache/tomcat/tomcat-7/v7.0.105/bin/apache-tomcat-7.0.105.tar.gz
- redis-cli 设置白名单
redis 操作:https://blog.csdn.net/u011424614/article/details/100170313
#-- 下载
# wget ./ http://download.redis.io/releases/redis-5.0.8.tar.gz

# ./redis-cli
127.0.0.1:6379> set gray 192.168.1.103
- 浏览器访问路径:http://192.168.1.103
- 测试时,出错或没有效果,可以查看日志
/opt/openresty/gray/logs/error.log


 1302
1302

 被折叠的 条评论
为什么被折叠?
被折叠的 条评论
为什么被折叠?
 到【灌水乐园】发言


