


译自 The Java Tutorials (TraIls: RMI)
RMI应用概述
一个RMI应用通常由两部分组成,即客户端和服务器端。服务器端程序创建若干远程对象(Remote Objects),使这些远程对象对客户端是可访问的,并等待客户端来调用这些远程对象的方法;客户端程序则获取服务器上若干个远程对象的引用,并调用这些其方法。像这种类型的应用被称为Distributed Object Application。
一个Distributed Object Application通常需要完成下列事情:
- 定位远程对象
- 与远程对象进行通讯
- 为被传递的对象加载其类定义
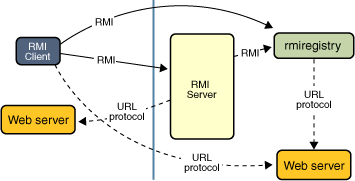
下图展示了一个RMI应用如何利用RMI注册服务(RMI Registry)来获得对一个远程对象的引用。Server令registry将一个名字与一个远程对象绑定,client则通过其名字在server的registry中寻找该远程对象并调用其上的方法。从图中还可以看出,该RMI应用系统利用了一个已有的Web Service来为在client与server之间传递的远程对象加载类定义。
远程接口、对象与方法
当某个对象实现了一个具备如下特性的远程接口(Remote Interface)时,该对象就成为了远程对象(Remote Objects):
- 该远程接口扩展了接口java.rmi.Remote;
- 该远程接口中的每个方法都要在throws中声明抛出java.rmi.RemoteException异常;
stub扮演了远程对象的本地代表(或者说是代理)的角色,作为client对远程对象的引用。client调用本地stub上的方法,而该stub则负责调用远程对象上的方法。
利用RMI创建分布式应用
利用RMI创建一个分布式应用包含如下四步:
- 设计并实现该分布式应用中的各个组件
- 编译源码
- 确保类可以通过网络访问
- 启动该应用
设计并实现分布式应用中的各个组件
首先,确定该分布式应用的架构,包括哪些组件是local objects,哪些组件是remote accessible。具体而言:
- 定义远程接口:客户端是对远程接口编程的,所以需要确定远程接口中各个方法的参数及返回值的类型,
- 实现远程对象:远程对象必须实现一个或者多个远程接口
- 实现客户端代码:使用远程对象的客户端可以在远程接口被定义之后再定义
编译源代码
使用javac命令来编译源文件。源文件包含了远程接口的声明、它们的定义,以及其他server及client端的实现。
注意:在Java 5 之前,还需要rmic来生成stub类。从Java 6 开始这一步已经不需要了。
确保类可以通过网络访问
启动分布式应用
启动应用包括运行RMI远程对象注册服务(registry)、server及client。
编写RMI Server
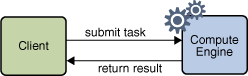
本文将构建一个称之为计算引擎的分布式应用。该计算引擎接受来自client的任务请求,运行该任务,并返回计算结果。
Server端的代码由接口和类组成:接口定义了client可以调用的方法,另外,接口也从client的视野定义了remote objects。
定义远程接口
下面,我们定义接口compute.Compute,它代表了计算引擎自身。再定义接口compute.Task,
package compute;

import java.rmi.Remote;
import java.rmi.RemoteException;

public interface Compute extends Remote {
	<T> T executeTask(Task<T> t) throws RemoteException;
}
package compute;
public interface Task<T> {
public T execute();
}RMI利用Java序列化机制在不同的虚拟机之间 以值传递(by value)的方式来传递对象。由于executeTask方法的返回值的类型为Task,因此实现Task接口的类必须同时实现Serializable接口。
实现远程接口
一般来说,一个实现了远程接口的类应该定义自己的构造函数。这是因为RMI Server需要创建初始的远程对象并将其导出到RMI运行时环境,以使远程对象能够接受远程调用。在该过程中,需要做下列事情:
- 创建并安装security manager
- 创建并导出一个或者多个远程对象
- 在RMI Registry中注册至少一个远程对象(也可以使用其他naming service,例如JDNI)
下面给出ComputeEngine代码
package engine;

import java.rmi.RemoteException;
import java.rmi.registry.LocateRegistry;
import java.rmi.registry.Registry;
import java.rmi.server.UnicastRemoteObject;
import compute.Compute;
import compute.Task;

public class ComputeEngine implements Compute  {
	public ComputeEngine() {
		super();
	}

	@Override
	public <T> T executeTask(Task<T> t) throws RemoteException {
		return t.execute();
	}

	public static void main(String[] args) {
		if (System.getSecurityManager() == null)
			System.setSecurityManager(new SecurityManager());
		try {
			Compute engine = new ComputeEngine();
			Compute stub = (Compute)UnicastRemoteObject.exportObject(engine, 0);
			Registry registry = LocateRegistry.getRegistry();
			registry.rebind("TheCompute", stub);
			System.out.println("ComputeEngine bound");
		} catch (RemoteException ex) {
			System.out.println("ComputeEngine exception!");
			ex.printStackTrace();
		}
	}
}
现在我们将对ComputeEngine类的各个部分作出解释
实现每个远程方法
ComputeEngine类实现了executeTask方法,该方法实现了ComputeEngine远程对象与client之间的协议。每一个client向ComputeEngine提供一个Task对象(实现了Task接口中的execute方法),ComputeEngine运行每一个client的task,并将结果直接返回给client。
在RMI中传递对象
远程方法的参数或者返回值几乎可以是任何类型,包括本地对象、远程对象以及Java基本数据类型。如果是本地对象,则必须实现java.io.Serializable接口。
关于远程方法的参数和返回值:
- 远程对象实际上是按引用传递的:对一个远程对象的引用是一个stub,这是一个client端的proxy,它实现了远程对象所实现的所有接口
- 本地对象使用序列化来按值传递:在默认情况下,除了static和transient成员,所有的类成员在传递时都会被复制
按引用传递远程对象,意味着远程方法对远程对象的状态所做的改变,都将在该原始的远程对象中反映出来。
按值传递非远程对象,意味着在接收者的Java VM中将创建非远程对象的副本。这样,接收者对该对象状态所做的任何修改都无法发送者的原始对象中反应出来。同样,发送者对该对象的修改对接收者也是不可见的。
实现Server的main主函数
我们在主函数中启动了ComputeEngine,并等待接收client的调用请求。
创建并安装security manager
创建并安装security manager,可以防止不被信任的代码访问系统资源。security manager可以决定下载的代码是否可以访问本地文件系统或者做其他需要权限的操作。如果没有安装security manager,那么RMI将不会为远程方法的参数或者返回值下载它们的类定义代码。
确保远程对象对客户端是可见的
在代码的第24-25行,我们创建了ComputeEngine的一个实例并将其导出到RMI运行时环境中。UnicastRemoteObject.exportObject方法负责将指定的远程对象导出,使其能够接受来自远程客户端对该远程对象上的远程方法的调用请求。
该方法的第二个参数(int类型),指定使用哪个TCP端口来监听远程调用请求。一般使用0,这将指定使用一个匿名端口,而实际的端口将在运行时由RMI或者操作系统来选择。当然,也可以使用非零值来指定一个特定的监听端口。
一旦UnicastRemoteObject.exportObject方法成功返回,则表示ComputeEngine已经准备就绪,并能够随时处理远程的调用请求。
UnicastRemoteObject.exportObject方法返回被导出远程对象的一个stub。
如果通讯资源有问题,例如指定的监听端口已被占用,那么试图导出远程对象可能会抛出RemoteException异常。
为了能够获得对其他远程对象的引用,系统提供了一种特别类型的远程对象——RMI registry。RMI registry是一种remote object naming service,它使得client能够通过名字来获取对远程对象的引用。
利用java.rmi.registry.Registry接口,我们可以在registry中绑定、注册或者查找远程对象。一旦一个远程对象通过RMI registry在本机上完成了注册,任何主机上的client都可以通过名字来查找该远程对象、获得对它的引用并调用它的方法。registry可以由一个主机上的所有server共享,而某个server也可以创建并使用它自己的registry。
关于LocateRegistry.getRegistry()方法:
- 使用无参数的版本,则会在本机的默认端口1099上创建一个对registry的引用,如果想在其它端口上创建对registry的引用,那么需要使用带int参数的LocateRegistry.getRegistry方法来指定端口
- When a remote invocation on the registry is made, a stub for the remote object is passed instead of a copy of the remote object itself. Remote implementation objects, such as instances of ComputeEngine, never leave the Java virtual machine in which they were created. Thus, when a client performs a lookup in a server's remote object registry, a copy of the stub is returned. Remote objects in such cases are thus effectively passed by (remote) reference rather than by value.
- For security reasons, an application can only bind, unbind, or rebind remote object references with a registry running on the same host. This restriction prevents a remote client from removing or overwriting any of the entries in a server's registry. A lookup, however, can be requested from any host, local or remote
一旦server通过本地RMI registry完成了注册,它就打印出成功的信息(在我们的代码中),main函数到此结束。在这里,并不需要使用一个线程来保证server一直处于alive的状态。只要其他虚拟机中存在一个对ComputeEngine的引用,不论是本地的还是远程的,那么该ComputeEngine对象就不会被关闭,也不会被垃圾回收掉。因为我们的程序在registry中将一个引用绑定到了ComputeEngine,因此RMI将使得ComputeEngine所在进程保持运行。该ComputeEngine对象将一直可以接收调用请求,直到它在registry中被解除绑定并且没有任何远程client持有对ComputeEngine的远程引用。
编写客户端程序
客户端的程序比ComputeEngine要复杂:客户端不仅需要调用ComputeEngine,还要定义将被ComputeEngine执行的任务的代码。
在本例中,客户端程序由两部分组成。第一个部分是ComputePi类,它负责查找并调用一个Compute远程对象;第二个部分是Pi接口,它实现了Task接口并定义了将被ComputeEngine执行的任务。
package pi;

import java.math.BigDecimal;
import java.rmi.registry.LocateRegistry;
import java.rmi.registry.Registry;
import compute.Compute;

public class ComputePi {
	public static void main(String[] args) {
		if (System.getSecurityManager() == null)
			System.setSecurityManager(new SecurityManager());
		try {
			String host = "127.0.0.1";	// Compute对象运行时所在的远程主机的名字
			String precision = "10";	// 计算PI时期望的精度
			Registry registry = LocateRegistry.getRegistry(host); //获取对远程server上registry的引用
			Compute comp = (Compute) registry.lookup("TheCompute");
			Pi task = new Pi(Integer.parseInt(precision));
			BigDecimal pi = comp.executeTask(task);
			System.out.println(pi);
		} catch (Exception ex) {
			System.err.println(ex);
			ex.printStackTrace();
		}
	}
}
package pi;
import java.io.Serializable;
import java.math.BigDecimal;
import compute.Task;
public class Pi implements Task<BigDecimal>, Serializable {
private static final long serialVersionUID = 227L;
/** constants used in pi computation */
private static final BigDecimal FOUR =
BigDecimal.valueOf(4);
/** rounding mode to use during pi computation */
private static final int roundingMode =
BigDecimal.ROUND_HALF_EVEN;
/** digits of precision after the decimal point */
private final int digits;
/**
* Construct a task to calculate pi to the specified
* precision.
*/
public Pi(int digits) {
this.digits = digits;
}
/**
* Calculate pi.
*/
public BigDecimal execute() {
return computePi(digits);
}
/**
* Compute the value of pi to the specified number of
* digits after the decimal point. The value is
* computed using Machin's formula:
*
* pi/4 = 4*arctan(1/5) - arctan(1/239)
*
* and a power series expansion of arctan(x) to
* sufficient precision.
*/
public static BigDecimal computePi(int digits) {
int scale = digits + 5;
BigDecimal arctan1_5 = arctan(5, scale);
BigDecimal arctan1_239 = arctan(239, scale);
BigDecimal pi = arctan1_5.multiply(FOUR).subtract(
arctan1_239).multiply(FOUR);
return pi.setScale(digits,
BigDecimal.ROUND_HALF_UP);
}
/**
* Compute the value, in radians, of the arctangent of
* the inverse of the supplied integer to the specified
* number of digits after the decimal point. The value
* is computed using the power series expansion for the
* arc tangent:
*
* arctan(x) = x - (x^3)/3 + (x^5)/5 - (x^7)/7 +
* (x^9)/9 ...
*/
public static BigDecimal arctan(int inverseX,
int scale)
{
BigDecimal result, numer, term;
BigDecimal invX = BigDecimal.valueOf(inverseX);
BigDecimal invX2 = BigDecimal.valueOf(inverseX * inverseX);
numer = BigDecimal.ONE.divide(invX, scale, roundingMode);
result = numer;
int i = 1;
do {
numer =
numer.divide(invX2, scale, roundingMode);
int denom = 2 * i + 1;
term =
numer.divide(BigDecimal.valueOf(denom),
scale, roundingMode);
if ((i % 2) != 0) {
result = result.subtract(term);
} else {
result = result.add(term);
}
i++;
} while (term.compareTo(BigDecimal.ZERO) != 0);
return result;
}
}与Server端一样,Client端运行时必须首先安装Security Manager,这是因为在接收server端的远程对象的stub时,client需要从server端下载代码,而RMI在下载类代码时必须运行Security Manager。
在安装完Security Manager之后,Client使用绑定远程对象时所用的名字(即TheCompute)来查找Compute远程对象。然后,Client利用LocateRegistry.getRegistry这个API来获取对server上registry的引用。这里,我们在API中指定了registry所在的server所在主机的名字(默认端口为1099)。如果使用其他的端口,需要在使用重载的API来指定行新端口。
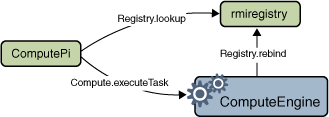
接下来,Client创建了一个Pi对象,然后调用Compute远程对象的executeTask方法,并将pi对象作为executeTask方法的参数。下图描述了消息在ComputePi客户端、rmiregistry和ComputeEngine之间的流动情况。
Pi类实现了Task接口并计算pi的数值。这里注意,任何可序列化的类,不论是直接地还是间接地实现了Serializable接口,都必须有一个名为serialVersionUID的private static final field,以此来保证在不同版本之间的序列化的兼容性。
在这个例子中,最神奇的地方在于:实现Compute接口的类(即ComputeEngine),直到executeTask方法被调用时,才需要得到PI类的实现代码(通过将PI对象作为参数传递给executeTask类)。在这个时候,PI的实现类代码被RMI下载到ComputeEngine的JVM中,
编译和运行RMI应用
既然Compute Engine例子相关的代码都已经就绪,我们就要开始编译并运行了。
编译
在真实的应用场景中,开发者往往会创建一个包含了Compute接口和Task接口的JAR文件,来供client和server使用。在本节中,您将看到,client端的PI类将在运行时被下载到server。同时,Compute和Task接口将在运行时从server下载到registry。
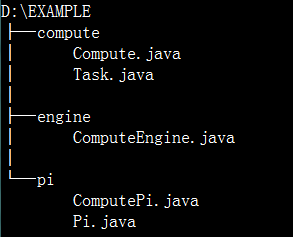
本例中有如下几个package:
- compute - 包含Compute和Task接口
- engine - 包含ComputeEngine的实现类
- client - 包含ComputePi客户端代码以及Pi实现类
为接口构建JAR文件
首先,我们来编译compute包里的代码
假定我们代码路径为:
cd D:\example
javac compute\Compute.java compute\Task.java
jar cvf compute.jar compute/*.class
可以看到,在D:\example路径下新增了compute.jar文件
After you build either server-side or client-side classes with the javac compiler, if any of those classes will need to be dynamically downloaded by other Java virtual machines, you must ensure that their class files are placed in a network-accessible location. In this example, for Solaris OS or Linux this location is /home/user/public_html/classes because many web servers allow the accessing of a user'spublic_html directory through an HTTP URL constructed as http://host/~user/. If your web server does not support this convention, you could use a different location in the web server's hierarchy, or you could use a file URL instead. The file URLs take the form file:/home/user/public_html/classes/ on Solaris OS or Linux and the form file:/c:/home/user/public_html/classes/ on Windows. You may also select another type of URL, as appropriate.
The network accessibility of the class files enables the RMI runtime to download code when needed. Rather than defining its own protocol for code downloading, RMI uses URL protocols supported by the Java platform (for example, HTTP) to download code. Note that using a full, heavyweight web server to serve these class files is unnecessary. For example, a simple HTTP server that provides the functionality needed to make classes available for downloading in RMI through HTTP can be found at .
Also see Remote Method Invocation Home.
构建Server类
cd D:\example
javac -cp compute.jar engine/ComputeEngine.java
这样,在目录engine下,生成了ComputeEngine.class文件。
构建client类
运行
关于Security
不论是Server还是Client,它们运行时都需要安装Security Manager。在运行server或者client时,我们需要指定一个安全策略文件(Security Policy File)来赋予代码所需的权限。


 957
957

 被折叠的 条评论
为什么被折叠?
被折叠的 条评论
为什么被折叠?
 到【灌水乐园】发言


