


Spring MVC 初体验
标签(空格分隔): J2EE Spring
学习参考书籍:《看透Spring MVC源代码分析与实践》2016.1 韩路彪
学习参考视频:传智播客 Spring MVC 整合Mybatis 2015 燕青
第一次录视频,记录下自己工作的细节,录得断断续续,几次遇到问题被打断,衔接性不好。
项目源码
Spring下载和源码关联
环境
Spring 4.2.4
eclipse Luna
Tomcat 8
MySQL 5.6
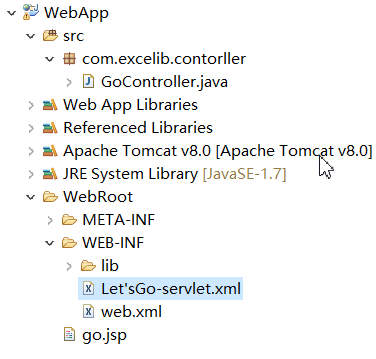
项目目录结构
导入jar包
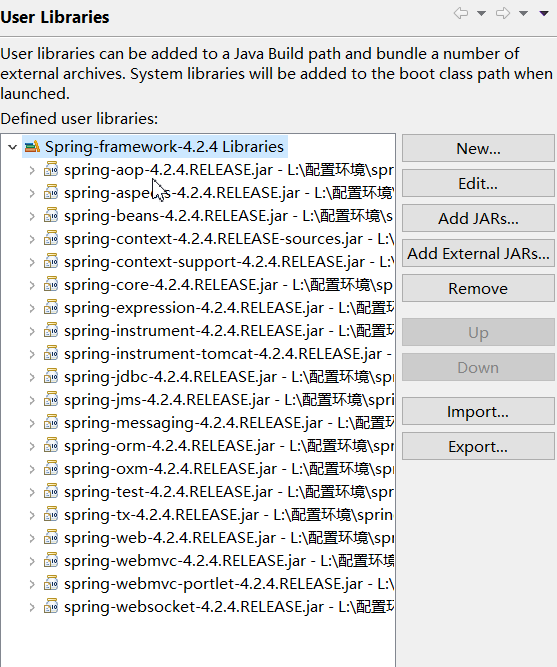
- 将Spring的jar包添加入工程WEB-INF\lib 目录下
也可以建立相应的User Library, 如下图:
Spring MVC 最简单的配置
- 在Web.xml中配置Servlet
- 创建Spring MVC的xml配置文件
- 创建Controller 和 Viewer
在Web.xml中配置Servlet
要注意两点:
- 一是 配置前端控制器DispatchServlet中contextConfigLocation的指定问题。contextConfigLocation参数来指定Spring
MVC配置文件的位置,如果不指定,就默认为使用WEB-INF下[ServletName]-servlet.xml文件。- 二是配置时,三种情况说明:
第一种: *.action,访问.action结尾 由DispatchServlet进行解析
第二种:/,所有访问的地址都由DispatchServlet进行解析,对于静态文件的解析需要配置不让DispatchServlet进行解析,此种方法可以使用RESTful1风格的url
第三种:/*,这样配置不对,最终要转发到一个jsp页面时,仍然会由DispatchServlet解析jsp地址,不能根据jsp页面找到handler,会报错。
下面是一个配置案例:
<?xml version="1.0" encoding="UTF-8"?>
<web-app xmlns:xsi="http://www.w3.org/2001/XMLSchema-instance"
         xmlns="http://xmlns.jcp.org/xml/ns/javaee"
         xsi:schemaLocation="http://xmlns.jcp.org/xml/ns/javaee http://xmlns.jcp.org/xml/ns/javaee/web-app_3_1.xsd"
         id="WebApp_ID" version="3.1">
  <display-name>WebApp</display-name>
  <!--Spring MVC开始配置 -->
  <servlet>
        <servlet-name>Let'sGo</servlet-name>
        <servlet-class>org.springframework.web.servlet.DispatcherServlet</servlet-class>
        <!-- 这里在配置DispatcherServlet的时候可以设置contextConfigLocation参数来指定Spring MVC配置文件的位置
        如果不指定,就默认为使用WEB-INF下[ServletName]-servlet.xml文件,这里使用了默认值,即WEB-INF/Let'sGo-servlet.xml-->
        <!--
        <init-param>
            <param-name>contextConfigLocation</param-name>
            <param-value>classpath:springmvc.xml</param-value>
        </init-param> -->
  </servlet>

  <servlet-mapping>
        <servlet-name>Let'sGo</servlet-name>
        <url-pattern>/</url-pattern>
        <!--
        第一种: *.action,访问.action结尾 由DispatchServlet进行解析
        第二种:/,所有访问的地址都由DispatchServlet进行解析,
            对于静态文件的解析需要配置不让DispatchServlet进行解析,此种方法可以使用RESTful风格的url
        第三种:/*,这样配置不对,最终要转发到一个jsp页面时,
            仍然会由DispatchServlet解析jsp地址,不能根据jsp页面找到handler,会报错。
        -->
  </servlet-mapping>

  <welcome-file-list>
    <welcome-file>index.html</welcome-file>
    <welcome-file>index.htm</welcome-file>
    <welcome-file>index.jsp</welcome-file>
    <welcome-file>default.html</welcome-file>
    <welcome-file>default.htm</welcome-file>
    <welcome-file>default.jsp</welcome-file>
  </welcome-file-list>
</web-app>
创建Spring MVC的xml配置文件
这一步配置处理器适配器。编写xml时相应的Spring约束xsd
可以通过XML Catalog实时校验,详细可以参考1。
下面是一个案例:
<!-- Let'sGo.xml-->
<?xml version="1.0" encoding="UTF-8"?>
<beans xmlns="http://www.springframework.org/schema/beans"
       xmlns:xsi="http://http://www.w3.org/2001/XMLSchema-instance"
       xmlns:p="http://www.springframework.org/schema/p"
       xmlns:context="http://www.springframework.org/schema/context"
       xmlns:mvc="http://www.springframework.org/schema/mvc"
       xsi:schemaLocation="http:www.springframework.org/schema/beans
                           http://www.springframework.org/schema/beans/spring-beans.xsd
                           http://www.springframework.org/schema/context
                           http://www.springframework.org/schema/context/spring-context.xsd
                           http://www.springframework.org/schema/mvc
                           http://www.springframework.org/schema/mvc/spring-mvc.xsd">
    <!--使用注解驱动 -->
    <mvc:annotation-driven></mvc:annotation-driven>
    <!-- 使用组件扫描,来扫描通过注解配置的类,还可以设置<context:include-filter>子标签来设置只扫描@Controller-->
    <context:component-scan>
        <context:include-filter type="annotation" expression="org.springframework.stereotype.Controller"/>
    </context:component-scan>
</beans>在使用标签<context:component-scan>时,要注意base-package是必要不可缺少的。否则,会提示如下错误:
cvc-complex-type.4: Attribute ‘base-package’ must appear on element ‘context:component-scan’.
注意如果没有配置ViewResolver,Spring MVC将默认使用org.springframework.web.servlet.view.InternalResourceViewResolver作为ViewResolver,而且prefix和suffix都为空。所以go.jsp返回值对应的就是根目录下的go.jsp.
创建Controller 和 Viewer
写了一个Controller
package com.excelib.contorller;

import org.apache.commons.logging.Log;
import org.apache.commons.logging.LogFactory;
import org.springframework.ui.Model;
import org.springframework.web.bind.annotation.RequestMapping;
import org.springframework.web.bind.annotation.RequestMethod;
@Controller
public class GoController {
    private final Log logger =  LogFactory.getLog(GoController.class);
    //处理Head类型的“/”请求
    @RequestMapping(value={"/"},method={RequestMethod.HEAD})
    public String head() {
        return "go.jsp";
    }

    //处理Get类型的"/index"和"/"请求
    @RequestMapping(value={"/index","/"},method={RequestMethod.GET})
    public String index(Model model) throws Exception{
        logger.info("=============processed by index=================");
        //设置msg参数
        model.addAttribute("msg","Go Go Go!");
        return "go.sjp";
    }
}
这里单独写了一个处理HEAD请求的方法,此方法可以监测服务器的状态,因为不返回body所以比GET请求更节省网络资源。
在Tomcat中部署好项目,然后在浏览器地址栏中输入http://localhost:8080/WebApp/index 或http://localhost:8080/WebApp/ 页面显示如下:

成功!
- REST(英文:Representational State Transfer,简称REST)描述了一个架构样式的网络系统,比如 web 应用程序。一种软件架构风格,设计风格而不是标准,只是提供了一组设计原则和约束条件。它主要用于客户端和服务器交互类的软件。基于这个风格设计的软件可以更简洁,更有层次,更易于实现缓存等机制。 ↩


 731
731

 被折叠的 条评论
为什么被折叠?
被折叠的 条评论
为什么被折叠?
 到【灌水乐园】发言


