


1.实现多线程
1.1简单了解多线程【理解】
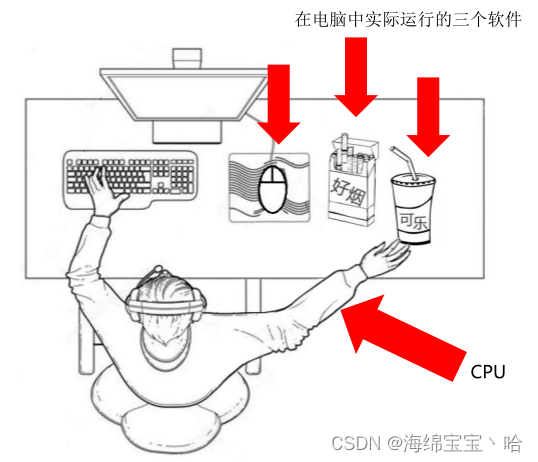
是指从软件或者硬件上实现多个线程并发执行的技术。
具有多线程能力的计算机因有硬件支持而能够在同一时间执行多个线程,提升性能。
1.2并发和并行【理解】
-
并行:在同一时刻,有多个指令在多个CPU上同时执行。

-
并发:在同一时刻,有多个指令在单个CPU上交替执行。

1.3进程和线程【理解】
-
进程:是正在运行的程序
独立性:进程是一个能独立运行的基本单位,同时也是系统分配资源和调度的独立单位
动态性:进程的实质是程序的一次执行过程,进程是动态产生,动态消亡的
并发性:任何进程都可以同其他进程一起并发执行 -
线程:是进程中的单个顺序控制流,是一条执行路径
单线程:一个进程如果只有一条执行路径,则称为单线程程序
多线程:一个进程如果有多条执行路径,则称为多线程程序

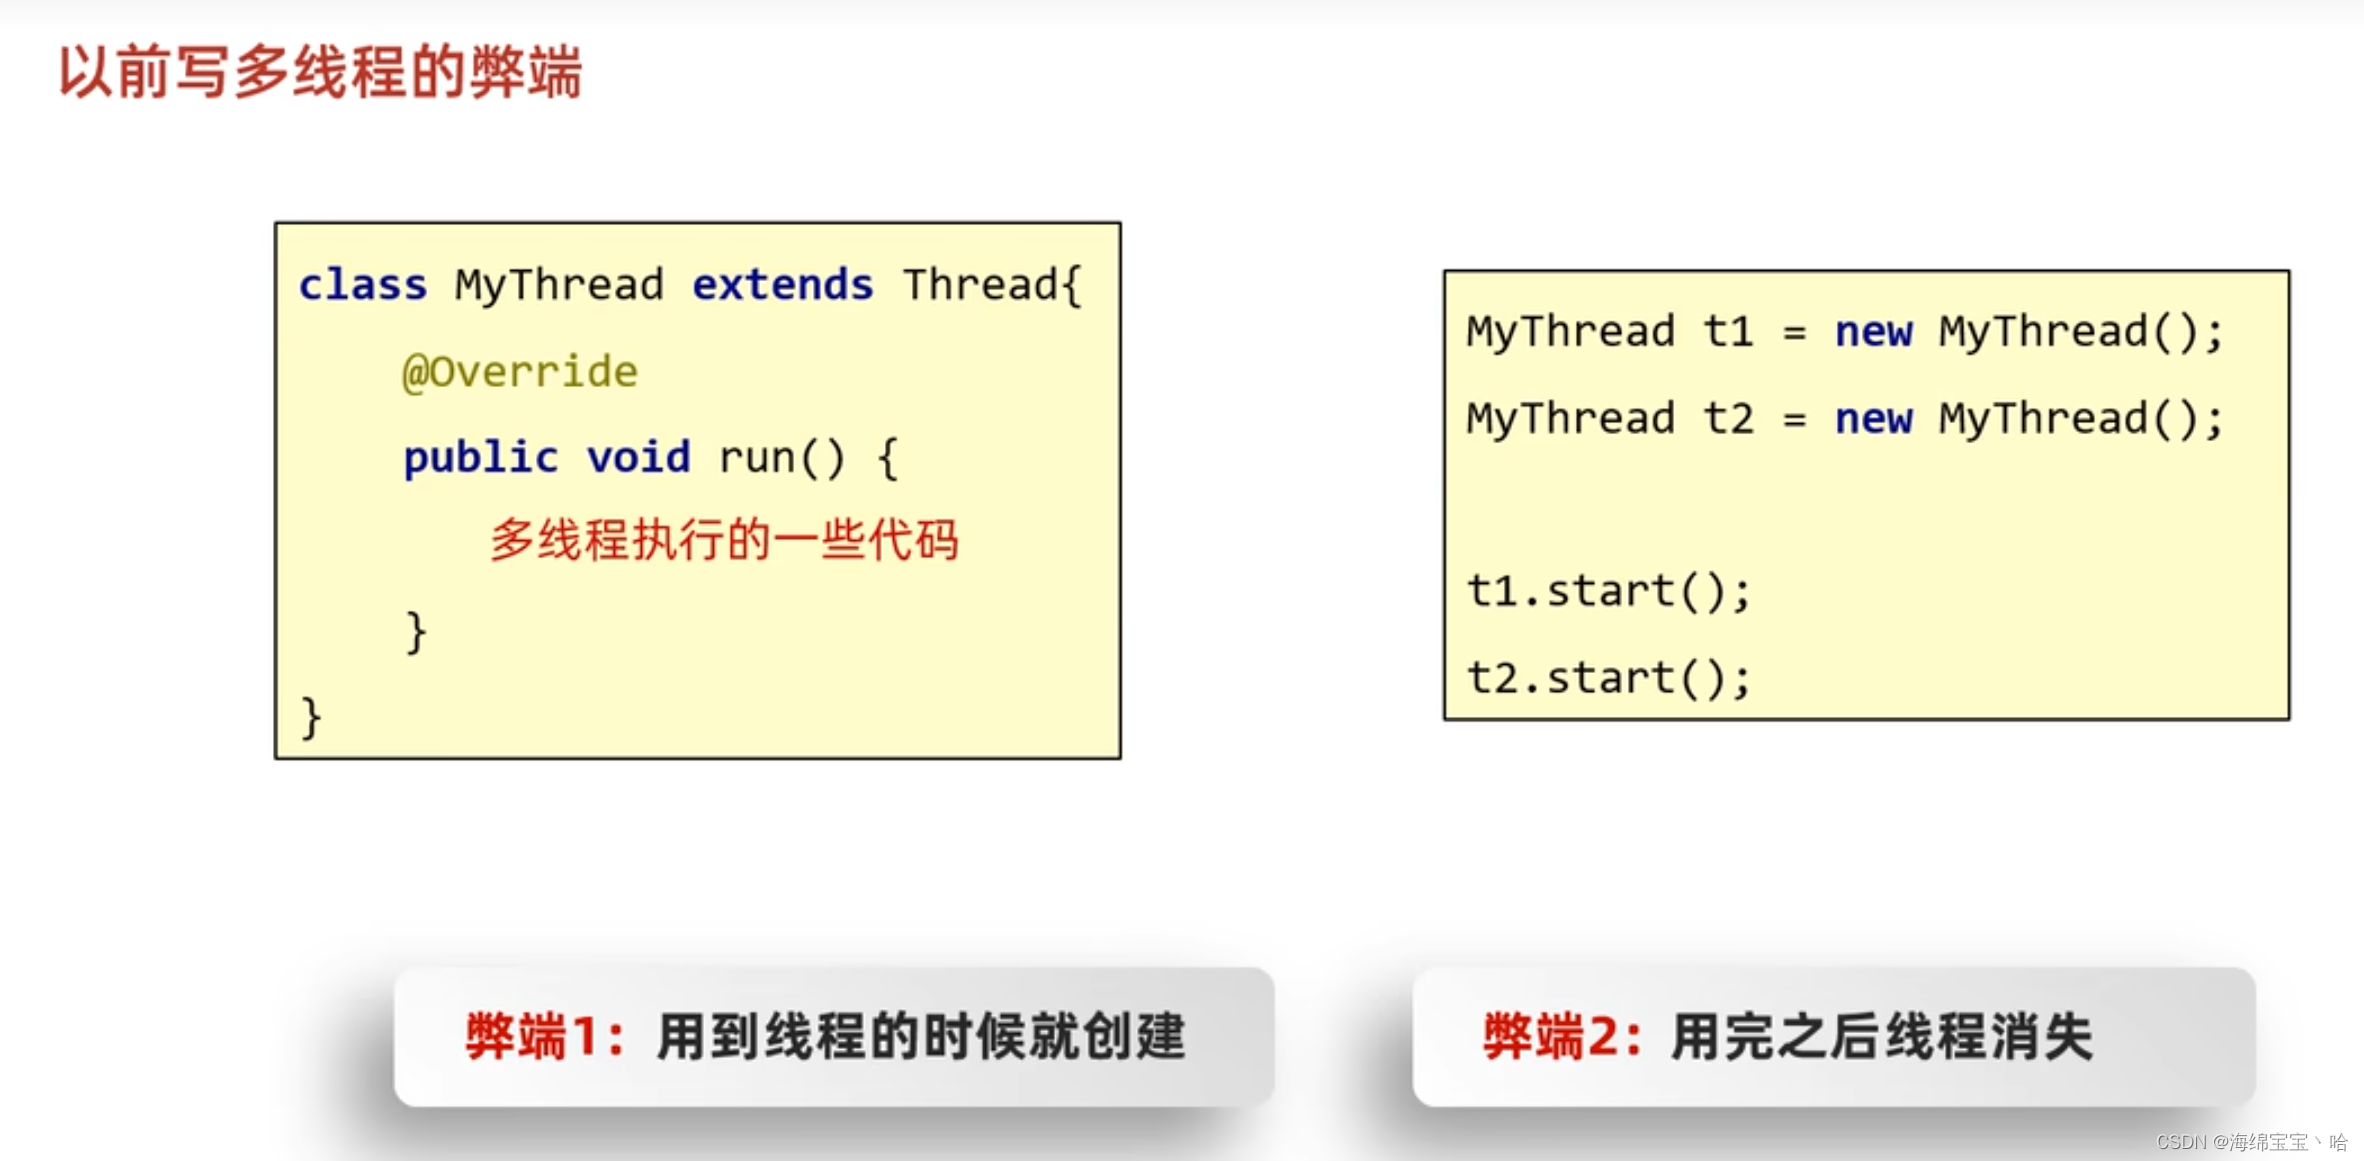
1.4实现多线程方式一:继承Thread类【应用】
-
方法介绍
方法名 说明 void run() 在线程开启后,此方法将被调用执行 void start() 使此线程开始执行,Java虚拟机会调用run方法() -
实现步骤
- 定义一个类MyThread继承Thread类
- 在MyThread类中重写run()方法
- 创建MyThread类的对象
- 启动线程
-
代码演示
public class MyThread extends Thread { @Override public void run() { for(int i=0; i<100; i++) { System.out.println(i); } } } public class MyThreadDemo { public static void main(String[] args) { MyThread my1 = new MyThread(); MyThread my2 = new MyThread(); // my1.run(); // my2.run(); //void start() 导致此线程开始执行; Java虚拟机调用此线程的run方法 my1.start(); my2.start(); } } -
两个小问题
-
为什么要重写run()方法?
因为run()是用来封装被线程执行的代码
-
run()方法和start()方法的区别?
run():封装线程执行的代码,直接调用,相当于普通方法的调用
start():启动线程;然后由JVM调用此线程的run()方法
-
1.5实现多线程方式二:实现Runnable接口【应用】
-
Thread构造方法
方法名 说明 Thread(Runnable target) 分配一个新的Thread对象 Thread(Runnable target, String name) 分配一个新的Thread对象 -
实现步骤
- 定义一个类MyRunnable实现Runnable接口
- 在MyRunnable类中重写run()方法
- 创建MyRunnable类的对象
- 创建Thread类的对象,把MyRunnable对象作为构造方法的参数
- 启动线程
-
代码演示
public class MyRunnable implements Runnable {
    @Override
    public void run() {
        for(int i=0; i<100; i++) {
            System.out.println(Thread.currentThread().getName()+":"+i);
        }
    }
}
public class MyRunnableDemo {
    public static void main(String[] args) {
        //创建MyRunnable类的对象
        MyRunnable my = new MyRunnable();

        //创建Thread类的对象,把MyRunnable对象作为构造方法的参数
        //Thread(Runnable target)
//        Thread t1 = new Thread(my);
//        Thread t2 = new Thread(my);
        //Thread(Runnable target, String name)
        Thread t1 = new Thread(my,"坦克");
        Thread t2 = new Thread(my,"飞机");

        //启动线程
        t1.start();
        t2.start();
    }
}
1.6实现多线程方式三: 实现Callable接口【应用】
-
方法介绍
方法名 说明 V call() 计算结果,如果无法计算结果,则抛出一个异常 FutureTask(Callable callable) 创建一个 FutureTask,一旦运行就执行给定的 Callable V get() 如有必要,等待计算完成,然后获取其结果 -
实现步骤
- 定义一个类MyCallable实现Callable接口
- 在MyCallable类中重写call()方法
- 创建MyCallable类的对象
- 创建Future的实现类FutureTask对象,把MyCallable对象作为构造方法的参数
- 创建Thread类的对象,把FutureTask对象作为构造方法的参数
- 启动线程
- 再调用get方法,就可以获取线程结束之后的结果。
-
代码演示
public class MyCallable implements Callable<String> { @Override public String call() throws Exception { for (int i = 0; i < 100; i++) { System.out.println("跟女孩表白" + i); } //返回值就表示线程运行完毕之后的结果 return "答应"; } } public class Demo { public static void main(String[] args) throws ExecutionException, InterruptedException { //线程开启之后需要执行里面的call方法 MyCallable mc = new MyCallable(); //Thread t1 = new Thread(mc); //可以获取线程执行完毕之后的结果.也可以作为参数传递给Thread对象 FutureTask<String> ft = new FutureTask<>(mc); //创建线程对象 Thread t1 = new Thread(ft); String s = ft.get(); //开启线程 t1.start(); //String s = ft.get(); System.out.println(s); } } -
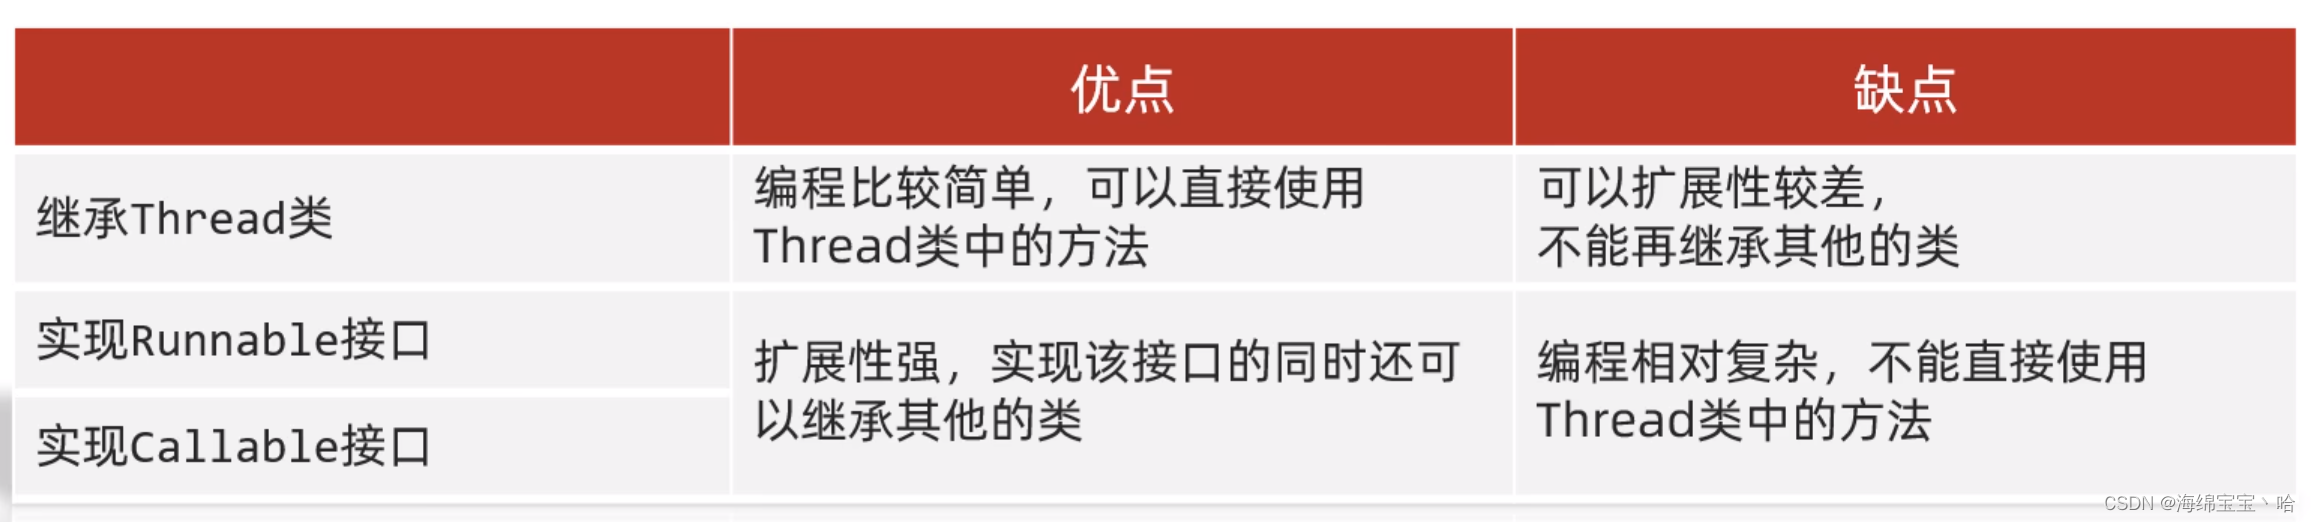
三种实现方式的对比
-
实现Runnable、Callable接口
- 好处: 扩展性强,实现该接口的同时还可以继承其他的类
- 缺点: 编程相对复杂,不能直接使用Thread类中的方法
-
继承Thread类
- 好处: 编程比较简单,可以直接使用Thread类中的方法
- 缺点: 可以扩展性较差,不能再继承其他的类
-
1.7设置和获取线程名称【应用】
-
方法介绍
方法名 说明 void setName(String name) 将此线程的名称更改为等于参数name String getName() 返回此线程的名称 Thread currentThread() 返回对当前正在执行的线程对象的引用
- 细节1:如果我们没有给线程设置名字,线程也是有默认的名字的
格式:Thread-X(X序号,从8开始的)
- 细节2:可以通过成员方法设置线程名字,也可以通过构造方法设置名字。
- 细节2:当JVM虚拟机启动之后,会自动的启动多条线程其中有一条线程就叫做main线程他的作用就是去调用main方法,并执行里面的代码在以前,我们写的所有的代码,其实都是运行在main线程当中
-
代码演示
public class MyThread extends Thread {
    public MyThread() {}
    public MyThread(String name) {
        super(name);
    }

    @Override
    public void run() {
        for (int i = 0; i < 100; i++) {
            System.out.println(getName()+":"+i);
        }
    }
}
public class MyThreadDemo {
    public static void main(String[] args) {
        MyThread my1 = new MyThread();
        MyThread my2 = new MyThread();

        //void setName(String name):将此线程的名称更改为等于参数 name
        my1.setName("高铁");
        my2.setName("飞机");

        //Thread(String name)
        MyThread my1 = new MyThread("高铁");
        MyThread my2 = new MyThread("飞机");

        my1.start();
        my2.start();

        //static Thread currentThread() 返回对当前正在执行的线程对象的引用
        System.out.println(Thread.currentThread().getName());
    }
}
1.8线程休眠【应用】
-
相关方法
方法名 说明 static void sleep(long millis) 使当前正在执行的线程停留(暂停执行)指定的毫秒数
- 细节:
-
- 哪条线程执行到这个方法,那么哪条线程就会在这里停留对应的时间
- 方法的参数:就表示睡眠的时间,单位毫秒
- 1 秒= 1000毫秒
- 当时间到了之后,线程会自动的醒来,继续执行下面的其他代码
-
代码演示
public class MyRunnable implements Runnable {
    @Override
    public void run() {
        for (int i = 0; i < 100; i++) {
            try {
                Thread.sleep(100);
            } catch (InterruptedException e) {
                e.printStackTrace();
            }

            System.out.println(Thread.currentThread().getName() + "---" + i);
        }
    }
}
public class Demo {
    public static void main(String[] args) throws InterruptedException {
        /*System.out.println("睡觉前");
        Thread.sleep(3000);
        System.out.println("睡醒了");*/

        MyRunnable mr = new MyRunnable();

        Thread t1 = new Thread(mr);
        Thread t2 = new Thread(mr);

        t1.start();
        t2.start();
    }
}
1.9线程优先级【应用】
-
线程调度
-
两种调度方式
- 分时调度模型:所有线程轮流使用 CPU 的使用权,平均分配每个线程占用 CPU 的时间片
- 抢占式调度模型:优先让优先级高的线程使用 CPU,如果线程的优先级相同,那么会随机选择一个,优先级高的线程获取的 CPU 时间片相对多一些
-
Java使用的是抢占式调度模型
-
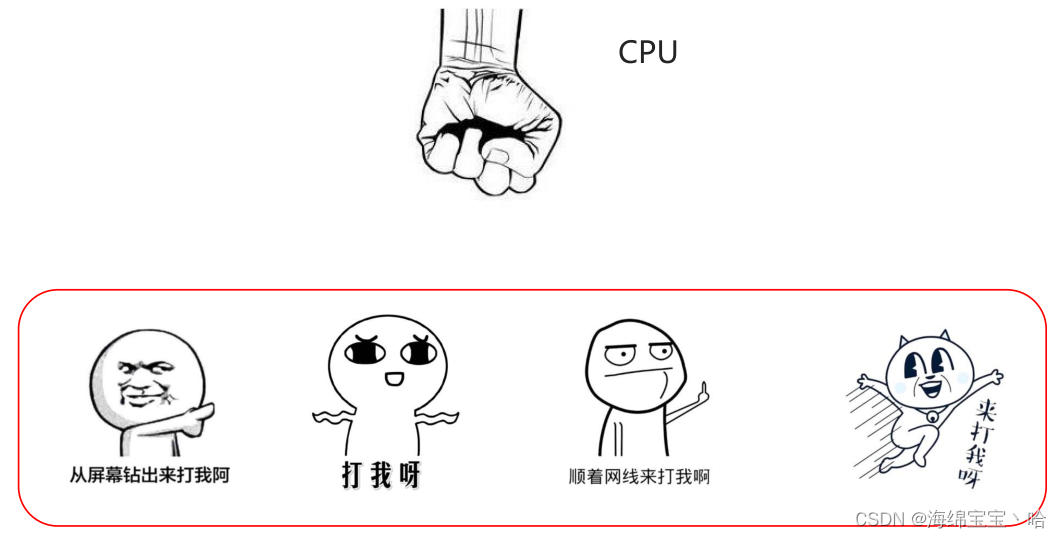
随机性
假如计算机只有一个 CPU,那么 CPU 在某一个时刻只能执行一条指令,线程只有得到CPU时间片,也就是使用权,才可以执行指令。所以说多线程程序的执行是有随机性,因为谁抢到CPU的使用权是不一定的
-
-
优先级相关方法
方法名 说明 final int getPriority() 返回此线程的优先级 final void setPriority(int newPriority) 更改此线程的优先级线程默认优先级是5;线程优先级的范围是:1-10 -
代码演示
public class MyCallable implements Callable<String> {
    @Override
    public String call() throws Exception {
        for (int i = 0; i < 100; i++) {
            System.out.println(Thread.currentThread().getName() + "---" + i);
        }
        return "线程执行完毕了";
    }
}
public class Demo {
    public static void main(String[] args) {
        //优先级: 1 - 10 默认值:5
        MyCallable mc = new MyCallable();

        FutureTask<String> ft = new FutureTask<>(mc);

        Thread t1 = new Thread(ft);
        t1.setName("飞机");
        t1.setPriority(10);
        //System.out.println(t1.getPriority());//5
        t1.start();

        MyCallable mc2 = new MyCallable();

        FutureTask<String> ft2 = new FutureTask<>(mc2);

        Thread t2 = new Thread(ft2);
        t2.setName("坦克");
        t2.setPriority(1);
        //System.out.println(t2.getPriority());//5
        t2.start();
    }
}
1.10守护线程【应用】
-
相关方法
方法名 说明 void setDaemon(boolean on) 将此线程标记为守护线程,当运行的线程都是守护线程时,Java虚拟机将退出
- 细节:
当其他的非守护线程执行完毕之后,守线程会陆续结束- 通俗易懂:
当女神线程结束了,那么备胎也没有存在的必要了
- 通俗易懂:
-
代码演示
public class MyThread1 extends Thread {
    @Override
    public void run() {
        for (int i = 0; i < 10; i++) {
            System.out.println(getName() + "---" + i);
        }
    }
}
public class MyThread2 extends Thread {
    @Override
    public void run() {
        for (int i = 0; i < 100; i++) {
            System.out.println(getName() + "---" + i);
        }
    }
}
public class Demo {
    public static void main(String[] args) {
        MyThread1 t1 = new MyThread1();
        MyThread2 t2 = new MyThread2();

        t1.setName("女神");
        t2.setName("备胎");

        //把第二个线程设置为守护线程
        //当普通线程执行完之后,那么守护线程也没有继续运行下去的必要了.
        t2.setDaemon(true);

        t1.start();
        t2.start();
    }
}
应用场景

1.11出让线程/礼让线程、插入线程/插队线程【了解】

yield() 方法:
-
作用:提示线程调度器当前线程愿意让出CPU执行时间,给其他线程更多机会运行。
-
语法:
Thread.yield(); -
例子:
Thread.yield();
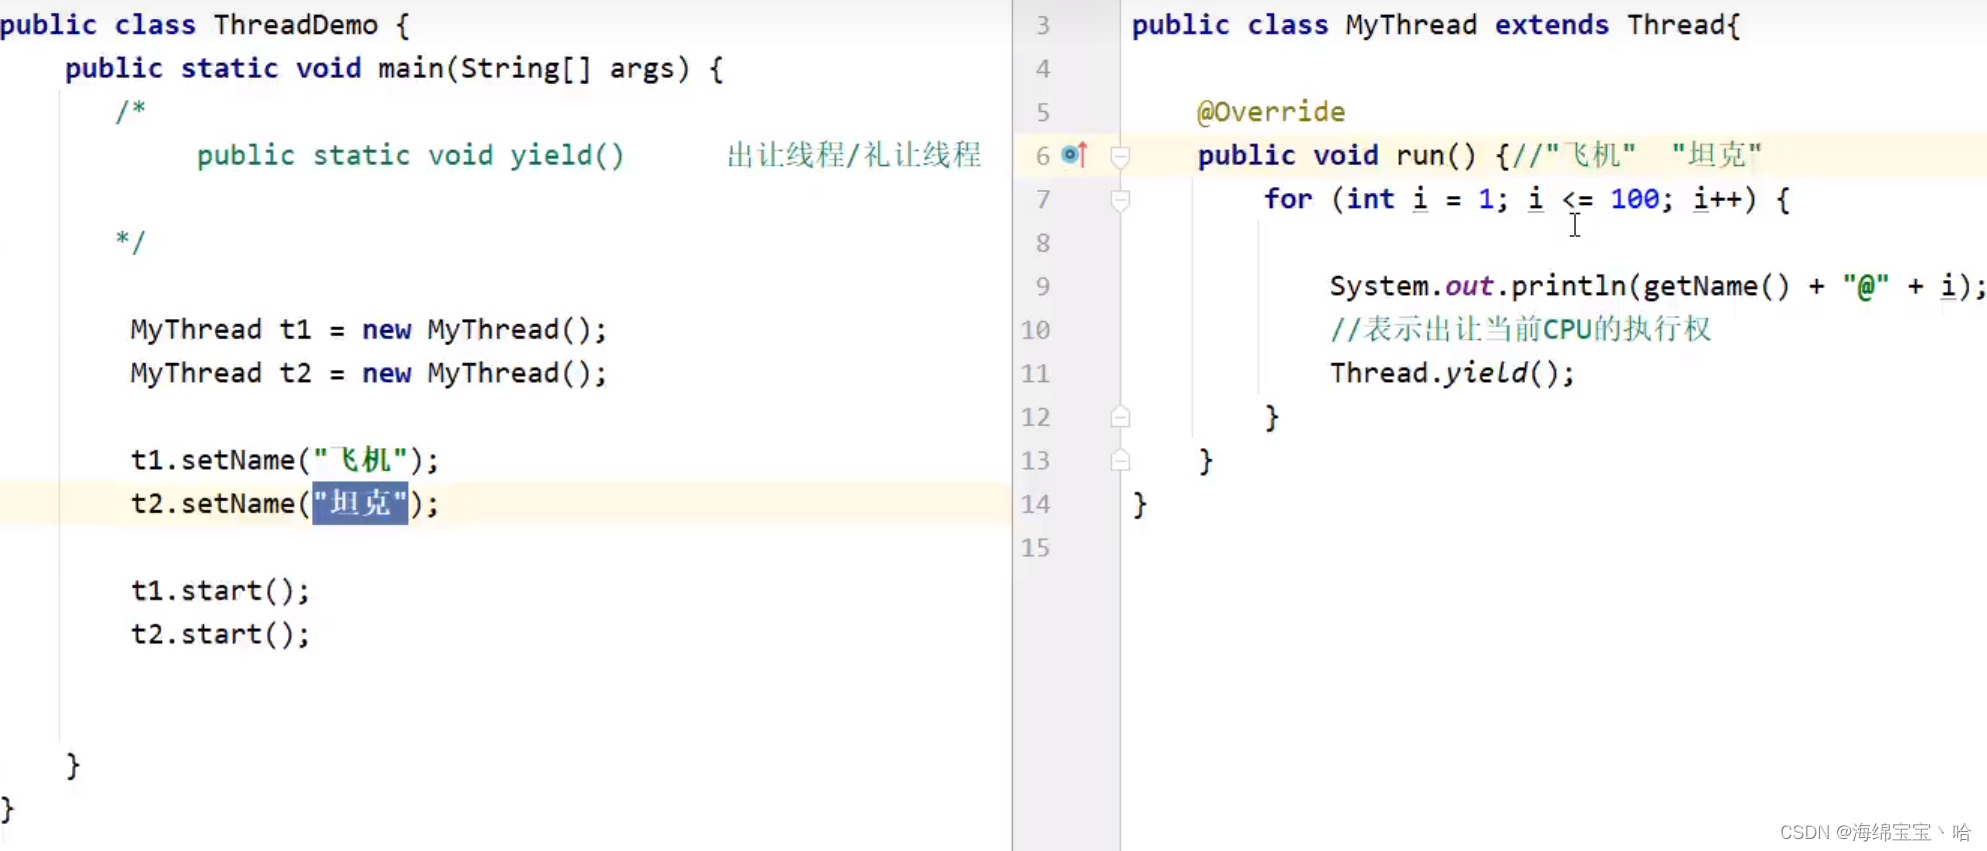
尽可能让两个线程均匀一些,但是再次抢夺不一定是谁抢到。
join() 方法:
-
作用:让一个线程等待另一个线程执行完成。。
-
语法:
Thread.join(); -
例子:
Thread.join();
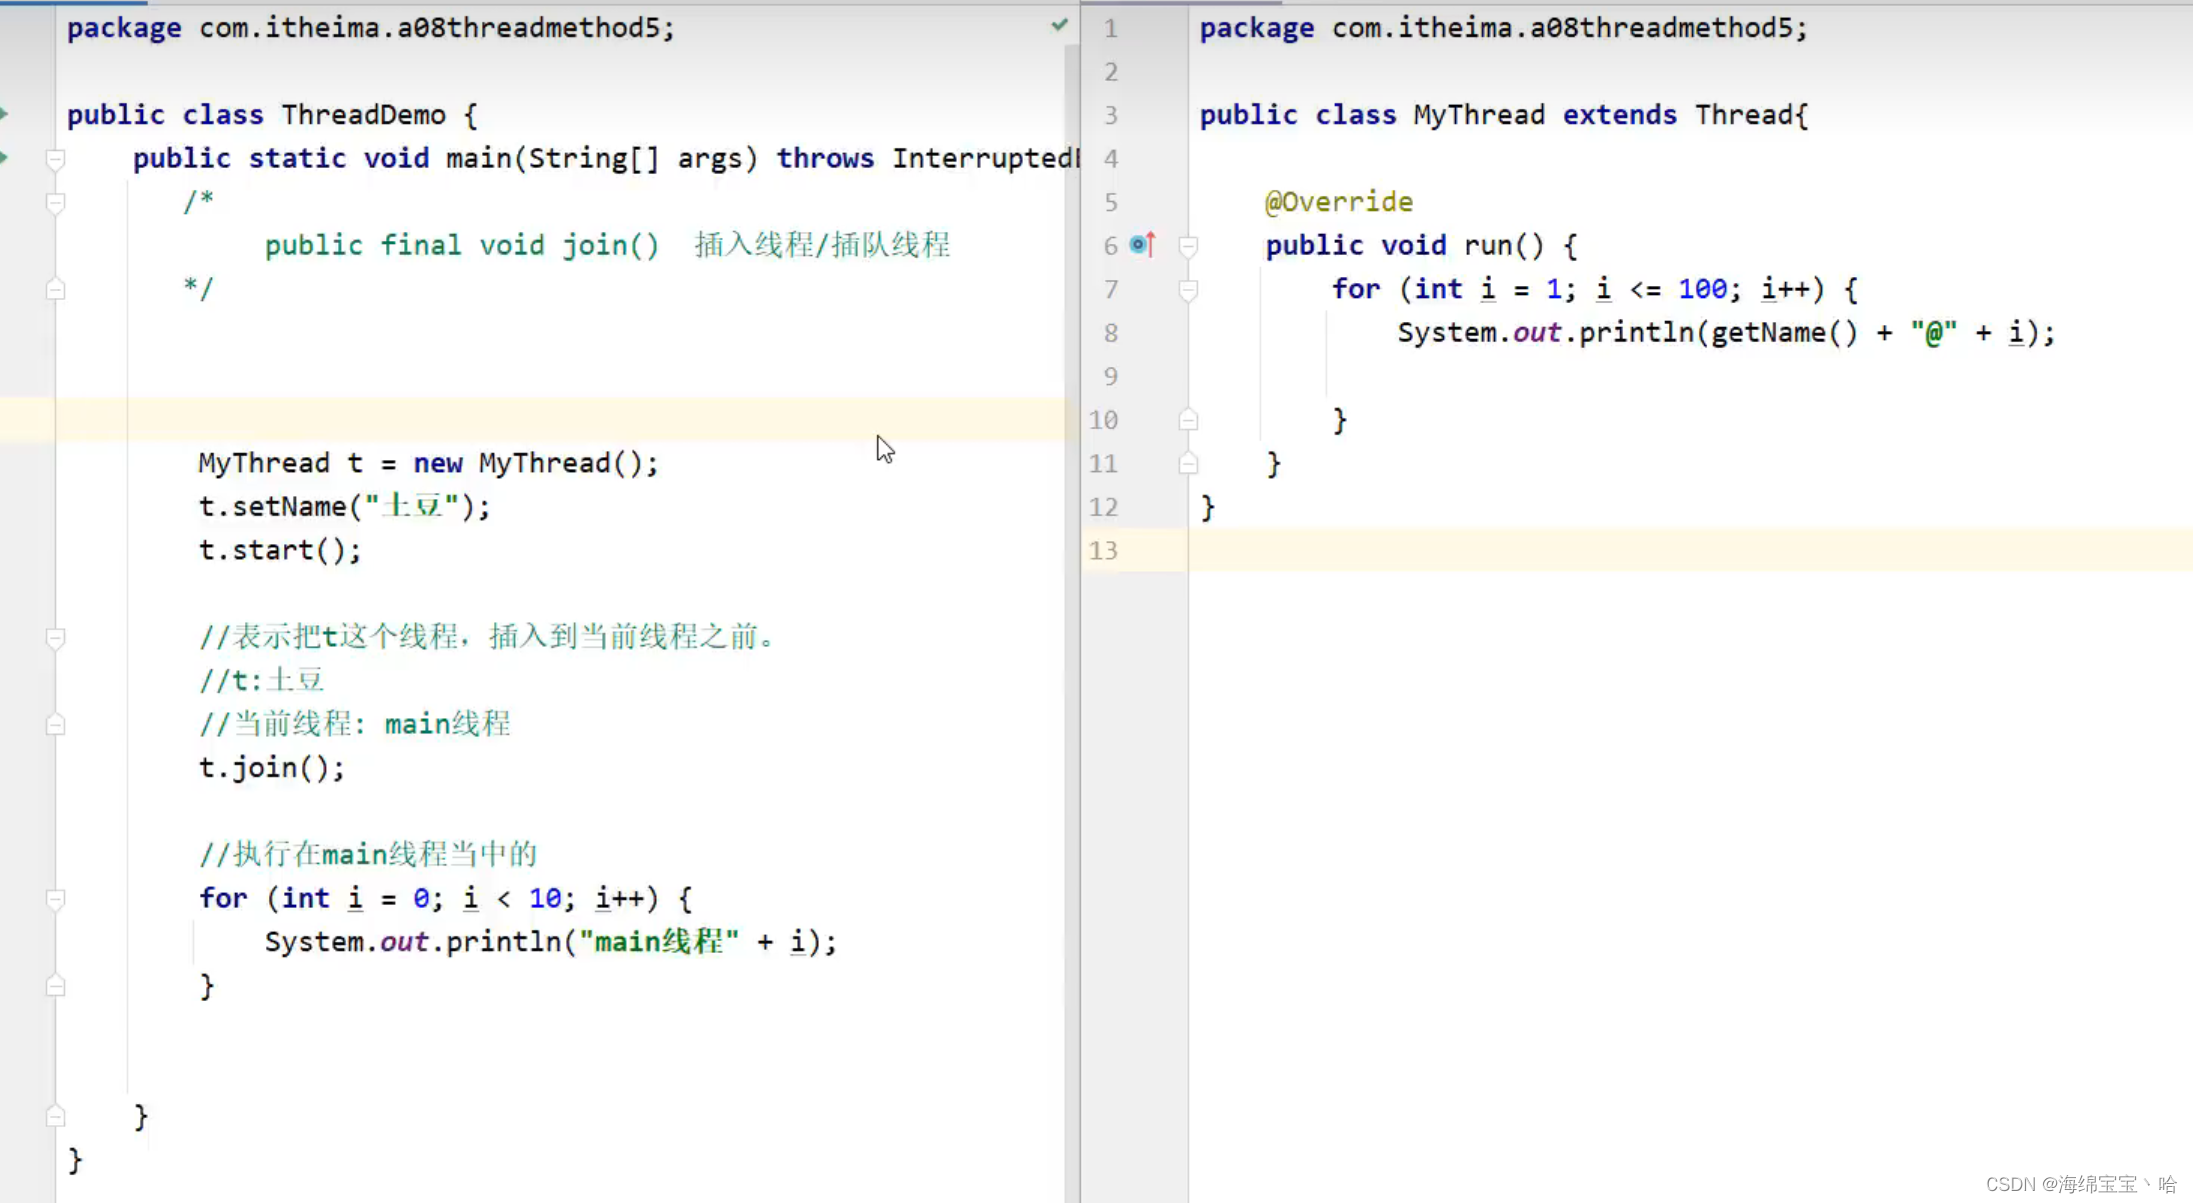
这样就会先执行MyThread现成,再执行main线程
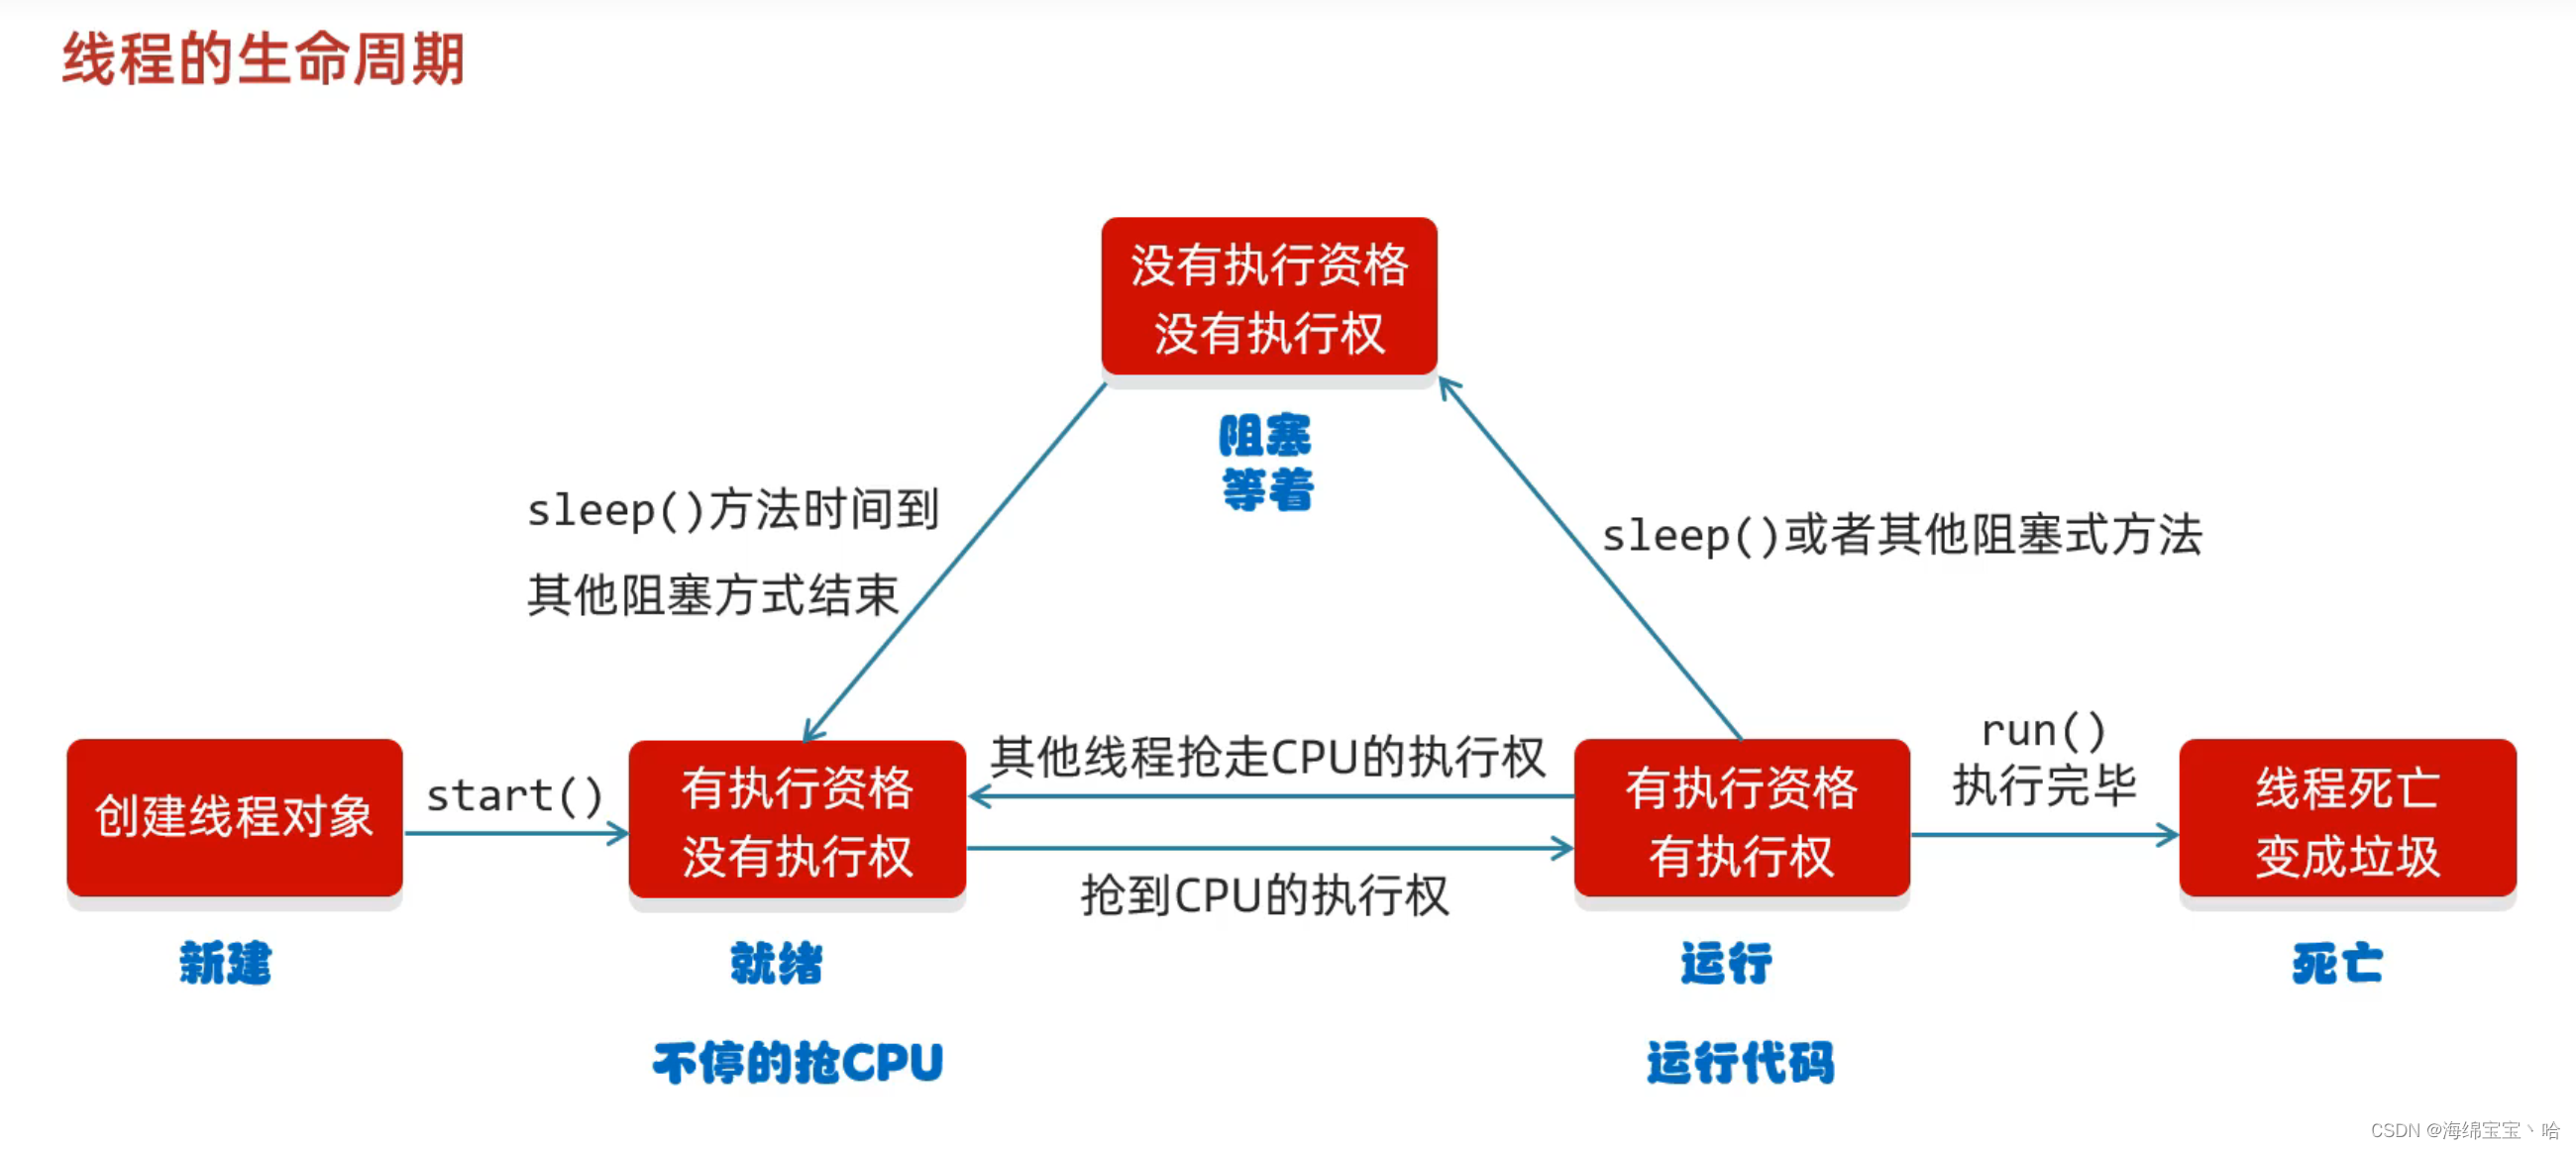
线程生命周期

回答:并不是,而是继续抢CPU
2.线程同步
2.1卖票【应用】
-
案例需求
某电影院目前正在上映国产大片,共有100张票,而它有3个窗口卖票,请设计一个程序模拟该电影院卖票
-
代码实现
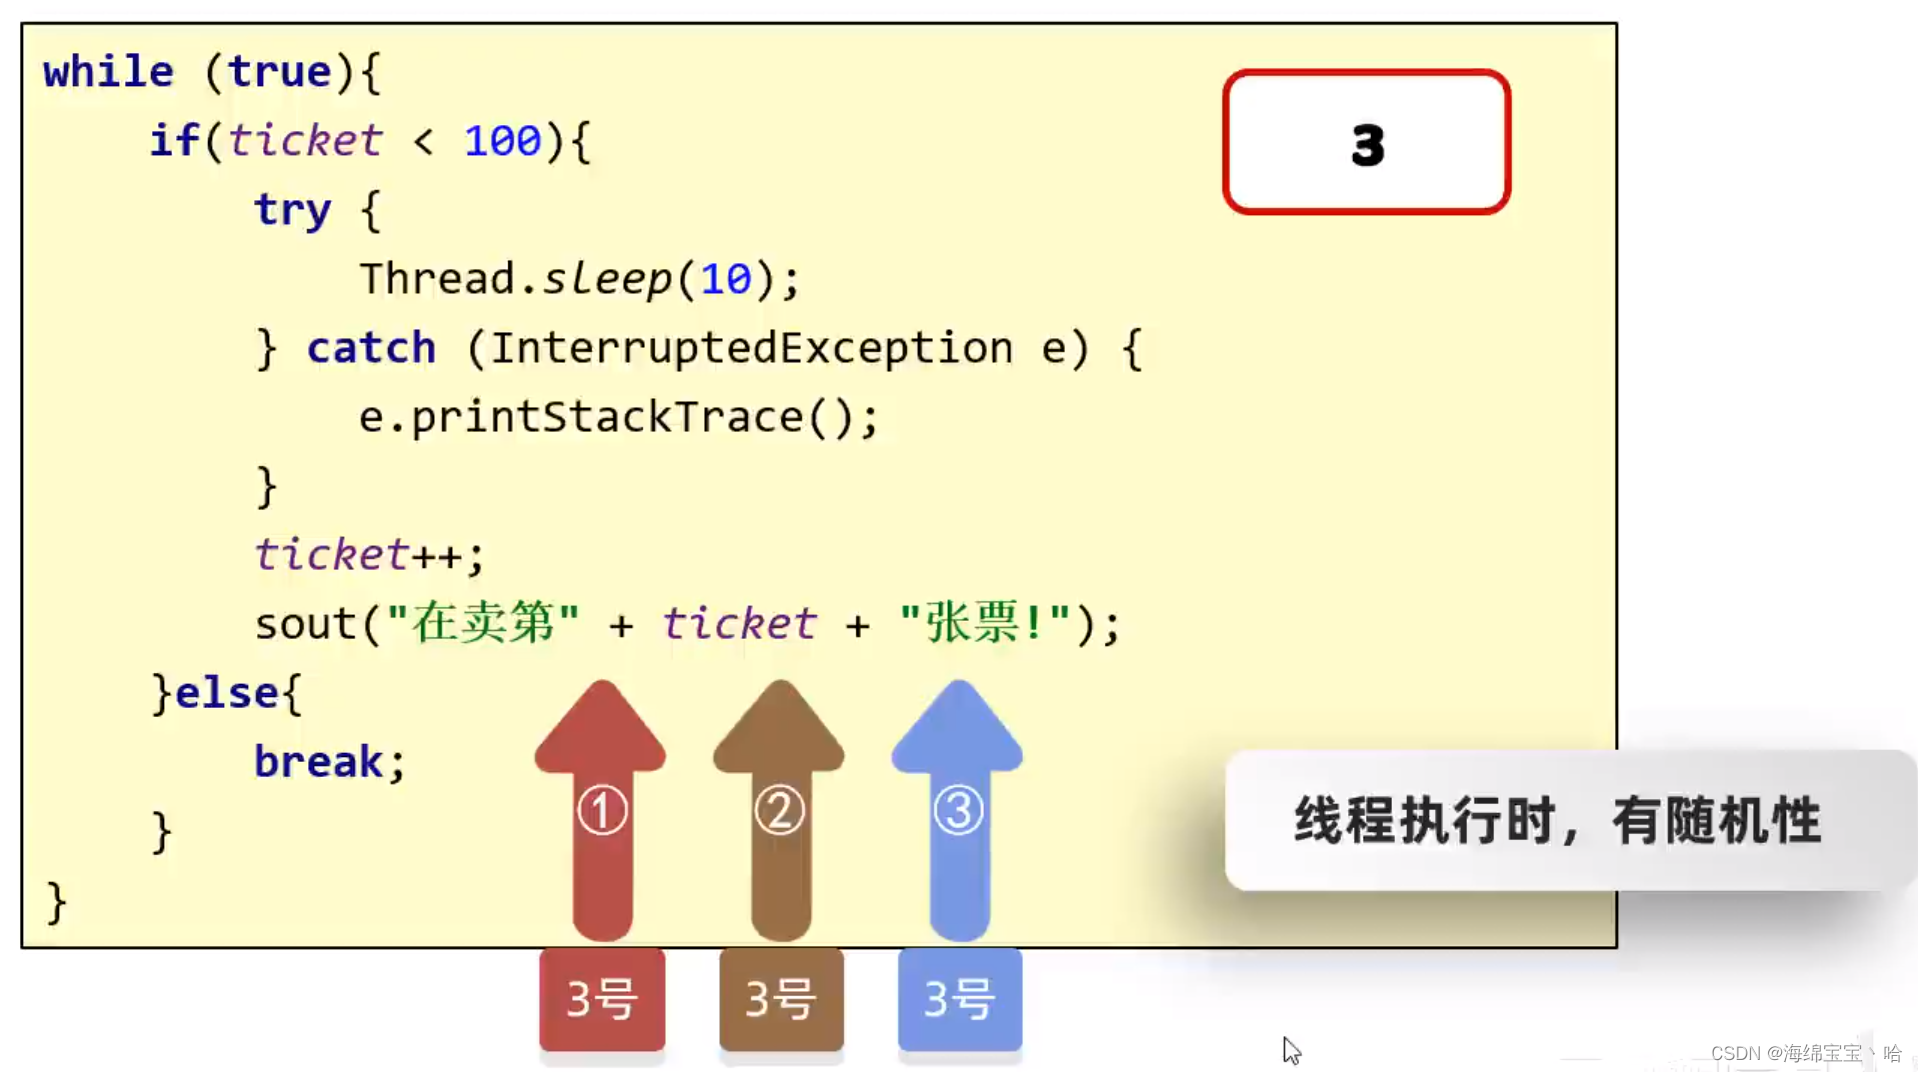
public class MyThread extends Thread {
    static private int ticket=0;

    @Override
    public void run(){
        while (true)!
            if(ticket<100){
                try {
                    Thread.sleep(10);
                } catch (InterruptedException e) {
                    throw new RuntimeException(e);
                }
                ticket++;
                System.out.println(Thread.currentThread().getName()+"正在卖第"+ticket+"张票!");
            }
            else {
                break;
            }
        }
    }
}
public class Main { public static void main(String[] args) { MyThread myThread1 = new MyThread(); MyThread myThread2 = new MyThread(); MyThread myThread3 = new MyThread(); myThread1.setName("窗口1"); myThread2.setName("窗口2"); myThread3.setName("窗口3"); myThread1.start(); myThread2.start(); myThread3.start(); } }会发现每个窗口都是独立的,都在独自卖票,每个窗口都卖了100张,因此需要将
ticket设置成static,变为类共享。

这样会发现,并没有按照顺序卖票,且还可能出现重复的以及超出范围的票。因此需要维护线程安全。
2.2卖票案例的问题【理解】
-
卖票出现了问题
-
相同的票出现了多次
-
出现了超出范围的票
-
-
问题产生原因
线程执行的随机性导致的,可能在卖票过程中丢失cpu的执行权,导致出现问题
2.3同步代码块解决数据安全问题【应用】
-
安全问题出现的条件
-
是多线程环境
-
有共享数据
-
有多条语句操作共享数据
-
-
如何解决多线程安全问题呢?
- 基本思想:让程序没有安全问题的环境
-
怎么实现呢?
-
把多条语句操作共享数据的代码给锁起来,让任意时刻只能有一个线程执行即可
-
Java提供了同步代码块的方式来解决
-
-
同步代码块格式:
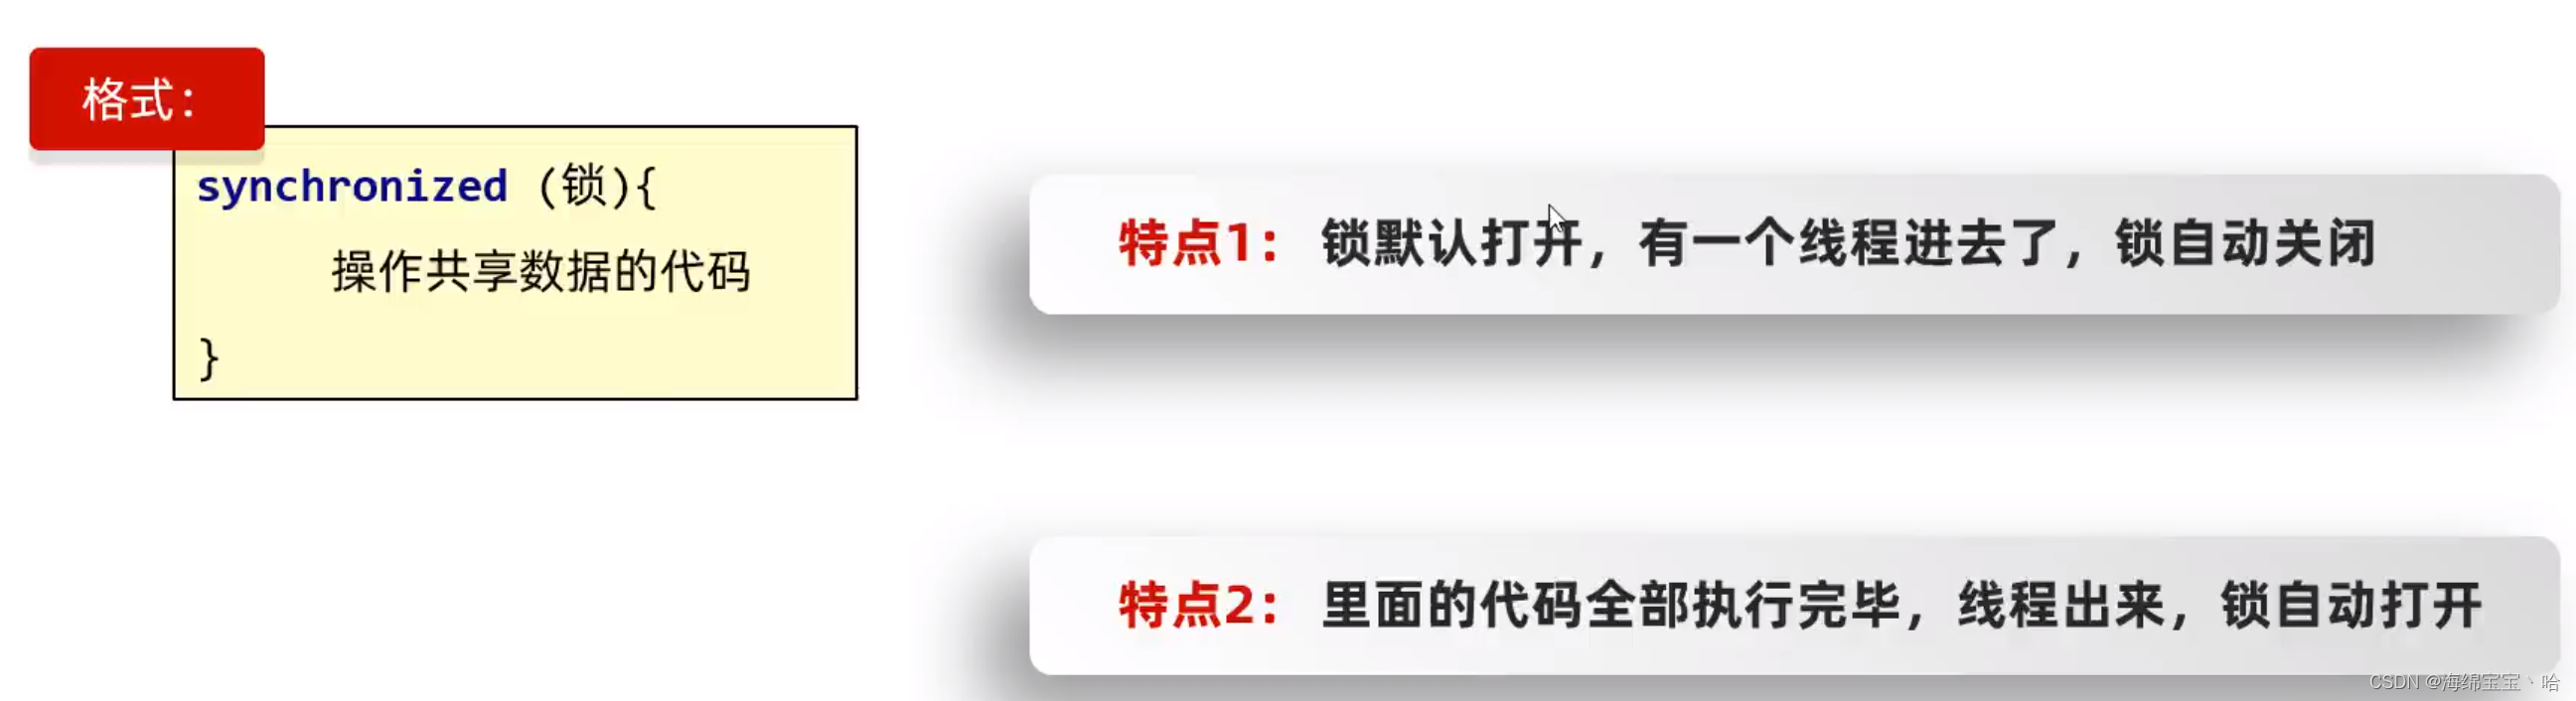
synchronized(任意对象):就相当于给代码加锁了,任意对象就可以看成是一把锁
-
同步的好处和弊端
-
好处:解决了多线程的数据安全问题
-
弊端:当线程很多时,因为每个线程都会去判断同步上的锁,这是很耗费资源的,无形中会降低程序的运行效率
-
-
代码演示
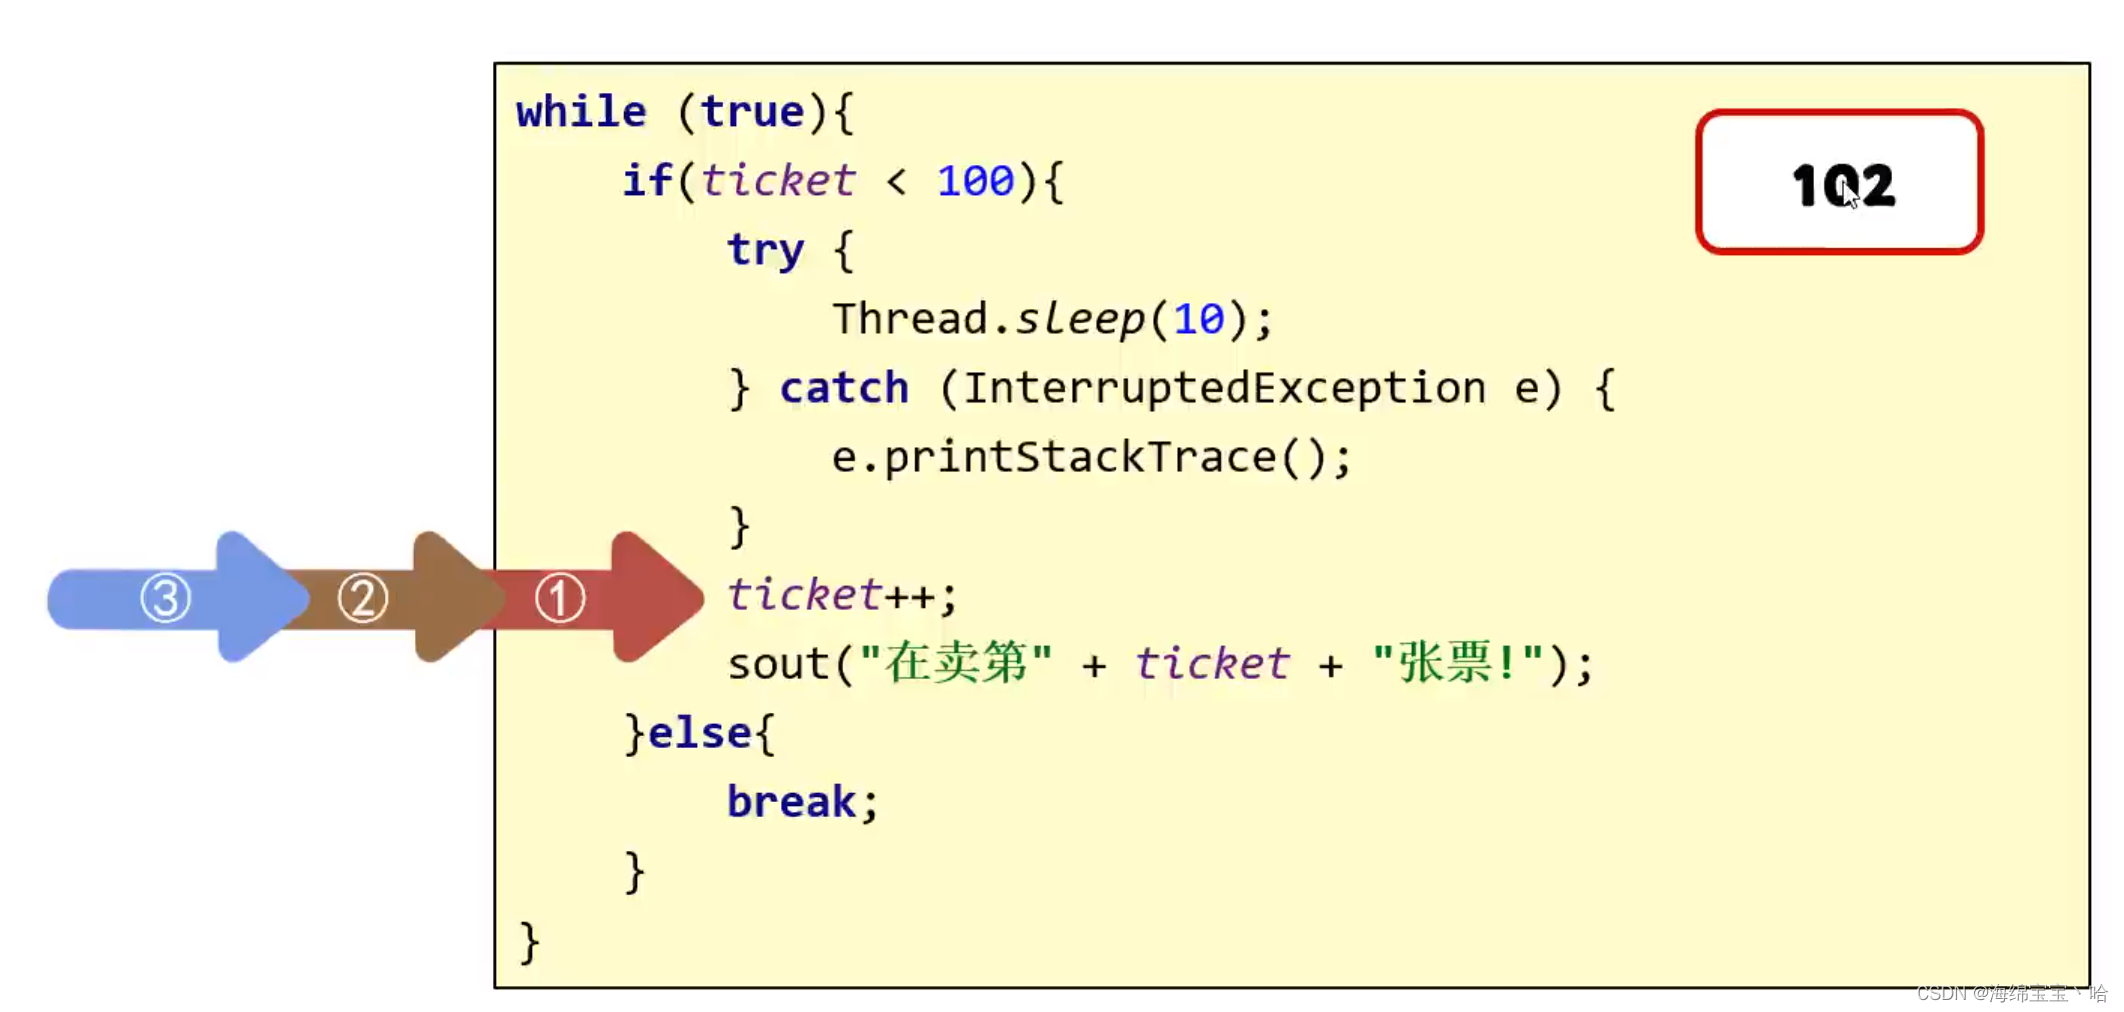
public class SellTicket implements Runnable { private int tickets = 100; //锁对象,一定是唯一的 static Object obj = new Object(); @Override public void run() { while (true) { synchronized (obj) { // 对可能有安全问题的代码加锁,多个线程必须使用同一把锁 //t1进来后,就会把这段代码给锁起来 if (tickets > 0) { try { Thread.sleep(10); //t1休息10毫秒 } catch (InterruptedException e) { e.printStackTrace(); } //窗口1正在出售第100张票 System.out.println(Thread.currentThread().getName() + "正在出售第" + tickets + "张票"); tickets--; //tickets = 99; } } //t1出来了,这段代码的锁就被释放了 } } } public class SellTicketDemo { public static void main(String[] args) { SellTicket st = new SellTicket(); Thread t1 = new Thread(st, "窗口1"); Thread t2 = new Thread(st, "窗口2"); Thread t3 = new Thread(st, "窗口3"); t1.start(); t2.start(); t3.start(); } }- **细节1:**同步代码块要放在
while之内,否则就变成了某个窗口把所有的票卖完之后,才会解锁,这样的话,只会有一个窗口在卖。 - **细节2:**锁必须是唯一的,如果不是唯一的,那么用的不是共同的锁,还会造成线程不安全。一般使用当前类的字节码文件,比如
SellTicket.class
- **细节1:**同步代码块要放在
2.4同步方法解决数据安全问题【应用】
-
同步方法的格式
同步方法:就是把synchronized关键字加到方法上
修饰符 synchronized 返回值类型 方法名(方法参数) {
	方法体;
}
同步方法的锁对象是什么呢?
this
-
静态同步方法
同步静态方法:就是把synchronized关键字加到静态方法上
修饰符 static synchronized 返回值类型 方法名(方法参数) {
	方法体;
}
同步静态方法的锁对象是什么呢?
类名.class

套路:一般先写同步代码块,再抽象成同步方法,这样就不会很难了。
-
代码演示(同步代码块)
import java.util.concurrent.Callable;

public class MyThread implements Runnable {
    private int ticket=0;


    @Override
    public void run() {
        while (true){
            synchronized(MyThread.class){
                if(ticket<100){
                    try {
                        Thread.sleep(10);
                    } catch (InterruptedException e) {
                        throw new RuntimeException(e);
                    }
                    ticket++;
                    System.out.println(Thread.currentThread().getName()+"正在卖第"+ticket+"张票!");
                }
                else {
                    break;
                }
            }
        }
    }
}
public class Main { public static void main(String[] args) { MyThread myThread = new MyThread(); Thread thread1 = new Thread(myThread); Thread thread2 = new Thread(myThread); Thread thread3 = new Thread(myThread); thread1.setName("窗口1"); thread2.setName("窗口2"); thread3.setName("窗口3"); thread1.start(); thread2.start(); thread3.start(); } } -
代码演示(同步方法)
import java.util.concurrent.Callable;

public class MyThread implements Runnable {
    private int ticket=0;


    @Override
    public void run() {
        while (true){
            if (method()) break;
        }
    }

    //同步方法里面的锁就是this,因为MyThread是唯一的
    private synchronized boolean method() {
        if (ticket < 100) {
            try {
                Thread.sleep(10);
            } catch (InterruptedException e) {
                throw new RuntimeException(e);
            }
            ticket++;
            System.out.println(Thread.currentThread().getName() + "正在卖第" + ticket + "张票!");
        } else {
            return true;
        }
        return false;
    }
}
public class Main { public static void main(String[] args) { MyThread myThread = new MyThread(); Thread thread1 = new Thread(myThread); Thread thread2 = new Thread(myThread); Thread thread3 = new Thread(myThread); thread1.setName("窗口1"); thread2.setName("窗口2"); thread3.setName("窗口3"); thread1.start(); thread2.start(); thread3.start(); } }
2.5Lock锁【应用】
虽然我们可以理解同步代码块和同步方法的锁对象问题,但是我们并没有直接看到在哪里加上了锁,在哪里释放了锁,为了更清晰的表达如何加锁和释放锁,JDK5以后提供了一个新的锁对象Lock
Lock是接口不能直接实例化,这里采用它的实现类ReentrantLock来实例化
-
ReentrantLock构造方法
方法名 说明 ReentrantLock() 创建一个ReentrantLock的实例 -
加锁解锁方法
方法名 说明 void lock() 获得锁 void unlock() 释放锁 -
代码演示
public class Ticket implements Runnable {
    //票的数量
    private int ticket = 100;
    private Object obj = new Object();
    private ReentrantLock lock = new ReentrantLock();

    @Override
    public void run() {
        while (true) {
            //synchronized (obj){//多个线程必须使用同一把锁.
            try {
                lock.lock();
                if (ticket <= 0) {
                    //卖完了
                    break;
                } else {
                    Thread.sleep(100);
                    ticket--;
                    System.out.println(Thread.currentThread().getName() + "在卖票,还剩下" + ticket + "张票");
                }
            } catch (InterruptedException e) {
                e.printStackTrace();
            } finally {
                lock.unlock();
            }
            // }
        }
    }
}

public class Demo {
    public static void main(String[] args) {
        Ticket ticket = new Ticket();

        Thread t1 = new Thread(ticket);
        Thread t2 = new Thread(ticket);
        Thread t3 = new Thread(ticket);

        t1.setName("窗口一");
        t2.setName("窗口二");
        t3.setName("窗口三");

        t1.start();
        t2.start();
        t3.start();
    }
}
2.6死锁【理解】
-
概述
线程死锁是指由于两个或者多个线程互相持有对方所需要的资源,导致这些线程处于等待状态,无法前往执行
-
什么情况下会产生死锁
- 资源有限
- 同步嵌套
-
代码演示
public class Demo {
    public static void main(String[] args) {
        Object objA = new Object();
        Object objB = new Object();

        new Thread(()->{
            while(true){
                synchronized (objA){
                    //线程一
                    synchronized (objB){
                        System.out.println("小康同学正在走路");
                    }
                }
            }
        }).start();

        new Thread(()->{
            while(true){
                synchronized (objB){
                    //线程二
                    synchronized (objA){
                        System.out.println("小薇同学正在走路");
                    }
                }
            }
        }).start();
    }
}
3.生产者消费者
3.1生产者和消费者模式概述【应用】
-
概述

生产者消费者模式是一个十分经典的多线程协作的模式,弄懂生产者消费者问题能够让我们对多线程编程的理解更加深刻。
所谓生产者消费者问题,实际上主要是包含了两类线程:
一类是生产者线程用于生产数据
一类是消费者线程用于消费数据
为了解耦生产者和消费者的关系,通常会采用共享的数据区域,就像是一个仓库
生产者生产数据之后直接放置在共享数据区中,并不需要关心消费者的行为
消费者只需要从共享数据区中去获取数据,并不需要关心生产者的行为
-
Object类的等待和唤醒方法
方法名 说明 void wait() 导致当前线程等待,直到另一个线程调用该对象的 notify()方法或 notifyAll()方法 void notify() 随机唤醒正在等待对象监视器的单个线程 void notifyAll() 唤醒正在等待对象监视器的所有线程
3.2生产者和消费者案例【应用】
-
案例需求
-
桌子类(Desk):定义表示包子数量的变量,定义锁对象变量,定义标记桌子上有无包子的变量
-
生产者类(Cooker):实现Runnable接口,重写run()方法,设置线程任务
1.判断是否有包子,决定当前线程是否执行
2.如果有包子,就进入等待状态,如果没有包子,继续执行,生产包子
3.生产包子之后,更新桌子上包子状态,唤醒消费者消费包子
-
消费者类(Foodie):实现Runnable接口,重写run()方法,设置线程任务
1.判断是否有包子,决定当前线程是否执行
2.如果没有包子,就进入等待状态,如果有包子,就消费包子
3.消费包子后,更新桌子上包子状态,唤醒生产者生产包子
-
测试类(Demo):里面有main方法,main方法中的代码步骤如下
创建生产者线程和消费者线程对象
分别开启两个线程
-
-
代码实现
public class Desk {

    //定义一个标记
    //true 就表示桌子上有汉堡包的,此时允许吃货执行
    //false 就表示桌子上没有汉堡包的,此时允许厨师执行
    public static boolean flag = false;

    //汉堡包的总数量
    public static int count = 10;

    //锁对象
    public static final Object lock = new Object();
}

public class Cooker extends Thread {
//    生产者步骤:
//            1,判断桌子上是否有汉堡包
//    如果有就等待,如果没有才生产。
//            2,把汉堡包放在桌子上。
//            3,叫醒等待的消费者开吃。
    @Override
    public void run() {
        while(true){
            synchronized (Desk.lock){
                if(Desk.count == 0){
                    break;
                }else{
                    if(!Desk.flag){
                        //生产
                        System.out.println("厨师正在生产汉堡包");
                        Desk.flag = true;
                        Desk.lock.notifyAll();
                    }else{
                        try {
                            Desk.lock.wait();
                        } catch (InterruptedException e) {
                            e.printStackTrace();
                        }
                    }
                }
            }
        }
    }
}

public class Foodie extends Thread {
    @Override
    public void run() {
//        1,判断桌子上是否有汉堡包。
//        2,如果没有就等待。
//        3,如果有就开吃
//        4,吃完之后,桌子上的汉堡包就没有了
//                叫醒等待的生产者继续生产
//        汉堡包的总数量减一

        //套路:
            //1. while(true)死循环
            //2. synchronized 锁,锁对象要唯一
            //3. 判断,共享数据是否结束. 结束
            //4. 判断,共享数据是否结束. 没有结束
        while(true){
            synchronized (Desk.lock){
                if(Desk.count == 0){
                    break;
                }else{
                    if(Desk.flag){
                        //有
                        System.out.println("吃货在吃汉堡包");
                        Desk.flag = false;
                        Desk.lock.notifyAll();
                        Desk.count--;
                    }else{
                        //没有就等待
                        //使用什么对象当做锁,那么就必须用这个对象去调用等待和唤醒的方法.
                        try {
                            Desk.lock.wait();
                        } catch (InterruptedException e) {
                            e.printStackTrace();
                        }
                    }
                }
            }
        }

    }
}

public class Demo {
    public static void main(String[] args) {
        /*消费者步骤:
        1,判断桌子上是否有汉堡包。
        2,如果没有就等待。
        3,如果有就开吃
        4,吃完之后,桌子上的汉堡包就没有了
                叫醒等待的生产者继续生产
        汉堡包的总数量减一*/

        /*生产者步骤:
        1,判断桌子上是否有汉堡包
        如果有就等待,如果没有才生产。
        2,把汉堡包放在桌子上。
        3,叫醒等待的消费者开吃。*/

        Foodie f = new Foodie();
        Cooker c = new Cooker();

        f.start();
        c.start();

    }
}
3.4阻塞队列基本使用【理解】
-
阻塞队列继承结构
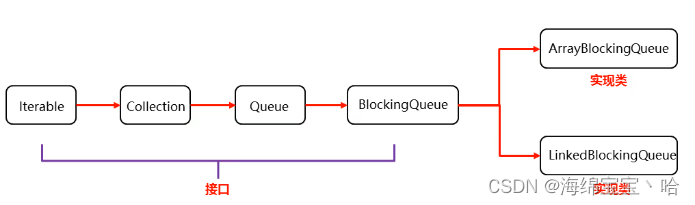
-
常见BlockingQueue:
ArrayBlockingQueue: 底层是数组,有界
LinkedBlockingQueue: 底层是链表,无界.但不是真正的无界,最大为int的最大值
-
BlockingQueue的核心方法:
put(anObject): 将参数放入队列,如果放不进去会阻塞
take(): 取出第一个数据,取不到会阻塞
-
代码示例
public class Demo02 {
    public static void main(String[] args) throws Exception {
        // 创建阻塞队列的对象,容量为 1
        ArrayBlockingQueue<String> arrayBlockingQueue = new ArrayBlockingQueue<>(1);

        // 存储元素
        arrayBlockingQueue.put("汉堡包");

        // 取元素
        System.out.println(arrayBlockingQueue.take());
        System.out.println(arrayBlockingQueue.take()); // 取不到会阻塞

        System.out.println("程序结束了");
    }
}
3.5阻塞队列实现等待唤醒机制【理解】
-
案例需求
-
生产者类(Cooker):实现Runnable接口,重写run()方法,设置线程任务
1.构造方法中接收一个阻塞队列对象
2.在run方法中循环向阻塞队列中添加包子
3.打印添加结果
-
消费者类(Foodie):实现Runnable接口,重写run()方法,设置线程任务
1.构造方法中接收一个阻塞队列对象
2.在run方法中循环获取阻塞队列中的包子
3.打印获取结果
-
测试类(Demo):里面有main方法,main方法中的代码步骤如下
创建阻塞队列对象
创建生产者线程和消费者线程对象,构造方法中传入阻塞队列对象
分别开启两个线程
-
-
代码实现
public class Cooker extends Thread {

    private ArrayBlockingQueue<String> bd;

    public Cooker(ArrayBlockingQueue<String> bd) {
        this.bd = bd;
    }
//    生产者步骤:
//            1,判断桌子上是否有汉堡包
//    如果有就等待,如果没有才生产。
//            2,把汉堡包放在桌子上。
//            3,叫醒等待的消费者开吃。

    @Override
    public void run() {
        while (true) {
            try {
                bd.put("汉堡包");
                System.out.println("厨师放入一个汉堡包");
            } catch (InterruptedException e) {
                e.printStackTrace();
            }
        }
    }
}

public class Foodie extends Thread {
    private ArrayBlockingQueue<String> bd;

    public Foodie(ArrayBlockingQueue<String> bd) {
        this.bd = bd;
    }

    @Override
    public void run() {
//        1,判断桌子上是否有汉堡包。
//        2,如果没有就等待。
//        3,如果有就开吃
//        4,吃完之后,桌子上的汉堡包就没有了
//                叫醒等待的生产者继续生产
//        汉堡包的总数量减一

        //套路:
        //1. while(true)死循环
        //2. synchronized 锁,锁对象要唯一
        //3. 判断,共享数据是否结束. 结束
        //4. 判断,共享数据是否结束. 没有结束
        while (true) {
            try {
                String take = bd.take();
                System.out.println("吃货将" + take + "拿出来吃了");
            } catch (InterruptedException e) {
                e.printStackTrace();
            }
        }

    }
}

public class Demo {
    public static void main(String[] args) {
        ArrayBlockingQueue<String> bd = new ArrayBlockingQueue<>(1);

        Foodie f = new Foodie(bd);
        Cooker c = new Cooker(bd);

        f.start();
        c.start();
    }
}
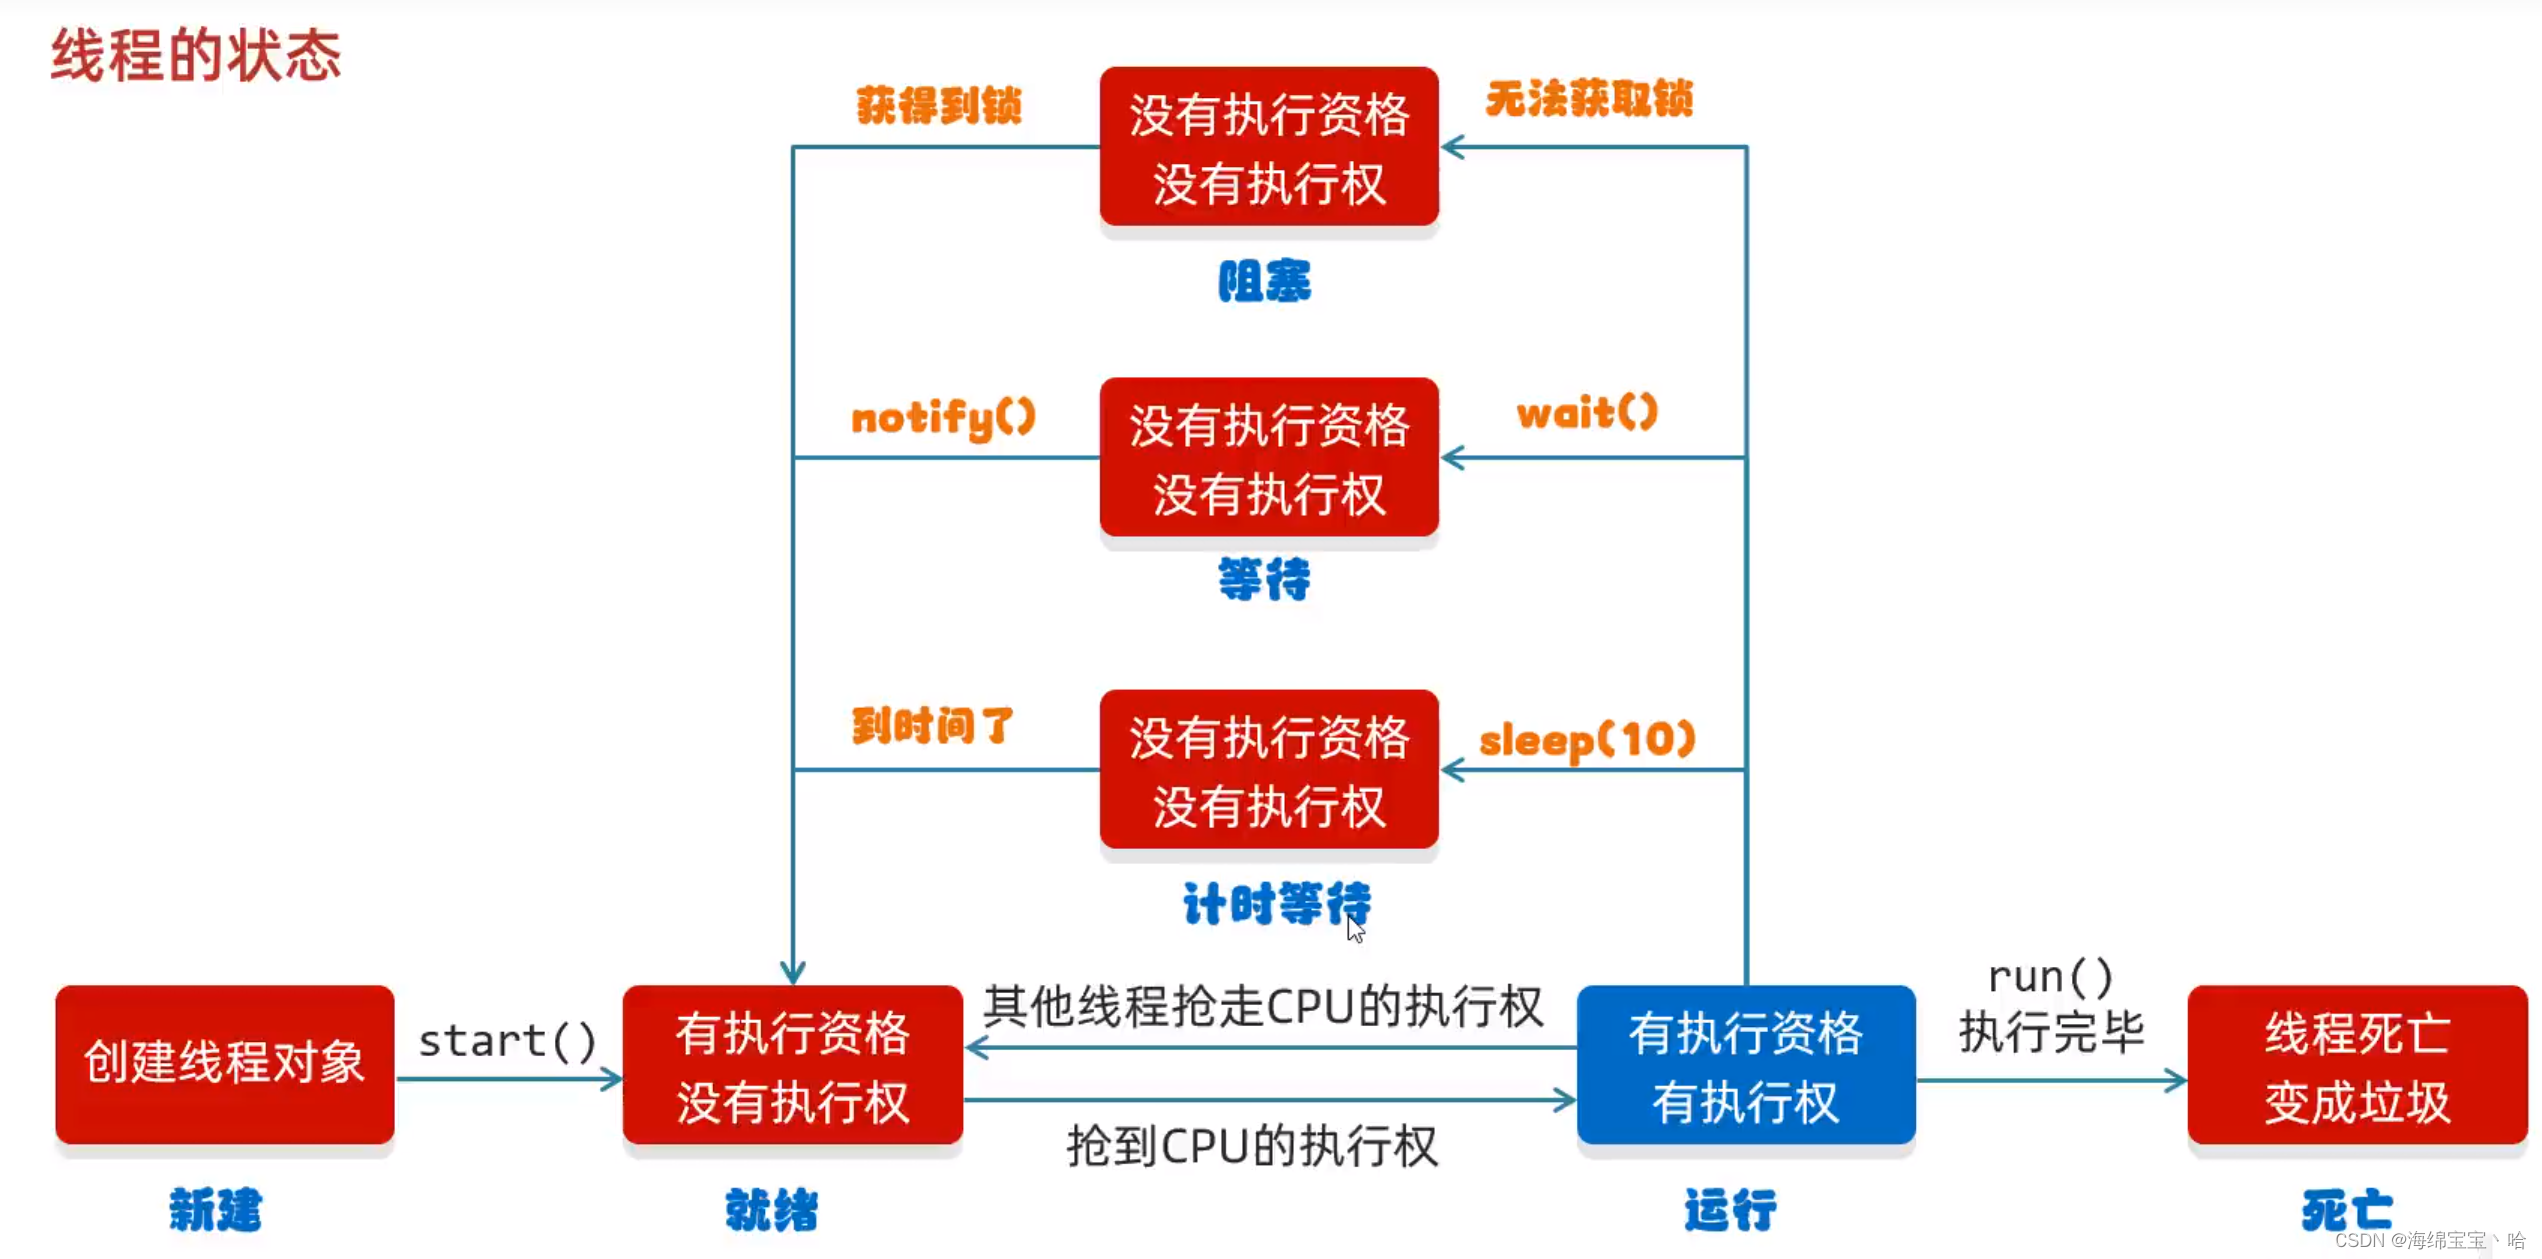
4 线程的状态
5 练习
5.1

public class Sell implements Runnable{
    private int ticket=1000;
    @Override
    public void run() {
        while (true){
            synchronized (Sell.class){
                if(ticket==0){
                    break;
                }
                else {
                    ticket--;
                    System.out.println(Thread.currentThread().getName()+"卖出一张,还有"+ticket+"张票!");
                }
            }
        }

    }
}
public class Main {
    public static void main(String[] args) {
        Sell sell = new Sell();

        Thread thread1 = new Thread(sell, "窗口1");
        Thread thread2 = new Thread(sell, "窗口2");

        thread1.start();
        thread2.start();
    }
}
5.2

public class Sell implements Runnable{
    private int ticket=100;
    @Override
    public void run() {
        while (true){
            synchronized (Sell.class){
                if(ticket==10){
                    break;
                }
                else {
                    ticket--;
                    System.out.println(Thread.currentThread().getName()+"送出一个礼物,还有"+ticket+"个礼物!");
                }
            }
        }

    }
}
public class Main {
    public static void main(String[] args) {
        Sell sell = new Sell();

        Thread thread1 = new Thread(sell, "送礼人1");
        Thread thread2 = new Thread(sell, "送礼人2");

        thread1.start();
        thread2.start();
    }
}
5.3

public class Sell implements Runnable{
    private int num=0;
    @Override
    public void run() {
        while (true){
            synchronized (Sell.class){
                if(num==100){
                    break;
                }
                else {
                    if(num%2==1){
                        System.out.println(Thread.currentThread().getName()+"输出了"+num);
                    }
                    num++;
                }
            }
        }

    }
}
public class Main {
    public static void main(String[] args) {
        Sell sell = new Sell();

        Thread thread1 = new Thread(sell, "线程1");
        Thread thread2 = new Thread(sell, "线程2");

        thread1.start();
        thread2.start();
    }
}
5.4
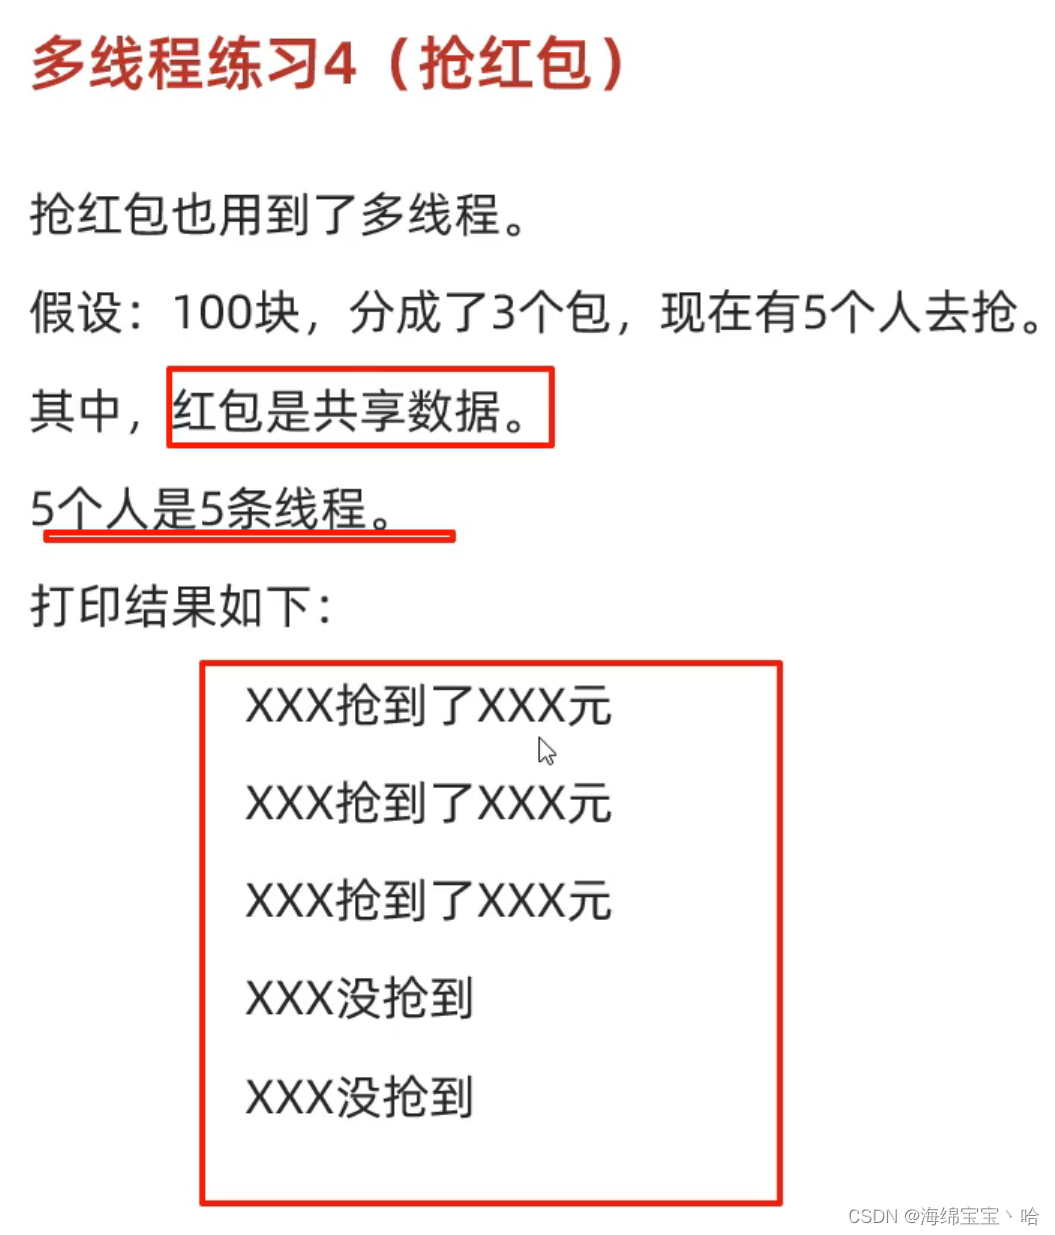
请注意,这里一个人只能抢一次,抢完一次后,线程就结束了,因此不需要循环。
import java.util.Random;

public class Sell implements Runnable{
    private double money=100.0;//总金额
    private int count=3;//红包数量
    private double minMoney=0.01;//最小抢到的金钱

    @Override
    public void run() {
        synchronized (Sell.class){
            //如果没有次数了,那么就没抢到
            if(count==0){
                System.out.println(Thread.currentThread().getName()+"没抢到!");
            }
            else {
                //如果只剩下一次次数了,则直接抢完
                if(count==1){
                    double getMoney = money;
                    System.out.println(Thread.currentThread().getName()+"抢到了"+getMoney+"元!");
                    count--;
                }
                //如果还有2或3次
                else {
                    //首先定义抢到钱的范围
                    double bound = money-(count-1)*minMoney;
                    double getMoney = new Random().nextDouble()*bound+minMoney;
                    System.out.println(Thread.currentThread().getName()+"抢到了"+getMoney+"元!");
                    money=money-getMoney;
                    count--;
                }

            }
        }
    }
}
public class Main {
    public static void main(String[] args) {
        Sell sell = new Sell();

        Thread thread1 = new Thread(sell, "1");
        Thread thread2 = new Thread(sell, "2");
        Thread thread3 = new Thread(sell, "3");
        Thread thread4 = new Thread(sell, "4");
        Thread thread5 = new Thread(sell, "5");

        thread1.start();
        thread2.start();
        thread3.start();
        thread4.start();
        thread5.start();
    }
}
5.5

import java.util.ArrayList;
import java.util.Random;


public class Sell implements Runnable{
    private ArrayList<Integer> list;


    public Sell(ArrayList<Integer> list){
        this.list = list;
    }

    @Override
    public void run() {
        while (true){
            synchronized (Sell.class){
                //如果没有次数了,那么就没抢到
                if(list.size()==0){
                    break;
                }
                else {
                    int index = new Random().nextInt(list.size());
                    int money = list.remove(index);;
                    System.out.println(Thread.currentThread().getName()+"抽到了"+money+"的大奖!");
                }
            }
            try {
                Thread.sleep(100);
            } catch (InterruptedException e) {
                throw new RuntimeException(e);
            }

        }

    }
}
import java.util.ArrayList;
import java.util.Collections;

public class Main {
    public static void main(String[] args) {
        ArrayList<Integer> integers = new ArrayList<>();
        Collections.addAll(integers,10,5,20,50,100,200,500,800,2,80,300,700);
        Sell sell = new Sell(integers);

        Thread thread1 = new Thread(sell, "抽奖箱1");
        Thread thread2 = new Thread(sell, "抽奖箱2");


        thread1.start();
        thread2.start();


    }
}
5.6

import java.util.ArrayList;
import java.util.Collections;
import java.util.Random;


public class Sell implements Runnable{
    private ArrayList<Integer> list;

    private ArrayList<Integer> list1 = new ArrayList<>();
    private ArrayList<Integer> list2 = new ArrayList<>();


    public Sell(ArrayList<Integer> list){
        this.list = list;
    }


    @Override
    public void run() {
        while (true){
            synchronized (Sell.class){
                //如果没有次数了,那么就没抢到
                if(list.size()==0){
                    if(Thread.currentThread().getName().equals("抽奖箱1")){
                        System.out.println("抽奖箱1"+list1);
                        System.out.println("总计为:"+ list1.stream().mapToInt(Integer::intValue).sum());
                    }
                    else {
                        System.out.println("抽奖箱2"+list2);
                        System.out.println("总计为:"+ list2.stream().mapToInt(Integer::intValue).sum());
                    }
                    break;
                }
                else {

                    int index = new Random().nextInt(list.size());
                    int money = list.remove(index);;
                    if(Thread.currentThread().getName().equals("抽奖箱1")){
                        list1.add(money);
                    }
                    else {
                        list2.add(money);
                    }
                }
            }
            try {
                Thread.sleep(100);
            } catch (InterruptedException e) {
                throw new RuntimeException(e);
            }

        }

    }
}
import java.util.ArrayList;
import java.util.Collections;

public class Main {
    public static void main(String[] args) {
        ArrayList<Integer> integers = new ArrayList<>();
        Collections.addAll(integers,10,5,20,50,100,200,500,800,2,80,300,700);
        Sell sell = new Sell(integers);

        Thread thread1 = new Thread(sell, "抽奖箱1");
        Thread thread2 = new Thread(sell, "抽奖箱2");

        thread1.start();
        thread2.start();
    }
}
优化,如果线程数很多,那么就会很多if else语句,因此在run方法里面定义一个局部变量集合,存储抽到的奖项就行了,原理是因为,创造一个线程,线程里面运行方法的时候,会给每个线程分配一个独立的栈,那么局部变量集合就在这个集合中。
import java.util.ArrayList;
import java.util.Collections;
import java.util.Random;


public class Sell implements Runnable {
    private ArrayList<Integer> list;

    public Sell(ArrayList<Integer> list) {
        this.list = list;
    }


    @Override
    public void run() {
        ArrayList<Integer> integers = new ArrayList<>();
        while (true) {
            synchronized (Sell.class) {
                //如果没有次数了,那么就没抢到
                if (list.size() == 0) {
                    System.out.println("抽奖箱1" + integers);
                    System.out.println("总计为:" + integers.stream().mapToInt(Integer::intValue).sum());
                    break;
                } else {

                    int index = new Random().nextInt(list.size());
                    int money = list.remove(index);
                    integers.add(money);
                }
            }
        }
        try {
            Thread.sleep(100);
        } catch (InterruptedException e) {
            throw new RuntimeException(e);
        }

    }

}
5.7

import java.util.ArrayList;
import java.util.Collections;
import java.util.concurrent.ExecutionException;
import java.util.concurrent.FutureTask;

public class Main {
    public static void main(String[] args) throws ExecutionException, InterruptedException {
        ArrayList<Integer> integers = new ArrayList<>();
        Collections.addAll(integers,10,5,20,50,100,200,500,800,2,80,300,700);
        Sell sell = new Sell(integers);

        FutureTask<Integer> integerFutureTask1 = new FutureTask<Integer>(sell);
        FutureTask<Integer> integerFutureTask2 = new FutureTask<Integer>(sell);

        Thread thread1 = new Thread(integerFutureTask1);
        Thread thread2 = new Thread(integerFutureTask2);

        thread1.start();
        thread2.start();

        thread1.setName("抽奖箱1");
        thread2.setName("抽奖箱2");

        Integer max1 = integerFutureTask1.get();
        Integer max2 = integerFutureTask2.get();

        System.out.println("抽奖箱1最大值"+max1);
        System.out.println("抽奖箱2最大值"+max2);


    }
}
import java.util.ArrayList;
import java.util.Collections;
import java.util.Random;
import java.util.concurrent.Callable;


public class Sell implements Callable<Integer> {
    private ArrayList<Integer> list;

    public Sell(ArrayList<Integer> list) {
        this.list = list;
    }

    @Override
    public Integer call() throws Exception {
        ArrayList<Integer> integers = new ArrayList<>();
        while (true) {
            synchronized (Sell.class) {
                //如果没有次数了,那么就没抢到
                if (list.size() == 0) {
                    System.out.println("抽奖箱" + integers);
                    System.out.println("总计为:" + integers.stream().mapToInt(Integer::intValue).sum());
                    break;
                } else {

                    int index = new Random().nextInt(list.size());
                    int money = list.remove(index);
                    integers.add(money);
                }
            }
        }
        Thread.sleep(100);
        return Collections.max(integers);

    }
}
6 线程池


-
newCachedThreadPool
public class MyThread implements Runnable{
    @Override
    public void run() {
        for (int i = 0; i < 100; i++) {
            System.out.println("线程:"+Thread.currentThread().getName()+"正在打印:"+i);
        }
    }
}
import java.util.concurrent.ExecutorService; import java.util.concurrent.Executors; public class Main { public static void main(String[] args) throws InterruptedException { //1.获取线程池对象 ExecutorService pool = Executors.newCachedThreadPool(); //2.提交任务 pool.submit(new MyThread()); pool.submit(new MyThread()); pool.submit(new MyThread()); pool.submit(new MyThread()); //3.销毁线程池 pool.shutdown(); } } -
newFixedThreadPool
public class Main {
    public static void main(String[] args) throws InterruptedException {

        //1.获取线程池对象
        ExecutorService pool = Executors.newFixedThreadPool(2);

        //2.提交任务
        pool.submit(new MyThread());
        pool.submit(new MyThread());
        pool.submit(new MyThread());
        pool.submit(new MyThread());

        //3.销毁线程池
        pool.shutdown();

    }
}
自定义线程池
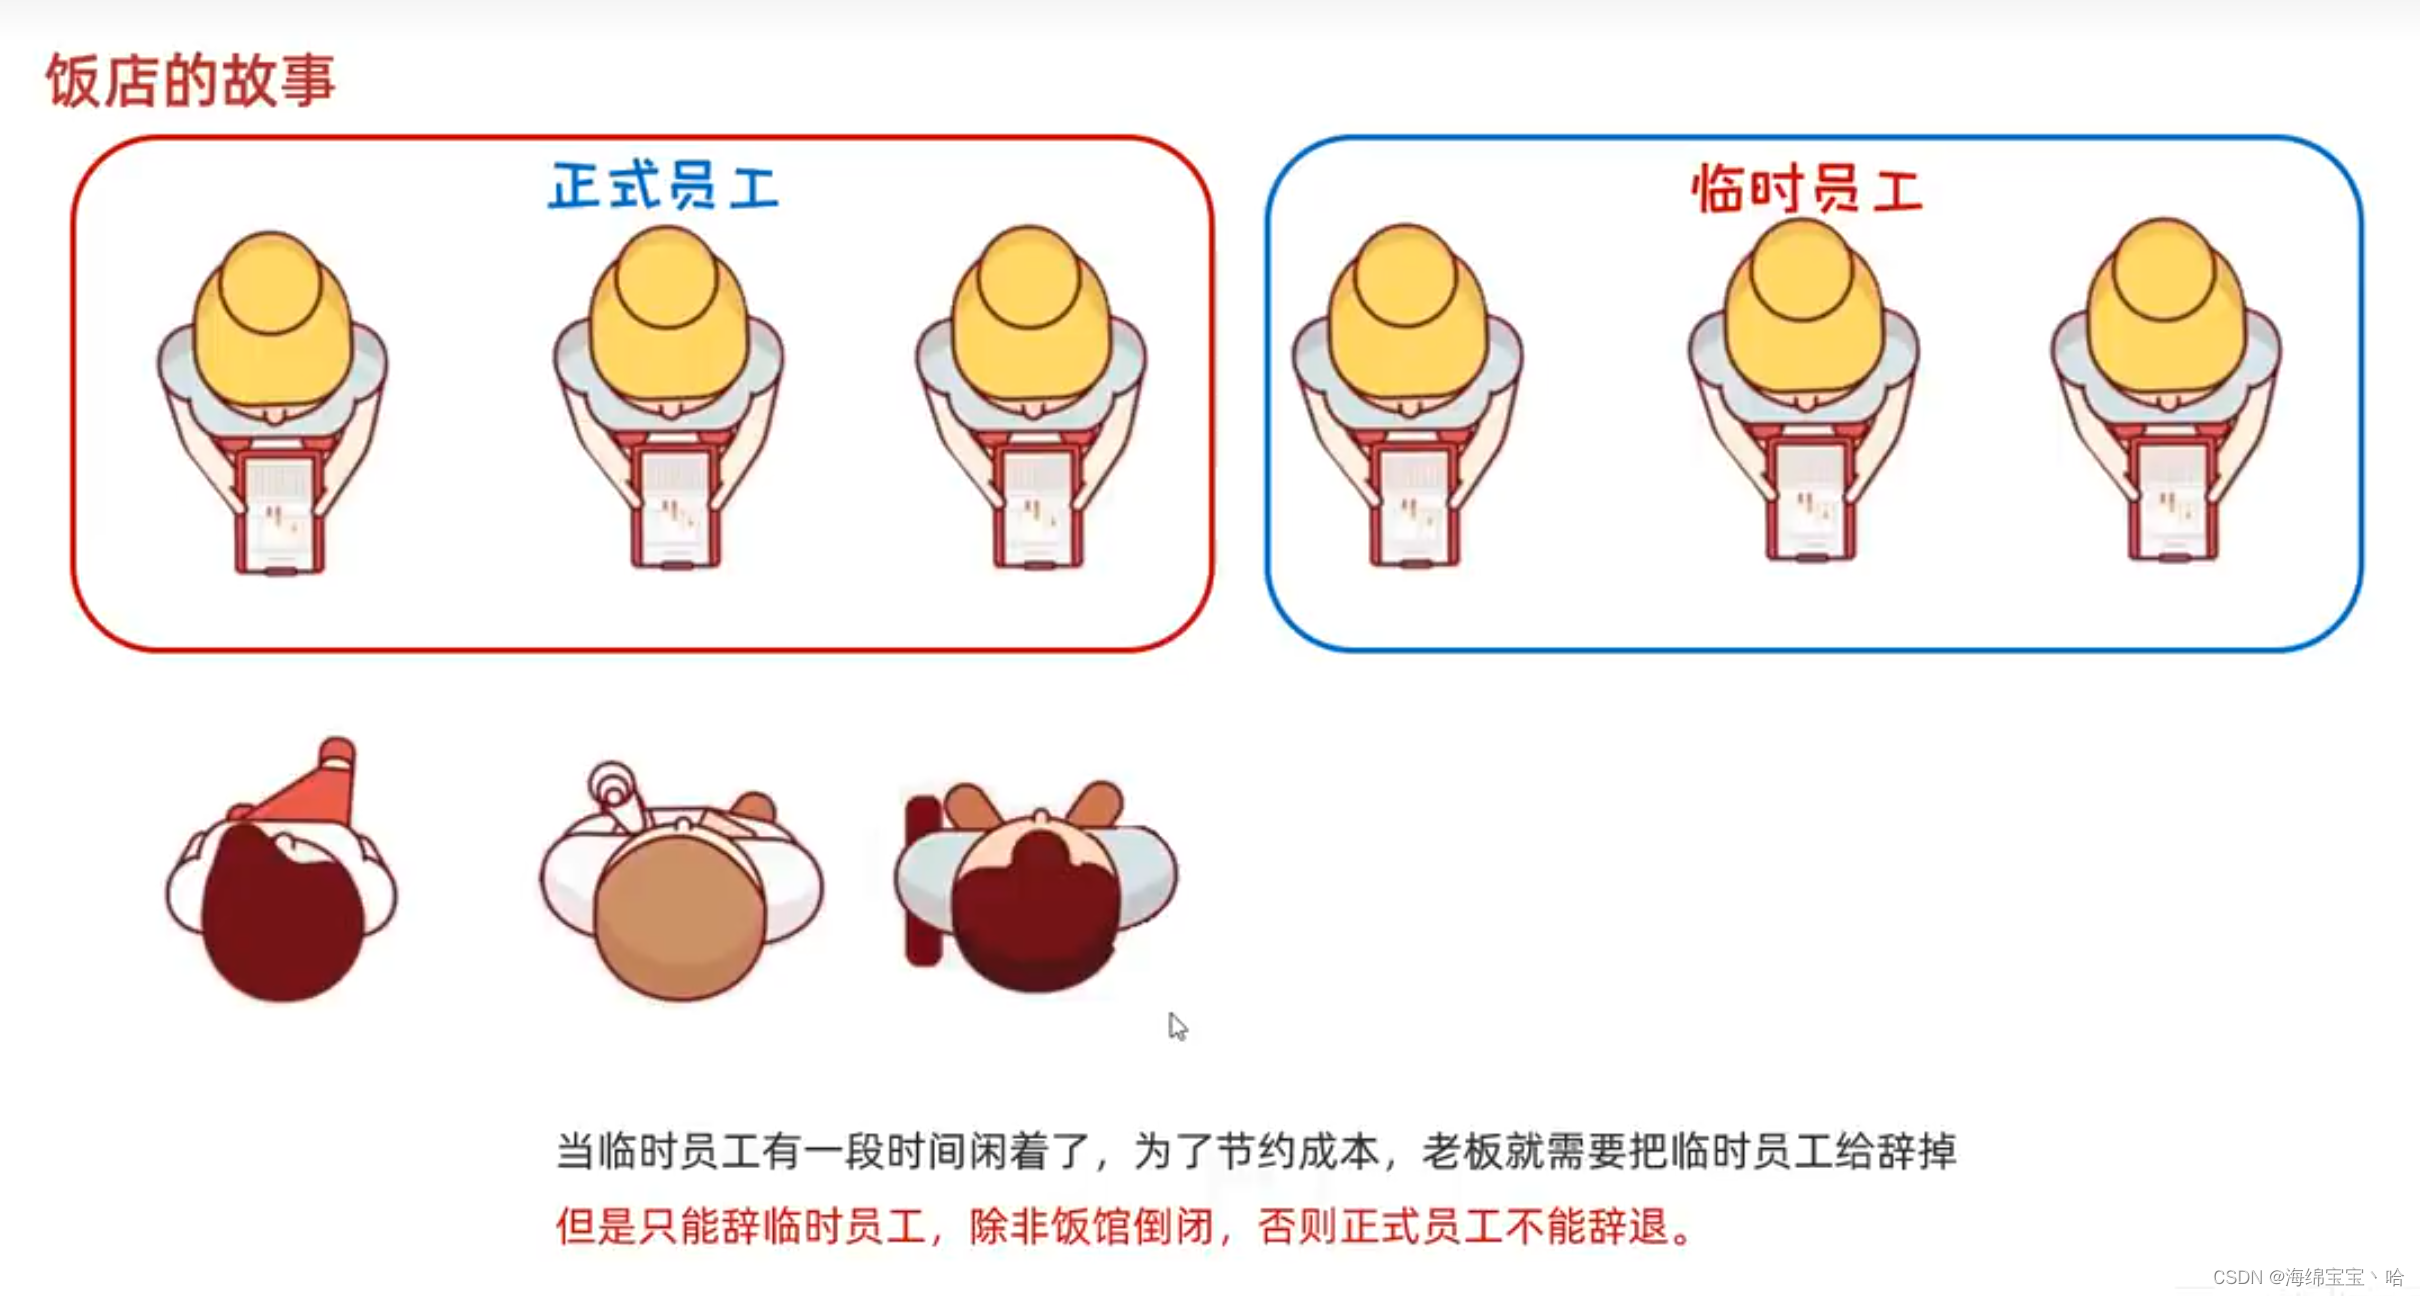
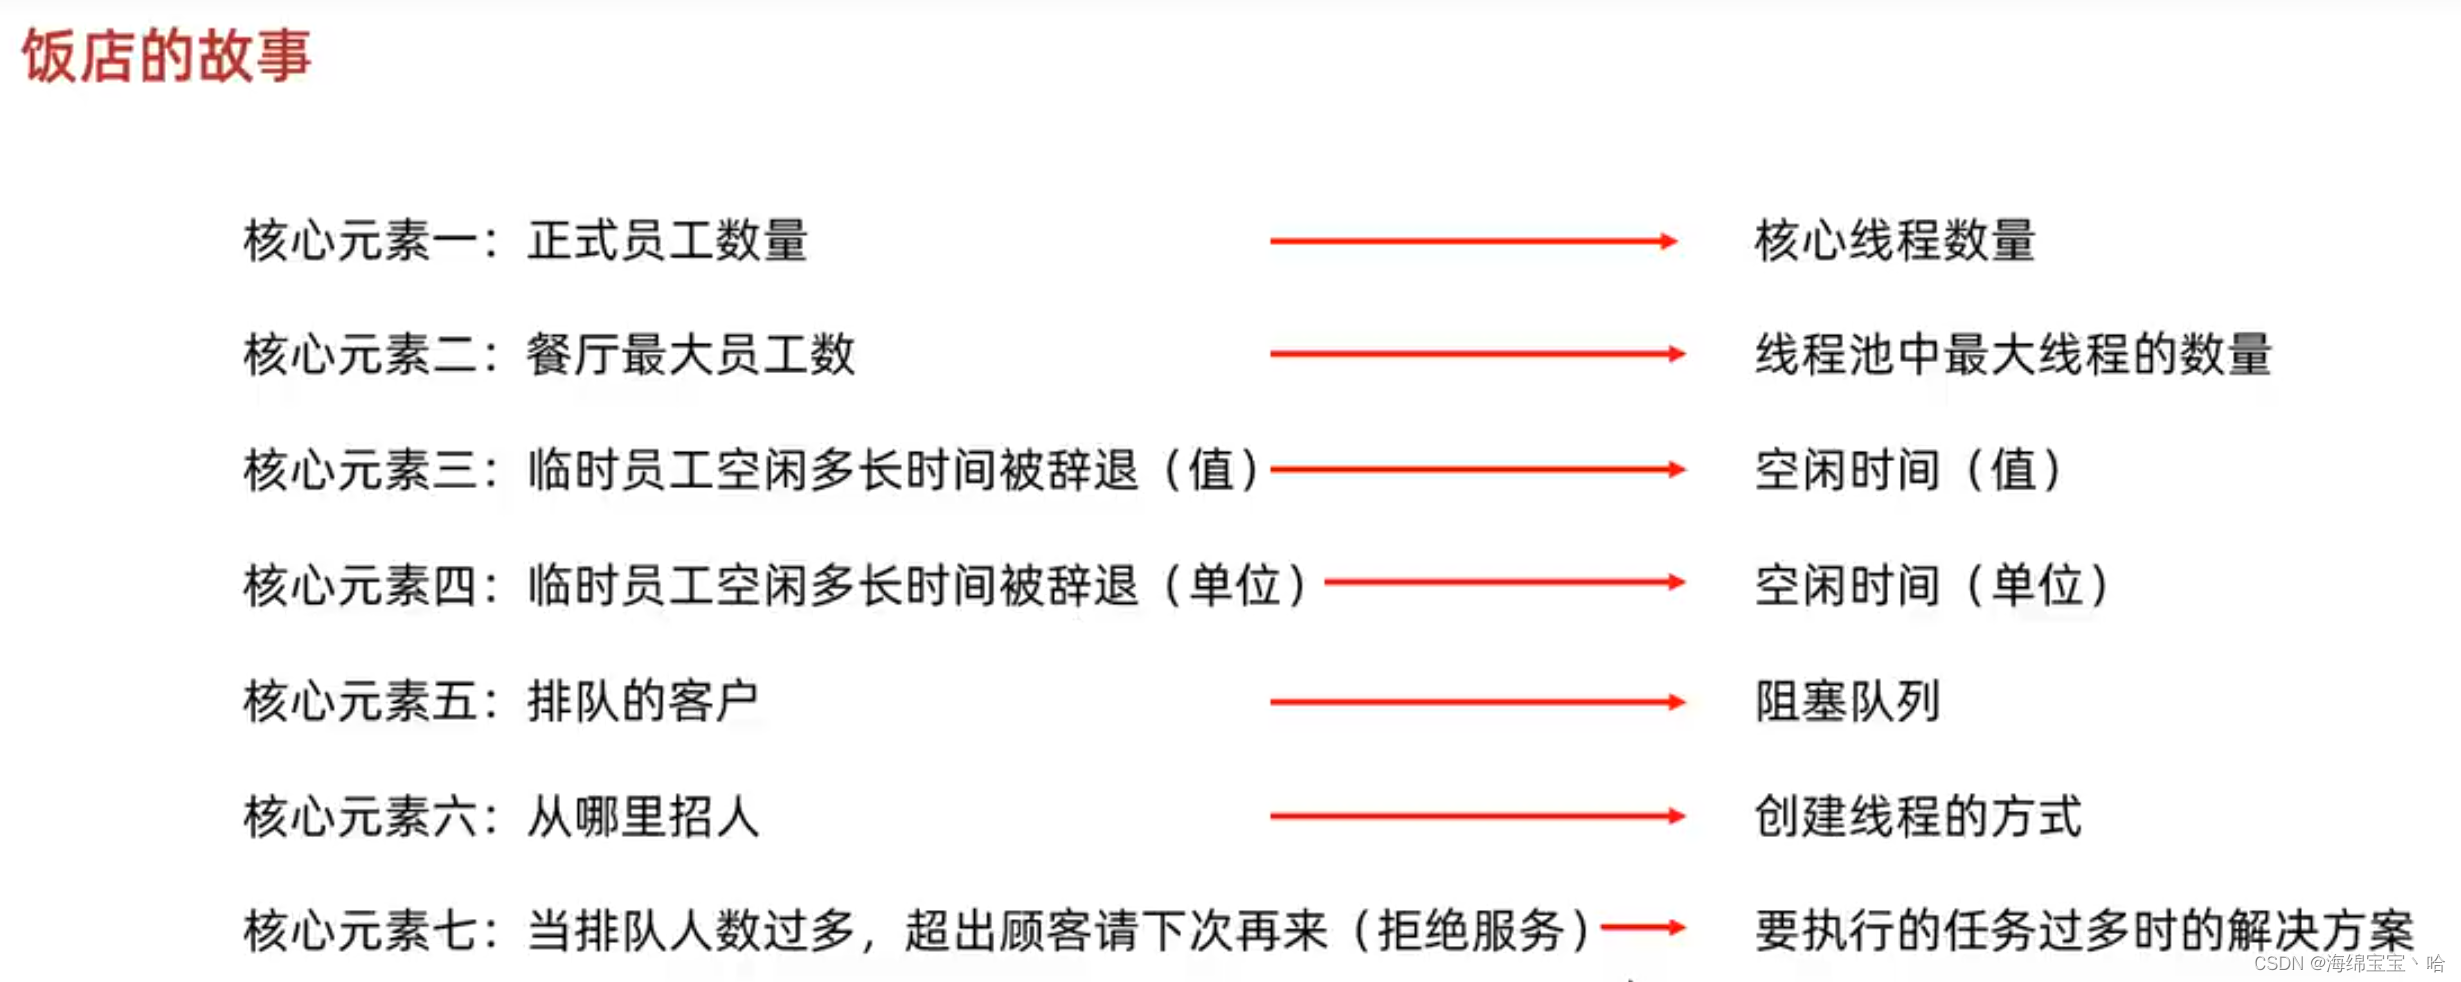
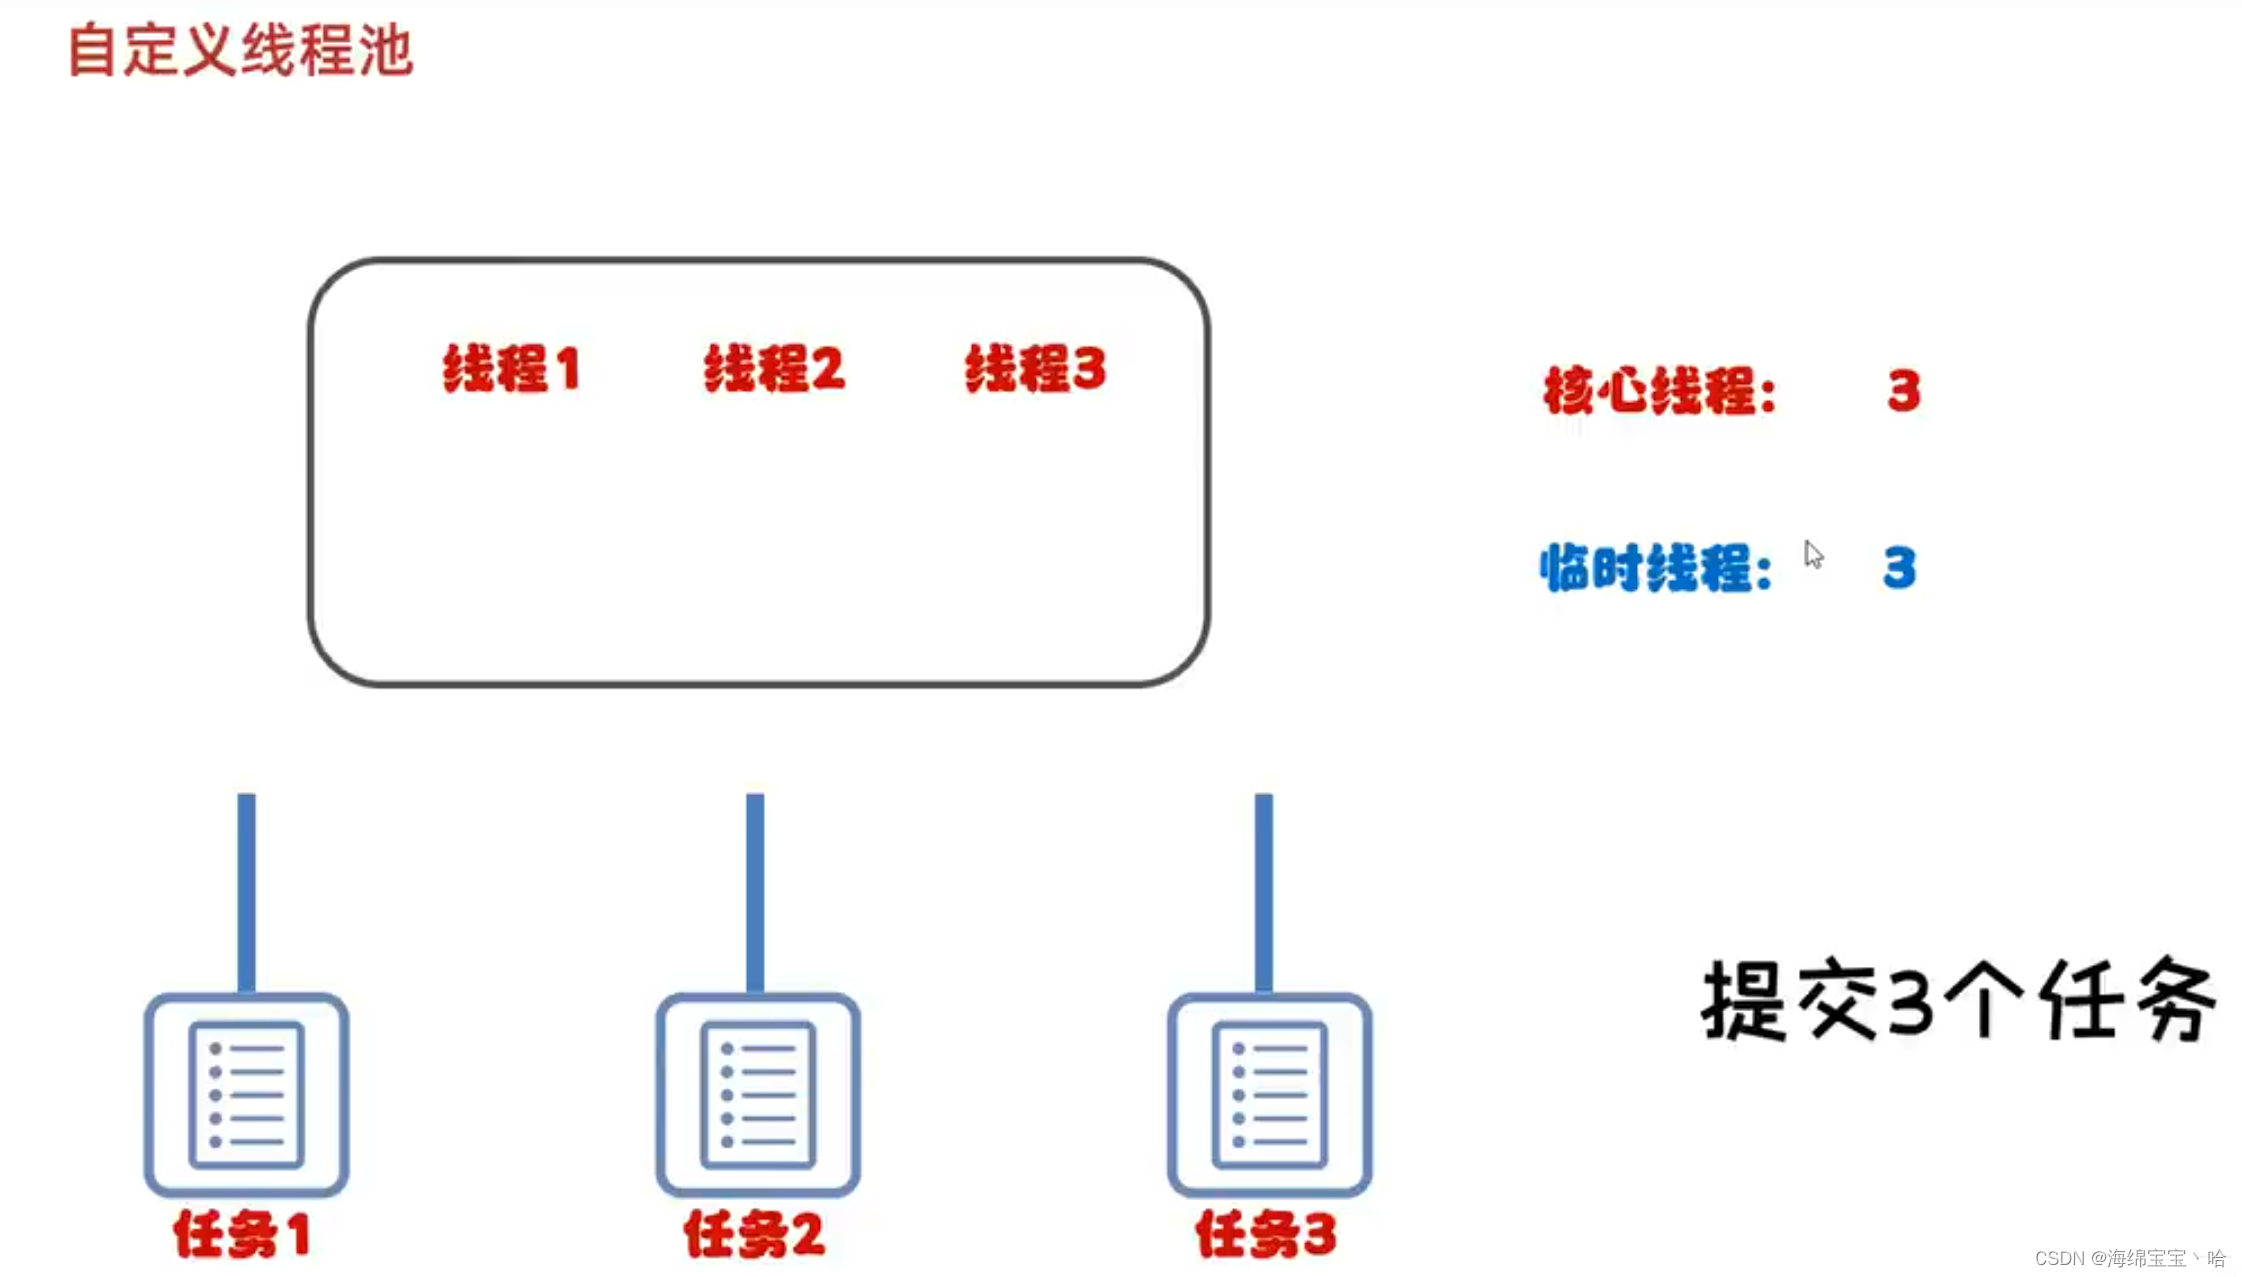
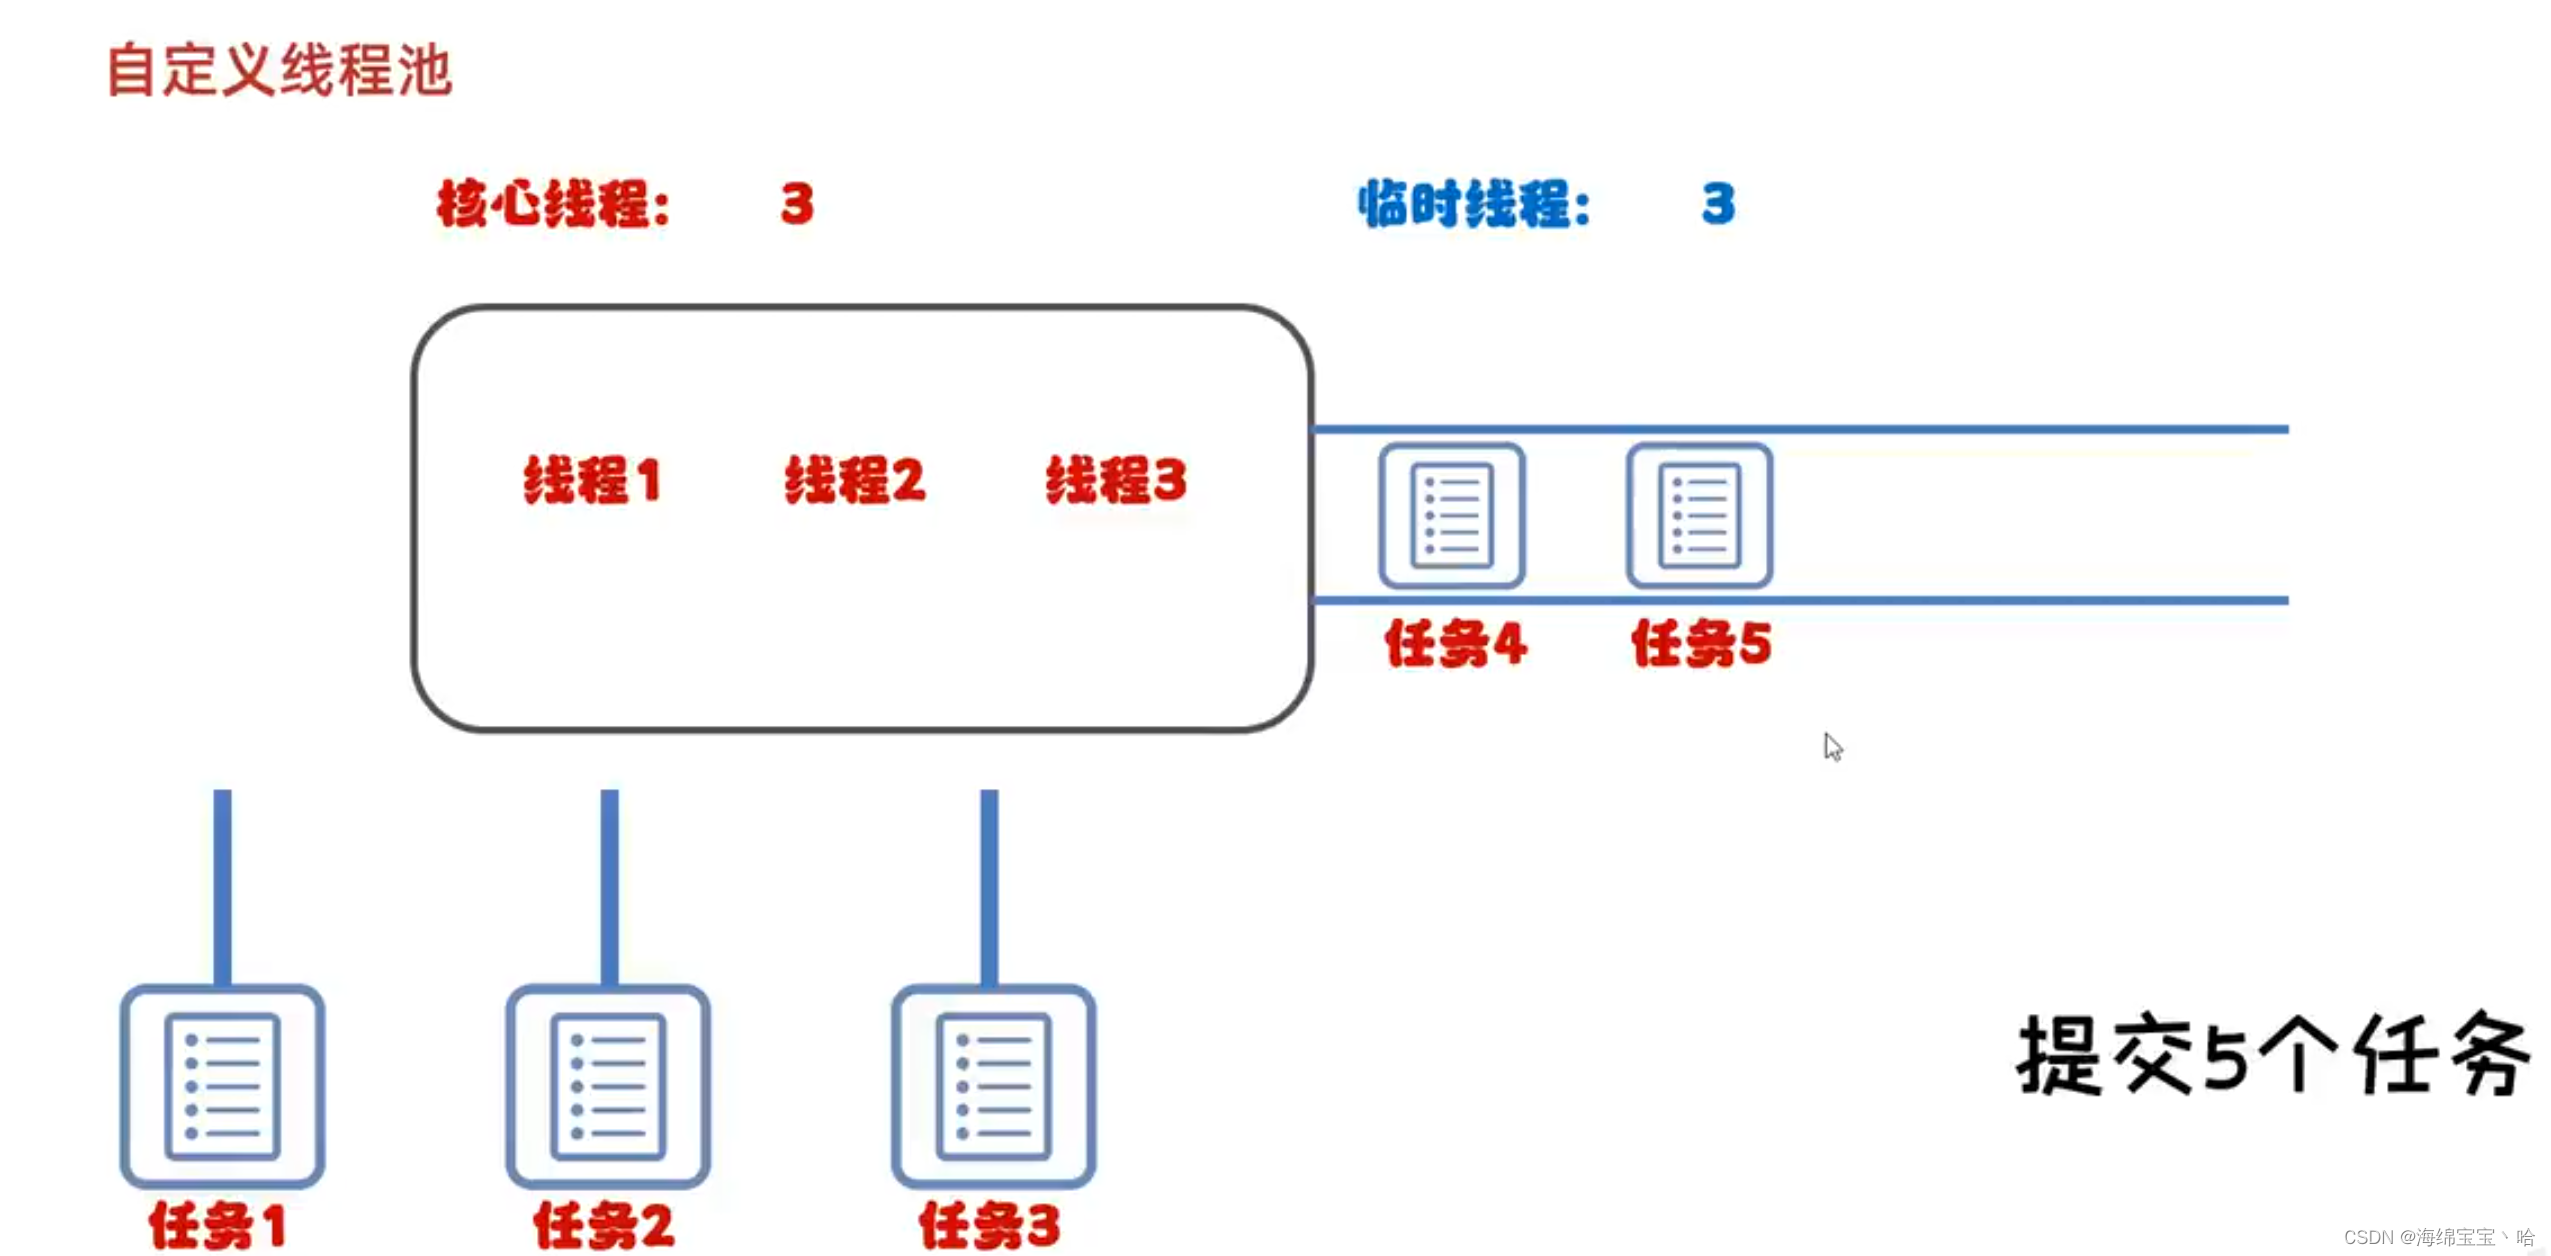
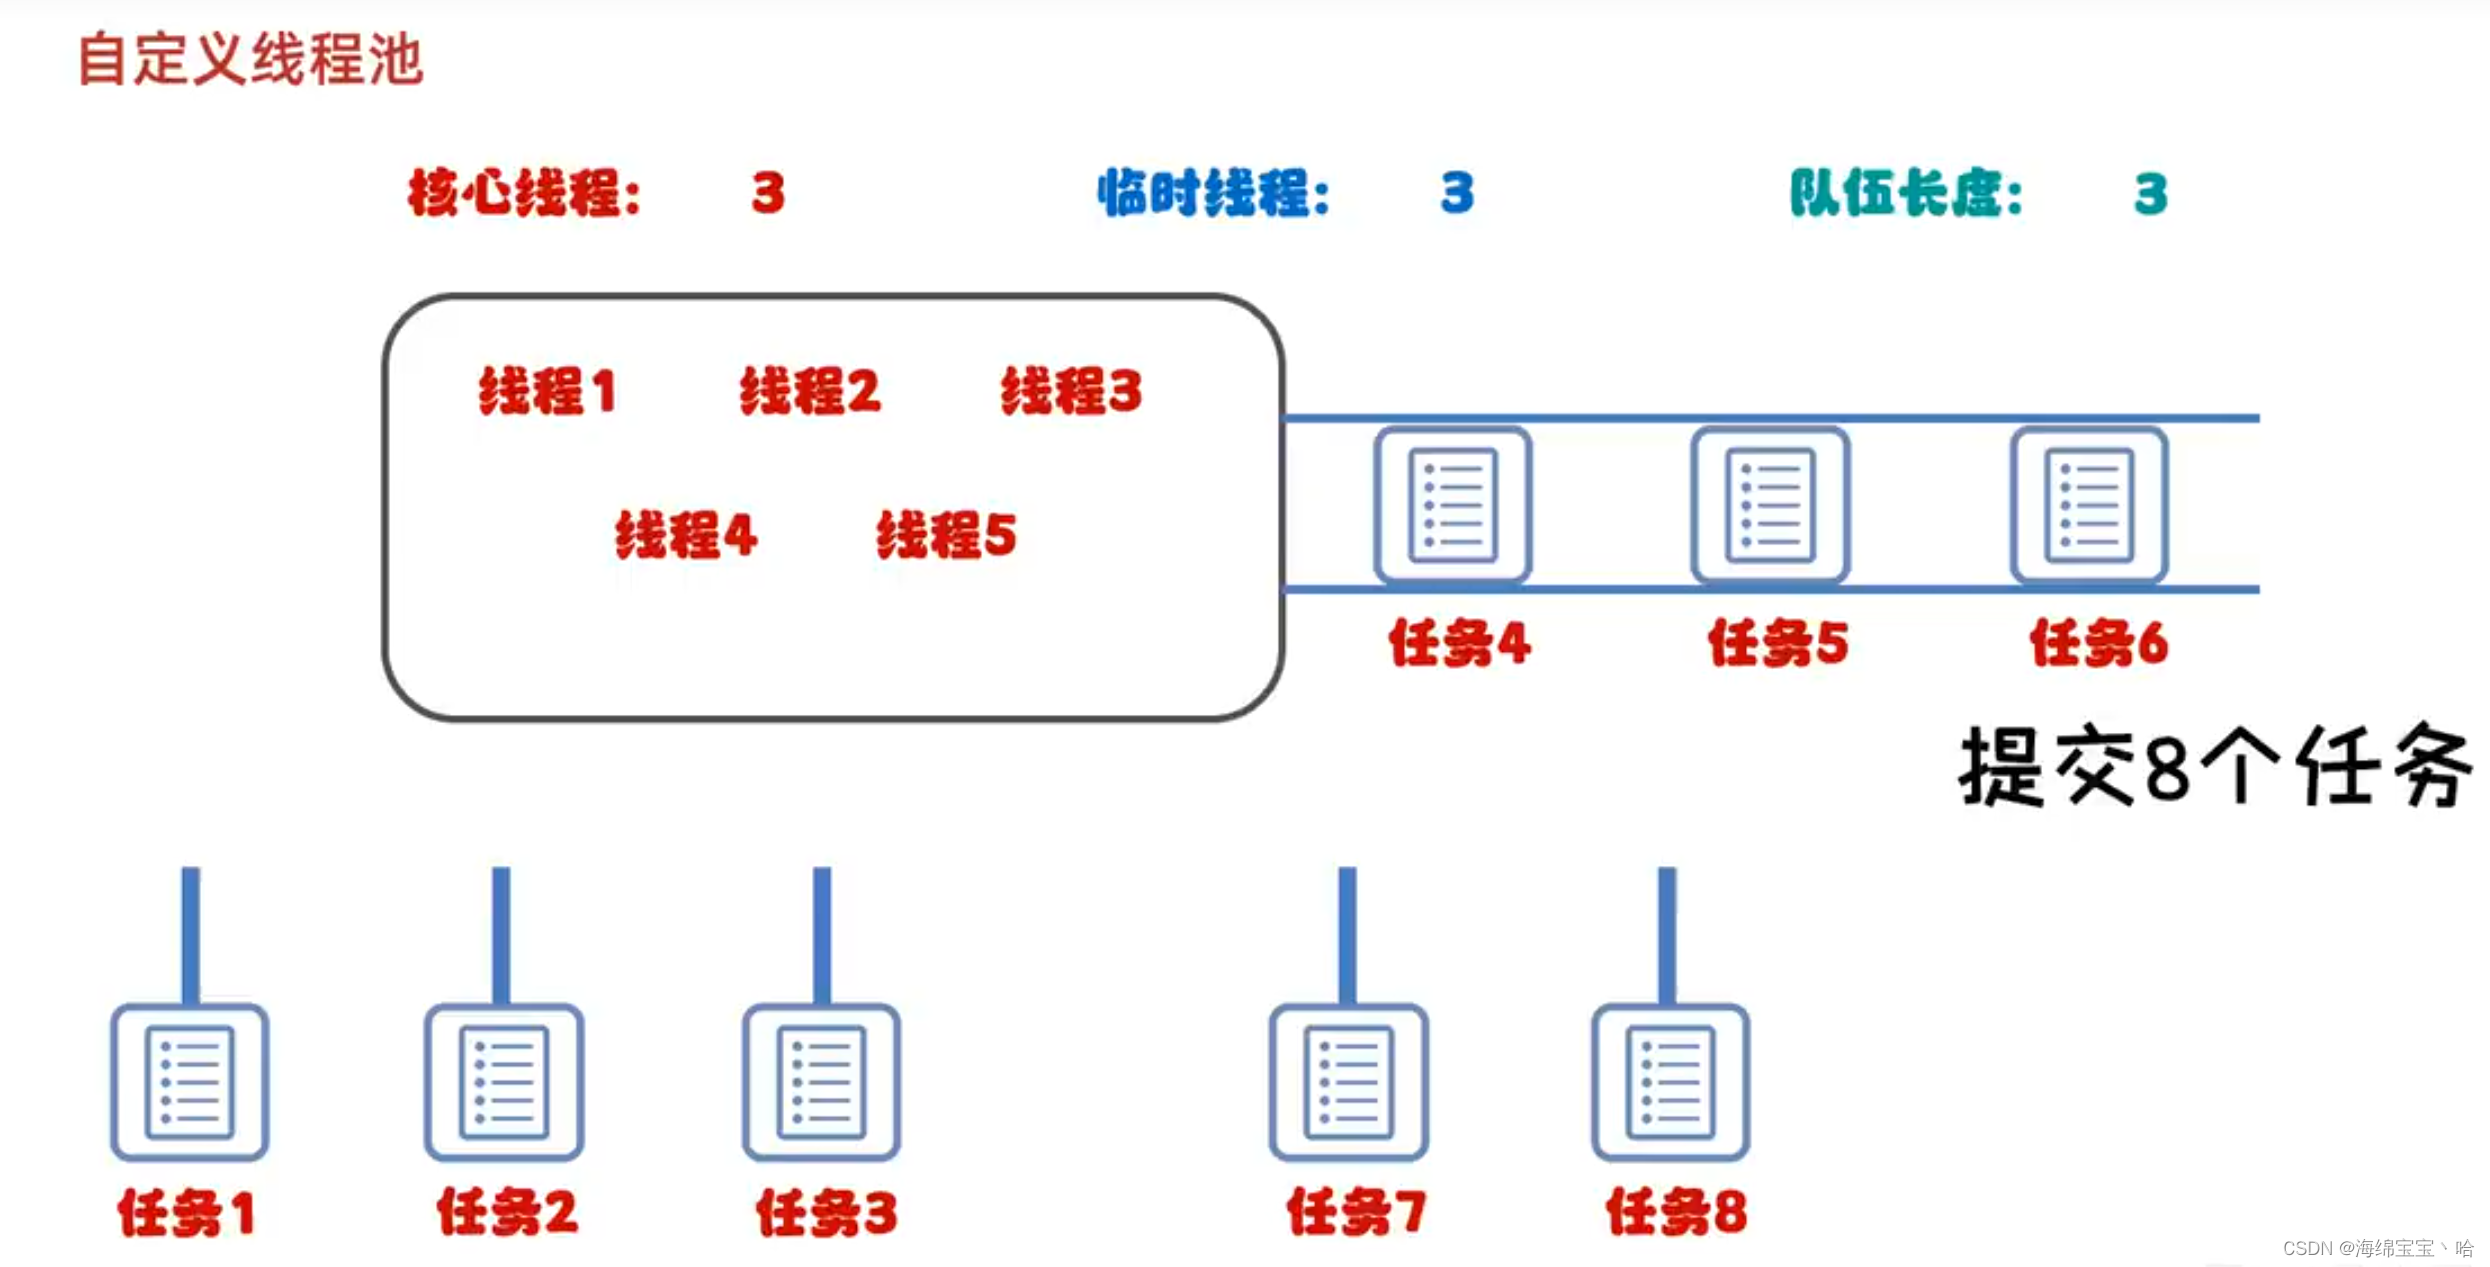
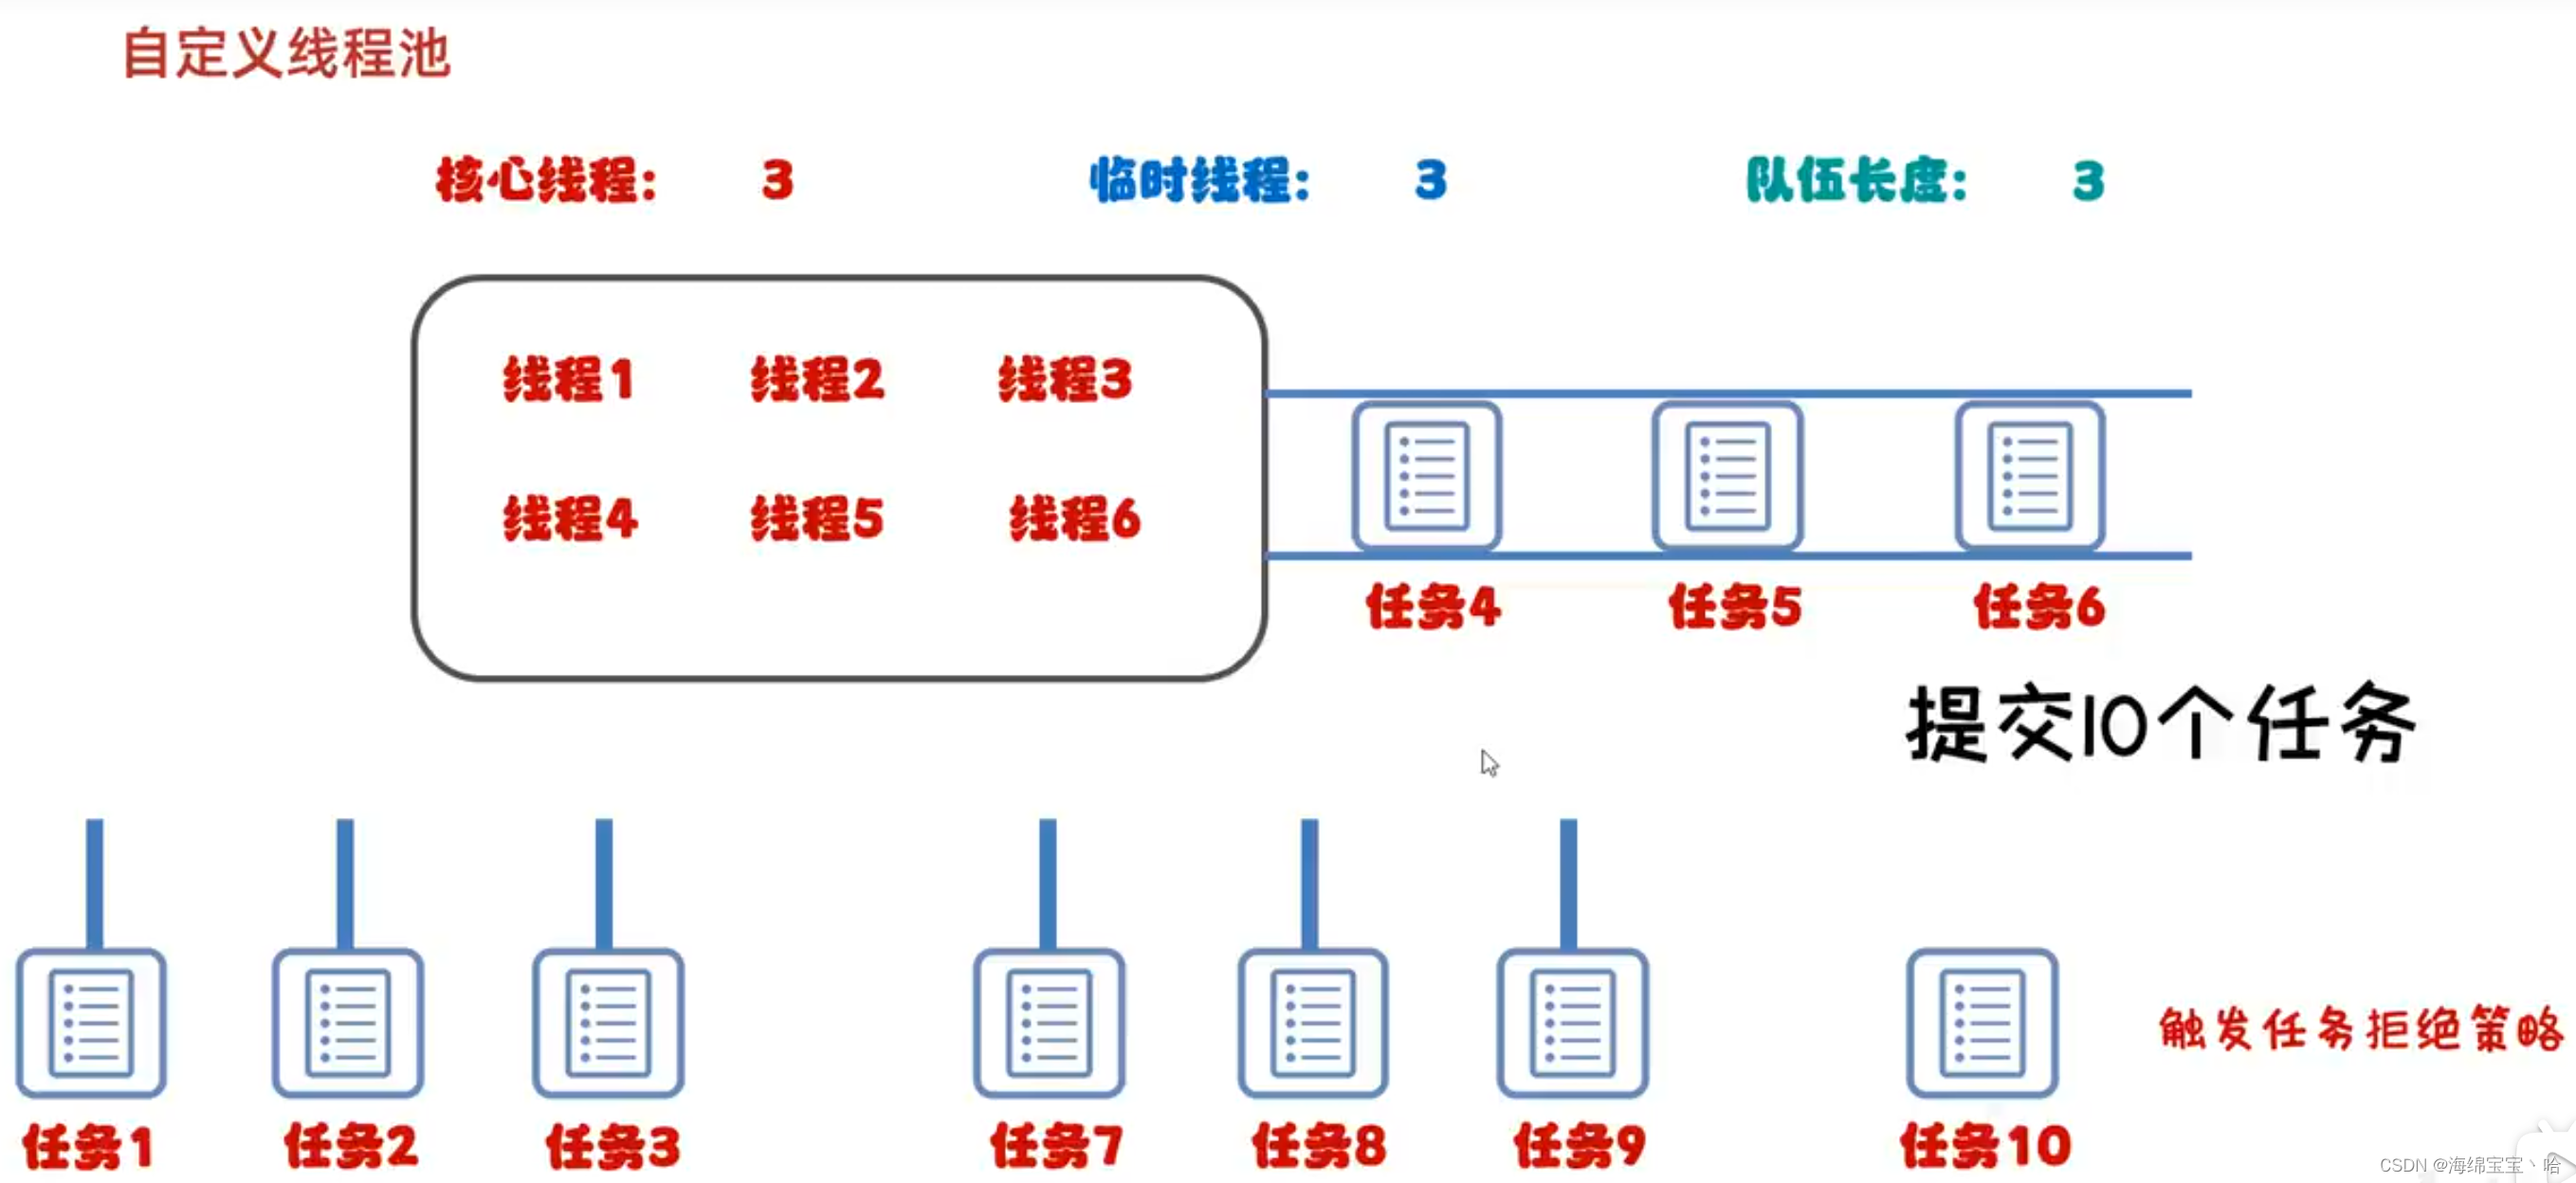
public class Main {
public static void main(String[] args) throws InterruptedException {
/*
ThreadPoolExecutor threadPoolExecutor = new ThreadPoolExecutor
(核心线程数量,最大线程数量,空闲线程最大存活时间,任务队列,创建线程工厂,任务的拒绝策略);
参数一:核心线程数量 不能小于0
参数二:最大线程数 不能小于0,最大数量 >= 核心线程数量
参数三:空闲线程最大存活时间 不能小于0
参数四:时间单位 用TimeUnit指定
参数五:任务队列 不能为null
参数六:创建线程工厂 不能为null
参数七:任务的拒绝策略 不能为null
*/
ThreadPoolExecutor threadPoolExecutor = new ThreadPoolExecutor(
3,//核心线程数,不能小于0
6,//最大线程数,不能小于0,且最大线程数>=核心线程数
60,//空闲线程最大存活时间
TimeUnit.SECONDS,//时间单位
new ArrayBlockingQueue<>(3),//任务队列
Executors.defaultThreadFactory(),//创建线程工厂
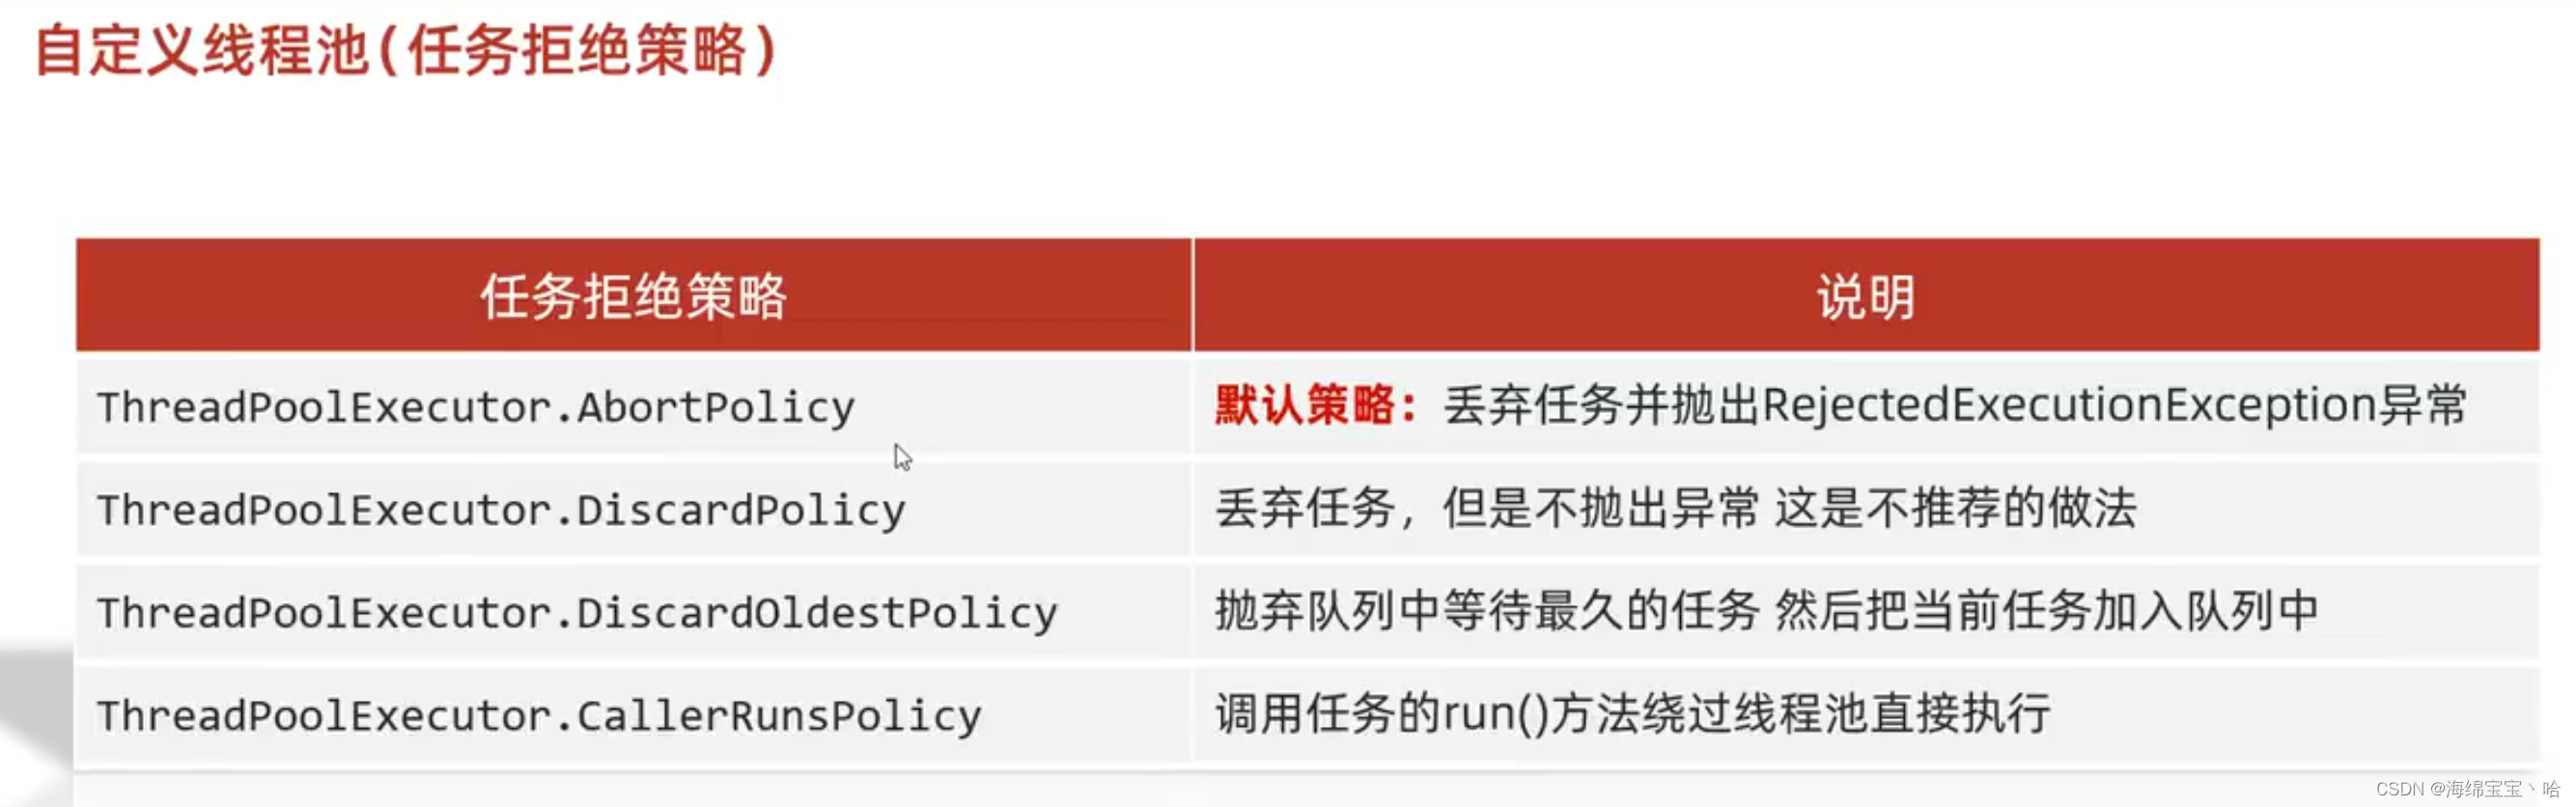
new ThreadPoolExecutor.AbortPolicy()//任务拒绝策略
);
}
}
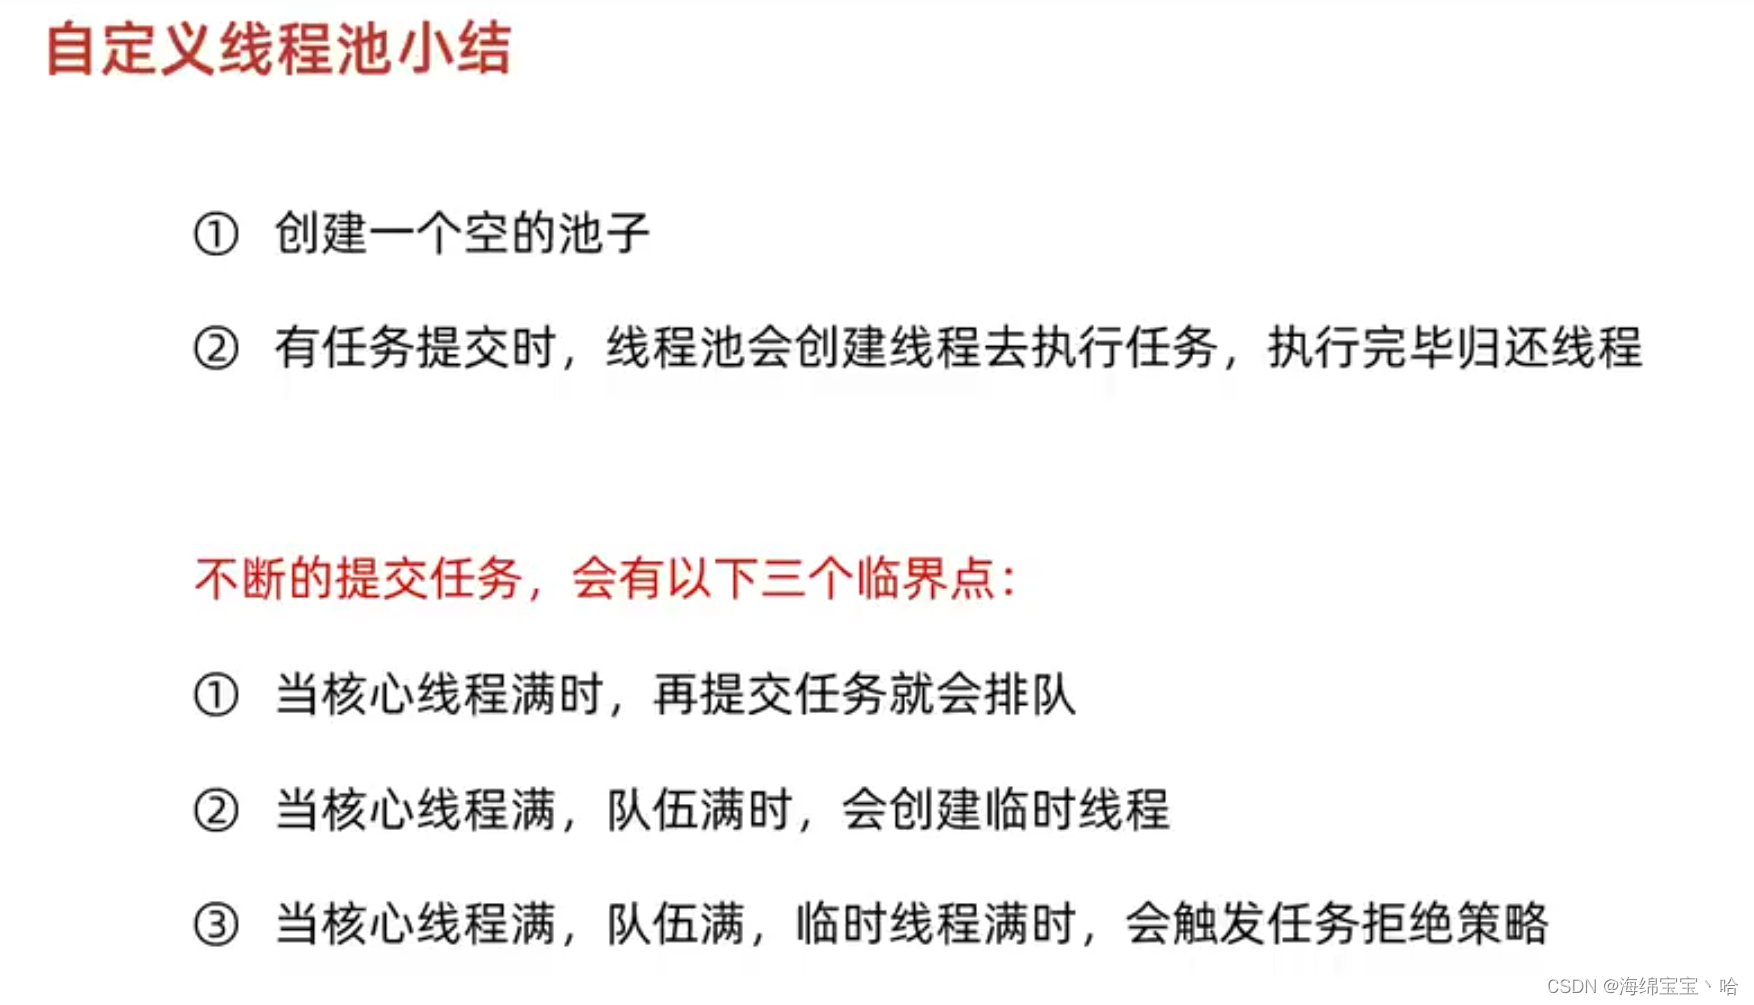
- 总结
- 线程池:主要用于管理和复用线程来执行任务。内部维护一个任务队列,但对外隐藏了队列的细节。适用于需要管理大量并发任务的场景。
- 阻塞队列:主要用于在多线程环境下安全地传递数据。生产者向队列中放数据,消费者从队列中取数据。适用于生产者-消费者模式。
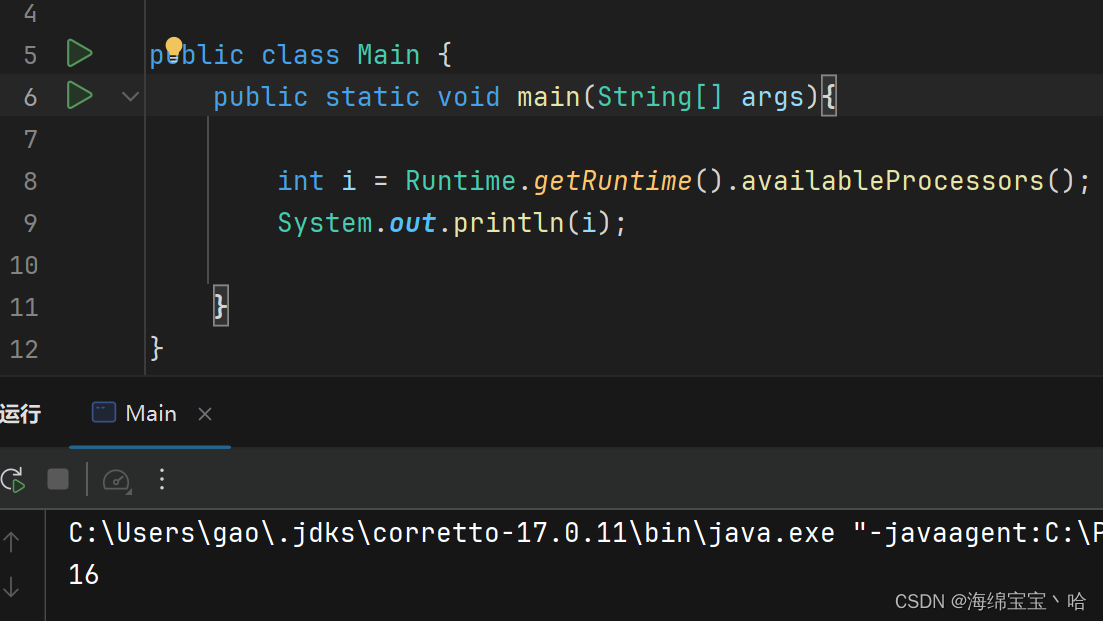
最大并行数

我的电脑:
线程池多大合适?
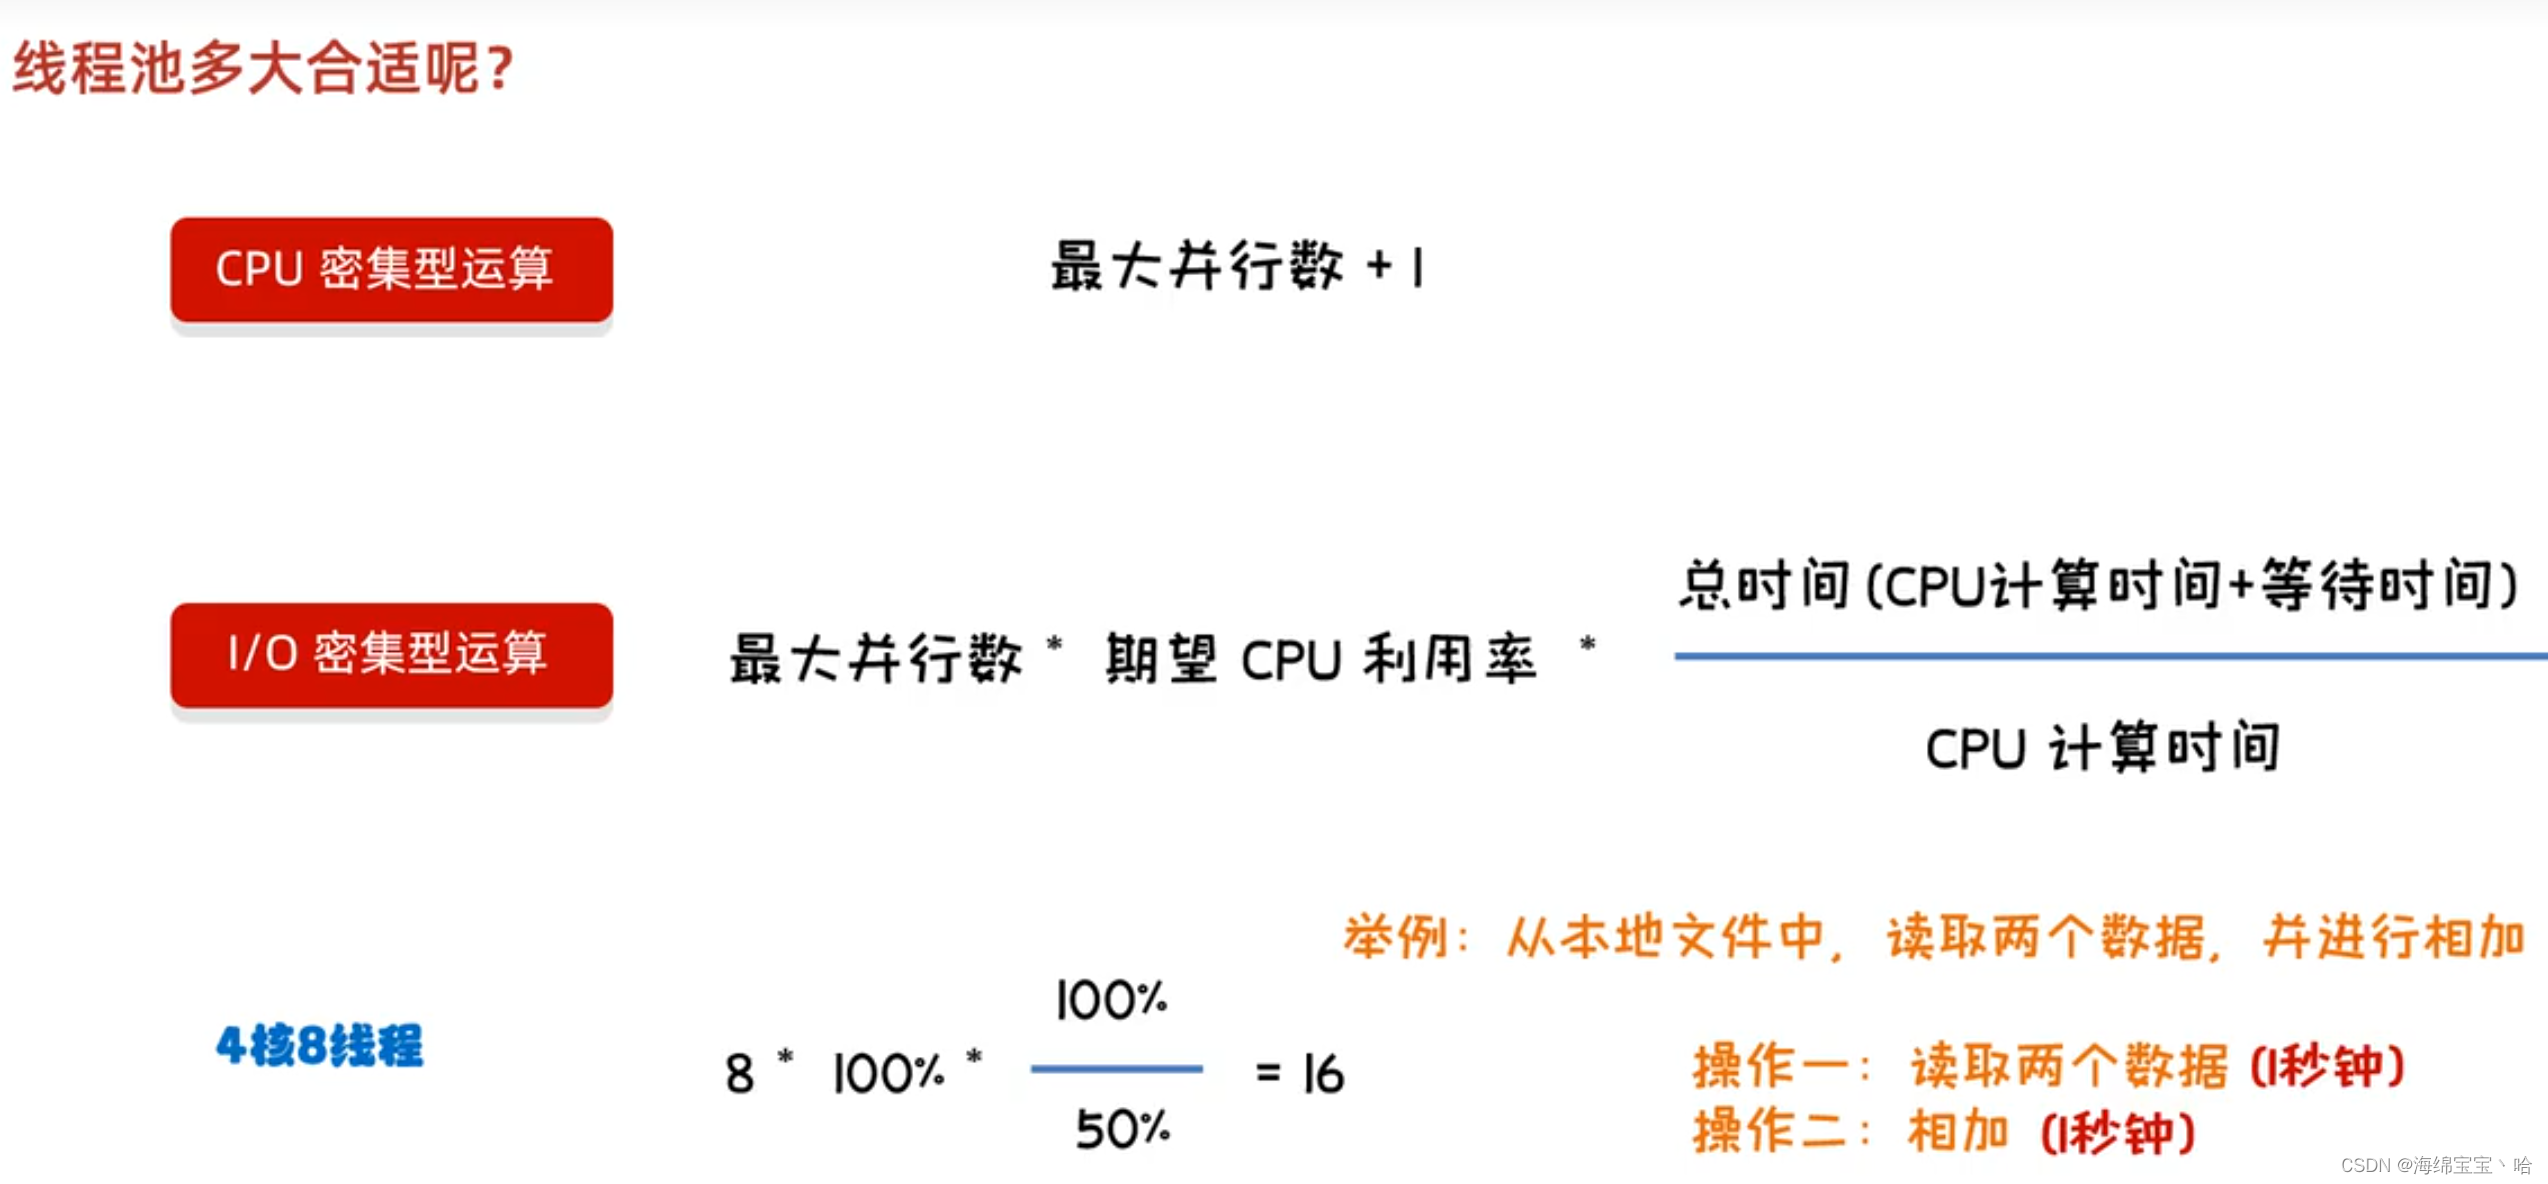


 190
190

 被折叠的 条评论
为什么被折叠?
被折叠的 条评论
为什么被折叠?
 到【灌水乐园】发言


