


代理模式是常用的java设计模式,他的特征是代理类与委托类有同样的接口,代理类主要负责为委托类预处理消息、过滤消息、把消息转发给委托类,以及事后处理消息等。代理类与委托类之间通常会存在关联关系,一个代理类的对象与一个委托类的对象关联,代理类的对象本身并不真正实现服务,而是通过调用委托类的对象的相关方法,来提供特定的服务。
下图就是代理模式的UML类图:
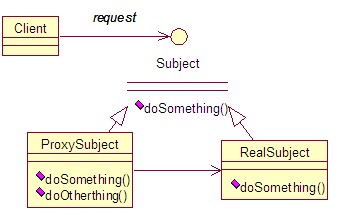
从图中可以看出,代理接口(Subject)、代理类(ProxySubject)、委托类(RealSubject)形成一个“品”字结构。
根据代理类的生成时间不同可以将代理分为静态代理和动态代理两种。
1)静态代理:由程序员创建或特定工具自动生成源代码,再对其编译。在程序运行前,代理类的.class文件就已经存在了。
2)动态代理:在程序运行时,运用反射机制动态创建而成。
1、静态代理
由程序员创建或工具生成代理类的源码,再编译代理类。所谓静态也就是在程序运行前就已经存在代理类的字节码文件,代理类和委托类的关系在运行前就确定了。
接口 :
/**
 * 定义一个接口
 * Created by Carl on 2016/8/14.
 */
public interface BookService {

    void buyBook();

}
实现类:
/**
 * 实现类
 * Created by Carl on 2016/8/14.
 */
public class BookServiceImpl implements BookService {
    @Override
    public void buyBook() {
        System.out.println("买一本书...");
    }
}
代理类:
/**
 * 代理类
 * Created by Carl on 2016/8/14.
 */
public class BookServiceProxy implements BookService {

    private BookService bookService;

    public BookServiceProxy(BookService bookService){
        this.bookService = bookService;
    }

    @Override
    public void buyBook() {
        prepareMoneyForBuyBook();
        bookService.buyBook();
        readBookAfterBuy();
    }

    private void prepareMoneyForBuyBook(){
        System.out.println("为买本准备好钱...");
    }

    private void readBookAfterBuy(){
        System.out.println("终于可以看自己喜欢的书了...");
    }
}
Client类:
/**
* Created by Carl on 2016/8/14.
*/
public class StaticProxyTest {
public static void main(String[] args) {
BookService bookService = new BookServiceProxy(new BookServiceImpl());
bookService.buyBook();
}
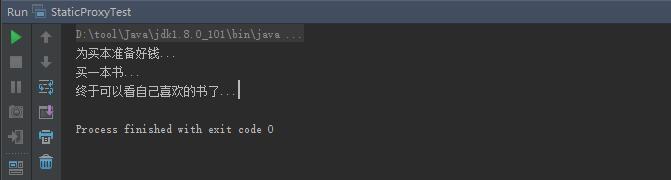
}运行结果如下所示:
静态代理类优缺点
优点:
业务类只需要关注业务逻辑本身,保证了业务类的重用性。这是代理的共有优点。
缺点:
1)代理对象的一个接口只服务于一种类型的对象,如果要代理的方法很多,势必要为每一种方法都进行代理,静态代理在程序规模稍大时就无法胜任了。
2)如果接口增加一个方法,除了所有实现类需要实现这个方法外,所有代理类也需要实现此方法。增加了代码维护的复杂度。
2、动态代理实现示例
创建自己的调用处理器
/**
 * 动态代理类对应的调用处理程序类
 * Created by Carl on 2016/8/14.
 */
public class SubjectInvocationHandler implements InvocationHandler {

    private Object delegate;

    public SubjectInvocationHandler(Object bookService){
        this.delegate = bookService;
    }

    @Override
    public Object invoke(Object proxy, Method method, Object[] args) throws Throwable {
        prepareMoneyForBuyBook();
        Object obj = method.invoke(delegate, args);
        readBookAfterBuy();
        return obj;
    }

    private void prepareMoneyForBuyBook(){
        System.out.println("为买本准备好钱...");
    }

    private void readBookAfterBuy(){
        System.out.println("终于可以看自己喜欢的书了...");
    }
}
客户端代码:
/**
 * 动态代理客户类 并生成代理类的二进制文件用于下面分析
 * Created by Carl on 2016/8/14.
 */
public class DynamicProxyTest {

    public static void main(String[] args) {
        BookService bookService = new BookServiceImpl();
        BookService dynamicProxy = (BookService) Proxy.newProxyInstance(BookService.class.getClassLoader(),
                new Class[]{BookService.class}, new SubjectInvocationHandler(bookService));
        dynamicProxy.buyBook();

        // write proxySubject class binary data to file
        createProxyClassFile();
    }

    public static void createProxyClassFile()
    {
        String name = "ProxySubject";
        byte[] data = ProxyGenerator.generateProxyClass( name, new Class[] { Subject.class } );
        try
        {
            FileOutputStream out = new FileOutputStream( name + ".class" );
            out.write( data );
            out.close();
        }
        catch( Exception e )
        {
            e.printStackTrace();
        }
    }

}
3、动态代理相关API
动态代理类的源码是在程序运行期间由JVM根据反射等机制动态的生成,所以不存在代理类的字节码文件。代理类和委托类的关系是在程序运行时确定。
先看看与动态代理紧密关联的Java API。
1)java.lang.reflect.Proxy
这是 Java 动态代理机制生成的所有动态代理类的父类,它提供了一组静态方法来为一组接口动态地生成代理类及其对象。
Proxy类的静态方法
// 方法 1: 该方法用于获取指定代理对象所关联的调用处理器
static InvocationHandler getInvocationHandler(Object proxy)

// 方法 2:该方法用于获取关联于指定类装载器和一组接口的动态代理类的类对象
static Class getProxyClass(ClassLoader loader, Class[] interfaces)

// 方法 3:该方法用于判断指定类对象是否是一个动态代理类
static boolean isProxyClass(Class cl)

// 方法 4:该方法用于为指定类装载器、一组接口及调用处理器生成动态代理类实例
static Object newProxyInstance(ClassLoader loader, Class[] interfaces, InvocationHandler h)
2)java.lang.reflect.InvocationHandler
这是调用处理器接口,它自定义了一个 invoke 方法,用于集中处理在动态代理类对象上的方法调用,通常在该方法中实现对委托类的代理访问。每次生成动态代理类对象时都要指定一个对应的调用处理器对象。
InvocationHandler的核心方法 :
// 该方法负责集中处理动态代理类上的所有方法调用。第一个参数既是代理类实例,第二个参数是被调用的方法对象
// 第三个方法是调用参数。调用处理器根据这三个参数进行预处理或分派到委托类实例上反射执行
Object invoke(Object proxy, Method method, Object[] args)
3)java.lang.ClassLoader
这是类装载器类,负责将类的字节码装载到 Java 虚拟机(JVM)中并为其定义类对象,然后该类才能被使用。Proxy 静态方法生成动态代理类同样需要通过类装载器来进行装载才能使用,它与普通类的唯一区别就是其字节码是由 JVM 在运行时动态生成的而非预存在于任何一个 .class 文件中。
每次生成动态代理类对象时都需要指定一个类装载器对象
4、动态代理内部实现
首先来看看类Proxy的代码实现 Proxy的主要静态变量
// 映射表:用于维护类装载器对象到其对应的代理类缓存
private static Map loaderToCache = new WeakHashMap();

// 标记:用于标记一个动态代理类正在被创建中
private static Object pendingGenerationMarker = new Object();

// 同步表:记录已经被创建的动态代理类类型,主要被方法 isProxyClass 进行相关的判断
private static Map proxyClasses = Collections.synchronizedMap(new WeakHashMap());

// 关联的调用处理器引用
protected InvocationHandler h;
Proxy的构造方法
// 由于 Proxy 内部从不直接调用构造函数,所以 private 类型意味着禁止任何调用
private Proxy() {}

// 由于 Proxy 内部从不直接调用构造函数,所以 protected 意味着只有子类可以调用
protected Proxy(InvocationHandler h) {this.h = h;}
我们可以先看一看Proxy代理类生成的调用过程:
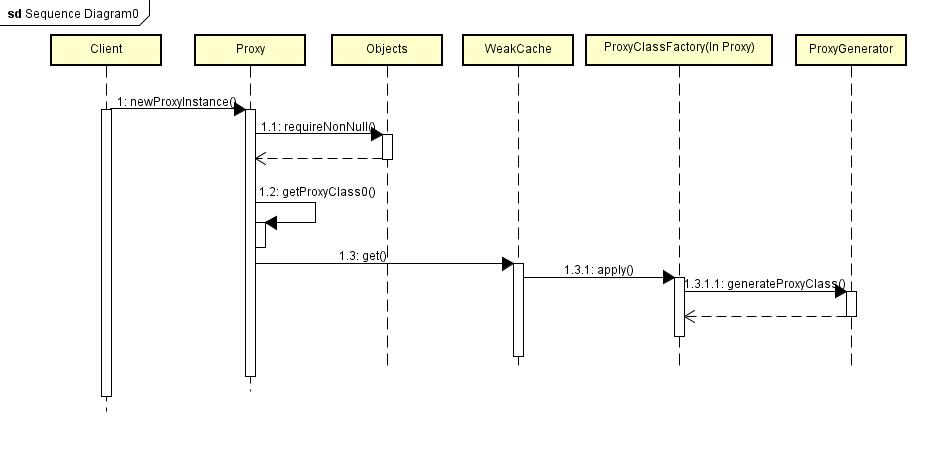
Proxy静态方法newProxyInstance
public static Object newProxyInstance(ClassLoader loader,
                                      Class<?>[] interfaces,
                                      InvocationHandler h)
    throws IllegalArgumentException
{
    // 检查h不为空,否则抛异常
    Objects.requireNonNull(h);
    final Class<?>[] intfs = interfaces.clone();
    final SecurityManager sm = System.getSecurityManager();
    if (sm != null) {
        checkProxyAccess(Reflection.getCallerClass(), loader, intfs);
    }
    /*
     * 获得与指定类装载器和一组接口相关的代理类类型对象
     */
    Class<?> cl = getProxyClass0(loader, intfs);

    /*
     * 调用指定invocation handler,通过反射获取构造函数对象并生成代理类实例
     */
    try {
        if (sm != null) {
            checkNewProxyPermission(Reflection.getCallerClass(), cl);
        }

        final Constructor<?> cons = cl.getConstructor(constructorParams);
        final InvocationHandler ih = h;
        if (!Modifier.isPublic(cl.getModifiers())) {
            AccessController.doPrivileged(new PrivilegedAction<Void>() {
                public Void run() {
                    cons.setAccessible(true);
                    return null;
                }
            });
        }
        return cons.newInstance(new Object[]{h});
    } catch (IllegalAccessException|InstantiationException e) {
        throw new InternalError(e.toString(), e);
    } catch (InvocationTargetException e) {
        Throwable t = e.getCause();
        if (t instanceof RuntimeException) {
            throw (RuntimeException) t;
        } else {
            throw new InternalError(t.toString(), t);
        }
    } catch (NoSuchMethodException e) {
        throw new InternalError(e.toString(), e);
    }
}
类Proxy的getProxyClass方法调用ProxyGenerator的 generateProxyClass方法产生ProxySubject.class的二进制数据:
public static byte[] generateProxyClass(final String name, Class[] interfaces)我们可以import sun.misc.ProxyGenerator,调用 generateProxyClass方法产生binary data,然后写入文件,最后通过反编译工具来查看内部实现原理。 反编译后的ProxySubject.java Proxy静态方法newProxyInstance在上面的动态代理测试类DynamicProxyTest已经生成了ProxySubject这个.class文件。具体代码如下:
import java.lang.reflect.*;
public final class ProxySubject extends Proxy
    implements Subject
{
    private static Method m1;
    private static Method m0;
    private static Method m3;
    private static Method m2;
    public ProxySubject(InvocationHandler invocationhandler)
    {
        super(invocationhandler);
    }
    public final boolean equals(Object obj)
    {
        try
        {
            return ((Boolean)super.h.invoke(this, m1, new Object[] {
                obj
            })).booleanValue();
        }
        catch(Error _ex) { }
        catch(Throwable throwable)
        {
            throw new UndeclaredThrowableException(throwable);
        }
    }
    public final int hashCode()
    {
        try
        {
            return ((Integer)super.h.invoke(this, m0, null)).intValue();
        }
        catch(Error _ex) { }
        catch(Throwable throwable)
        {
            throw new UndeclaredThrowableException(throwable);
        }
    }
    public final void buyBook()
    {
        try
        {
            super.h.invoke(this, m3, null);
            return;
        }
        catch(Error _ex) { }
        catch(Throwable throwable)
        {
            throw new UndeclaredThrowableException(throwable);
        }
    }
    public final String toString()
    {
        try
        {
            return (String)super.h.invoke(this, m2, null);
        }
        catch(Error _ex) { }
        catch(Throwable throwable)
        {
            throw new UndeclaredThrowableException(throwable);
        }
    }
    static
    {
        try
        {
            m1 = Class.forName("java.lang.Object").getMethod("equals", new Class[] {
                Class.forName("java.lang.Object")
            });
            m0 = Class.forName("java.lang.Object").getMethod("hashCode", new Class[0]);
            m3 = Class.forName("Subject").getMethod("buyBook", new Class[0]);
            m2 = Class.forName("java.lang.Object").getMethod("toString", new Class[0]);
        }
        catch(NoSuchMethodException nosuchmethodexception)
        {
            throw new NoSuchMethodError(nosuchmethodexception.getMessage());
        }
        catch(ClassNotFoundException classnotfoundexception)
        {
            throw new NoClassDefFoundError(classnotfoundexception.getMessage());
        }
    }
}
ProxyGenerator内部是如何生成class二进制数据,可以参考源代码。
private byte[] generateClassFile() {
  /*
   * Record that proxy methods are needed for the hashCode, equals,
   * and toString methods of java.lang.Object.  This is done before
   * the methods from the proxy interfaces so that the methods from
   * java.lang.Object take precedence over duplicate methods in the
   * proxy interfaces.
   */
  addProxyMethod(hashCodeMethod, Object.class);
  addProxyMethod(equalsMethod, Object.class);
  addProxyMethod(toStringMethod, Object.class);
  /*
   * Now record all of the methods from the proxy interfaces, giving
   * earlier interfaces precedence over later ones with duplicate
   * methods.
   */
  for (int i = 0; i < interfaces.length; i++) {
      Method[] methods = interfaces[i].getMethods();
      for (int j = 0; j < methods.length; j++) {
    addProxyMethod(methods[j], interfaces[i]);
      }
  }
  /*
   * For each set of proxy methods with the same signature,
   * verify that the methods' return types are compatible.
   */
  for (List<ProxyMethod> sigmethods : proxyMethods.values()) {
      checkReturnTypes(sigmethods);
  }
  /* ============================================================
   * Step 2: Assemble FieldInfo and MethodInfo structs for all of
   * fields and methods in the class we are generating.
   */
  try {
      methods.add(generateConstructor());
      for (List<ProxyMethod> sigmethods : proxyMethods.values()) {
    for (ProxyMethod pm : sigmethods) {
        // add static field for method's Method object
        fields.add(new FieldInfo(pm.methodFieldName,
      "Ljava/lang/reflect/Method;",
       ACC_PRIVATE | ACC_STATIC));
        // generate code for proxy method and add it
        methods.add(pm.generateMethod());
    }
      }
      methods.add(generateStaticInitializer());
  } catch (IOException e) {
      throw new InternalError("unexpected I/O Exception");
  }
  /* ============================================================
   * Step 3: Write the final class file.
   */
  /*
   * Make sure that constant pool indexes are reserved for the
   * following items before starting to write the final class file.
   */
  cp.getClass(dotToSlash(className));
  cp.getClass(superclassName);
  for (int i = 0; i < interfaces.length; i++) {
      cp.getClass(dotToSlash(interfaces[i].getName()));
  }
  /*
   * Disallow new constant pool additions beyond this point, since
   * we are about to write the final constant pool table.
   */
  cp.setReadOnly();
  ByteArrayOutputStream bout = new ByteArrayOutputStream();
  DataOutputStream dout = new DataOutputStream(bout);
  try {
      /*
       * Write all the items of the "ClassFile" structure.
       * See JVMS section 4.1.
       */
          // u4 magic;
      dout.writeInt(0xCAFEBABE);
          // u2 minor_version;
      dout.writeShort(CLASSFILE_MINOR_VERSION);
          // u2 major_version;
      dout.writeShort(CLASSFILE_MAJOR_VERSION);
      cp.write(dout);   // (write constant pool)
          // u2 access_flags;
      dout.writeShort(ACC_PUBLIC | ACC_FINAL | ACC_SUPER);
          // u2 this_class;
      dout.writeShort(cp.getClass(dotToSlash(className)));
          // u2 super_class;
      dout.writeShort(cp.getClass(superclassName));
          // u2 interfaces_count;
      dout.writeShort(interfaces.length);
          // u2 interfaces[interfaces_count];
      for (int i = 0; i < interfaces.length; i++) {
    dout.writeShort(cp.getClass(
        dotToSlash(interfaces[i].getName())));
      }
          // u2 fields_count;
      dout.writeShort(fields.size());
          // field_info fields[fields_count];
      for (FieldInfo f : fields) {
    f.write(dout);
      }
          // u2 methods_count;
      dout.writeShort(methods.size());
          // method_info methods[methods_count];
      for (MethodInfo m : methods) {
    m.write(dout);
      }
             // u2 attributes_count;
      dout.writeShort(0); // (no ClassFile attributes for proxy classes)
  } catch (IOException e) {
      throw new InternalError("unexpected I/O Exception");
  }
  return bout.toByteArray();
5、总结
一个典型的动态代理创建对象过程可分为以下四个步骤:
1. 通过实现InvocationHandler接口创建自己的调用处理器 IvocationHandler handler = new InvocationHandlerImpl(…);
2. 通过为Proxy类指定ClassLoader对象和一组interface创建动态代理类
Class clazz = Proxy.getProxyClass(classLoader,new Class[]{…});
3. 通过反射机制获取动态代理类的构造函数,其参数类型是调用处理器接口类型
Constructor constructor = clazz.getConstructor(new Class[]{InvocationHandler.class});
4. 通过构造函数创建代理类实例,此时需将调用处理器对象作为参数被传入
Interface Proxy = (Interface)constructor.newInstance(new Object[] (handler));
为了简化对象创建过程,Proxy类中的newInstance方法封装了2~4,只需两步即可完成代理对象的创建。
生成的ProxySubject继承Proxy类实现Subject接口,实现的Subject的方法实际调用处理器的invoke方法,而invoke方法利用反射调用的是被代理对象的的方法(Object result=method.invoke(proxied,args))
简化后的动态代理实现
// InvocationHandlerImpl 实现了 InvocationHandler 接口,并能实现方法调用从代理类到委托类的分派转发
InvocationHandler handler = new InvocationHandlerImpl(..);

// 通过 Proxy 直接创建动态代理类实例
Interface proxy = (Interface)Proxy.newProxyInstance( classLoader,
     new Class[] { Interface.class },  handler );
6、美中不足
诚然,Proxy已经设计得非常优美,但是还是有一点点小小的遗憾之处,那就是它始终无法摆脱仅支持interface代理的桎梏,因为它的设计注定了这个遗憾。
回想一下那些动态生成的代理类的继承关系图,它们已经注定有一个共同的父类叫Proxy。Java的继承机制注定了这些动态代理类们无法实现对class的动态代理,原因是多继承在Java中本质上就行不通。有很多条理由,人们可以否定对 class代理的必要性,但是同样有一些理由,相信支持class动态代理会更美好。
接口和类的划分,本就不是很明显,只是到了Java中才变得如此的细化。如果只从方法的声明及是否被定义来考量,有一种两者的混合体,它的名字叫抽象类。实现对抽象类的动态代理,相信也有其内在的价值。此外,还有一些历史遗留的类,它们将因为没有实现任何接口而从此与动态代理永世无缘。如此种种,不得不说是一个小小的遗憾。但是,不完美并不等于不伟大,伟大是一种本质,Java动态代理就是佐例。
引用地址:
彻底理解JAVA动态代理
java动态代理(JDK和cglib)


 707
707

 被折叠的 条评论
为什么被折叠?
被折叠的 条评论
为什么被折叠?
 到【灌水乐园】发言


