 Android IMS启动流程解析


1, IMS启动
IMS(InputManagerService)管理android系统中的所有输入,包括常见的触摸屏和键盘,还包括各种传感器的输入。
IMS和其他的系统服务一样,都是在SystemServer中创建的,
inputManager = new InputManagerService(context);static jlong nativeInit(JNIEnv* env, jclass /* clazz */,
        jobject serviceObj, jobject contextObj, jobject messageQueueObj) {
    sp<MessageQueue> messageQueue =
            android_os_MessageQueue_getMessageQueue(env, messageQueueObj);
    if (messageQueue == NULL) {
        jniThrowRuntimeException(env, "MessageQueue is not initialized.");
        return 0;
    }

    NativeInputManager* im = new NativeInputManager(contextObj, serviceObj,
            messageQueue->getLooper());
    im->incStrong(0);
    return reinterpret_cast<jlong>(im);
}
wm = WindowManagerService.main(context, inputManager, mFactoryTestMode != FactoryTest.FACTORY_TEST_LOW_LEVEL, !mFirstBoot, mOnlyCore); ServiceManager.addService(Context.WINDOW_SERVICE, wm); ServiceManager.addService(Context.INPUT_SERVICE, inputManager); mActivityManagerService.setWindowManager(wm);inputManager.setWindowManagerCallbacks(wm.getInputMonitor());inputManager.start();
IMS和WMS千丝万缕的联系暂且不管,先看IMS的构造方法,
public InputManagerService(Context context) {
    this.mContext = context;
    this.mHandler = new InputManagerHandler(DisplayThread.get().getLooper());

    mUseDevInputEventForAudioJack =context.getResources().getBoolean(
              R.bool.config_useDevInputEventForAudioJack);
   mPtr = nativeInit(this, mContext, mHandler.getLooper().getQueue());
  LocalServices.addService(InputManagerInternal.class, new LocalService());
    }
在构造函数中,构造了一个InputManagerHandler对象,看都不看就知道它的主要作用是将JNI层的调用切换到主线程中执行。
IMS对应的C/C++ 层为com_android_server_input_InputManagerService.cpp
nativeInit方法的具体代码如下:
static jlong nativeInit(JNIEnv* env, jclass /* clazz */,
        jobject serviceObj, jobject contextObj, jobject messageQueueObj) {
    sp<MessageQueue> messageQueue =
            android_os_MessageQueue_getMessageQueue(env, messageQueueObj);
    if (messageQueue == NULL) {
        jniThrowRuntimeException(env, "MessageQueue is not initialized.");
        return 0;
    }

    NativeInputManager* im = new NativeInputManager(contextObj, serviceObj,
            messageQueue->getLooper());
    im->incStrong(0);
    return reinterpret_cast<jlong>(im);
}
由此可见, int 型变量mPtr保存的是NativeInputManager对象指针的地址。
看看NativeInputManager的构造函数,
NativeInputManager::NativeInputManager(jobject contextObj,
        jobject serviceObj, const sp<Looper>& looper) :
        mLooper(looper), mInteractive(true) {
    JNIEnv* env = jniEnv();

    mContextObj = env->NewGlobalRef(contextObj);
    mServiceObj = env->NewGlobalRef(serviceObj);

    {
        AutoMutex _l(mLock);
        mLocked.systemUiVisibility = ASYSTEM_UI_VISIBILITY_STATUS_BAR_VISIBLE;
        mLocked.pointerSpeed = 0;
        mLocked.pointerGesturesEnabled = true;
        mLocked.showTouches = false;
    }
    mInteractive = true;

    sp<EventHub> eventHub = new EventHub();
    mInputManager = new InputManager(eventHub, this, this);
}
EventHub下个小节再论述,首先InputManager的构造方法,
InputManager::InputManager(
        const sp<EventHubInterface>& eventHub,
        const sp<InputReaderPolicyInterface>& readerPolicy,
        const sp<InputDispatcherPolicyInterface>& dispatcherPolicy) {
    mDispatcher = new InputDispatcher(dispatcherPolicy);
    mReader = new InputReader(eventHub, readerPolicy, mDispatcher);
    initialize();
}
照例又是新创建了两个对象, InputDispatcher, InputReader
void InputManager::initialize() {
    mReaderThread = new InputReaderThread(mReader);
    mDispatcherThread = new InputDispatcherThread(mDispatcher);
}
Initialize方法新建了2个线程对象。
接下来看看InputManagerService 的start方法,
static void nativeStart(JNIEnv* env, jclass /* clazz */, jlong ptr) {
    NativeInputManager* im = reinterpret_cast<NativeInputManager*>(ptr);

    status_t result = im->getInputManager()->start();
    if (result) {
        jniThrowRuntimeException(env, "Input manager could not be started.");
    }
}
getInputManager得到的是InputManager对象,
status_t InputManager::start() {
    status_t result = mDispatcherThread->run("InputDispatcher", PRIORITY_URGENT_DISPLAY);
    if (result) {
        ALOGE("Could not start InputDispatcher thread due to error %d.", result);
        return result;
    }

    result = mReaderThread->run("InputReader", PRIORITY_URGENT_DISPLAY);
    if (result) {
        ALOGE("Could not start InputReader thread due to error %d.", result);

        mDispatcherThread->requestExit();
        return result;
    }

    return OK;
}
终于让这2个线程跑起来了。
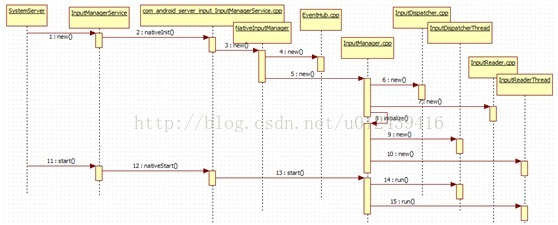
总体的流程图如下:
绕来绕去绕了这么久,结构图如下,
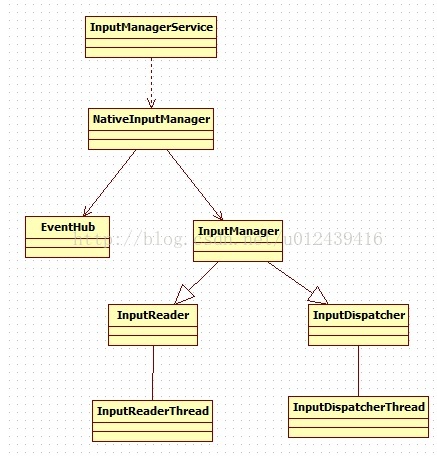
1,首先, InputManagerService创建一个NativeInputManager对象,
2,NativeInputManager创建EventHub, InputManager对象,
3,InputManager创建InputReader, InputDispatcher个对象和
InputReaderThread, InputDispatcherThread2个线程,
4,最后运行InputReaderThread, InputDispatcherThread程2个线程。
InputReaderThread是InputReader的内部类,负责各种事件的读取,相对应的, InputDispatcherThread是
那么, EventHub是做啥的呢?请看下篇文章。


 到【灌水乐园】发言


