


一个自定义的控件可以像Button 控件,有自己的标签。
创建自定义控件有2步,分别是创建控件layout 和 创建控件标签。
创建layout
创建的layout 就是自定义控件的UI
title_layout.xml
<?xml version="1.0" encoding="utf-8"?>
<LinearLayout xmlns:android="http://schemas.android.com/apk/res/android"
    android:layout_width="match_parent"
    android:layout_height="wrap_content"
    android:orientation="horizontal"
    android:background="#2DB0ED"
 >

    <Button
        android:id="@+id/Button01"
        style="?android:attr/buttonBarButtonStyle"
        android:layout_marginTop="0dp"
        android:layout_width="wrap_content"
        android:layout_height="wrap_content"
        android:text="back"
        android:textColor="#fff" />

    <TextView
        android:id="@+id/textView1"
        android:layout_width="match_parent"
        android:layout_height="match_parent"
        android:layout_weight="1"
        android:gravity="center"
        android:text="register"
        android:textColor="#fff"
        android:background="#46B2E8"
       />

    <Button
        android:id="@+id/button1"
        android:layout_marginTop="0dp"
        style="?android:attr/buttonBarButtonStyle"
        android:layout_width="wrap_content"
        android:layout_height="wrap_content"
        android:text="next"
        android:textColor="#fff" />

</LinearLayout>
控件效果图

创建控件标签
创建控件的标签其实就是实现某个布局类,我们这里用的是LinearLayout 布局。
LayoutInflater.from(context).inflate(R.layout.title_layout, this); 这是控件的layout(UI)
package cn.met0.android.chapter1;

import android.content.Context;
import android.util.AttributeSet;
import android.view.LayoutInflater;
import android.widget.LinearLayout;

public class TitleLayout extends LinearLayout {


    public TitleLayout(Context context, AttributeSet attrs) {
        super(context, attrs);
        LayoutInflater.from(context).inflate(R.layout.title_layout, this);
    }

}
如何使用
使用非常简单,只要包名+类名 就是这个控件的标签了。
<?xml version="1.0" encoding="utf-8"?>
<LinearLayout xmlns:android="http://schemas.android.com/apk/res/android"
    android:layout_width="match_parent"
    android:layout_height="match_parent"
    android:orientation="vertical" >

    <cn.met0.android.chapter1.TitleLayout
        android:layout_width="match_parent"
        android:layout_height="wrap_content">
    </cn.met0.android.chapter1.TitleLayout>

    <EditText
        android:layout_width="match_parent"
        android:layout_height="wrap_content"
        android:layout_marginTop="20dp"
        android:hint="username" />

    <EditText
        android:layout_width="match_parent"
        android:layout_height="wrap_content"
        android:layout_marginTop="20dp"
        android:hint="password" />

    <EditText
        android:layout_width="match_parent"
        android:layout_height="wrap_content"
        android:layout_marginTop="20dp"
        android:hint="confirm password" />

</LinearLayout>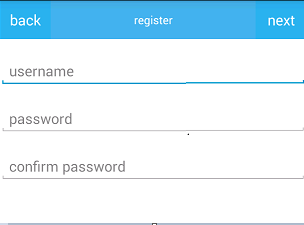


 879
879

 被折叠的 条评论
为什么被折叠?
被折叠的 条评论
为什么被折叠?
 到【灌水乐园】发言


