


前言
ClickHouse 是一款开源的分布式列式数据库管理系统,专门设计用于高性能的大数据分析和查询。
目前项目中用到的一个场景是将mongo的数据同步到clickhouse,使用clickhouse做报表,后续也将分享同步和使用方案
- 使用 Docker Compose 部署单机版,小项目和自己测试够用了,生产使用集群,基于此方案后续有需要我再尝试整理
安装
- 安装目录:/app/clickhouse
- 镜像:yandex/clickhouse-server:20.6.8.5
- 版本: v20.6.8.5
- 配置文件文档:配置文件
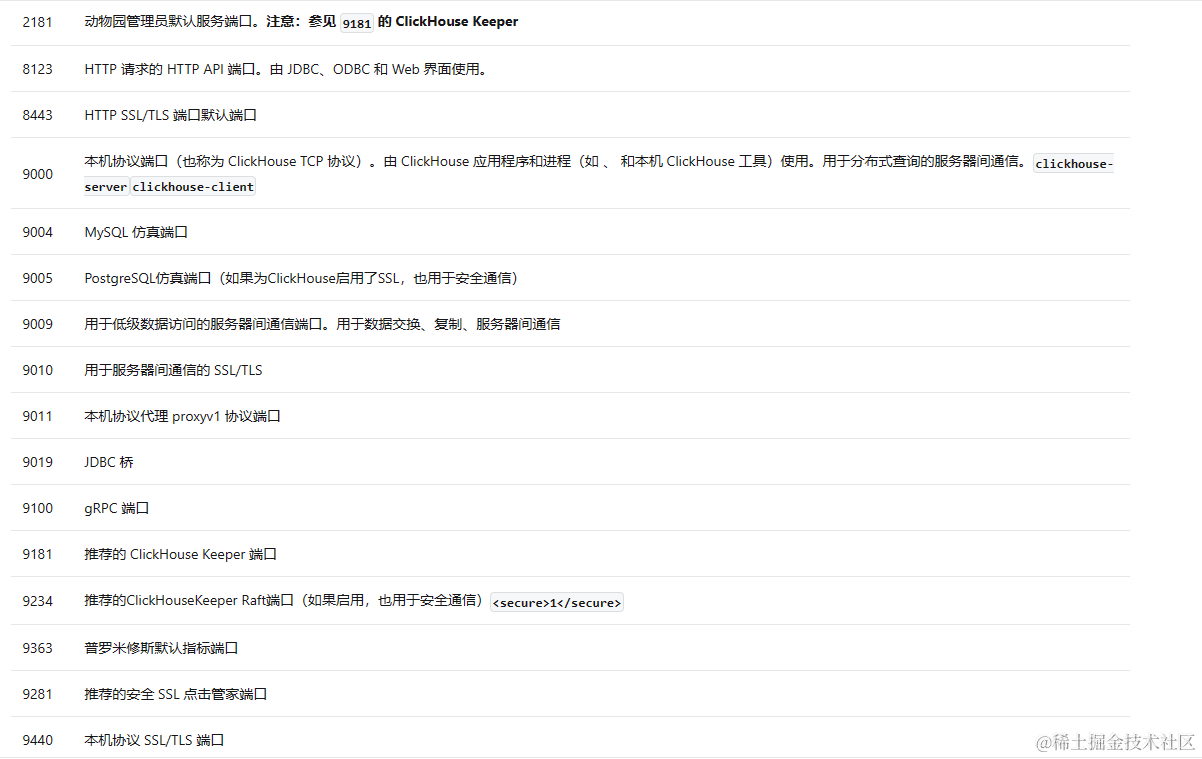
- 端口说明:Network ports ,单机部署可以就暴露 8123(连接),9363(prometheus );ps:如果使用 Archery v1.10 连接需要使用 9000 端口
获取默认配置文件
默认配置文件: config.xml, users.xml
- 从容器内拷贝配置文件到容器外部主机
(创建 work 目录,进入运行的 clickhouse 容器后会将默认的配置文件(config.xml, users.xml)复制到 work 目录)-
创建容器获取容器内的默认配置文件
mkdir ./work
docker run -it --rm --entrypoint=/bin/bash -v ./work:/work --privileged=true --user=root yandex/clickhouse-server:20.6.8.5
进入容器后复制配置到work文件夹
cp -r /etc/clickhouse-server/* /work
exit
-
- ./work/config.xml
-
<?xml version="1.0"?>
<!--
  NOTE: User and query level settings are set up in "users.xml" file.
  If you have accidentially specified user-level settings here, server won't start.
  You can either move the settings to the right place inside "users.xml" file
   or add <skip_check_for_incorrect_settings>1</skip_check_for_incorrect_settings> here.
-->
<yandex>
    <logger>
        <!-- Possible levels: https://github.com/pocoproject/poco/blob/poco-1.9.4-release/Foundation/include/Poco/Logger.h#L105 -->
        <level>trace</level>
        <log>/var/log/clickhouse-server/clickhouse-server.log</log>
        <errorlog>/var/log/clickhouse-server/clickhouse-server.err.log</errorlog>
        <size>1000M</size>
        <count>10</count>
        <!-- <console>1</console> --> <!-- Default behavior is autodetection (log to console if not daemon mode and is tty) -->

        <!-- Per level overrides (legacy):

        For example to suppress logging of the ConfigReloader you can use:
        NOTE: levels.logger is reserved, see below.
        -->
        <!--
        <levels>
          <ConfigReloader>none</ConfigReloader>
        </levels>
        -->

        <!-- Per level overrides:

        For example to suppress logging of the RBAC for default user you can use:
        (But please note that the logger name maybe changed from version to version, even after minor upgrade)
        -->
        <!--
        <levels>
          <logger>
            <name>ContextAccess (default)</name>
            <level>none</level>
          </logger>
          <logger>
            <name>DatabaseOrdinary (test)</name>
            <level>none</level>
          </logger>
        </levels>
        -->
    </logger>

    <send_crash_reports>
        <!-- Changing <enabled> to true allows sending crash reports to -->
        <!-- the ClickHouse core developers team via Sentry https://sentry.io -->
        <!-- Doing so at least in pre-production environments is highly appreciated -->
        <enabled>false</enabled>
        <!-- Change <anonymize> to true if you don't feel comfortable attaching the server hostname to the crash report -->
        <anonymize>false</anonymize>
        <!-- Default endpoint should be changed to different Sentry DSN only if you have -->
        <!-- some in-house engineers or hired consultants who're going to debug ClickHouse issues for you -->
        <endpoint>https://6f33034cfe684dd7a3ab9875e57b1c8d@o388870.ingest.sentry.io/5226277</endpoint>
    </send_crash_reports>

    <!--display_name>production</display_name--> <!-- It is the name that will be shown in the client -->
    <http_port>8123</http_port>
    <tcp_port>9000</tcp_port>
    <mysql_port>9004</mysql_port>
    <!-- For HTTPS and SSL over native protocol. -->
    <!--
    <https_port>8443</https_port>
    <tcp_port_secure>9440</tcp_port_secure>
    -->
    <!-- Used with https_port and tcp_port_secure. Full ssl options list: https://github.com/ClickHouse-Extras/poco/blob/master/NetSSL_OpenSSL/include/Poco/Net/SSLManager.h#L71 -->
    <openSSL>
        <server> <!-- Used for https server AND secure tcp port -->
            <!-- openssl req -subj "/CN=localhost" -new -newkey rsa:2048 -days 365 -nodes -x509 -keyout /etc/clickhouse-server/server.key -out /etc/clickhouse-server/server.crt -->
            <certificateFile>/etc/clickhouse-server/server.crt</certificateFile>
            <privateKeyFile>/etc/clickhouse-server/server.key</privateKeyFile>
            <!-- openssl dhparam -out /etc/clickhouse-server/dhparam.pem 4096 -->
            <dhParamsFile>/etc/clickhouse-server/dhparam.pem</dhParamsFile>
            <verificationMode>none</verificationMode>
            <loadDefaultCAFile>true</loadDefaultCAFile>
            <cacheSessions>true</cacheSessions>
            <disableProtocols>sslv2,sslv3</disableProtocols>
            <preferServerCiphers>true</preferServerCiphers>
        </server>

        <client> <!-- Used for connecting to https dictionary source and secured Zookeeper communication -->
            <loadDefaultCAFile>true</loadDefaultCAFile>
            <cacheSessions>true</cacheSessions>
            <disableProtocols>sslv2,sslv3</disableProtocols>
            <preferServerCiphers>true</preferServerCiphers>
            <!-- Use for self-signed: <verificationMode>none</verificationMode> -->
            <invalidCertificateHandler>
                <!-- Use for self-signed: <name>AcceptCertificateHandler</name> -->
                <name>RejectCertificateHandler</name>
            </invalidCertificateHandler>
        </client>
    </openSSL>

    <!-- Default root page on http[s] server. For example load UI from https://tabix.io/ when opening http://localhost:8123 -->
    <!--
    <http_server_default_response><![CDATA[<html ng-app="SMI2"><head><base href="http://ui.tabix.io/"></head><body><div ui-view="" class="content-ui"></div><script src="http://loader.tabix.io/master.js"></script></body></html>]]></http_server_default_response>
    -->

    <!-- Port for communication between replicas. Used for data exchange. -->
    <interserver_http_port>9009</interserver_http_port>

    <!-- Hostname that is used by other replicas to request this server.
         If not specified, than it is determined analoguous to 'hostname -f' command.
         This setting could be used to switch replication to another network interface.
      -->
    <!--
    <interserver_http_host>example.yandex.ru</interserver_http_host>
    -->

    <!-- Listen specified host. use :: (wildcard IPv6 address), if you want to accept connections both with IPv4 and IPv6 from everywhere. -->
    <!-- <listen_host>::</listen_host> -->
    <!-- Same for hosts with disabled ipv6: -->
    <!-- <listen_host>0.0.0.0</listen_host> -->

    <!-- Default values - try listen localhost on ipv4 and ipv6: -->
    <!--
    <listen_host>::1</listen_host>
    <listen_host>127.0.0.1</listen_host>
    -->
    <!-- Don't exit if ipv6 or ipv4 unavailable, but listen_host with this protocol specified -->
    <!-- <listen_try>0</listen_try> -->

    <!-- Allow listen on same address:port -->
    <!-- <listen_reuse_port>0</listen_reuse_port> -->

    <!-- <listen_backlog>64</listen_backlog> -->

    <max_connections>4096</max_connections>
    <keep_alive_timeout>3</keep_alive_timeout>

    <!-- Maximum number of concurrent queries. -->
    <max_concurrent_queries>100</max_concurrent_queries>

    <!-- Maximum memory usage (resident set size) for server process.
         Zero value or unset means default. Default is "max_server_memory_usage_to_ram_ratio" of available physical RAM.
         If the value is larger than "max_server_memory_usage_to_ram_ratio" of available physical RAM, it will be cut down.

         The constraint is checked on query execution time.
         If a query tries to allocate memory and the current memory usage plus allocation is greater
          than specified threshold, exception will be thrown.

         It is not practical to set this constraint to small values like just a few gigabytes,
          because memory allocator will keep
-
 最低0.47元/天 解锁文章


 3159
3159

 被折叠的 条评论
为什么被折叠?
被折叠的 条评论
为什么被折叠?
 到【灌水乐园】发言


