ThinkPHP3.2.2整合PHPMailer发邮件

1.下载PHPMailer;
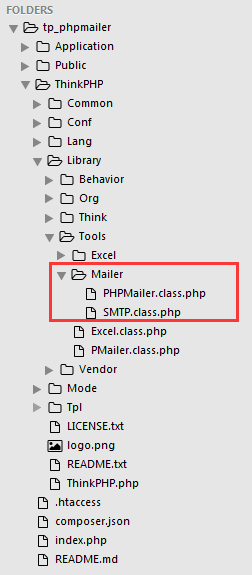
2.把class.phpmailer.php,class.smtp.php取出分别重命名为PHPMailer.class.php和SMTP.class.php;
3.并把以上两个文件放到如下图位置:
目录结构
4.在Tools文件夹下建PMailer.class.php,代码如下:

<?php

namespace Tools;
/**
 * PHPMailer 发邮件工具类
 * @author hzd
 */
class PMailer {

    private static $CharSet = 'UTF-8'; // 设置邮件的字符编码
    private static $Host = 'smtp.qq.com'; // 您的企业邮局服务器
    private static $Username = '*******@qq.com'; // 邮局用户名(请填写完整的email地址)
    private static $Password = '*******'; // 邮局密码(邮箱密码)
    private static $From = '********@qq.com'; // 邮件发送者email地址
    private static $FromName = 'hzd'; // 邮件发送者姓名


    /**
     * 发邮件
     */
    public static function send($to,$toname,$title,$message) {
        import("Tools.Mailer.PHPMailer");
        import("Tools.Mailer.SMTP");
        $mail = new \PHPMailer();
        $mail->IsSMTP(); // 使用SMTP方式发送
        $mail->CharSet=self::$CharSet;
        $mail->Host = self::$Host; 
        //$mail->Port = 25; // 设置端口
        $mail->SMTPAuth = true; // 启用SMTP验证功能
        $mail->Username = self::$Username; 
        $mail->Password = self::$Password; 
        $mail->From = self::$From; 
        $mail->FromName = self::$FromName;
        $mail->AddAddress($to, $toname);//收件人地址,可以替换成任何想要接收邮件的email信箱,格式是AddAddress("收件人email","收件人姓名")

        $mail->IsHTML(true); // set email format to HTML //是否使用HTML格式
        $mail->Subject = $title;//"PHPMailer测试邮件"; //邮件标题
        $mail->Body = $message; //邮件内容
        if(!$mail->Send())
        {
            return $mail->ErrorInfo;
        }else{
            return true;
        }   
    }
}

5.在控制器中直接调用即可,代码如下:

<?php
namespace Home\Controller;
use Think\Controller;
class IndexController extends Controller {
    public function index(){
        header('Content-Type:text/html;charset=utf-8');
        $mail = new \Tools\PMailer();
        $to = "*******@qq.com"; //收件人的邮箱地址
        $toname = "***"; //收件人的姓名(可为空)
        $title = '测试'; //主题
        $message = '<a href="http://www.baidu.com">这是一条测试信息</a>'; //发送的信息
        $res = $mail->send($to,$toname,$title,$message);
        if ($res) {
            echo '发送成功';
        }else{
            echo $res;
        }
   }
}
  • 0
    点赞
  • 1
    收藏
    觉得还不错? 一键收藏
  • 0
    评论
以下是基于ThinkPHP框架整合极光推送的示例代码: 1. 安装JPush SDK 使用composer安装JPush SDK: ``` composer require jpush/jpush ``` 2. 配置JPush 在ThinkPHP框架中,可以将JPush的配置信息写入到config目录下的jpush.php文件中,示例代码如下: ```php return [ 'app_key' => 'YOUR_APP_KEY', 'master_secret' => 'YOUR_MASTER_SECRET', ]; ``` 3. 创建JPushService类 在app/service目录下创建JPushService类,该类用于封装极光推送的相关操作。 ```php <?php namespace app\service; use JPush\Client as JPush; class JPushService { protected $jpush; public function __construct() { $config = config('jpush'); $this->jpush = new JPush($config['app_key'], $config['master_secret']); } // 发送通知 public function sendNotification($title, $content, $extras = [], $audience = 'all') { $notification = [ 'title' => $title, 'alert' => $content, ]; $message = [ 'title' => $title, 'msg_content' => $content, 'extras' => $extras, ]; $options = [ 'apns_production' => false, ]; $response = $this->jpush->push() ->setPlatform(['ios', 'android']) ->setAudience($audience) ->setNotification($notification) ->setMessage($message) ->setOptions($options) ->send(); return $response; } } ``` 4. 使用JPushService类发送推送 在控制器中使用JPushService类发送推送,示例代码如下: ```php <?php namespace app\controller; use app\service\JPushService; class PushController { public function send() { $title = '测试推送'; $content = '这是一条测试推送'; $extras = ['key1' => 'value1', 'key2' => 'value2']; $jpushService = new JPushService(); $response = $jpushService->sendNotification($title, $content, $extras); if ($response['http_code'] === 200) { return json(['code' => 0, 'message' => '推送成功']); } else { return json(['code' => -1, 'message' => '推送失败']); } } } ``` 以上就是基于ThinkPHP框架整合极光推送的示例代码。需要注意的是,示例代码中使用了JPush的免费版服务,如果需要使用更高级别的服务,需要进行相应的付费。

“相关推荐”对你有帮助么?

  • 非常没帮助
  • 没帮助
  • 一般
  • 有帮助
  • 非常有帮助
提交
评论
添加红包

请填写红包祝福语或标题

红包个数最小为10个

红包金额最低5元

当前余额3.43前往充值 >
需支付:10.00
成就一亿技术人!
领取后你会自动成为博主和红包主的粉丝 规则
hope_wisdom
发出的红包
实付
使用余额支付
点击重新获取
扫码支付
钱包余额 0

抵扣说明:

1.余额是钱包充值的虚拟货币,按照1:1的比例进行支付金额的抵扣。
2.余额无法直接购买下载,可以购买VIP、付费专栏及课程。

余额充值