


一般组件的核心代码放在Classes目录中,而图片存放于Assets目录下,如图所示,拖动部分图片到Assets中

一、修改Spec(Podfile中未使用use_frameworks!)
修改HFMyTest.podspec资源加载方式
s.resource_bundles = {
  'HFMyTestImg' => ['HFMyTest/Assets/*']
}

HFMyTestImg为显示的图片资源的bundle的名字,在本地会显示为HFMyTestImg.bundle,这个可以自定义,HFMyTest/Assets为图片文件目录
回到HFMyTest的Example模块,我们进行一次本地的安装和测试(pod install)

在FFMyView中添加如下代码
#import "FFMyView.h"

@implementation FFMyView

-(instancetype)initWithFrame:(CGRect)frame{
    if (self = [super initWithFrame:frame]) {
        UIImageView *imgView = [[UIImageView alloc] initWithFrame:CGRectMake(10, 10, 30, 30)];
        [self addSubview:imgView];
        imgView.backgroundColor = [UIColor yellowColor];
        imgView.image = [UIImage imageNamed:@"白富美.png"];
    }
    return self;
}

@end
然后在主控制器FFViewController中调用FFMyView
#import "FFViewController.h"
#import <HFMyTest/FFMyView.h>

@interface FFViewController ()

@end

@implementation FFViewController

- (void)viewDidLoad
{
    [super viewDidLoad];
    FFMyView *imgView = [[FFMyView alloc] initWithFrame:CGRectMake(100, 100, 100, 100)];
    [self.view addSubview:imgView];
    imgView.backgroundColor = [UIColor redColor];
}

@end
运行一次项目,发现图片不能正常的显示出来
二、 修改资源加载方式
上面的图片加载方式为
[UIImage imageNamed:@"图片名称"];
在项目中我们打开主包内容


右键显示图片的资源包HFMyTestImg.bundle的包内容就可以看见里面图片资源了

通常如果我们在主工程调用主工程的资源时,可以直接imageName或者[mainbundle pathForResource]读取,但是在用pod进行管理的时候,pod中的资源文件也会变成bundle加入到mainBundle中,但是由于资源文件的bundle并不是mainBundle,所以这种方法是行不通的,关键是要取到资源相关联的bundle
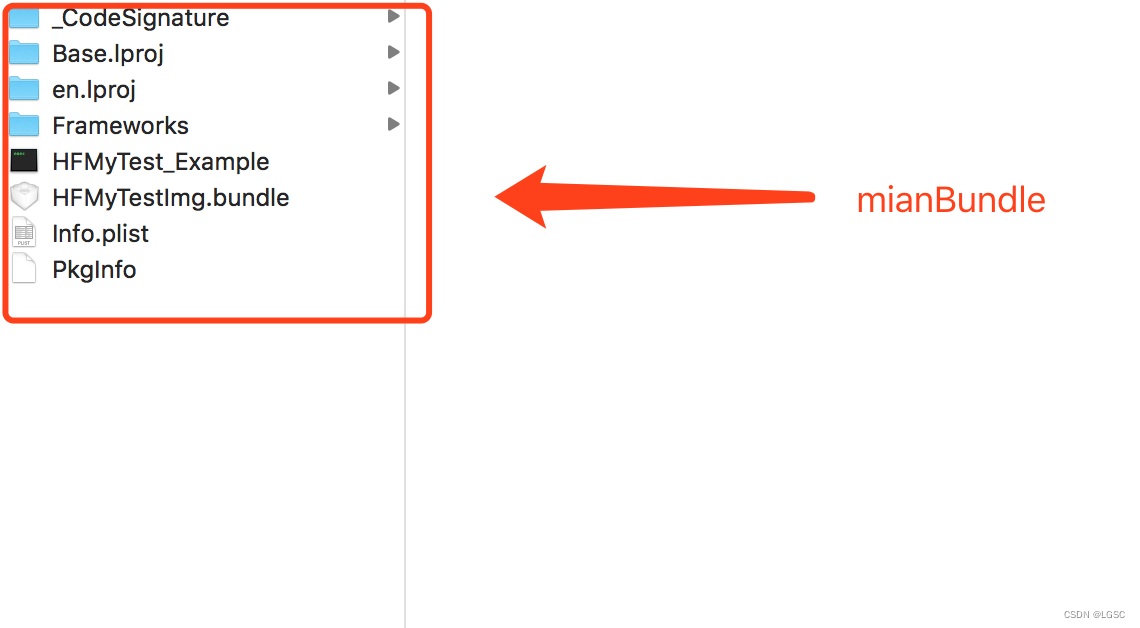
上面图片可以看出图片资源处于HFMyTestimg.bundle包下,所以需要拼接方式关联到该包下
NSURL *bundleURL = [[NSBundle mainBundle]  URLForResource:bundleName withExtension:@"bundle"];
NSBundle *bundle = [NSBundle bundleWithURL:bundleURL];
修改项目代码为
#import "FFMyView.h"

@implementation FFMyView

-(instancetype)initWithFrame:(CGRect)frame{
    if (self = [super initWithFrame:frame]) {
        UIImageView *imgView = [[UIImageView alloc] initWithFrame:CGRectMake(10, 10, 30, 30)];
        [self addSubview:imgView];
        imgView.backgroundColor = [UIColor yellowColor];
        NSURL *bundleURL = [[NSBundle mainBundle] URLForResource:@"HFMyTestImg" withExtension:@"bundle"];
        if (bundleURL) {
            NSBundle *bundle = [NSBundle bundleWithURL:bundleURL];
            NSInteger scale = [[UIScreen mainScreen] scale];
            NSString *imgName = [NSString stringWithFormat:@"%@@%zdx.png", @"白富美",scale];
            imgView.image = [UIImage imageWithContentsOfFile:[bundle pathForResource:imgName ofType:nil]];
        }
    }
    return self;
}

@end
上面的图片加载imgName必须使用图片的完整名称,如白富美@2x.png
或者下面的代码
#import "FFMyView.h"

@implementation FFMyView

-(instancetype)initWithFrame:(CGRect)frame{
    if (self = [super initWithFrame:frame]) {
        UIImageView *imgView = [[UIImageView alloc] initWithFrame:CGRectMake(10, 10, 30, 30)];
        [self addSubview:imgView];
        imgView.backgroundColor = [UIColor yellowColor];
        NSString *imgName = [NSString stringWithFormat:@"%@/%@", @"HFMyTestImg.bundle",@"白富美"];
        imgView.image = [UIImage imageNamed:imgName];
    }
    return self;
}

@end
接下来运行项目就可以看见图片了
还看见网上一种加载方式
NSBundle *currentBundle = [NSBundle bundleForClass:[self class]];
//图片名称要写全称
NSString *patch = [currentBundle pathForResource:@"Group.png" ofType:nil inDirectory:@"wgPersonInfoKit.bundle"];
_imgView.image = [UIImage imageWithContentsOfFile:patch];
因为修改的地方会很多,所以把这个方法抽出来:
新建一个UIImage的分类
#import <UIKit/UIKit.h>

@interface UIImage (wgBundle)

+ (instancetype)wg_imgWithName:(NSString *)name bundle:(NSString *)bundleName targetClass:(Class)targetClass;

@end
#import "UIImage+wgBundle.h"

@implementation UIImage (wgBundle)

+ (instancetype)wg_imgWithName:(NSString *)name bundle:(NSString *)bundleName targetClass:(Class)targetClass{
    NSInteger scale = [[UIScreen mainScreen] scale];
    NSBundle *curB = [NSBundle bundleForClass:targetClass];
    NSString *imgName = [NSString stringWithFormat:@"%@@%zdx.png", name,scale];
    NSString *dir = [NSString stringWithFormat:@"%@.bundle",bundleName];
    NSString *path = [curB pathForResource:imgName ofType:nil inDirectory:dir];
    return path?[UIImage imageWithContentsOfFile:path]:nil;
}

@end
在使用的地方
_imgView.image = [UIImage wg_imgWithName:@"Group" bundle:@"wgPersonInfoKit" targetClass:[self class]];
上面资源加载方式为
s.resource_bundles = {
  'HFMyTestImg' => ['HFMyTest/Assets/*']
}
资源加载方式还有另一种
s.resources = ['HFMyTest/Assets/*']
这两种的区别在于
s.resource_bundles会自动创建HFMyTestImg.bundle包(这个HFMyTestImg自己自定义的),而s.resources不会创建bundle,文件会直接放到目录下
三、采用s.resources加载资源
s.resources = ['HFMyTest/Assets/*']

pod install重新加载项目,然后采用上面的方式显示包内容

删除掉之前的缓存记录,然后重新运行下程序,在进入到显示包内容里面

会发现包里面的内容时这样的

和上面不同的是上面的图片资源全部被自动打包到
HFMyTestImg.bundle中,这个里面的图片资源没有打包成bundle,而是直接显示在主包mainBundle中的,这种方式加载图片时可以直接采用imageNamed,同时也不需要写出完整的图片名字
#import "FFMyView.h"

@implementation FFMyView

-(instancetype)initWithFrame:(CGRect)frame{
    if (self = [super initWithFrame:frame]) {
        UIImageView *imgView = [[UIImageView alloc] initWithFrame:CGRectMake(10, 10, 30, 30)];
        [self addSubview:imgView];
        imgView.backgroundColor = [UIColor yellowColor];
        imgView.image = [UIImage imageNamed:@"白富美"];
    }
    return self;
}

@end
需要注意的点
OC工程的Podfile一般是不使用use_frameworks!的,swift和自己创建的lib库是默认有的,关于这两点的差异,如果Podfile不使用use_frameworks!,pod里的资源文件会被打成bundle放在mainBundle下面,如果使用的话会被放到mainBundle的Frameworks文件夹下的,下面进行详细说明下
上面的Podfile采用的是
#use_frameworks!

target 'HFMyTest_Example' do
  pod 'HFMyTest', :path => '../'

  target 'HFMyTest_Tests' do
    inherit! :search_paths

  end
end
并没有采用use_frameworks!
采用use_frameworks!将在下面进行说明
四、采用use_frameworks!
- 使用
resource_bundles
修改Podfile文件为
use_frameworks!

target 'HFMyTest_Example' do
  pod 'HFMyTest', :path => '../'

  target 'HFMyTest_Tests' do
    inherit! :search_paths

  end
end
`HFMyTest.podspec`文件为
 回到项目主目录
cd /Users/hf/MyTest/HFMyTest/Example
pod install
更新完成后重新打开HFMyTest.xcworkspace,和之前操作一样的方式删除掉缓存文件,也可以采用下面方式清除缓存

运行程序,然后如上方式一样打开文件包内容,会发现图片资源的位置改变了
图片资源在Frameworks下的HFMyTest.framework下的HFMyTestImg.bundle包中
所以这时候加载图片已经不再mainBundle中了,需要指定带现在的图片资源目录中
#import "FFMyView.h"

@implementation FFMyView

-(instancetype)initWithFrame:(CGRect)frame{
    if (self = [super initWithFrame:frame]) {
        UIImageView *imgView = [[UIImageView alloc] initWithFrame:CGRectMake(10, 10, 30, 30)];
        [self addSubview:imgView];
        imgView.backgroundColor = [UIColor yellowColor];
        //到指定目录
        NSURL *bundleURL = [[NSBundle mainBundle] URLForResource:@"Frameworks" withExtension:nil];
        bundleURL = [bundleURL URLByAppendingPathComponent:@"HFMyTest"];
        bundleURL = [bundleURL URLByAppendingPathExtension:@"framework"];
        if (bundleURL) {
            NSBundle *imgBundle = [NSBundle bundleWithURL:bundleURL];
            bundleURL = [imgBundle URLForResource:@"HFMyTestImg" withExtension:@"bundle"];
            if (bundleURL) {
                NSBundle *bundle = [NSBundle bundleWithURL:bundleURL];
                NSInteger scale = [[UIScreen mainScreen] scale];
                NSString *imgName = [NSString stringWithFormat:@"%@@%zdx.png", @"白富美",scale];
                imgView.image = [UIImage imageWithContentsOfFile:[bundle pathForResource:imgName ofType:nil]];
            }
        }
    }
    return self;
}

@end
2、使用resources
 首先
首先pod install程序,重新打开HFMyTest.xcworkspace,然后清除缓存(快捷键shift+command+k),运行程序,打开查看程序包内容

其实相对于
resource_bundles少了个打包的bundle,resource_bundles会自动创建一个bundle
修改FFMyView.m的代码为
#import "FFMyView.h"

@implementation FFMyView

-(instancetype)initWithFrame:(CGRect)frame{
    if (self = [super initWithFrame:frame]) {
        UIImageView *imgView = [[UIImageView alloc] initWithFrame:CGRectMake(10, 10, 30, 30)];
        [self addSubview:imgView];
        imgView.backgroundColor = [UIColor yellowColor];
        //到指定目录
        NSURL *bundleURL = [[NSBundle mainBundle] URLForResource:@"Frameworks" withExtension:nil];
        bundleURL = [bundleURL URLByAppendingPathComponent:@"HFMyTest"];
        bundleURL = [bundleURL URLByAppendingPathExtension:@"framework"];
        if (bundleURL) {
            NSBundle *bundle = [NSBundle bundleWithURL:bundleURL];
            NSInteger scale = [[UIScreen mainScreen] scale];
            NSString *imgName = [NSString stringWithFormat:@"%@@%zdx.png", @"白富美",scale];
            imgView.image = [UIImage imageWithContentsOfFile:[bundle pathForResource:imgName ofType:nil]];
        }
    }
    return self;
}

@end
就可以正常的展示图片了
正常情况下,对于采用了
resources加载资源的,可以手动创建bundle用于存放图片资源
五、手动创建bundle(Podfile中未使用use_frameworks!)
右键新建文件夹

重命名改文件夹名字为MyImg.bundle

右键MyImg.bundle显示包内容,将之前的图片资源copy到里面去
cd /Users/hf/MyTest/HFMyTest/Example
pod install
重新打开HFMyTest.xcworkspace,发现pod中的目录变化了
清除缓存(shift+command+k),然后运行程序,再去打开包的内容

发现了图片在mainBundle的MyImg.bundle包下,这种形式相对于resource_bundles形式来说,它把图片资源同样打包了,但是在本地资源中,它显示形式是MyImg.bundle,图片全在bundle里面,而resource_bundles在本地显示没有bundle,直接显示的是图片的资源,采用下面的代码就可以调用
#import "FFMyView.h"

@implementation FFMyView

-(instancetype)initWithFrame:(CGRect)frame{
    if (self = [super initWithFrame:frame]) {
        UIImageView *imgView = [[UIImageView alloc] initWithFrame:CGRectMake(10, 10, 30, 30)];
        [self addSubview:imgView];
        imgView.backgroundColor = [UIColor yellowColor];
        NSString *imgName = [NSString stringWithFormat:@"%@/%@",@"MyImg.bundle",@"白富美"];
        imgView.image = [UIImage imageNamed:imgName];
    }
    return self;
}

@end
作者:Daniel_you
链接:https://www.jianshu.com/p/34930c466884
来源:简书
著作权归作者所有。商业转载请联系作者获得授权,非商业转载请注明出处。


 1328
1328

 被折叠的 条评论
为什么被折叠?
被折叠的 条评论
为什么被折叠?
 到【灌水乐园】发言


