


最近做一个OA的项目,之前做过网上商城,也是SSH的框架,这一次搭框架,熟悉了很多,从jar包的引入,到Struts和spring的整合,Hibernate和spring的整合,自己更加了解三者之间的合作关系了。
OA是Office Automation的缩写,本意为利用技术的手段提高办公的效率,进而实现办公的自动化处理。实现信息化、无纸化办公,可方便的生成统计报表等。OA是OFFICE AUTOMATION的缩写,本意为利用技术的手段提高办公的效率,进而实现办公的自动化处理。采用Internet/Intranet技术,基于工作流的概念,使企业内部人员方便快捷地共享信息,高效地协同工作;改变过去复杂、低效的手工办公方式,实现迅速、全方位的信息采集、信息处理,为企业的管理和决策提供科学的依据
这个教程从这个几个方面介绍ssh框架整合
- 新Web工程,并把编码设为utf-8
- 添加框架环境 Junit Struts2 Hibernate Spring
- 整合SSH
- Struts2与Spring整合
- Hibernate与Spring整合
- 资源分类
- 配置日志
1、新建工程:
File——New——WebProject
右击项目,选择properties,resource,修改text file encoding 为UTF-8
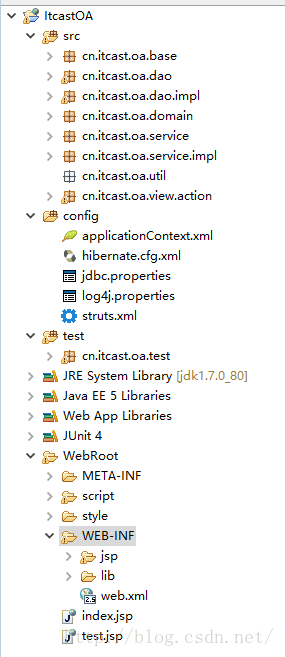
大概的目录结构是这样的:
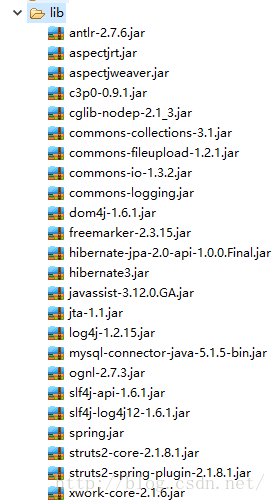
2,添加jar包
最后是这样的:
3、集成 Spring 与 Hibernate
spring是用来做容器的,管理对象的。需要配置SessionFactory来整合Hibernate的连接数据库信息。在
spring配置文件中 配置声明式事务,可以在类中使用注解的方式,调用资源。
1,配置SessionFactory
1,配置
---------------------- applicationContext.xml ------------------------
<!-- 配置SessionFactory(整合Hibernate) -->
			<context:property-placeholder location="classpath:jdbc.properties" />
			<bean id="sessionFactory"
				class="org.springframework.orm.hibernate3.LocalSessionFactoryBean">
				<property name="dataSource">
					<bean class="com.mchange.v2.c3p0.ComboPooledDataSource">
						<!-- 数据库连接信息 -->
						<property name="jdbcUrl" value="${jdbcUrl}"></property>
						<property name="driverClass" value="${driverClass}"></property>
						<property name="user" value="${username}"></property>
						<property name="password" value="${password}"></property>
						<!-- 其他配置 -->
						<property name="initialPoolSize" value="3"></property>
						<property name="maxPoolSize" value="5"></property>
						<property name="minPoolSize" value="3"></property>
						<property name="acquireIncrement" value="2"></property>
						<property name="maxStatements" value="8"></property>
						<property name="maxStatementsPerConnection" value="5"></property>
						<property name="maxIdleTime" value="20"></property>
					</bean>
				</property>
				<!-- 指定hibernate的配置文件的位置 -->
				<property name="configLocation" value="classpath:hibernate.cfg.xml"></property>
			</bean>
---------------------- jdbc.properties配置文件的内容 ------------------------
jdbcUrl		= jdbc:mysql:///itcastoa0720
driverClass	= com.mysql.jdbc.Driver
user		= root
password	= 123456
2,测试代码
             @Test// 测试 SessionFactory 的配置
			public void testSessionFactory(){
				SessionFactory sessionFactory = (SessionFactory) ac.getBean("sessionFactory");
				Assert.assertNotNull(sessionFactory.openSession());
			}
2,配置声明式事务(使用基于注解的方式) spring配置文件中
1,配置
<!-- 配置事务管理器 -->
			<bean id="transactionManager" class="org.springframework.orm.hibernate3.HibernateTransactionManager">
				<property name="sessionFactory" ref="sessionFactory"></property>
			</bean>
			<!-- 配置基于注解的事务支持-->
			<tx:annotation-driven transaction-manager="transactionManager"/>
2,测试代码
1,Service类
                           @Service
				public class InsertUserService {
					@Resource
					private SessionFactory sessionFactory;
					@Transactional
					public void addUsers() {
						sessionFactory.getCurrentSession().save(new User());
						// int a = 1 / 0; // 这行会抛异常
						sessionFactory.getCurrentSession().save(new User());
					}
				}
2,单元测试
				@Test // 测试声明式事务
				public void testTransaction() {
					InsertUserService service = (InsertUserService) ac.getBean("insertUserService");
					service.addUsers();
				}
3,在web.xml中配置 spring 的 OpenSessionInView 过滤器(解决抛LazyInitializationException的问题)
1,配置
<!-- 配置 spring 的 OpenSessionInView 过滤器 -->
			<filter>
				<filter-name>OpenSessionInView</filter-name>
				<filter-class>org.springframework.orm.hibernate3.support.OpenSessionInViewFilter</filter-class>
			</filter>
			<filter-mapping>
				<filter-name>OpenSessionInView</filter-name>
				<url-pattern>*.action</url-pattern>
			</filter-mapping>
2,LazyInitializationException异常说明
- 对于集合属性,默认是lazy="true"的,在第一次使用时才加载。
- 但在加载时,如果Session已经关掉了就会抛LazyInitializationException异常
4、Struts2与Spring整合
1,在web.xml配置监听器(Spring Reference 15.2 Common configuration)
             <!-- 集成Spring -->
		<listener>
			<listener-class>org.springframework.web.context.ContextLoaderListener</listener-class>
		</listener>
		<context-param>
			<param-name>contextConfigLocation</param-name>
			<param-value>/WEB-INF/classes/applicationContext*.xml</param-value>
		</context-param>
2,写Action类与Service类
这个类放到test文件夹下,是来进行junit测试的。在写Action时要指定 @Controller 与 @Scope("prototype")
<span style="font-family:Microsoft YaHei;font-size:18px;">                       @Controller("testAction")
			@Scope("prototype")
			public class TestAction extends ActionSupport {
				@Resource
				private TestService testService;
				@Override
				public String execute(){
					testService.saveTwoUser();
					return SUCCESS;
				}
			}</span>
这个类是提供服务的。
<span style="font-family:Microsoft YaHei;font-size:18px;"> @Service
public class TestService {
@Resource
private SessionFactory sessionFactory;
@Transactional
public void saveTwoUser() {
sessionFactory.getCurrentSession().save(new User());
sessionFactory.getCurrentSession().save(new User());
}
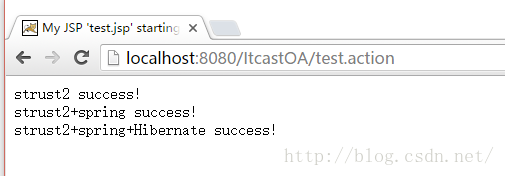
}</span>在Struts.xml中配置action,名字尽量用action结尾,这样在使用action拦截器的时候会比较方便。在struts.xml中配置action时,在class属性中写bean的名称
<span style="font-family:Microsoft YaHei;font-size:18px;"><!-- 测试 -->
			<action name="test" class="testAction">
				<result>/test.jsp</result>
			</action></span>
5、资源分类
如果一个项目是ssh的框架,我们需要有一个整理的目录结构让这个系统结构很清晰,这个项目算是modelfirst,当我建立了domain里面实体和对应的Hibernatexml文件的时候,运行一下,就可以建立表了,前提是建立一个utf-8编码的数据库:
6、收获
Struts是基于MVC框架思想设计了一个web层框架,spring框架负责管理对象(IOC)和事务管理(AOP),Hibernate持久层是一个ORM框架,可以面向对象的管理实体对象。这一次搭框架,自己对ssh更加熟悉了。重复就是力量~~


 271
271

 被折叠的 条评论
为什么被折叠?
被折叠的 条评论
为什么被折叠?
 到【灌水乐园】发言


