


在实现柱状图的过程中,主要是用到了UIBezierPath和CAShapeLayer
1、新建UIBezierPath对象bezierPath
2、新建CAShapeLayer对象caShapeLayer
3、将bezierPath的CGPath赋值给caShapeLayer的path,即caShapeLayer.path = bezierPath.CGPath
4、新建CABasicAnimation对象pathAnimation,设置相关动画的属性,并把pathAnimation赋给caShapeLayer,即[_caShapeLayer addAnimation:pathAnimation forKey:@"str"];
4、把caShapeLayer添加到某个显示该图形的layer中
CAShapeLayer的简介:
CAShapeLayer顾名思义,就是代表一个形状(Shape)的Layer,它是CALayer的子类。
CAShapeLayer初始化需要指定Frame,但它的形状是由path属性来决定,且必须指定path,不然会没有形状。
CAShapeLayer的重要属性:
1、lineWidth 渲染线的宽度
2、lineCap、lineJoin 渲染线两端和转角的样式
3、fillColor、strokeColor 填充、描边的渲染颜色
4、path 指定的绘图路径,path不完整会自动封闭区域
5、strokeStart、strokeEnd 绘制path的起始和结束的百分比
CAShapeLayer的动画特点:
1、CAShapeLayer跟CALayer一样自带动画效果
2、CAShapeLayer的动画效果仅限沿路径变化,不支持填充区域的动画效果
UIBezierPath 基础 (此处源引Locking_Xu的博客 --贝塞尔曲线(UIBezierPath)属性、方法汇总)
UIBezierPath 属性介绍
1.CGPath:将UIBezierPath类转换成CGPath,类似于UIColor的CGColor
2.empty:只读类型,路径上是否有有效的元素
3.bounds:和view的bounds是不一样的,它获取path的X坐标、Y坐标、宽度,但是高度为0
4.currentPoint:当前path的位置,可以理解为path的终点
5.lineWidth:path宽度
6.lineCapStyle:path端点样式,有3种样式
kCGLineCapButt:无端点
kCGLineCapRound:圆形端点
kCGLineCapSquare:方形端点(样式上和kCGLineCapButt是一样的,但是比kCGLineCapButt长一点)
7.lineJoinStyle:拐角样式
kCGLineJoinMiter:尖角
kCGLineJoinRound:圆角
kCGLineJoinBevel:缺角
8.miterLimit:最大斜接长度(只有在使用kCGLineJoinMiter是才有效), 边角的角度越小,斜接长度就会越大
为了避免斜接长度过长,使用lineLimit属性限制,如果斜接长度超过miterLimit,边角就会以KCALineJoinBevel类型来显示

9.flatness:弯曲路径的渲染精度,默认为0.6,越小精度越高,相应的更加消耗性能。
10.usesEvenOddFillRule:单双数圈规则是否用于绘制路径,默认是NO。
11. UIRectCorner:角
UIRectCornerTopLeft:左上角
UIRectCornerTopRight:右上角
UIRectCornerBottomLeft:左下角
UIRectCornerBottomRight:右下角
UIRectCornerAllCorners:所有四个角
UIBezierPath的方法介绍:
1.创建UIBezierPath对象:
+ (instancetype)bezierPath:
2.创建在rect内的矩形:
+ (instancetype)bezierPathWithRect:(CGRect)rect:
参数:rect->矩形的Frame
3.创建在rect里的内切曲线:
+ (instancetype)bezierPathWithOvalInRect:(CGRect)rect:
参数:rect->矩形的Frame
4.创建带有圆角的矩形,当矩形变成正圆的时候,Radius就不再起作用:
+ (instancetype)bezierPathWithRoundedRect:(CGRect)rect cornerRadius:(CGFloat)cornerRadius
参数:rect->矩形的Frame
cornerRadius->圆角大小
5.设定特定的角为圆角的矩形:
+ (instancetype)bezierPathWithRoundedRect:(CGRect)rect byRoundingCorners:(UIRectCorner)corners cornerRadii:(CGSize)cornerRadii
参数:rect->矩形的Frame
corners->指定的圆角
cornerRadii->圆角的大小
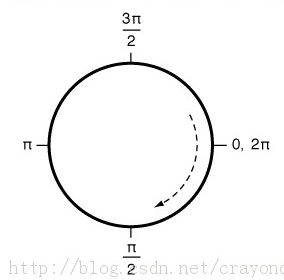
6.创建圆弧+ (instancetype)bezierPathWithArcCenter:(CGPoint)center radius:(CGFloat)radius startAngle:(CGFloat)startAngle endAngle:(CGFloat)endAngle clockwise:(BOOL)clockwise
参数:center->圆点
radius->半径
startAngle->起始位置
endAngle->结束为止
clockwise->是否顺时针方向
起始位置参考图:
7.通过已有路径创建路径:
B+ (instancetype)bezierPathWithCGPath:(CGPathRef)CGPath
参数:CGPath->已有路径
8.init方法:
- (instancetype)init
9.initWiteCoder方法:
- (nullable instancetype)initWithCoder:(NSCoder *)aDecoder
10.转换成CGPath:
- (CGPathRef)CGPath
11.移动到某一点:
- (void)moveToPoint:(CGPoint)point
参数:point->目标位置
12.绘制一条线:
- (void)addLineToPoint:(CGPoint)point
参数:point->目标位置
13.创建三次贝塞尔曲线:
- (void)addCurveToPoint:(CGPoint)endPoint controlPoint1:(CGPoint)controlPoint1 controlPoint2:(CGPoint)controlPoint2
参数:endPoint->终点
controlPoint1->控制点1
controlPoint2->控制点2
参照图:

14.创建二次贝塞尔曲线:
- (void)addQuadCurveToPoint:(CGPoint)endPoint controlPoint:(CGPoint)controlPoint
参数:endPoint->终点
controlPoint->控制点
参照图:

15.添加圆弧:
- (void)addArcWithCenter:(CGPoint)center radius:(CGFloat)radius startAngle:(CGFloat)startAngle endAngle:(CGFloat)endAngle clockwise:(BOOL)clockwise
参数:参看创建圆弧
16.闭合路径,即在终点和起点连一根线:
- (void)closePath;
17.清空路径:
- (void)removeAllPoints;
18.追加路径:
- (void)appendPath:(UIBezierPath *)bezierPath
参数:bezierPath->追加的路径
19.扭转路径,即起点变成终点,终点变成起点:
- (UIBezierPath *)bezierPathByReversingPath
20.路径进行仿射变换:
- (void)applyTransform:(CGAffineTransform)transform;
参数:transform->仿射变换
21.绘制虚线:
- (void)setLineDash:(nullable const CGFloat *)pattern count:(NSInteger)count phase:(CGFloat)phase
参数:pattern->C类型线性数据
count->pattern中数据个数
phase-> 起始位置
22.填充:
- (void)fill
23.描边,路径创建需要描边才能显示出来:
- (void)stroke;
24.设置描边颜色,需要在设置后调用描边方法:
[[UIColor blackColor] setStroke];
25.设置填充颜色,需要在设置后调用填充方法
[[UIColor redColor] setFill];
26.设置描边的混合模式:
- (void)fillWithBlendMode:(CGBlendMode)blendMode alpha:(CGFloat)alpha
参数:blendMode->混合模式
alpha->透明度
27.设置填充的混合模式:
- (void)strokeWithBlendMode:(CGBlendMode)blendMode alpha:(CGFloat)alpha;
参数:blendMode->混合模式
alpha->透明度
28.修改当前图形上下文的绘图区域可见,随后的绘图操作导致呈现内容只有发生在指定路径的填充区域
- (void)addClip;
实现的部分代码://初始化
- (id)initWithFrame:(CGRect)frame
{
self = [super initWithFrame:frame];
if (self) {
_barLayer = [CAShapeLayer new];
_barLayer.lineCap = kCALineCapSquare;
_barLayer.fillColor = [UIColor whiteColor].CGColor;
_barLayer.lineWidth = self.frame.size.width;
_barLayer.strokeEnd = 0.0;
self.clipsToBounds = YES;
[self.layer addSublayer:_barLayer];
}
return self;
}
//动画
- (void)setProgress
{
/**
* _progress是柱状图的比例值
*/
UIBezierPath *barPath = [UIBezierPath bezierPath];
[barPath moveToPoint:CGPointMake(self.bounds.origin.x + self.bounds.size.width / 2, self.bounds.size.height + self.frame.size.width)];
[barPath addLineToPoint:CGPointMake(self.bounds.origin.x + self.bounds.size.width / 2, self.bounds.size.height * (1-_progress) + self.frame.size.width/2)];
barPath.lineCapStyle = kCGLineCapSquare;
CABasicAnimation *pathAnimation = [CABasicAnimation animationWithKeyPath:@"strokeEnd"];
/**
* 为了动画效果相对较同步,根据比例进行设置不同的动画时间
*/
if (_progress > 0.3f && _progress <= 0.6) {
pathAnimation.duration = 1.5f;
}
else if (_progress >= 0 && _progress <= 0.3)
{
pathAnimation.duration = 1.0f;
}
else
{
pathAnimation.duration = 2.0f;
}
// pathAnimation.duration = 2.0f * _progress;
pathAnimation.timingFunction = [CAMediaTimingFunction functionWithName:kCAMediaTimingFunctionEaseInEaseOut];
pathAnimation.fromValue = [NSNumber numberWithFloat:0.0f];
pathAnimation.toValue = [NSNumber numberWithFloat:1.0f];
[_barLayer addAnimation:pathAnimation forKey:@"str"];
_barLayer.strokeEnd = 1.0f;
_barLayer.path = barPath.CGPath;
}
这部分代码是柱状图的主要代码,数据部分根据自己的需要进行编写。


 4434
4434


 被折叠的 条评论
为什么被折叠?
被折叠的 条评论
为什么被折叠?
 到【灌水乐园】发言


