


一直从事SSH和SSM的项目开发,结合实战,系统的对每一部分进行了一次系统的学习。下面来简单介绍Hibernate+mysql的环境搭建和向数据库中插入一条数据;
Hibernate是一个开放源代码的对象关系映射框架,它对JDBC进行了非常轻量级的对象封装,它将POJO与数据库表建立映射关系,是一个全自动的orm框架,hibernate可以自动生成SQL语句,自动执行,使得Java程序员可以随心所欲的使用对象编程思维来操纵数据库。
一.环境搭建
1.创建java项目
2.创建User Libray,引入jar包
创建User Libray来管理依赖的jar包,把所有要引入的jar包加入到User Libray中,然后把创建的User Libray引入到项目中;
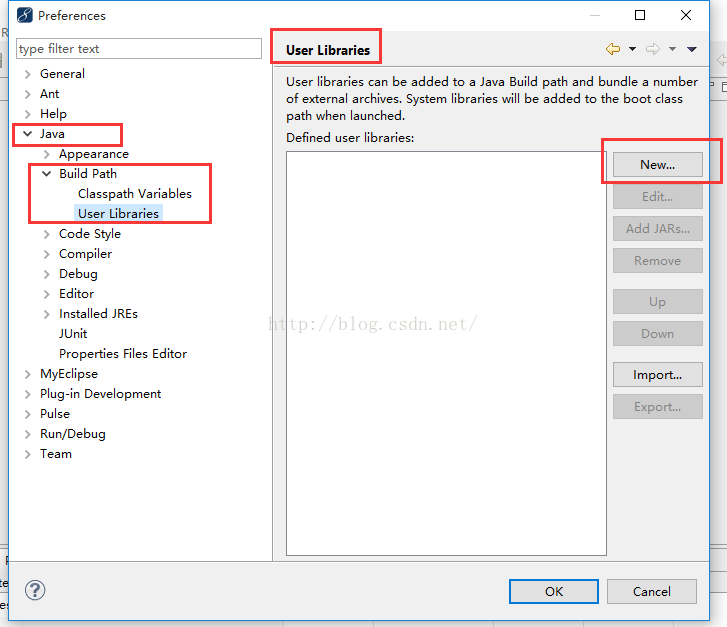
引入jar包到创建的User Libray中
1.在Hibernate的源码文件lib下的所有依赖包
2.加入Hibernate的核心包hibernate3.jar
3.Hibernate与数据库操作,引入mysql的jar包
3.核心配置文件hibernate.cfg.xml文件,完成基本配置
1.在Hibernate源代码,etc文件中找到hibernate.cfg.xml核心配置文件,在后面的项目中根据需求进行修改内容。
2.核心配置文件中的内容,要去Hibernate源代码,etc下面的hibernate.properties文件中,查找并根据项目需求进行配置。
3.文件放到src目录
<!DOCTYPE hibernate-configuration PUBLIC
	"-//Hibernate/Hibernate Configuration DTD 3.0//EN"
	"http://hibernate.sourceforge.net/hibernate-configuration-3.0.dtd">

<hibernate-configuration>
	<session-factory>

		<!-- 配置数据库链接 -->
		<property name="hibernate.connection.driver_class">com.mysql.jdbc.Driver</property>
		<property name="hibernate.connection.url">jdbc:mysql://localhost:3306/hibernate_first</property>
		<property name="hibernate.connection.username">root</property>
		<property name="hibernate.connection.password">fxq123</property>
		<property name="hibernate.dialect">org.hibernate.dialect.MySQLDialect</property><!-- mysql数据库 -->
		<property name="hibernate.show_sql">true</property><<span style="font-family: SimSun;">!-- 显示sql语句 --></span>
		<property name="hibernate.format_sql">true</property>

	    <mapping resource="com/bjpowernode/hibernate/User.hbm.xml"/><span style="font-family: SimSun;"><!-- 引入Users实体和数据库的映射文件 --></span>

	</session-factory>
</hibernate-configuration>
4.log4j引入
1.在Hibernate源代码,etc文件中找到log4j.properties核心配置文件,根据需要对文件进行简单修改;
2.文件放到src目录
二.实例
1.实体
package com.bjpowernode.hibernate;

import java.util.Date;

public class User {
	private String id;

	private String name;

	private String password;
	// 创建日期
	private Date createTime;
	// 失效日期
	private Date expireTime;

	public String getId() {
		return id;
	}

	public void setId(String id) {
		this.id = id;
	}

	public String getName() {
		return name;
	}

	public void setName(String name) {
		this.name = name;
	}

	public String getPassword() {
		return password;
	}

	public void setPassword(String password) {
		this.password = password;
	}

	public Date getCreateTime() {
		return createTime;
	}

	public void setCreateTime(Date dateCreatetime) {
		this.createTime = dateCreatetime;
	}

	public Date getExpireTime() {
		return expireTime;
	}

	public void setExpireTime(Date expireTime) {
		this.expireTime = expireTime;
	}

	@Override
	public String toString() {
		return "User [id=" + id + ", name=" + name + ", password=" + password
				+ ", createTime=" + createTime + ", expireTime=" + expireTime
				+ "]";
	}

}
2.创建实体和表的映射文件User.hbm.xml文件
到Hibernate的源代码hibernate-3.2\eg\org\hibernate\auction文件夹下,找 hbm.xml文件作为模板,根据具体情况进行修改。
<?xml version="1.0"?>
<!DOCTYPE hibernate-mapping PUBLIC
	"-//Hibernate/Hibernate Mapping DTD 3.0//EN"
	"http://hibernate.sourceforge.net/hibernate-mapping-3.0.dtd">
<hibernate-mapping >
	<class name="com.bjpowernode.hibernate.User" >
<!-- 		主键生成策略 -->
		<id name="id">
			<generator class="uuid"></generator>
		</id>
		<property name="name"/>
		<property name="password"/>
		<property name="createTime"/>
		<property name="expireTime"/>

	</class>

</hibernate-mapping>
3.根据实体和实体与表的映射文件User.hbm.xml文件,创建数据库表
package com.bjpowernode.hibernate;

import org.hibernate.cfg.Configuration;
import org.hibernate.tool.hbm2ddl.SchemaExport;

//将hbm转为ddl
//转为数据库
public class ExportDB {
	public static void main(String[] args) {

		// 默认读取hibernate.cfg.xml文件,使用缺省名称;
		// 创建配置对象
		Configuration cfg = new Configuration().configure();
		// 创建SchemaExport对象
		SchemaExport export = new SchemaExport(cfg);

		export.create(true, true);

	}
}
4.向数据库中插入数据库
package com.bjpowernode.hibernate;

import java.text.SimpleDateFormat;
import java.util.Date;
import java.util.Locale;

import org.hibernate.Session;
import org.hibernate.SessionFactory;
import org.hibernate.cfg.Configuration;

public class Client {

	/**
	 * @param args
	 */
	public static void main(String[] args) {
		// 读取Hibernate.cfg.xml 文件
		Configuration cfg = new Configuration().configure();
		// 建立sessionFactory
		SessionFactory sessionFactory = cfg.buildSessionFactory();
		// 取得Session
		Session session = null;
		try {
			session = sessionFactory.openSession();
			// 开启事务
			session.beginTransaction();
			User user = new User();
			user.setName("张三");
			user.setPassword("123");
			/*************** 向数据库中插入日期类型-Start ***************************/
			String datestr = new Date().toString();
			SimpleDateFormat simpleDateFormat = new SimpleDateFormat(
					"EEE MMM dd HH:mm:ss z yyyy", Locale.US);
			Date date = simpleDateFormat.parse(datestr);
			simpleDateFormat = new SimpleDateFormat("yyyy-MM-dd HH:mm:ss");
			Date dateCreatetime = simpleDateFormat.parse(simpleDateFormat
					.format(date));
			Date dateExpireTime = simpleDateFormat.parse(simpleDateFormat
					.format(date));
			/*************** 向数据库中插入日期类型-End ***************************/
			user.setCreateTime(dateCreatetime);
			user.setExpireTime(dateExpireTime);
			// 保存User对象
			session.save(user);
			// 提交事务
			session.getTransaction().commit();

		} catch (Exception e) {
			e.printStackTrace();
			session.getTransaction().rollback();
			if (session != null) {
				if (session.isOpen()) {
					// 关闭session;
					session.close();
				}
			}
		}
	}
}
总结:


 139
139

 被折叠的 条评论
为什么被折叠?
被折叠的 条评论
为什么被折叠?
 到【灌水乐园】发言


