


1、SpringBoot Cache
Spring Boot 本身提供了一个基于ConcurrentHashMap 的缓存机制,也集成了EhCache2.x、JCache CJSR-107、EhCache3.x、Infinispan ),还有Couchbase、Redis 等。Spring Boot应用通过注解的方式使用统一的缓存,只需在方法上使用缓存注解即可。
【注意】在SpringBoot中使用缓存需要对实体类序列化。
1.1、Spring Boot Cache常用注解说明
一旦配置好Spring Boot 缓存,就可以在Spring管理的Bean 中使用缓存注解,通常可以直接放在Service 类上。
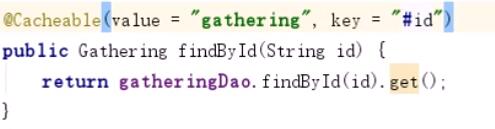
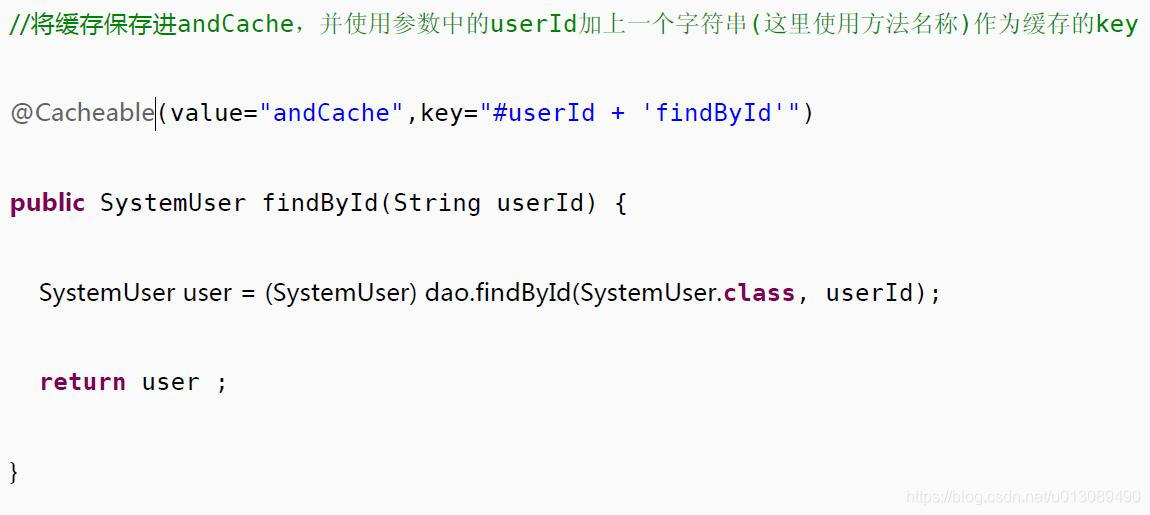
@Cacheable:作用在方法上,触发缓存读取操作。
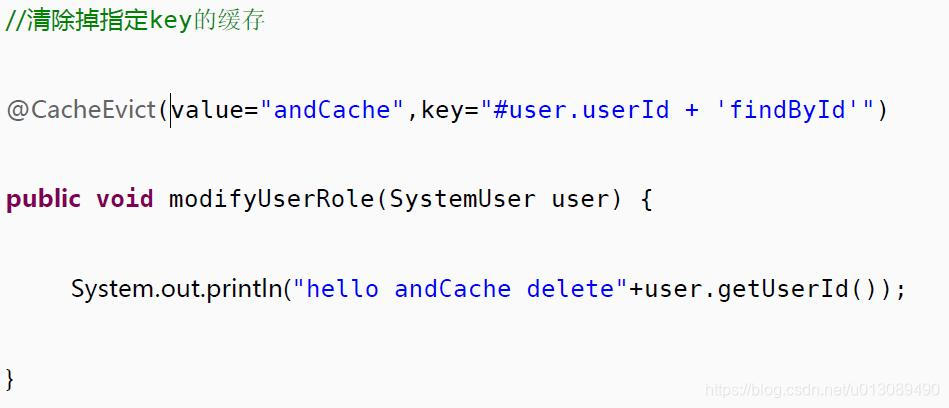
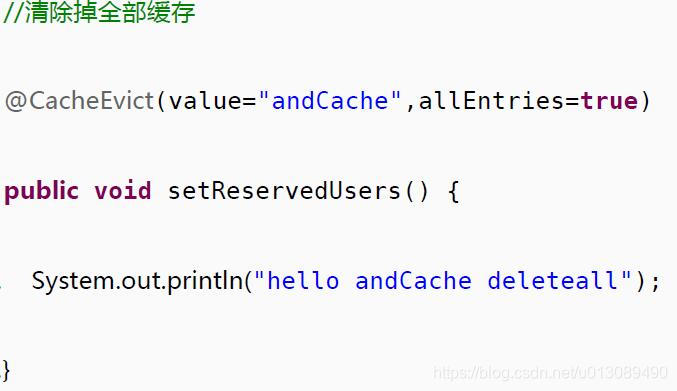
@CacheEvict:作用在方法上,触发缓存失效操作。
@CachePut:作用在方法上,触发缓存更新操作。
@Cache:作用在方法上,综合上面的各种操作,在有些场景下,调用业务会触发多种缓存操作。
@CacheConfig,在类上设置当前缓存的一些公共设置。
1.2、Cache中key生成器
缓存的Key非常重要,Spring使用SimpleKeyGenerator来实现上述Key的生。
package org.springframework.cache.interceptor;
import java.lang.reflect.Method;

//SimpleKeyGenerator类继承KeyGenerator接口
public class SimpleKeyGenerator implements KeyGenerator {

	@Override
	public Object generate(Object target, Method method, Object... params) {
		return generateKey(params);
	}
	/**
	 * SimpleKey 实现了hash Code 和equals 方法:
	 */
	public static Object generateKey(Object... params) {
		if (params.length == 0) {
			return SimpleKey.EMPTY;
		}
		if (params.length == 1) {
			Object param = params[0];
			if (param != null && !param.getClass().isArray()) {
				return param;
			}
		}
		return new SimpleKey(params);
	}
}
【注意】 通常生产环境情况下,直接使用SpEL表达式来指定Key 比自定义一个KeyGenerator更为简单:

1.3、注解详解
【@Cacheable支持如下几个参数】
(1)value:缓存位置名称,不能为空,如果使用EHCache,就是ehcache.xml中声明的cache的name。
(2)key:缓存的key,默认为空,既表示使用方法的参数类型及参数值作为key,支持SpEL。
(3)condition:触发条件,只有满足条件的情况才会加入缓存,默认为空,既表示全部都加入缓存,支持SpEL。

【@CacheEvict支持如下几个参数】
(1)value:缓存位置名称,不能为空,同上
(2)key:缓存的key,默认为空,同上
(3)condition:触发条件,只有满足条件的情况才会清除缓存,默认为空,支持SpEL
(4)allEntries:true表示清除value中的全部缓存,默认为false。
【@CachePut注释】
@CachePut注释,这个注释可以确保方法被执行,同时方法的返回值也被记录到缓存中,实现缓存与数据库的同步更新,理解为update语句。
2、Spring Boot EHCache应用
2.1、引入pom
 <!--开启 cache 缓存-->
        <dependency>
            <groupId>org.springframework.boot</groupId>
            <artifactId>spring-boot-starter-cache</artifactId>
        </dependency>
        <!--ehcache缓存,依赖spring-context-support包-->
        <dependency>
            <groupId>net.sf.ehcache</groupId>
            <artifactId>ehcache</artifactId>
            <version>2.8.3</version>
        </dependency>
 <!-- 该依赖必须加,里面spring支持schedule的支持,以及ehcache缓存-->
        <dependency>
            <groupId>org.springframework</groupId>
            <artifactId>spring-context-support</artifactId>
        </dependency>
2.2、ehcache.xml配置文件
ehcache.xml配置文件是位于resources资源文件下
<?xml version="1.0" encoding="UTF-8"?>
<ehcache xmlns:xsi="http://www.w3.org/2001/XMLSchema-instance"
         xsi:noNamespaceSchemaLocation="http://ehcache.org/ehcache.xsd"
         updateCheck="false">
    <!-- diskStore:ehcache其实是支持内存+磁盘+堆外内存,几个层级的缓存 -->
    <!-- 在这里设置一下,但是一般不用的 -->
    <diskStore path="java.io.tmpdir/Tmp_EhCache" />
    <!-- defaultCache,是默认的缓存策略 -->
    <!-- 如果你指定的缓存策略没有找到,那么就用这个默认的缓存策略 -->
    <!-- external:如果设置为true的话,那么timeout就没有效果,缓存就会一直存在,一般默认就是false -->
    <!-- maxElementsInMemory:内存中可以缓存多少个缓存条目,在实践中,你是需要自己去计算的,比如你计算你要缓存的对象是什么?有多大?最多可以缓存多少MB,或者多少个G的数据?除以每个对象的大小,计算出最多可以放多少个对象 -->
    <!-- overflowToDisk:如果内存不够的时候,是否溢出到磁盘 -->
    <!-- diskPersistent:是否启用磁盘持久化的机制,在jvm崩溃的时候和重启之间,不用 -->
    <!-- timeToIdleSeconds:对象最大的闲置的时间,如果超出闲置的时间,可能就会过期,我们这里就不用了,缓存最多闲置5分钟就被干掉了 -->
    <!-- timeToLiveSeconds:对象最多存活的时间,我们这里也不用,超过这个时间,缓存就过期,就没了 -->
    <!-- memoryStoreEvictionPolicy:当缓存数量达到了最大的指定条目数的时候,需要采用一定的算法,从缓存中清除一批数据,LRU,最近最少使用算法,最近一段时间内,最少使用的那些数据,就被干掉了 -->
    <defaultCache
            eternal="false"
            maxElementsInMemory="50000"
            overflowToDisk="false"
            diskPersistent="false"
            timeToIdleSeconds="300"
            timeToLiveSeconds="0"
            memoryStoreEvictionPolicy="LRU" />
    <!-- 手动指定的缓存策略 -->
    <!-- 比如你一个应用吧,可能要缓存很多种不同的数据,比如说商品信息,或者是其他的一些数据 -->
    <!-- 对不同的数据,缓存策略可以在这里配置多种 -->
    <cache
        name="deptCache"
        eternal="false"
        maxElementsInMemory="10000"
        overflowToDisk="false"
        diskPersistent="false"
        timeToIdleSeconds="300"
        timeToLiveSeconds="0"
        memoryStoreEvictionPolicy="LRU" />
    <cache
            name="yearCache"
            eternal="false"
            maxElementsInMemory="1000"
            overflowToDisk="false"
            diskPersistent="false"
            timeToIdleSeconds="300"
            timeToLiveSeconds="0"
            memoryStoreEvictionPolicy="LRU" />
    <cache
            name="quotaCache"
            eternal="false"
            maxElementsInMemory="50000"
            overflowToDisk="false"
            diskPersistent="false"
            timeToIdleSeconds="300"
            timeToLiveSeconds="0"
            memoryStoreEvictionPolicy="LRU" />

    <!-- ehcache这种东西,简单实用,是很快速的,1小时上手可以用在项目里了,没什么难度的 -->
    <!-- ehcache这个技术,如果讲深了,里面的东西还是很多的,高级的feature,但是我们这里就不涉及了 -->

</ehcache>
2.3、EhCache配置类
import org.springframework.cache.annotation.EnableCaching;
import org.springframework.cache.ehcache.EhCacheCacheManager;
import org.springframework.cache.ehcache.EhCacheManagerFactoryBean;
import org.springframework.context.annotation.Bean;
import org.springframework.context.annotation.Configuration;
import org.springframework.core.io.ClassPathResource;

/**
 * ehcache缓存
 */
@Configuration
@EnableCaching//标注启动了encache缓存
public class EhCacheConfig
{
    /**
     * EhCacheManagerFactoryBean缓存管理器,默认的为EhCacheCacheManager
     * Spring分别通过CacheManager.create()和new CacheManager方式来创建一个ehcache工厂
     * 一个EhCacheManagerFactoryBean创建完成, 也就代表着一个CacheManager
     */
    @Bean
    public EhCacheManagerFactoryBean ehCacheManagerFactoryBean(){
        EhCacheManagerFactoryBean cacheManagerFactoryBean = new EhCacheManagerFactoryBean();
        cacheManagerFactoryBean.setConfigLocation(new ClassPathResource("ehcache.xml"));
        cacheManagerFactoryBean.setShared(true);
        return cacheManagerFactoryBean;
    }
    /**
     * ehcache 主要的管理器
     */
    @Bean
    public EhCacheCacheManager ehCacheCacheManager(EhCacheManagerFactoryBean bean){
        return new EhCacheCacheManager(bean.getObject());
    }
}
2.4、应用
   public static final String CACHE_NAME = "deptCache";
    /**
     * 查询部门列表
     *
     * @return
     */
    @Cacheable(value = CACHE_NAME, key = "'key_deptList'")
    @Override
    public List<Dept> deptList()
    {
        return this.baseMapper.deptList();
    }
    /**
     * 部门ztree树
     * @return
     */
    @Cacheable(value = CACHE_NAME, key = "'key_deptTree'")
    @Override
    public List<ZTreeNode> zTree(){

       /* List<ZTreeNode> zTreeNodes=tree();
        zTreeNodes.add(ZTreeNode.createParent("区域选择"));*/
        return tree();
    }
    @CachePut(value = CACHE_NAME, key = "'key_deptTree'")
    @Override
    public List<ZTreeNode> zTreeInit(){
       /* List<ZTreeNode> zTreeNodes=tree();
        zTreeNodes.add(ZTreeNode.createParent("区域选择"));*/
        return tree();
    }
    private List<ZTreeNode> tree(){
        List<ZTreeNode> tree = this.baseMapper.tree();
        return  tree;
    }
    @CacheEvict(value = CACHE_NAME, key = "'key_deptTree'")
    @Override
    public void EmptyCache(){

    }


 86
86


 被折叠的 条评论
为什么被折叠?
被折叠的 条评论
为什么被折叠?
 到【灌水乐园】发言


