


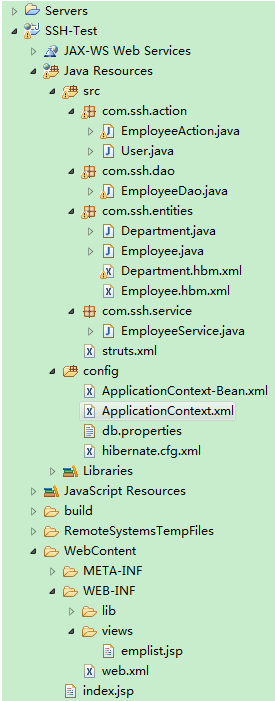
一、目录结构:
二、环境搭配
1. 导入jar包
2. 配置web.xml(直接复制即可)
<?xml version="1.0" encoding="UTF-8"?>
<web-app xmlns:xsi="http://www.w3.org/2001/XMLSchema-instance" xmlns="http://xmlns.jcp.org/xml/ns/javaee" xsi:schemaLocation="http://xmlns.jcp.org/xml/ns/javaee http://xmlns.jcp.org/xml/ns/javaee/web-app_3_1.xsd" id="WebApp_ID" version="3.1">
  <display-name>SSH-Test</display-name>

  <welcome-file-list>
        <welcome-file>index.jsp</welcome-file>
    </welcome-file-list>

 <!-- 配置 Spring 配置文件的名称和位置 -->
    <context-param>
        <param-name>contextConfigLocation</param-name>
        <param-value>classpath:ApplicationContext*.xml</param-value>
    </context-param>
    <!-- 启动 IOC 容器的 ServletContextListener -->
    <listener>
        <listener-class>org.springframework.web.context.ContextLoaderListener</listener-class>
    </listener>

     <!-- 配置 Struts2 的 Filter -->
    <filter>
        <filter-name>struts2</filter-name>
        <filter-class>org.apache.struts2.dispatcher.ng.filter.StrutsPrepareAndExecuteFilter</filter-class>
    </filter>

    <filter-mapping>
        <filter-name>struts2</filter-name>
        <url-pattern>/*</url-pattern>
    </filter-mapping>
</web-app>
3. 配置struts.xml,初始结构
<?xml version="1.0" encoding="UTF-8" ?>
<!DOCTYPE struts PUBLIC
    "-//Apache Software Foundation//DTD Struts Configuration 2.3//EN"
    "http://struts.apache.org/dtds/struts-2.3.dtd">

<struts>

    <constant name="struts.enable.DynamicMethodInvocation" value="false" />
    <constant name="struts.devMode" value="false" />

    <package name="default" namespace="/" extends="struts-default">
       <action name="emp-*" class="employeeAction" method="{1}">
         <result name="list">/WEB-INF/views/emplist.jsp</result>
         <result name="delete" type="redirect">/emp-list</result>
       </action>
    </package>

</struts>
4. 在config文件夹中设置db.properties
jdbc.user=root
jdbc.password=root
jdbc.driverClass=com.mysql.jdbc.Driver
jdbc.jdbcUrl=jdbc:mysql://127.0.0.1:3306/ssh

jdbc.initialPoolSize=5
jdbc.maxPoolSize=10
5.在config文件夹中配置ApplicationContext.xml
负责和数据库的一些连接配置,与上步db.properties关联。一般直接复制即可
<?xml version="1.0" encoding="UTF-8"?>
<beans xmlns="http://www.springframework.org/schema/beans"
    xmlns:xsi="http://www.w3.org/2001/XMLSchema-instance"
    xmlns:aop="http://www.springframework.org/schema/aop"
    xmlns:context="http://www.springframework.org/schema/context"
    xmlns:mvc="http://www.springframework.org/schema/mvc"
    xmlns:p="http://www.springframework.org/schema/p"
    xmlns:tx="http://www.springframework.org/schema/tx"
    xsi:schemaLocation="http://www.springframework.org/schema/beans http://www.springframework.org/schema/beans/spring-beans.xsd
        http://www.springframework.org/schema/aop http://www.springframework.org/schema/aop/spring-aop-4.0.xsd
        http://www.springframework.org/schema/context http://www.springframework.org/schema/context/spring-context-4.0.xsd
        http://www.springframework.org/schema/mvc http://www.springframework.org/schema/mvc/spring-mvc-4.0.xsd
        http://www.springframework.org/schema/tx http://www.springframework.org/schema/tx/spring-tx-4.0.xsd">


     <context:property-placeholder location="classpath:db.properties"/>

     <bean id="dataSource" class="com.mchange.v2.c3p0.ComboPooledDataSource">
       <property name="user" value="${jdbc.user}"></property>
       <property name ="password" value="${jdbc.password}"></property>
       <property name="driverClass" value="${jdbc.driverClass}"></property>
         <property name="jdbcUrl" value="${jdbc.jdbcUrl}"></property>

       <property name="initialPoolSize" value="${jdbc.initialPoolSize}"></property>
       <property name="maxPoolSize" value="${jdbc.maxPoolSize}"></property>
     </bean>

     <bean id="sessionFactory" class="org.springframework.orm.hibernate4.LocalSessionFactoryBean" >
        <property name="dataSource" ref="dataSource"></property>
        <property name="configLocation" value="classpath:hibernate.cfg.xml"></property>
        <property name="mappingLocations" value="classpath:com/ssh/entities/*.hbm.xml"></property>
     </bean>

</beans>
6. 在src中建立包,例com.ssh.entities,com.ssh.action,com.ssh.service,com.ssh.dao
entities负责实体,一般和数据库相匹配,建立好.java类后,还要建立一个 heiberate数据库关联文件.hbm.xml。
例:Department.java:
package com.ssh.entities;

public class Department {

    private Integer deptId;
    private String deptName;


    public Integer getDeptId() {
        return deptId;
    }
    public void setDeptId(Integer deptId) {
        this.deptId = deptId;
    }
    public String getDeptName() {
        return deptName;
    }
    public void setDeptName(String deptName) {
        this.deptName = deptName;
    }


}
例:Department.hbm.xml:
<?xml version="1.0"?>
<!DOCTYPE hibernate-mapping PUBLIC "-//Hibernate/Hibernate Mapping DTD 3.0//EN"
"http://hibernate.sourceforge.net/hibernate-mapping-3.0.dtd">
<!-- Generated 2016-6-10 21:13:26 by Hibernate Tools 3.4.0.CR1 -->
<hibernate-mapping>

    <class name="com.ssh.entities.Department" table="SSH_DEPARTMENT">
        <id name="deptId" type="java.lang.Integer">
            <column name="DEPT_ID" />
            <generator class="native" />
        </id>

        <property name="deptName" type="java.lang.String">
            <column name="DEPT_NAME" />
        </property>
    </class>
</hibernate-mapping>
action负责响应行为。
package com.ssh.action;
import java.util.Map;
import org.apache.struts2.interceptor.RequestAware;
import org.springframework.web.context.request.RequestAttributes;
import com.ssh.service.EmployeeService;
import com.opensymphony.xwork2.ActionSupport;


public class EmployeeAction extends ActionSupport implements RequestAware{
    private static final long serialVersionUID = 1L;
    private EmployeeService employeeService;
    private Integer id;
    public void setId(Integer id) {
        this.id = id;
    }
    public void setEmployeeService(EmployeeService employeeService) {
        this.employeeService = employeeService;
    }
    public String list()
    {
        request.put("employees", employeeService.getAll());
        request.put("111", employeeService.getAll());
        return "list";
    }
    public String delete()
    {
        employeeService.deleteEmployee(id);
        return "delete";
    }

    private Map<String,Object> request;
    @Override
    public void setRequest(Map<String, Object> arg0) {
        // TODO Auto-generated method stub
        this.request=arg0;
    }
}
service调用dao的方法。
package com.ssh.service;

import java.util.List;

import com.ssh.dao.EmployeeDao;
import com.ssh.entities.Employee;

public class EmployeeService {
    private EmployeeDao employeeDao;

    public void setEmployeeDao(EmployeeDao employeeDao) {
        this.employeeDao = employeeDao;
    }

     public List<Employee> getAll()
     {
         return employeeDao.getAll();
     }


     public void deleteEmployee(Integer id)
     {
         employeeDao.deleteEmployee(id);
     }
}
dao负责数据库的一些操作方法。
package com.ssh.dao;
import java.util.List;
import org.hibernate.Query;
import org.hibernate.Session;
import org.hibernate.SessionFactory;
import com.ssh.entities.Employee;

public class EmployeeDao {
    private SessionFactory sessionFactory;
    public void setSessionFactory(SessionFactory sessionFactory) {
        this.sessionFactory = sessionFactory;
    }
    private Session getSession()
    {
        //return sessionFactory.getCurrentSession();
        return sessionFactory.openSession();
    }
    public List<Employee> getAll()
    {
        String sql="FROM Employee e LEFT OUTER JOIN FETCH e.dept";
        return getSession().createQuery(sql).list();
    }

    public  void deleteEmployee(Integer id)
    {
        String sql="delete from Employee e where e.id = ?";
        Query query=getSession().createQuery(sql).setInteger(0, id);
        query.executeUpdate();
    }
}
7.建立好src框架后,在config文件夹中配置ApplicationContext-Bean.xml
ApplicationContext-Bean.xml 负责将action,service,dao联系起来。
<?xml version="1.0" encoding="UTF-8"?>
<beans xmlns="http://www.springframework.org/schema/beans"
    xmlns:xsi="http://www.w3.org/2001/XMLSchema-instance"
    xmlns:aop="http://www.springframework.org/schema/aop"
    xmlns:context="http://www.springframework.org/schema/context"
    xmlns:mvc="http://www.springframework.org/schema/mvc"
    xmlns:p="http://www.springframework.org/schema/p"
    xmlns:tx="http://www.springframework.org/schema/tx"
    xsi:schemaLocation="http://www.springframework.org/schema/beans http://www.springframework.org/schema/beans/spring-beans.xsd
        http://www.springframework.org/schema/aop http://www.springframework.org/schema/aop/spring-aop-4.0.xsd
        http://www.springframework.org/schema/context http://www.springframework.org/schema/context/spring-context-4.0.xsd
        http://www.springframework.org/schema/mvc http://www.springframework.org/schema/mvc/spring-mvc-4.0.xsd
        http://www.springframework.org/schema/tx http://www.springframework.org/schema/tx/spring-tx-4.0.xsd">


   <bean id="employeeDao" class="com.ssh.dao.EmployeeDao">
      <property name="sessionFactory" ref="sessionFactory"></property>
   </bean>
    <bean id="deptDao" class="com.ssh.dao.deptDao">
      <property name="sessionFactory" ref="sessionFactory"></property>
   </bean>

   <bean id="employeeService" class="com.ssh.service.EmployeeService">
      <property name="employeeDao" ref="employeeDao"></property>
       <property name="deptDao" ref="deptDao"></property>
   </bean>

   <bean id="employeeAction" class="com.ssh.action.EmployeeAction" scope="prototype">
      <property name="employeeService" ref="employeeService"></property>
   </bean>
</beans>
到此,整个框架就搭起来了。
现在可以写你的页面了。
emplist.jsp
<%@ page language="java" contentType="text/html; charset=UTF-8"
    pageEncoding="UTF-8"%>
    <%@taglib prefix="s" uri="/struts-tags" %>
<!DOCTYPE html PUBLIC "-//W3C//DTD HTML 4.01 Transitional//EN" "http://www.w3.org/TR/html4/loose.dtd">
<html>
<head>
<meta http-equiv="Content-Type" content="text/html; charset=UTF-8">
<title>Insert title here</title>
</head>
<body >
      <h3 align="center">Employee list page</h3>

      <s:if test="#request.employees==null || #request.employees.size()==0">
              没有任何员工信息
      </s:if>
      <s:else>
        <table border="1" cellpadding="10" cellspacing="0" align="center">
          <tr>
            <td>ID</td>
            <td>NAME</td>
            <td>EMAIL</td>
            <td>BIRTH</td>
            <td>dept</td>
            <td>DELETE</td>
            <td>UPDATE</td>
          </tr>
          <s:iterator value="#request.employees">
           <tr>
             <td>${id}</td>
             <td>${name}</td>
             <td>${email}</td>
             <td>${birth}</td>
             <td>${dept.deptName}</td>
             <td><a href="emp-delete?id=${id}">delete</a></td>
             <td><a href="emp-update?id=${id}">update</a></td>
           </tr>
           </s:iterator>
        </table>
      </s:else>
</body>
</html>
在index.jsp中调用action方法,从而显示emplist.jsp页面
<%@ page language="java" contentType="text/html; charset=UTF-8"
    pageEncoding="UTF-8"%>
<!DOCTYPE html PUBLIC "-//W3C//DTD HTML 4.01 Transitional//EN" "http://www.w3.org/TR/html4/loose.dtd">
<html>
<head>
<meta http-equiv="Content-Type" content="text/html; charset=UTF-8">
<title>Insert title here</title>
</head>
<body>
   <a href="emp-list"> list all employee</a>
</body>
</html> 


 3199
3199


 被折叠的 条评论
为什么被折叠?
被折叠的 条评论
为什么被折叠?
 到【灌水乐园】发言


