


上一篇我们创建了工程和一个Factory的po对象(javaBean),我们也写好了Mapper的映射文件,接下来我们来完成生产厂家的DAO与SERVICE,以及CONTROLLER,还有做显示的JSP页面,以及框架的配置文件。
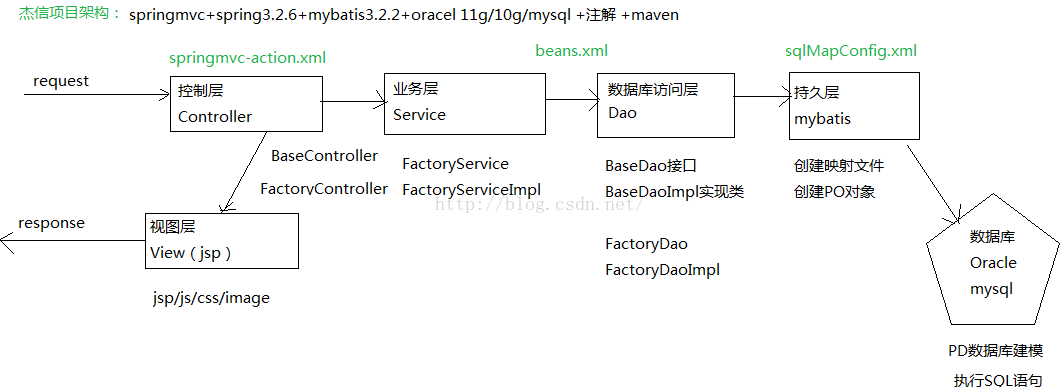
首先回顾一下我们的系统架构:
我们的BaseDao与BaseDaoImpl:
我们现在来创建自己的Dao层
FactoryDao:
FactoryDaoImpl:
接下来写service层
FactoryService:
FactoryServiceImpl(我们先只实现查询)
下面开始编写Controller层
看看我们之前引入的工具类BaseController:
然后我们创建FactoryController(继承BaseController是为了以后的扩充):
接下来我们实现jsp界面
我们首先先在main/webapp/WEB-INF/pages下写一个最最基础的jsp的配置页面
base.jsp
之后再写一个显示list列表的配置jsp文件:
baselist.jsp
最后,,我们在main/webapp/WEB-INF/pages/factory下创建baseinfo文件夹,我们在里面写我们需要给用户显示的jsp界面(里面包含了baselist.jsp)
jFactoryList.jsp:
接下来进行最后一步,我们要配置各种配置文件
我们现在src/main/resources下配置MyBatis的配置文件
sqlMapConfig.xml
接下来我们创建spring的配置文件beans.xml:
其中jdbc.properties:
然后我们的spring有关service的配置文件
beans-service.xml:
接下来配置springmvc的配置文件springmvc-servlet.xml
最后我们来配置我们的web.xml
我们基本上把所有基本的东西都配置完毕了,接下来我们发布我们的工程进行测试。
将任务部署至tomcat,然后我们在浏览器上访问我们的工程,我们访问我们的路径,看看数据是否返回(我们事先在数据库中填写了一些从测试数据):
访问http://localhost/jx-Maven-Webapp/(我的tomcat默认端口是80)
首先回顾一下我们的系统架构:
我们的BaseDao与BaseDaoImpl:
package cn.hpu.jk.dao;

import java.io.Serializable;
import java.util.List;
import java.util.Map;

import cn.hpu.jk.pagination.Page;

//泛型类,基础的DAO接口
public interface BaseDao<T> {
	public List<T> findPage(Page page);//分页查询
	public List<T> find(Map paraMap);//带条件查询,条件可以为null,既没有条件;返回list对象集合
	public T get(Serializable id);//只查询一个,常用于修改
	public void insert(T entity);//插入,用实体作为参数
	public void update(T entity);//修改,用实体作为参数
	public void deleteById(Serializable id);//按id删除,删除一条;支持整数型和字符串类型ID
	public void delete(Serializable[] ids);//批量删除;支持整数型和字符串类型ID
}
BaseDaoImpl:
package cn.hpu.jk.dao.impl;

import java.io.Serializable;
import java.util.List;
import java.util.Map;

import org.apache.ibatis.session.SqlSessionFactory;
import org.mybatis.spring.support.SqlSessionDaoSupport;
import org.springframework.beans.factory.annotation.Autowired;

import cn.hpu.jk.dao.BaseDao;
import cn.hpu.jk.pagination.Page;


public abstract class BaseDaoImpl<T> extends SqlSessionDaoSupport implements BaseDao<T>{
	@Autowired
	//mybatis-spring 1.0无需此方法;mybatis-spring1.2必须注入。
	public void setSqlSessionFactory(SqlSessionFactory sqlSessionFactory){
		super.setSqlSessionFactory(sqlSessionFactory);
	}

	private String ns;		//命名空间
	public String getNs() {
		return ns;
	}
	public void setNs(String ns) {
		this.ns = ns;
	}

	public List<T> findPage(Page page){
		List<T> oList = this.getSqlSession().selectList(ns + ".findPage", page);
		return oList;
	}


	public List<T> find(Map map) {
		List<T> oList = this.getSqlSession().selectList(ns + ".find", map);
		return oList;
	}
	public T get(Serializable id) {
		return this.getSqlSession().selectOne(ns + ".get", id);
	}


	public void insert(T entity) {
		this.getSqlSession().insert(ns + ".insert", entity);
	}


	public void update(T entity) {
		this.getSqlSession().update(ns + ".update", entity);
	}


	public void deleteById(Serializable id) {
		this.getSqlSession().delete(ns + ".deleteById", id);
	}


	public void delete(Serializable[] ids) {
		this.getSqlSession().delete(ns + ".delete", ids);
	}
}
我们现在来创建自己的Dao层
FactoryDao:
package cn.hpu.jk.dao;

import cn.hpu.jk.domain.Factory;

public interface FactoryDao extends BaseDao<Factory>{
	//我们这里可以直接使用继承的BaseDao的增删改查方法
	//创建一系列其它Dao的原因是因为其它Dao有可能需要拓展

}
FactoryDaoImpl:
package cn.hpu.jk.dao.impl;

import org.springframework.stereotype.Repository;

import cn.hpu.jk.dao.FactoryDao;
import cn.hpu.jk.domain.Factory;


@Repository //为了包扫描的时候这个Dao被扫描到
public class FactoryDaoImpl extends BaseDaoImpl<Factory> implements FactoryDao{
	public FactoryDaoImpl(){
		//设置命名空间
		super.setNs("cn.hpu.jk.mapper.FactoryMapper");
	}
}
接下来写service层
FactoryService:
package cn.hpu.jk.service;

import java.io.Serializable;
import java.util.List;
import java.util.Map;

import org.apache.poi.ss.formula.functions.T;

import cn.hpu.jk.domain.Factory;
import cn.hpu.jk.pagination.Page;

public interface FactoryService {
	public List<Factory> findPage(Page page);//分页查询
	public List<Factory> find(Map paraMap);	//带条件查询,条件可以为null,既没有条件;返回list对象集合
	public Factory get(Serializable id);//只查询一个,常用于修改
	public void insert(Factory factory);//插入,用实体作为参数
	public void update(Factory factory);//修改,用实体作为参数
	public void deleteById(Serializable id);//按id删除,删除一条;支持整数型和字符串类型ID
	public void delete(Serializable[] ids);//批量删除;支持整数型和字符串类型ID
}
FactoryServiceImpl(我们先只实现查询)
package cn.hpu.jk.service.impl;

import java.io.Serializable;
import java.util.List;
import java.util.Map;

import javax.annotation.Resource;

import org.apache.poi.ss.formula.functions.T;
import org.springframework.stereotype.Service;

import cn.hpu.jk.dao.FactoryDao;
import cn.hpu.jk.domain.Factory;
import cn.hpu.jk.pagination.Page;
import cn.hpu.jk.service.FactoryService;

@Service
public class FactoryServiceImpl implements FactoryService{

	@Autowired
	FactoryDao factoryDao;


	@Override
	public void delete(Serializable[] ids) {
		// TODO Auto-generated method stub

	}


	@Override
	public void deleteById(Serializable id) {
		// TODO Auto-generated method stub

	}


	@Override
	public List<Factory> find(Map paraMap) {
		return factoryDao.find(paraMap);
	}


	@Override
	public List<Factory> findPage(Page page) {
		// TODO Auto-generated method stub
		return null;
	}


	@Override
	public Factory get(Serializable id) {
		// TODO Auto-generated method stub
		return null;
	}


	@Override
	public void insert(Factory factory) {
		// TODO Auto-generated method stub

	}


	@Override
	public void update(Factory factory) {
		// TODO Auto-generated method stub

	}


}
下面开始编写Controller层
看看我们之前引入的工具类BaseController:
package cn.hpu.jk.controller;

import java.text.DateFormat;
import java.text.SimpleDateFormat;
import java.util.Date;

import org.springframework.beans.propertyeditors.CustomDateEditor;
import org.springframework.web.bind.WebDataBinder;
import org.springframework.web.bind.annotation.InitBinder;


public abstract class BaseController {
	@InitBinder
	//此方法用于日期的转换,如果未加,当页面日期格式转换错误,将报400错误,实际是因为此方法
	public void initBinder(WebDataBinder binder) {
		DateFormat dateFormat = new SimpleDateFormat("yyyy-MM-dd");
		dateFormat.setLenient(true);
		binder.registerCustomEditor(Date.class, new CustomDateEditor(dateFormat, true));
	}
}
然后我们创建FactoryController(继承BaseController是为了以后的扩充):
package cn.hpu.jk.controller.basicinfo.factory;

import java.util.List;

import javax.annotation.Resource;

import org.springframework.ui.Model;
import org.springframework.web.bind.annotation.RequestMapping;

import cn.hpu.jk.controller.BaseController;
import cn.hpu.jk.domain.Factory;
import cn.hpu.jk.service.FactoryService;


public class FactoryController extends BaseController{
	@Resource
	FactoryService factoryService;

	//列表
	@RequestMapping("/basicinfo/factory/list.action")
	public String list(Model model){
		List<Factory> dataList=factoryService.find(null);
		model.addAttribute("dataList", dataList);//将数据传递到页面

		return "/baseinfo/factory/jFactoryList.jsp";//转向页面
	}
}
接下来我们实现jsp界面
我们首先先在main/webapp/WEB-INF/pages下写一个最最基础的jsp的配置页面
base.jsp
<%@ page language="java" pageEncoding="UTF-8"%>
<!--引入c标签库-->
<%@ taglib uri="http://java.sun.com/jsp/jstl/core" prefix="c"%>
<!--配置虚拟路径(工程路径)-->
<c:set var="ctx" value="${pageContext.request.contextPath}"/>


<!--引入最基础的css与js配置文件-->
<link rel="stylesheet" rev="stylesheet" type="text/css" href="${ctx}/skin/default/css/default.css" media="all"/>
<script language="javascript" src="${ctx}/js/common.js"></script>
之后再写一个显示list列表的配置jsp文件:
baselist.jsp
<%@ page language="java" pageEncoding="UTF-8"%>
<!--引入base.jsp-->
<%@ include file="base.jsp"%>


<!--引入与list列表有关的样式表-->
 	<link rel="stylesheet" rev="stylesheet" type="text/css" href="${ctx}/css/extreme/extremecomponents.css" />
    <link rel="stylesheet" rev="stylesheet" type="text/css" href="${ctx}/css/extreme/extremesite.css" />
最后,,我们在main/webapp/WEB-INF/pages/factory下创建baseinfo文件夹,我们在里面写我们需要给用户显示的jsp界面(里面包含了baselist.jsp)
jFactoryList.jsp:
<%@ page language="java" pageEncoding="UTF-8"%>
<%@ include file="../../baselist.jsp"%>
<html xmlns="http://www.w3.org/1999/xhtml">
<head>
	<title>生产厂家列表</title>
</head>


<body>
<form name="icform" method="post">


<div id="menubar">
<div id="middleMenubar">
<div id="innerMenubar">
  <div id="navMenubar">

	<ul>
	<li id="view"><a href="#" οnclick="formSubmit('toview.action','_self');this.blur();">查看</a></li>
	</ul>


  </div>
</div>
</div>
</div>

<!-- 页面主体部分(列表等) -->
<div class="textbox" id="centerTextbox">
  <div class="textbox-header">
  <div class="textbox-inner-header">
  <div class="textbox-title">
   生产厂家列表
  </div>
  </div>
  </div>

<div>
<div class="eXtremeTable" >
<table id="ec_table" class="tableRegion" width="98%" >
	<thead>
	<tr>
		<td class="tableHeader"><input type="checkbox" name="selid" οnclick="checkAll('id',this)"></td>
		<td class="tableHeader">序号</td>
		<td class="tableHeader">厂家全称</td>
		<td class="tableHeader">缩写</td>
		<td class="tableHeader">联系人</td>
		<td class="tableHeader">电话</td>
		<td class="tableHeader">手机</td>
		<td class="tableHeader">传真</td>
		<td class="tableHeader">验货员</td>
	</tr>
	</thead>
	<tbody class="tableBody" >

	<c:forEach items="${dataList}" var="o" varStatus="status">
	<tr class="odd" οnmοuseοver="this.className='highlight'" οnmοuseοut="this.className='odd'" >
		<td><input type="checkbox" name="id" value="${o.id}"/></td>
		<td>${status.index+1}</td>
		<td><a href="toview.action?id=${o.id}">${o.fullName}</a></td>
		<td>${o.factoryName}</td>
		<td>${o.contacts}</td>
		<td>${o.phone}</td>
		<td>${o.mobile}</td>
		<td>${o.fax}</td>
		<td>${o.inspector}</td>
	</tr>
	</c:forEach>

	</tbody>
</table>
</div>

</div>


</form>
</body>
</html>
接下来进行最后一步,我们要配置各种配置文件
我们现在src/main/resources下配置MyBatis的配置文件
sqlMapConfig.xml
<?xml version="1.0" encoding="UTF-8"?>
<!DOCTYPE configuration
	PUBLIC "-//mybatis.org//DTD Config 3.0//EN"
	"http://mybatis.org/dtd/mybatis-3-config.dtd">
<configuration>
	<!--  引入了spring就不需要这些了
	<environments default="">
		<environment id="">
			<transactionManager type=""></transactionManager>
			<dataSource type=""></dataSource>
		</environment>
	</environments>
	-->
</configuration>
接下来我们创建spring的配置文件beans.xml:
<?xml version="1.0" encoding="UTF-8"?>
<beans xmlns="http://www.springframework.org/schema/beans"
	xmlns:xsi="http://www.w3.org/2001/XMLSchema-instance" xmlns:mvc="http://www.springframework.org/schema/mvc"
	xmlns:context="http://www.springframework.org/schema/context"
	xmlns:aop="http://www.springframework.org/schema/aop" xmlns:tx="http://www.springframework.org/schema/tx"
	xsi:schemaLocation="http://www.springframework.org/schema/beans
			http://www.springframework.org/schema/beans/spring-beans-3.0.xsd
			http://www.springframework.org/schema/mvc
			http://www.springframework.org/schema/mvc/spring-mvc-3.0.xsd
			http://www.springframework.org/schema/context
			http://www.springframework.org/schema/context/spring-context-3.0.xsd
			http://www.springframework.org/schema/aop
			http://www.springframework.org/schema/aop/spring-aop-3.0.xsd
			http://www.springframework.org/schema/tx
			http://www.springframework.org/schema/tx/spring-tx-3.0.xsd ">

		<!-- 1.加载数据库配置的属性文件 -->
		<context:property-placeholder location="classpath:jdbc.properties"/>

		<!-- 2.包扫描:dao,service -->
		<context:component-scan base-package="cn.hpu.jk.dao,cn.hpu.jk.service"/>

		<!-- 3,dataSource数据源 -->
		<bean id="dataSource" class="com.mchange.v2.c3p0.ComboPooledDataSource">
			<property name="driverClass" value="${jdbc.driverClassName}"/>
			<property name="jdbcUrl" value="${jdbc.url}"/>
			<property name="user" value="${jdbc.username}"/>
			<property name="password" value="${jdbc.password}"/>

			<property name="maxPoolSize" value="${c3p0.pool.maxPoolSize}"/>
			<property name="minPoolSize" value="${c3p0.pool.minPoolSize}" />
			<property name="initialPoolSize" value="${c3p0.pool.initialPoolSize}"/>
			<property name="acquireIncrement" value="${c3p0.pool.acquireIncrement}"/>
		</bean>

		<!-- 4.SessionFactory -->
		<bean id="sessionFactory" class="org.mybatis.spring.SqlSessionFactoryBean">
			<property name="dataSource" ref="dataSource"/>
			<!-- 整合mybatis,包扫描mapper文件 -->
			<property name="configLocation" value="classpath:sqlMapConfig.xml"></property>
			<property name="mapperLocations" value="classpath:cn/hpu/jk/mapper/*.xml"></property>
		</bean>

		<!-- 5.事务管理-->
		<bean id="txManager" class="org.springframework.jdbc.datasource.DataSourceTransactionManager">
			<property name="dataSource" ref="dataSource"/>
		</bean>

		<!-- 事务通知 -->
		<tx:advice id="txAdivce" transaction-manager="txManager">
			<tx:attributes>
				<tx:method name="insert*" propagation="REQUIRED"/>
				<tx:method name="update*" propagation="REQUIRED"/>
				<tx:method name="delete*" propagation="REQUIRED"/>
				<tx:method name="save*" propagation="REQUIRED"/>

				<tx:method name="find*" read-only="false"/>
				<tx:method name="get*" read-only="false"/>
				<tx:method name="view*" read-only="false"/>
			</tx:attributes>
		</tx:advice>

		<aop:config>
			<aop:pointcut expression="execution(* cn.hpu.jk.service.*.*(..))" id="txPointcut"/>
			<aop:advisor advice-ref="txAdivce" pointcut-ref="txPointcut"/>
		</aop:config>

</beans>
其中jdbc.properties:
#jdbc.driverClassName=com.mysql.jdbc.Driver
#jdbc.url=jdbc:mysql://localhost:3306/jkdb?characterEncoding=utf-8
#jdbc.username=root
#jdbc.password=1234


jdbc.driverClassName=oracle.jdbc.driver.OracleDriver
jdbc.url=jdbc:oracle:thin:@127.0.0.1:1521:XE
jdbc.username=jkdb
jdbc.password=22


c3p0.pool.maxPoolSize=20
c3p0.pool.minPoolSize=5
c3p0.pool.initialPoolSize=3
c3p0.pool.acquireIncrement=2
然后我们的spring有关service的配置文件
beans-service.xml:
<?xml version="1.0" encoding="UTF-8"?>
<beans xmlns="http://www.springframework.org/schema/beans"
	xmlns:xsi="http://www.w3.org/2001/XMLSchema-instance" xmlns:mvc="http://www.springframework.org/schema/mvc"
	xmlns:context="http://www.springframework.org/schema/context"
	xmlns:aop="http://www.springframework.org/schema/aop" xmlns:tx="http://www.springframework.org/schema/tx"
	xsi:schemaLocation="http://www.springframework.org/schema/beans
			http://www.springframework.org/schema/beans/spring-beans-3.0.xsd
			http://www.springframework.org/schema/mvc
			http://www.springframework.org/schema/mvc/spring-mvc-3.0.xsd
			http://www.springframework.org/schema/context
			http://www.springframework.org/schema/context/spring-context-3.0.xsd
			http://www.springframework.org/schema/aop
			http://www.springframework.org/schema/aop/spring-aop-3.0.xsd
			http://www.springframework.org/schema/tx
			http://www.springframework.org/schema/tx/spring-tx-3.0.xsd ">

		<!-- 加载service-->
	<bean name="factoryService" class="cn.hpu.jk.service.impl.FactoryServiceImpl"/>


</beans>
接下来配置springmvc的配置文件springmvc-servlet.xml
<?xml version="1.0" encoding="UTF-8"?>
<beans xmlns="http://www.springframework.org/schema/beans"
	xmlns:xsi="http://www.w3.org/2001/XMLSchema-instance"
	xmlns:mvc="http://www.springframework.org/schema/mvc"
	xmlns:context="http://www.springframework.org/schema/context"
	xmlns:aop="http://www.springframework.org/schema/aop"
	xmlns:tx="http://www.springframework.org/schema/tx"
	xsi:schemaLocation="http://www.springframework.org/schema/beans
	http://www.springframework.org/schema/beans/spring-beans-3.0.xsd
	http://www.springframework.org/schema/mvc
	http://www.springframework.org/schema/mvc/spring-mvc-3.0.xsd
	http://www.springframework.org/schema/context
	http://www.springframework.org/schema/context/spring-context-3.0.xsd
	http://www.springframework.org/schema/aop
	http://www.springframework.org/schema/aop/spring-aop-3.0.xsd
	http://www.springframework.org/schema/tx
	http://www.springframework.org/schema/tx/spring-tx-3.0.xsd ">

	<!-- 1.扫描controller包 -->
	<context:component-scan base-package="cn.hpu.jk.controller.*"/>

	<!-- 2.内部资源视图解析器,suffix为空,方便跟参数 url?id=xxx -->
	<bean id="jspViewResolver" class="org.springframework.web.servlet.view.InternalResourceViewResolver">
		<property name="prefix" value="/WEB-INF/pages"/>
		<property name="suffix" value=""/>
	</bean>

	<!-- 3.注解驱动 -->
	<mvc:annotation-driven/>


	<!-- 4.文件上传解析器,最大能上传10M文件(1024*1024*10)-->
	<bean id="multipartResolver" class="org.springframework.web.multipart.commons.CommonsMultipartResolver">
		<property name="maxUploadSize" value="10485760"/>
	</bean>

</beans>
最后我们来配置我们的web.xml
<?xml version="1.0" encoding="UTF-8"?>
<web-app xmlns:xsi="http://www.w3.org/2001/XMLSchema-instance"
	xmlns="http://java.sun.com/xml/ns/javaee"
	xmlns:web="http://java.sun.com/xml/ns/javaee/web-app_2_5.xsd"
	xsi:schemaLocation="http://java.sun.com/xml/ns/javaee http://java.sun.com/xml/ns/javaee/web-app_3_0.xsd"
	id="WebApp_ID" version="3.0">


  <display-name>Archetype Created Web Application</display-name>

  <!-- 1.加载spring框架容器 -->
  <context-param>
  	<param-name>contextConfigLocation</param-name>
  	<param-value>classpath:beans*.xml</param-value>
  </context-param>
  <listener>
  	<listener-class>org.springframework.web.context.ContextLoaderListener</listener-class>
  </listener>

  <!-- 2.springmvc前端控制器 -->
  <servlet>
  	<servlet-name>springmvc</servlet-name>
  	<servlet-class>org.springframework.web.servlet.DispatcherServlet</servlet-class>
	<init-param>
  		<param-name>contextConfigLocation</param-name>
  		<param-value>classpath:springmvc-servlet.xml</param-value>
  	</init-param>
  </servlet>
  <servlet-mapping>
  	<servlet-name>springmvc</servlet-name>
  	<url-pattern>*.action</url-pattern>
  </servlet-mapping>

  <!-- 3.post乱码过虑器 -->
	<filter>
		<filter-name>CharacterEncodingFilter</filter-name>
		<filter-class>org.springframework.web.filter.CharacterEncodingFilter</filter-class>
		<init-param>
			<param-name>encoding</param-name>
			<param-value>utf-8</param-value>
		</init-param>
	</filter>
	<filter-mapping>
		<filter-name>CharacterEncodingFilter</filter-name>
		<url-pattern>/*</url-pattern>
	</filter-mapping>

</web-app>
我们基本上把所有基本的东西都配置完毕了,接下来我们发布我们的工程进行测试。
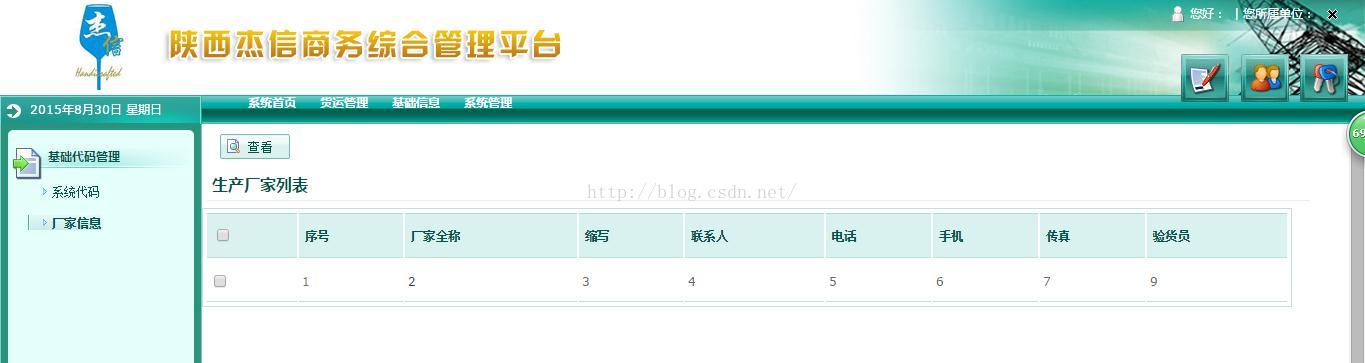
将任务部署至tomcat,然后我们在浏览器上访问我们的工程,我们访问我们的路径,看看数据是否返回(我们事先在数据库中填写了一些从测试数据):
访问http://localhost/jx-Maven-Webapp/(我的tomcat默认端口是80)
点击之后结果如图:
附工程源码:jx-Maven-Webapp.zip
以后会继续发布新功能模块的编写步骤
转载请注明出处:http://blog.csdn.net/acmman/article/details/48182869


 128
128


 被折叠的 条评论
为什么被折叠?
被折叠的 条评论
为什么被折叠?
 到【灌水乐园】发言


