


概要
本章主要简示了使用IOS的绘图Quartz,包括简单的画直线、图片、文字、圆、矩形、贝塞尔曲线,包括一些基本使用方法。
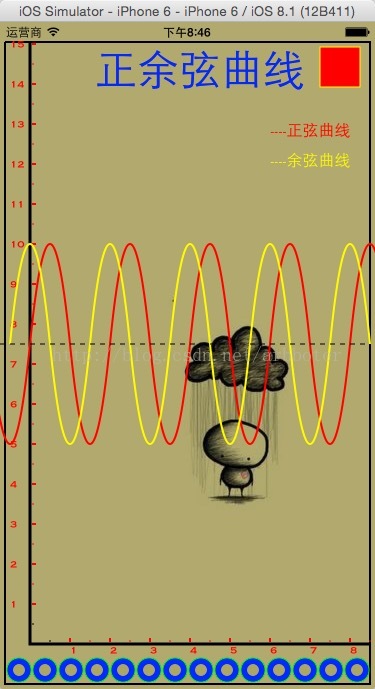
结果展示
流程概要
1.绘图好像直接在UIView类里面绘制的,在控制类里面绘制没有尝试。
2.新建一个基于UIView的类,发现新建类里面自动生成了drawRect方法,直接在这个方法里面写代码即可自动被调用
3.注意绘图时是先绘制路径,然后使用画图函数(eg.CGContextDrawPath,CGContextFillPath等)才能在界面上显示。
主要代码
基于UIView的类的m文件
//
//  MyView.m
//  CustomDraw
//
//  Created by arbboter on 14/12/18.
//  Copyright (c) 2014年 arbboter. All rights reserved.
//

#import "MyView.h"

@interface MyView ()

@property (nonatomic, readwrite) CGRect myFrame;

@end

@implementation MyView

- (void) setMyFrame
{
    CGFloat x = self.frame.origin.x;
    CGFloat y = self.frame.origin.y;
    CGFloat w = self.frame.size.width;
    CGFloat h = self.frame.size.height;

    x = x + 5;
    y = y + 20 ;
    w = w - 10;
    h = h - 25;

    _myFrame = CGRectMake(x, y, w, h);
}

/** 该方法是UIView内置方法 */
- (void) drawRect:(CGRect)rect
{
    // 设置绘图区域
    [self setMyFrame];

    /** 画图 */
    NSString* filePath = [[NSBundle mainBundle] pathForResource:@"sad" ofType:@"jpeg"];
    UIImage* image = [[UIImage alloc] initWithContentsOfFile:filePath];
    [image drawAtPoint:CGPointMake(self.frame.origin.x, self.frame.origin.y)];
    [image release];
    image = nil;

    /** 写字(设置字体大小及颜色) */
    NSArray* array = [UIFont familyNames];
    UIFont* font = [UIFont fontWithName:[array objectAtIndex:35] size:42];
    NSDictionary* dict = [[NSDictionary alloc] initWithObjectsAndKeys:font, NSFontAttributeName,
                          [UIColor blueColor], NSForegroundColorAttributeName,
                          nil];
    NSString* title = [[NSString alloc] initWithString:@"正余弦曲线"];
    [title drawAtPoint:CGPointMake(95, 35) withAttributes:dict];
    [dict release];
    dict = nil;


    CGFloat x = self.myFrame.origin.x;
    CGFloat y = self.myFrame.origin.y;
    CGFloat w = self.myFrame.size.width;
    CGFloat h = self.myFrame.size.height;

    CGContextRef ctx = UIGraphicsGetCurrentContext();

    /** ==画矩形框== */
    /** 设置路径 */
    CGContextMoveToPoint(ctx, x, y);
    CGContextAddLineToPoint(ctx, x + w, y);
    CGContextAddLineToPoint(ctx, x + w, y + h);
    CGContextAddLineToPoint(ctx, x, y + h);
    CGContextAddLineToPoint(ctx, x, y);

    /** 设置画图颜色 */
    [[UIColor blackColor] setStroke];

    /** 设置画笔大小 */
    CGContextSetLineWidth(ctx, 2.0);

    /** 根据设置的路径画路径 */
    CGContextStrokePath(ctx);


    /** ==画矩形块== */
    /* 设置路径  */
    CGContextMoveToPoint(ctx, x + w - 50, y + 5);
    CGContextAddLineToPoint(ctx, x + w - 10, y + 5);
    CGContextAddLineToPoint(ctx, x + w - 10, y + 45);
    CGContextAddLineToPoint(ctx, x + w - 50, y + 45);
    /* 可选择自己绘制闭合路径, 也可使用CGContextClosePath自动绘制 */
#if 0
    /* 绘制闭合路径 */
    CGContextAddLineToPoint(ctx, x + 5, y + 5);
#else
    /** 自动绘制闭合路径 */
    CGContextClosePath(ctx);
#endif

    /* 设置绘图画笔颜色 */
    [[UIColor yellowColor] setStroke];
    /* 设置绘图填充颜色 */
    [[UIColor redColor] setFill];
    /** 设置画笔大小 */
    CGContextSetLineWidth(ctx, 1.0);

    /* 绘制方式绘画
     * kCGPathFillStroke -> 填充+描边
     * kCGPathFill       -> 填充
     * kCGPathStroke     -> 描边
     */
    CGContextDrawPath(ctx, kCGPathFillStroke);


    /** ==画下边框的圆还== */

    CGFloat r1 = 12;
    CGFloat r2 = 6;
    CGFloat x1 = x + r1 + 2;
    CGFloat y1 = y + h - r1 -2;

    for (CGFloat xMax=x1+r1; xMax < x + w; xMax=x1+r1)
    {
        /** 通过先绘制大圆,然后再绘制和背景色相同的小圆实现圆环绘制 */
        /** 移动到圆周上一点,不然会把当前圆和之前的最后点连接起来 */
        CGContextMoveToPoint(ctx, x1+r1, y1);

        /* 绘制大圆路径 */
        CGContextAddArc(ctx, x1, y1, r1, 0, M_PI*2, 0);

        /* 设置颜色 */
        CGContextSetFillColor(ctx, CGColorGetComponents([[UIColor blueColor] CGColor]));
        CGContextSetStrokeColor(ctx, CGColorGetComponents([[UIColor greenColor] CGColor]));

        /** 绘制图形 */
        CGContextDrawPath(ctx, kCGPathFillStroke);

        /** 移动到圆周上一点 */
        CGContextMoveToPoint(ctx, x1+r2, y1);

        /** 绘制小圆路径 */
        CGContextAddArc(ctx, x1, y1, r2, 0, M_PI*2, 0);

        /** 设置小圆填充颜色[颜色值用系统自带的数码测色器获取背景色] */
        [[UIColor colorWithRed:170.0/255 green:166.0/255 blue:102.0/255 alpha:1.0] setFill];

        /** 绘制图形 */
        CGContextFillPath(ctx);

        x1 += (2*r1+2);
    }


    [self drawCoordinate];
    [self drawSin];

}
/** 绘制坐标轴 */
- (void) drawCoordinate
{
    CGFloat x = self.myFrame.origin.x;
    CGFloat y = self.myFrame.origin.y;
    CGFloat w = self.myFrame.size.width;
    CGFloat h = self.myFrame.size.height;

    /* 坐标系原点 */
    CGFloat x1 = x + 5 + 20;
    CGFloat y1 = y + h - 40;

    CGContextRef ctx = UIGraphicsGetCurrentContext();

    /** 设置绘图颜色 */
    CGContextSetStrokeColorWithColor(ctx, [[UIColor blackColor] CGColor]);
    CGContextSetLineWidth(ctx, 3.0);

    /** 设置标准字体 */
    /** 写字(设置字体大小及颜色) */
    NSArray* array = [UIFont familyNames];
    UIFont* font = [UIFont fontWithName:[array objectAtIndex:1] size:12];
    NSDictionary* dict = [[NSDictionary alloc] initWithObjectsAndKeys:font, NSFontAttributeName,
                          [UIColor redColor], NSForegroundColorAttributeName,
                          nil];

    /** 先绘制坐标 */
    CGContextMoveToPoint(ctx, x1, y1);

    /** 横坐标系 */
    CGContextAddLineToPoint(ctx, x + w, y1);
    CGContextStrokePath(ctx);

    /* 绘制尺寸标注 */
    CGFloat h1 = 0;
    NSInteger wid = 20;
    for (NSInteger x2= x1+wid; x2 < x1 + w; x2+=wid)
    {
        NSInteger num = (x2 - x1)/wid;
        if( num%2 )
        {
            h1 = 4;
            CGContextSetLineWidth(ctx, 1.0);
        }
        else
        {
            h1 = 6;
            CGContextSetLineWidth(ctx, 2.0);

            NSString* strNum = [[NSString alloc] initWithFormat:@"%ld", num/2];
            [strNum drawAtPoint:CGPointMake(x2, y1) withAttributes:dict];
            [strNum release];
        }


        CGContextMoveToPoint(ctx, x2, y1-2);
        CGContextAddLineToPoint(ctx, x2, y1-h1);
        CGContextStrokePath(ctx);
    }

    /** 纵坐标系 */
    CGContextSetStrokeColorWithColor(ctx, [[UIColor blackColor] CGColor]);
    CGContextSetLineWidth(ctx, 3.0);
    CGContextMoveToPoint(ctx, x1, y1+1.5);
    CGContextAddLineToPoint(ctx, x1, y);
    CGContextStrokePath(ctx);

    /* 绘制尺寸标注 */
    for (NSInteger y2=y1-wid; y2 > y; y2-=wid)
    {
        NSInteger num = (y1 - y2)/wid;
        if( num%2 )
        {
            h1 = 4;
            CGContextSetLineWidth(ctx, 1.0);
        }
        else
        {
            h1 = 6;
            CGContextSetLineWidth(ctx, 2.0);

            if (num>1)
            {
                NSString* strNum = [[NSString alloc] initWithFormat:@"%ld", num/2];
                [strNum drawAtPoint:CGPointMake(x1-20, y2-6) withAttributes:dict];
                [strNum release];
            }
        }


        CGContextMoveToPoint(ctx, x1+2, y2);
        CGContextAddLineToPoint(ctx, x1+h1, y2);
        CGContextStrokePath(ctx);
    }


    [dict release];
    dict = nil;
}

- (void) drawSin
{
    /** 使用二阶贝塞尔曲线模拟正余弦 */
    CGFloat x = self.myFrame.origin.x;
    CGFloat y = self.myFrame.origin.y;
    CGFloat w = self.myFrame.size.width;
    CGFloat h = self.myFrame.size.height;

    /* 坐标系原点 */
    CGFloat x1 = x + 5 + 20;
    CGFloat y1 = y + h - 40;
    CGFloat w1 = 20;
    CGFloat h1 = 200;

    CGContextRef ctx = UIGraphicsGetCurrentContext();

    /** 正弦 */
    CGContextSetStrokeColorWithColor(ctx, [[UIColor redColor] CGColor]);
    CGFloat yShift = -300;
    for (CGFloat x2=x1-2*w1; x2<x+w; x2+=2*w1)
    {
        h1 *= -1;
        CGContextMoveToPoint(ctx, x2, y1+yShift);
        CGContextAddQuadCurveToPoint(ctx, x2+w1, y1-h1+yShift, x2+2*w1, y1+yShift);
        CGContextStrokePath(ctx);
    }

    /** 余弦 */
    CGContextSetStrokeColorWithColor(ctx, [[UIColor yellowColor] CGColor]);
    for (CGFloat x2=x1-w1; x2<x+w; x2+=2*w1)
    {
        CGContextMoveToPoint(ctx, x2, y1+yShift);
        CGContextAddQuadCurveToPoint(ctx, x2+w1, y1-h1+yShift, x2+2*w1, y1+yShift);
        CGContextStrokePath(ctx);

        h1 *= -1;
    }

    /** 给曲线加个基线 */
    /** 分别指定虚线的小实线和空白的长度 */
    CGFloat fpDash[] = {5,5};
    CGContextSetStrokeColorWithColor(ctx, [[UIColor blackColor] CGColor]);
    CGContextSetLineWidth(ctx, 1.0);
    /** 设置画线格式为虚线:参数含义
     * context – 这个不用多说
     * phase参数表示在第一个虚线绘制的时候跳过多少个点
     * lengths – 指明虚线是如何交替绘制,上面的数组fpDash
     * count – lengths数组的长度
     */
    CGContextSetLineDash(ctx, 0, fpDash, 2);
    CGContextMoveToPoint(ctx, 0, y1+yShift);
    CGContextAddLineToPoint(ctx, x+w, y1+yShift);
    CGContextStrokePath(ctx);

    /** 文字标注 */

    /** 写字(设置字体大小及颜色) */
    NSArray* array = [UIFont familyNames];
    UIFont* font = [UIFont fontWithName:[array objectAtIndex:20] size:16];
    NSDictionary* dict = [[NSDictionary alloc] initWithObjectsAndKeys:font, NSFontAttributeName,
                          [UIColor redColor], NSForegroundColorAttributeName,
                          nil];
    NSString* title = [[NSString alloc] initWithString:@"----正弦曲线"];
    [title drawAtPoint:CGPointMake(x + w - 100, y + h/8) withAttributes:dict];
    [dict release];
    dict = nil;

    dict = [[NSDictionary alloc] initWithObjectsAndKeys:font, NSFontAttributeName,
            [UIColor yellowColor], NSForegroundColorAttributeName,
            nil];
    title = [[NSString alloc] initWithString:@"----余弦曲线"];
    [title drawAtPoint:CGPointMake(x + w - 100, y + h/8 + 30) withAttributes:dict];
    [dict release];
    dict = nil;

}
@end


 4005
4005


 被折叠的 条评论
为什么被折叠?
被折叠的 条评论
为什么被折叠?
 到【灌水乐园】发言


