


最近刚接触caffe弄了一个caffe多标签遇到各种蛋疼的问题跟大家分享分享。
一 准备数据这里用的验证码0-9+26个字母字母生成4位数的验证码
二 修改caffe源码涉及到修改的文件有
caffe.proto ,
convert_imageset.cpp,
data_layer.cpp,
io.cpp,
data_layer.hpp,
io.hpp
具体修改就不介绍了去下面地址下载修改后的文件然后替换掉原有caffe中的
文件下载地址:https://pan.baidu.com/s/1eSP1RUi
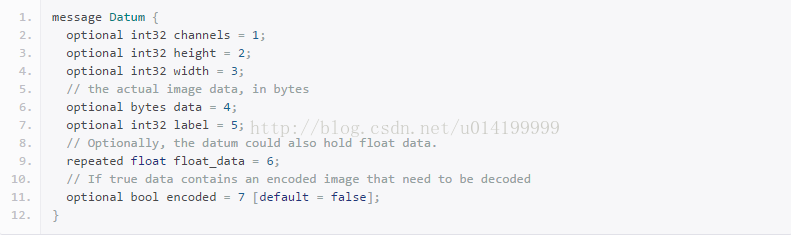
这里我们理解一下,caffe原本不支持多标签分类任务,这里的主要修改是为了是的caffe支持多标签分类,我们知道caffe的label原版指定的是整数型且只有1个,看caffe.proto里面写的:Datum就是我们的数据层,那么数据层的label是int32,这就限制了数据label的输入必须是一个整数,那么修改他的起点就是从proto里面开始,加一个labels,数组类型
修改完了然后接着修改caffe使用Datum部分代码,实现对labels的支持
最后修改convert_imageset.cpp,让他实现对例如如下:
imgs/abc.jpg 1 2 3 4 5
这种类型的多标签做支持
最终完成这次修改,再编译一遍就好了
三 制作数据标签
图片路径 + 对应的标签 samples/MYL1.bmp 22 34 21 1
四 写个多分类网络
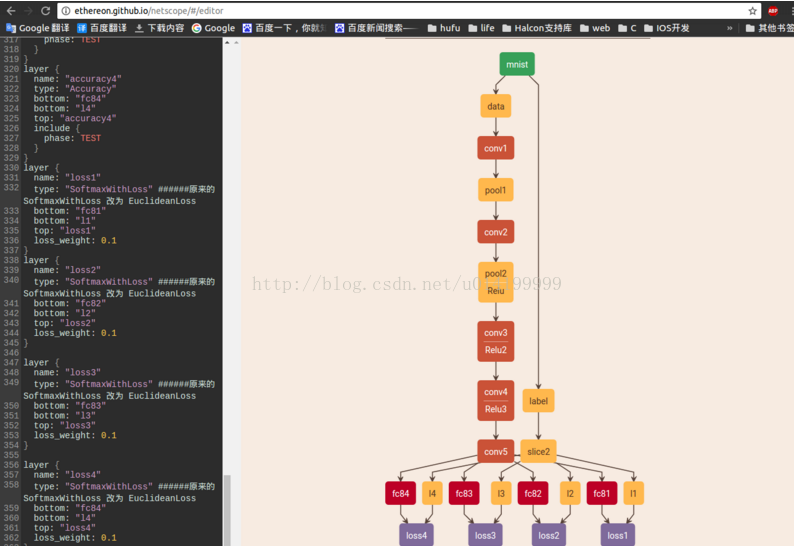
结构如下:
-
name:"LeNet" -
layer{ -
name:"mnist" -
type:"Data" -
top:"data" -
top:"label" -
include{ -
phase: TRAIN -
} -
transform_param{ -
scale:0.003921568627451 -
} -
data_param{ -
source:"train_lmdb" -
batch_size:64 -
backend: LMDB -
} -
} -
layer{ -
name:"mnist" -
type:"Data" -
top:"data" -
top:"label" -
include{ -
phase: TEST -
} -
transform_param{ -
scale:0.003921568627451 -
} -
data_param{ -
source:"val_lmdb" -
batch_size:64 -
backend: LMDB -
} -
} -
layer{ -
name:"conv1" -
type:"Convolution" -
bottom:"data" -
top:"conv1" -
param{ -
lr_mult:1 -
} -
param{ -
lr_mult:2 -
} -
convolution_param{ -
num_output:128 -
kernel_size:7 -
stride:1 -
weight_filler{ -
type:"xavier" -
} -
bias_filler{ -
type:"constant" -
} -
} -
} -
layer{ -
name:"pool1" -
type:"Pooling" -
bottom:"conv1" -
top:"pool1" -
pooling_param{ -
pool: MAX -
kernel_size:2 -
stride:2 -
} -
} -
layer{ -
name:"conv2" -
type:"Convolution" -
bottom:"pool1" -
top:"conv2" -
param{ -
lr_mult:1 -
} -
param{ -
lr_mult:2 -
} -
convolution_param{ -
num_output:128 -
kernel_size:5 -
stride:1 -
weight_filler{ -
type:"xavier" -
} -
bias_filler{ -
type:"constant" -
} -
} -
} -
layer{ -
name:"pool2" -
type:"Pooling" -
bottom:"conv2" -
top:"pool2" -
pooling_param{ -
pool: MAX -
kernel_size:2 -
stride:1 -
} -
} -
layer{ -
name:"Relu" -
type:"ReLU" -
bottom:"pool2" -
top:"pool2" -
} -
layer{ -
name:"conv3" -
type:"Convolution" -
bottom:"pool2" -
top:"conv3" -
param{ -
lr_mult:1 -
} -
param{ -
lr_mult:2 -
} -
convolution_param{ -
num_output:128 -
kernel_size:3 -
stride:1 -
weight_filler{ -
type:"xavier" -
} -
bias_filler{ -
type:"constant" -
} -
} -
} -
layer{ -
name:"Relu2" -
type:"ReLU" -
bottom:"conv3" -
top:"conv3" -
} -
layer{ -
name:"conv4" -
type:"Convolution" -
bottom:"conv3" -
top:"conv4" -
param{ -
lr_mult:1 -
} -
param{ -
lr_mult:2 -
} -
convolution_param{ -
num_output:128 -
kernel_size:3 -
stride:1 -
weight_filler{ -
type:"xavier" -
} -
bias_filler{ -
type:"constant" -
} -
} -
} -
layer{ -
name:"Relu3" -
type:"ReLU" -
bottom:"conv4" -
top:"conv4" -
} -
layer{ -
name:"conv5" -
type:"Convolution" -
bottom:"conv4" -
top:"conv5" -
param{ -
lr_mult:1 -
} -
param{ -
lr_mult:2 -
} -
convolution_param{ -
num_output:128 -
kernel_size:3 -
stride:1 -
weight_filler{ -
type:"xavier" -
} -
bias_filler{ -
type:"constant" -
} -
} -
} -
layer{ -
name:"fc81" -
type:"InnerProduct" -
bottom:"conv5" -
top:"fc81" -
param{ -
lr_mult:1 -
} -
param{ -
lr_mult:2 -
} -
inner_product_param{ -
num_output:36 -
weight_filler{ -
type:"xavier" -
} -
bias_filler{ -
type:"constant" -
} -
} -
} -
layer{ -
name:"fc82" -
type:"InnerProduct" -
bottom:"conv5" -
top:"fc82" -
param{ -
lr_mult:1 -
} -
param{ -
lr_mult:2 -
} -
inner_product_param{ -
num_output:36 -
weight_filler{ -
type:"xavier" -
} -
bias_filler{ -
type:"constant" -
} -
} -
} -
layer{ -
name:"fc83" -
type:"InnerProduct" -
bottom:"conv5" -
top:"fc83" -
param{ -
lr_mult:1 -
} -
param{ -
lr_mult:2 -
} -
inner_product_param{ -
num_output:36 -
weight_filler{ -
type:"xavier" -
} -
bias_filler{ -
type:"constant" -
} -
} -
} -
layer{ -
name:"fc84" -
type:"InnerProduct" -
bottom:"conv5" -
top:"fc84" -
param{ -
lr_mult:1 -
} -
param{ -
lr_mult:2 -
} -
inner_product_param{ -
num_output:36 -
weight_filler{ -
type:"xavier" -
} -
bias_filler{ -
type:"constant" -
} -
} -
} -
layer{ -
name:"slice2" -
type:"Slice" -
bottom:"label" -
top:"l1" -
top:"l2" -
top:"l3" -
top:"l4" -
slice_param{ -
axis:1 -
slice_point:1 -
slice_point:2 -
slice_point:3 -
} -
} -
layer{ -
name:"accuracy1" -
type:"Accuracy" -
bottom:"fc81" -
bottom:"l1" -
top:"accuracy1" -
include{ -
phase: TEST -
} -
} -
layer{ -
name:"accuracy2" -
type:"Accuracy" -
bottom:"fc82" -
bottom:"l2" -
top:"accuracy2" -
include{ -
phase: TEST -
} -
} -
layer{ -
name:"accuracy3" -
type:"Accuracy" -
bottom:"fc83" -
bottom:"l3" -
top:"accuracy3" -
include{ -
phase: TEST -
} -
} -
layer{ -
name:"accuracy4" -
type:"Accuracy" -
bottom:"fc84" -
bottom:"l4" -
top:"accuracy4" -
include{ -
phase: TEST -
} -
} -
layer{ -
name:"loss1" -
type:"SoftmaxWithLoss" -
bottom:"fc81" -
bottom:"l1" -
top:"loss1" -
loss_weight:0.1 -
} -
layer{ -
name:"loss2" -
type:"SoftmaxWithLoss" -
bottom:"fc82" -
bottom:"l2" -
top:"loss2" -
loss_weight:0.1 -
} -
-
layer{ -
name:"loss3" -
type:"SoftmaxWithLoss" -
bottom:"fc83" -
bottom:"l3" -
top:"loss3" -
loss_weight:0.1 -
} -
-
layer{ -
name:"loss4" -
type:"SoftmaxWithLoss" -
bottom:"fc84" -
bottom:"l4" -
top:"loss4" -
loss_weight:0.1 -
}
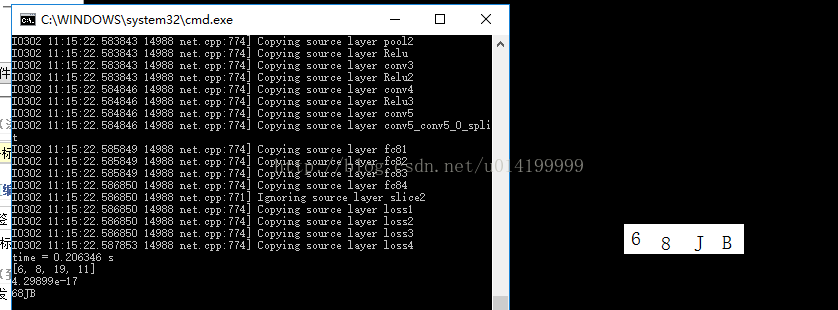
然后就可以开始训练了
结果如下:


 599
599


 被折叠的 条评论
为什么被折叠?
被折叠的 条评论
为什么被折叠?
 到【灌水乐园】发言


