


1.文章来由:一直都是在别人搭建好的框架下进行开发,所以对框架的集成,具体文件怎么配置,怎样搭建很疑惑,于某天决定自己来搭建一次。(我搭建的只是个测试环境,细节的配置问题未涉及。看个人项目需求)
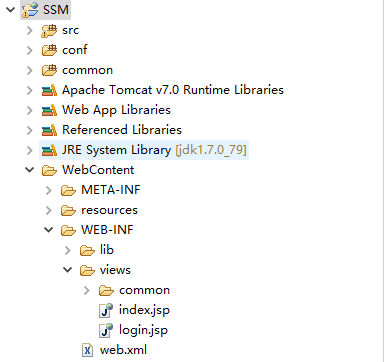
2.下看看我的项目结构目录,方便描述
3.我使用的是myeclipse,先创建一个web项目。
4.在生成的web.xml文件中进行第一步配置
**web.xml**
<?xml version="1.0" encoding="UTF-8"?>
<web-app version="2.5" xmlns="http://java.sun.com/xml/ns/javaee"
    xmlns:xsi="http://www.w3.org/2001/XMLSchema-instance"
    xsi:schemaLocation="http://java.sun.com/xml/ns/javaee
    http://java.sun.com/xml/ns/javaee/web-app_2_5.xsd">

    <!-- Spring 容器加载 -->
    <listener>
        <listener-class>
        org.springframework.web.context.ContextLoaderListener
        </listener-class>
    </listener>
    <context-param>
        <param-name>contextConfigLocation</param-name>
        <!--加载spring配置文件-->
        <param-value>
            classpath:SpringConf.xml
        </param-value>
    </context-param>

    <!-- SpringMVC的前端控制器 -->
    <servlet>
     <servlet-name>MyDispatcher</servlet-name>
     <servlet-class>
        org.springframework.web.servlet.DispatcherServlet
     </servlet-class>

        <!-- 加载springmvc配置文件路径 -->
        <init-param>
          <param-name>contextConfigLocation</param-name>
           <param-value>
              classpath:SpringMVC-servlet.xml
           </param-value>
        </init-param>

        <!-- 何时启动 大于0的值表示容器启动时初始化此servlet,正值越小优先级越高 -->
        <load-on-startup>1</load-on-startup>
    </servlet>
    <!-- Spring MVC配置文件结束 -->

    <!-- SpringMVC拦截设置,保证静态文件加载,看个人需求 -->
    <servlet-mapping>
        <servlet-name>default</servlet-name>
        <url-pattern>*.css</url-pattern>
    </servlet-mapping>

    <servlet-mapping>
        <servlet-name>default</servlet-name>
        <url-pattern>*.js</url-pattern>
    </servlet-mapping>

    <servlet-mapping>
        <servlet-name>default</servlet-name>
        <url-pattern>*.gif</url-pattern>
    </servlet-mapping>


    <servlet-mapping>
        <servlet-name>default</servlet-name>
        <url-pattern>*.png</url-pattern>
    </servlet-mapping>

    <servlet-mapping>
        <servlet-name>default</servlet-name>
        <url-pattern>*.jpg</url-pattern>
    </servlet-mapping>

    <servlet-mapping>
        <servlet-name>MyDispatcher</servlet-name>
        <!-- 由SpringMVC拦截所有请求 -->
        <url-pattern>/</url-pattern>
    </servlet-mapping>
    <!-- SpringMVC拦截设置结束 -->

    <!--解决中文乱码问题 -->
    <filter>
        <filter-name>CharacterEncodingFilter</filter-name>
        <filter-class>
    org.springframework.web.filter.CharacterEncodingFilter
        </filter-class>
        <init-param>
            <param-name>encoding</param-name>
            <param-value>UTF-8</param-value>
        </init-param>
    </filter>
    <filter-mapping>
        <filter-name>CharacterEncodingFilter</filter-name>
        <url-pattern>/*</url-pattern>
    </filter-mapping>

</web-app>
5.接着来配置springmvc的配置文件,
**SpringMVC-servlet.xml**
<beans xmlns="http://www.springframework.org/schema/beans"
    xmlns:context="http://www.springframework.org/schema/context"
    xmlns:util="http://www.springframework.org/schema/util" xmlns:xsi="http://www.w3.org/2001/XMLSchema-instance"
    xmlns:p="http://www.springframework.org/schema/p" xmlns:mvc="http://www.springframework.org/schema/mvc"
    xsi:schemaLocation="
        http://www.springframework.org/schema/util
        http://www.springframework.org/schema/util/spring-util-3.2.xsd
        http://www.springframework.org/schema/mvc
        http://www.springframework.org/schema/mvc/spring-mvc-3.2.xsd
        http://www.springframework.org/schema/beans
        http://www.springframework.org/schema/beans/spring-beans-3.2.xsd
        http://www.springframework.org/schema/context
        http://www.springframework.org/schema/context/spring-context-3.2.xsd">


<mvc:annotation-driven/>

    <!-- 扫描Controller注解的Bean -->
    <context:component-scan base-package="cn.ffyz" use-default-filters="false">
        <context:include-filter type="annotation" expression="org.springframework.stereotype.Controller"/>
    </context:component-scan>

    <!-- 对模型视图名称的解析,即在模型视图名称添加前后缀 -->
<bean class="org.springframework.web.servlet.view.
InternalResourceViewResolver"
        p:prefix="/WEB-INF/views/" p:suffix=".jsp" />

<!-- 避免IE执行AJAX时,返回JSON出现下载文件 -->
    <bean id="mappingJacksonHttpMessageConverter" class="org.springframework.http.converter.json.MappingJacksonHttpMessageConverter">
        <property name="supportedMediaTypes">
            <list>
                <value>text/html;charset=UTF-8</value>
            </list>
        </property>
    </bean>

    <!-- 启动Spring MVC的注解功能,完成请求和注解POJO的映射 -->
 <bean class="org.springframework.web.servlet.mvc.
 annotation.AnnotationMethodHandlerAdapter">
        <property name="messageConverters">
            <list>
              <ref bean="mappingJacksonHttpMessageConverter" />
                <!-- json转换器 -->
            </list>
        </property>
    </bean>
</beans>
6.然后是spirng的配置
**SpringConf.xml**
<?xml version="1.0" encoding="UTF-8"?>
<beans xmlns="http://www.springframework.org/schema/beans"
    xmlns:xsi="http://www.w3.org/2001/XMLSchema-instance" xmlns:context="http://www.springframework.org/schema/context"
    xmlns:aop="http://www.springframework.org/schema/aop"
    xsi:schemaLocation="
           http://www.springframework.org/schema/beans
           http://www.springframework.org/schema/beans/spring-beans-3.2.xsd
           http://www.springframework.org/schema/aop
           http://www.springframework.org/schema/aop/spring-aop-3.2.xsd
           http://www.springframework.org/schema/context
           http://www.springframework.org/schema/context/spring-context-3.2.xsd">
   <!--下面这句是为了引入deploy.properties来手动方便管理数据库连接,这里因为我在配置文件写死了,所以虽然创建了文件,但是没有用到-->
   <!--  <context:property-placeholder location="classPath:deploy.properties" /> -->
    <!-- 配置数据源 -->

<bean id="dataSource"   class="org.springframework.jdbc.datasource.DriverManagerDataSource">
<!--p配置驱动,地址,用户名,密码-->
<property name="driverClassName"
        value="com.mysql.jdbc.Driver" />

<property name="url"      value="jdbc:mysql://localhost:3306/ssh_new" />

<property name="username" value="yang" />
<property name="password" value="yang" />
</bean>
    <!-- 注入jdbcTemplate -->
 <bean id="jdbcTemplate"  class="org.springframework.jdbc.core.JdbcTemplate" >
     <property name="dataSource" ref="dataSource" />
  </bean>

<!--下面注释掉的文件就是上面说的引入配置文件管理数据库的配置-->
<!--    <bean id="dataSource"
        class="org.springframework.jdbc.datasource.DriverManagerDataSource">
        <property name="driverClassName" value="${dataSource.driver}" />
        <property name="url" value="${dataSource.url}" />
        <property name="username" value="${dataSource.username}" />
        <property name="password" value="${dataSource.password}" />
    </bean> -->

<!--用spring管理Mybatis数据源,引入配置文件-->
    <bean id="sqlSessionFactory" class="org.mybatis.spring.SqlSessionFactoryBean">
        <property name="dataSource" ref="dataSource" />
        <property name="configLocation" value="classpath:MyBatisConf.xml" />
    </bean>

<!--创建dao bean(只需提供接口不需提供实现类 )-->
    <bean id="userMapper" class="org.mybatis.spring.mapper.MapperFactoryBean">
       <property name="mapperInterface"
           value="cn.ffyz.user.dao.UserMapper" />
  <property name="sqlSessionFactory" ref="sqlSessionFactory" />
 </bean>

<!--扫描service-->
<context:component-scan base-package="cn.ffyz.user.service" />

</beans>
7.然后是Mybatis的配置
**MyBatisConf.xml**
<?xml version="1.0" encoding="UTF-8"?>
<!DOCTYPE configuration PUBLIC "-//mybatis.org//DTD Config 3.0//EN"
"http://mybatis.org/dtd/mybatis-3-config.dtd">
<configuration>

   <!-- 配置映射类的别名 -->
    <typeAliases>
      <typeAlias alias="User" type="cn.ffyz.user.domain.User"/>
   </typeAliases>

   <!-- 配置Mapper文件的路径,接口Dao的实现 -->
   <mappers>
       <mapper resource="mapper/UserMapper.xml"/>
   </mappers>
</configuration>
8.最后就是接口的实现,UserMapper.xml(dao层接口的实现)
<?xml version="1.0" encoding="UTF-8"?>
<!DOCTYPE mapper PUBLIC "-//mybatis.org//DTD Mapper 3.0//EN"
"http://mybatis.org/dtd/mybatis-3-mapper.dtd">
<mapper namespace="cn.ffyz.user.dao.UserMapper">
<!-- 查询单条记录 -->
<select id="getValidate" resultType="Map">
select * from t_sm_user where account = #{0} and password = #{1}
</select>
<!-- 增加单条记录 -->
<insert id="addUser" useGeneratedKeys="true" keyProperty="id">
insert into t_sm_user (account,password) values(#{username},#{password})
</insert>
<!-- 使用对象进行插入 -->
<insert id="inTable" parameterType="cn.ffyz.user.domain.User">
insert into t_sm_user (account,password) values(#{account},#{password})
</insert>
<!--单条数据删除 -->
<delete id="deData" parameterType="String">
delete from t_sm_user where account = #{usName}
</delete>
<!-- 修改单条数据 -->
<update id="upData" parameterType="String">
update t_sm_user set account="zhe" where account=#{usName}
</update>
<!-- 查询多条数据 -->
<select id="selAll" resultType="User">
select * from t_sm_user
</select>
<resultMap type="cn.ffyz.user.domain.User" id="user" autoMapping="true">
<id property="id" column="id"/>
<result property="account" column="ACCOUNT"/>
<result property="password" column="PASSWORD"/>
</resultMap>
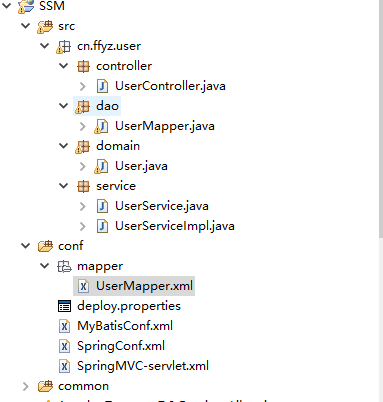
</mapper>7.1具体这个文件里面的怎么写,就是mybatis的用法了,这里不讲,下面贴上代码的所在层次图
8.你的接口里面定义的方法,在这个配置文件里面实现,这个文件就相当于与原来的DaoImpl(dao接口的实现)。
9.这就是完整的配置了,具体代码上面怎么写,还有前台代码,加上一些外部引入的文件,Jar啊什么的,太多了,就不贴了,有需要源码的可以留言QQ或者邮箱,我发给你们,互相学习。


 1万+
1万+


 被折叠的 条评论
为什么被折叠?
被折叠的 条评论
为什么被折叠?
 到【灌水乐园】发言


