


1.首先第一种由系统自带样式摆布,必须重写两个方法如下
#pragma mark - Table view data source
- (NSInteger)tableView:(UITableView *)tableView numberOfRowsInSection:(NSInteger)section {
    return 100;
}说明:上面这个方法是返回tableView的数据源数量
- (UITableViewCell *)tableView:(UITableView *)tableView cellForRowAtIndexPath:(NSIndexPath *)indexPath
{
    static NSString *ID = @"cell";

    UITableViewCell *cell = [tableView dequeueReusableCellWithIdentifier:ID];
    if (cell == nil) {
        cell = [[UITableViewCell alloc] initWithStyle:UITableViewCellStyleDefault reuseIdentifier:ID];
    }

    cell.textLabel.text = [NSString stringWithFormat:@"%@---%zd", [self class], indexPath.row];

    return cell;

}说明:上名的方法设置tableView的每一行数据,这里提供几Style样式,比如上面默认的之后一行text显示,还有显示两行数据,左边显示图片等等,我感觉实际项目中也用的不多,一般都是自定义。。。
2第二种通过xib+自定义Cell实现,这种应该是比较常用的
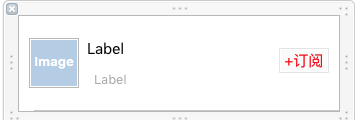
这个首先吗创建一个自定义Cell,勾选创建xib选项,在xib中添加所需控件如下图
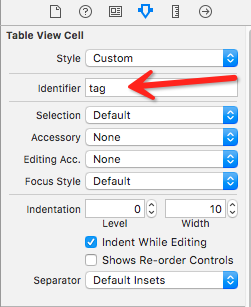
其次定义一个标识名字随意起但最好起的有意义一些如下图
最后就是在代码中注册了代码如下:
#pragma mark - 设置tableView一些属性
- (void)setupTableView
{
   static NSString * const GCSTagsId = @"tag";
    //注册
    [self.tableView registerNib:[UINib nibWithNibName:NSStringFromClass([GCSRecommendTagCell class]) bundle:nil] forCellReuseIdentifier:GCSTagsId];
    //行高
    self.tableView.rowHeight = 70;
    //线
    self.tableView.separatorStyle = UITableViewCellSeparatorStyleNone;
    self.tableView.backgroundColor = GCSRGBColor(223, 223, 223);

}
#pragma mark - tableView数据源
- (NSInteger)tableView:(UITableView *)tableView numberOfRowsInSection:(NSInteger)section {
return self.tags.count;
}
#pragma mark - 显示每一行的数据
- (UITableViewCell *)tableView:(UITableView *)tableView cellForRowAtIndexPath:(NSIndexPath *)indexPath {
// GCSRecommendTagCell *cell = [tableView dequeueReusableCellWithIdentifier:GCSTagsId forIndexPath:indexPath];
GCSRecommendTagCell *cell = [tableView dequeueReusableCellWithIdentifier:GCSTagsId];
cell.recommendTag = self.tags[indexPath.row];
return cell;
}说明:tags很明显是数据源,测试你可以是模拟数据,一般都是通过获取接口数据,然后通过将数据传给自定义Cell来对数据以及一些额外设置如下自定义cell
.h
#import <UIKit/UIKit.h>
@class GCSRecommendTag;
@interface GCSRecommendTagCell : UITableViewCell

/**模型数据*/

@property (nonatomic, strong) GCSRecommendTag *recommendTag;


@end说明:一般都会在自定义Cell头文件中给出一个模型数据方法,用于接收控制器传来数据就比如你去星巴克只有拿到咖啡你才能做下面的处理撒。。。
.m
#import "GCSRecommendTagCell.h"
#import <UIImageView+WebCache.h>
#import "GCSRecommendTag.h"

@interface GCSRecommendTagCell()
@property (weak, nonatomic) IBOutlet UIImageView *imageListImageView;
@property (weak, nonatomic) IBOutlet UILabel *themeNameLabel;
@property (weak, nonatomic) IBOutlet UILabel *subNumberLabel;

@end

@implementation GCSRecommendTagCell

#pragma mark -数据的传递
- (void)setRecommendTag:(GCSRecommendTag *)recommendTag
{
    _recommendTag = recommendTag;
    [self.imageListImageView sd_setImageWithURL:[NSURL URLWithString:recommendTag.image_list] placeholderImage:[UIImage imageNamed:@"defaultUserIcon"]];
    self.themeNameLabel.text = recommendTag.theme_name;
    NSString *subNumber = nil;
    if (recommendTag.sub_number < 10000) {
        subNumber = [NSString stringWithFormat:@"%zd人订阅", recommendTag.sub_number];
    } else {
        subNumber = [NSString stringWithFormat:@"%zd人订阅", recommendTag.sub_number / 10000];
    }
    self.subNumberLabel.text = subNumber;
}

#pragma mark - 重新设置frame
- (void)setFrame:(CGRect)frame
{
    //x轴坐标
    frame.origin.x = 5;
    frame.size.width -= 2 * frame.origin.x;
    frame.size.height -= 1;
    [super setFrame:frame];
}说明:这里就是对数据具体的处理了(咖啡拿到手,下面就是你想咋喝就咋喝了,坐着喝,站着喝,躺着喝,随你意),这里面重写了一个setFrame方法,用于配置每个cell的间距。。。。。


 4002
4002

 被折叠的 条评论
为什么被折叠?
被折叠的 条评论
为什么被折叠?
 到【灌水乐园】发言


