


Android笔记之消息处理机制
本文转载于 http://www.cnblogs.com/qingblog/archive/2012/06/27/2566021.html并加以整理
要素概念
- Message
消息,线程间通讯的数据单元。 - Message Queue
消息队列(FIFO),用来存放通过Handler发布的消息。封装于Looper里面。 - Handler
Handler是Message的主要处理者,负责将Message发送到Message Queue和对Message Queue的Message进行处理。 - Looper
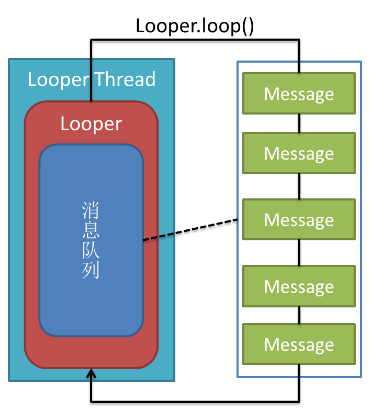
消息循环器,扮演Message Queue和Handler之间桥梁的角色,循环取出Message Queue里面的Message,并交付给相应的Handler进行处理。 - 线程
UI thread 通常就是main thread,而Android启动程序时会替它建立一个Message Queue。每一个线程里可含有一个Looper对象以及一个MessageQueue数据结构。在你的应用程序里,可以定义Handler的子类别来接收Looper所送出的消息。
运行机理
每个线程都可以并仅可以拥有一个Looper实例,消息队列MessageQueue在Looper的构造函数中被创建并且作为成员变量被保存,也就是说MessageQueue相对于线程也是唯一的。Android应用在启动的时候会默认会为主线程创建一个Looper实例,并借助相关的Handler和Looper里面的MessageQueue完成对Activities、Services、Broadcase Receivers等的管理。而在子线程中,Looper需要通过显式调用Looper. Prepare()方法进行创建。Prepare方法通过ThreadLocal来保证Looper在线程内的唯一性,如果Looper在线程内已经被创建并且尝试再度创建”Only one Looper may be created per thread”异常将被抛出。
Handler在创建的时候可以指定Looper,这样通过Handler的sendMessage()方法发送出去的消息就会添加到指定Looper里面的MessageQueue里面去。在不指定Looper的情况下,Handler绑定的是创建它的线程的Looper。如果这个线程的Looper不存在,程序将抛出”Can’t create handler inside thread that has not called Looper.prepare()”。因此我们可以指定子线程的Handler使用 UI 线程的Looper,这样我们就可以通过该Handler通知UI 线程更新。
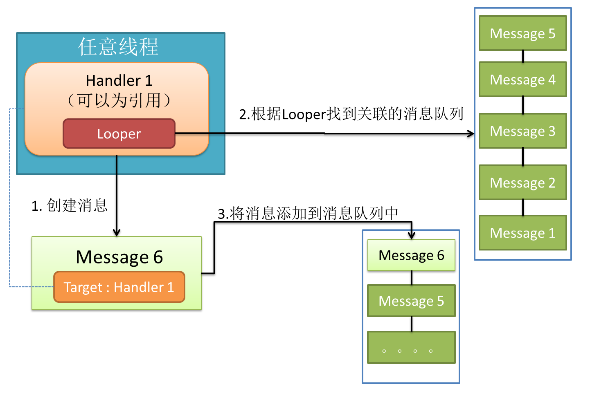
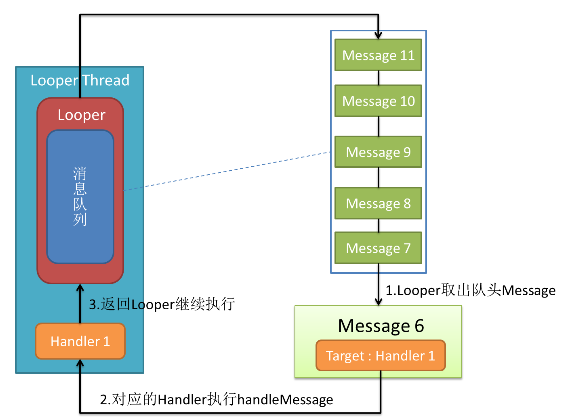
整个消息处理的大概流程是:1. 包装Message对象(指定Handler、回调函数和携带数据等);2. 通过Handler的sendMessage()等类似方法将Message发送出去;3. 在Handler的处理方法里面将Message添加到Handler绑定的Looper的MessageQueue;4. Looper的loop()方法通过循环不断从MessageQueue里面提取Message进行处理,并移除处理完毕的Message;5. 通过调用Message绑定的Handler对象的dispatchMessage()方法完成对消息的处理。
在dispatchMessage()方法里,如何处理Message则由用户指定,三个判断,优先级从高到低:1. Message里面的Callback,一个实现了Runnable接口的对象,其中run函数做处理工作;2. Handler里面mCallback指向的一个实现了Callback接口的对象,由其handleMessage进行处理;3. 处理消息Handler对象对应的类继承并实现了其中handleMessage函数,通过这个实现的handleMessage函数处理消息。
线程
在Android,线程分为有消息循环的线程和没有消息循环的线程,有消息循环的线程一般都会有一个Looper; Android 应用的主线程(UI线程)就是一个消息循环的线程。
对于没有消息循环的线程,当Run()方法运行完后,线程就会退出。
针对这种消息循环的机制,我们引入一个新的机制Handle,我们有消息循环,就要往消息循环里面发送相应的消息,自定义消息一般都会有自己对应的处理,消息的发送和清除,消息的的处理,把这些都封装在Handle里面,注意Handle只是针对那些有Looper的线程,不管是UI线程还是子线程,只要你有Looper,我就可以往你的消息队列里面添加东西,并做相应的处理。但是只要是关于UI相关的东西,就不能放在子线程中,因为子线程是不能操作UI的,只能进行数据、系统等其他非UI的操作。
线程的魔法师 Looper
关于标准的异步消息处理线程(拥有Looper,可异步处理信息), Android官方文档上的Damo:
class LooperThread extends Thread {
      public Handler mHandler;
      public void run() {
          // 将当前线程初始化为Looper线程
          Looper.prepare();
          /*mHandler = new Handler() {
              public void handleMessage(Message msg) {
                  // 进行Message处理
              }
          };*/
          // 开始循环处理消息队列
          Looper.loop();
      }
  }
加入Handler后线程效果如下:

下面进行分析上面调用方法的源码:
1)线程就会拥有一个 Looper对象,它的内部维护了一个消息队列MQ。 Looper.java部分源码:
public class Looper {
    // 每个线程中的Looper对象其实是一个ThreadLocal,即线程本地存储(TLS)对象
    private static final ThreadLocal sThreadLocal = new ThreadLocal();

    // Looper内的消息队列
    final MessageQueue mQueue;

    // 当前线程
    Thread mThread;

    // 。。。其他属性

    // 每个Looper对象中有它的消息队列,和它所属的线程
    private Looper() {
        mQueue = new MessageQueue();
        mRun = true;
        //标志Looper持有的当前线程
        mThread = Thread.currentThread();
    }

    // 我们调用该方法会在调用线程的TLS中创建Looper对象
    public static final void prepare() {
        if (sThreadLocal.get() != null) {
            // 试图在有Looper的线程中再次创建Looper将抛出异常
            throw new RuntimeException("Only one Looper may be created per thread");
        }
        sThreadLocal.set(new Looper());
    }
    // 其他方法
}其核心就是将looper对象定义为ThreadLocal。ThreadLocal为每个使用该变量的线程提供独立的变量副本,所以每一个线程都可以独立地改变自己的副本,而不会影响其它线程所对应的副本。详细可参考理解ThreadLocal.
2) 只是拥有Looper对象,还要调用 Loop(); 它不断从自己的MQ中取出队头的消息(也叫任务)执行。
public static final void loop() {
        Looper me = myLooper();  //得到当前线程Looper
        MessageQueue queue = me.mQueue;  //得到当前looper的MQ

        ...

        // 开始循环
        while (true) {
            Message msg = queue.next(); //May block// 取出message
            if (msg != null) {
                if (msg.target == null) {//Target变量为发该Message的Handler
                    // message没有target为结束信号,退出循环
                    return;
                }

                ...

                // 非常重要!将真正的处理工作交给message的target,即后面要讲的handler
                msg.target.dispatchMessage(msg);

               ...

                // 回收message资源
                msg.recycle();
            }
        }
    }
其它Looper经常使用的方法:
//得到当前线程looper对象
public static final Looper myLooper() {
    // 在任意线程调用Looper.myLooper()返回的都是那个线程的looper
    return (Looper)sThreadLocal.get();
}

//得到looper对象所属线程
public Thread getThread() {
   return mThread;
}

//结束looper循环
public void quit() {
   // 创建一个空的message,它的target为NULL,表示结束循环消息
   Message msg = Message.obtain();
   // 发出消息
   mQueue.enqueueMessage(msg, 0);
}
总结:
- 每个线程有且最多只能有一个Looper对象,它是一个ThreadLocal
- Looper内部有一个消息队列,loop()方法调用后线程开始不断从队列中取出消息执行
- Looper使一个线程变成Looper线程。
异步处理大师 Handler
handler扮演了往MQ上添加消息和处理消息的角色(只处理由自己发出的消息),即通知MQ它要执行一个任务(sendMessage),并在loop到自己的时候执行该任务(handleMessage),整个过程是异步的。handler创建时会关联一个looper,默认的构造方法将关联当前线程的looper,不过这也是可以set的。
创建Handler
默认的构造方法:
public Handler()
public Handler(Callback callback)
public Handler(Looper looper)
public Handler(Looper looper, Callback callback)
...
源代码如下:
public class handler {
    final MessageQueue mQueue;  // 关联的MQ

    final Looper mLooper;  // 关联的looper

    final Callback mCallback;

    // 其他属性

    public Handler() {

        ...

        // 默认将关联当前线程的looper
        mLooper = Looper.myLooper();
        // looper不能为空,即该默认的构造方法只能在looper线程中使用
        if (mLooper == null) {
            throw new RuntimeException(
                "Can't create handler inside thread that has not called Looper.prepare()");
        }
        // 重要!!!直接把关联looper的MQ作为自己的MQ,因此它的消息将发送到关联looper的MQ上
        mQueue = mLooper.mQueue;
        mCallback = null;
    }
    // 其他方法
}
一个线程可以有多个Handler,但是只能有一个Looper!
在创建 Handler对象,要确保已经为该线程创建Looper对象,不然会抛出异常。
    if (mLooper == null) {
        throw new RuntimeException(
            "Can't create handler inside thread that has not called Looper.prepare()");
    }
Handler发送消息
Handler和Looper都创建成功了,接下来就是发送信息。 可以使用:
 post(Runnable)
 postAtTime(Runnable, long)
 postDelayed(Runnable, long)
 sendEmptyMessage(int)
 sendMessage(Message)
 sendMessageAtTime(Message, long)
 sendMessageDelayed(Message, long)
从上面直观看到,Handler能发2种消息: Runnable对象 和 Message 对象。但通过源码学习,其实只有一种Message对象,对于 Runnable对象会被封装成Message对象。
    public final boolean post(Runnable r)
    {
       //通过sendMessageDelayed发送Runnable消息
       return  sendMessageDelayed(getPostMessage(r), 0);
    }
    //封装成Message
    private static Message getPostMessage(Runnable r) {
        Message m = Message.obtain();
        m.callback = r;
        return m;
    }
最后都会调用到sendMessageAtTime(), 下面看看其源码:
    public boolean sendMessageAtTime(Message msg, long uptimeMillis) {
        MessageQueue queue = mQueue;
        if (queue == null) {//MessageQueue为空,抛出异常
            RuntimeException e = new RuntimeException(
                    this + " sendMessageAtTime() called with no mQueue");
            Log.w("Looper", e.getMessage(), e);
            return false;
        }
        //Delay时 uptimeMillis = currentTime + delayTime;
        return enqueueMessage(queue, msg, uptimeMillis);
    }

    private boolean enqueueMessage(MessageQueue queue, Message msg, long uptimeMillis) {
        msg.target = this;
        if (mAsynchronous) {
            msg.setAsynchronous(true);
        }
        //最终把Message推送到MessageQueue
        return queue.enqueueMessage(msg, uptimeMillis);
    }
Handler处理消息
从上面的Looper分析中, 我们知道在调用Looper.prepare()和创建Handler对象后,就调用 Looper.Loop() 让Looper进行循环取Message进行处理。
public static final void loop() {
        Looper me = myLooper();  //得到当前线程Looper
        MessageQueue queue = me.mQueue;  //得到当前looper的MQ

        ...

        // 开始循环
        while (true) {
            Message msg = queue.next(); //May block// 取出message
            if (msg != null) {
                if (msg.target == null) {//Target变量为发该Message的Handler
                    // message没有target为结束信号,退出循环
                    return;
                }

                ...

                // 非常重要!将真正的处理工作交给message的target,即后面要讲的handler
                msg.target.dispatchMessage(msg);

               ...

                // 回收message资源
                msg.recycle();
            }
        }
    }
因此当MessageQueue有Message可取出时,会调用msg.target.dispatchMessage(msg) 进行处理消息,而target正是我们Handler, 看看Handler的dispatchMessage(msg):
    public void dispatchMessage(Message msg) {
        if (msg.callback != null) {
            handleCallback(msg);
        } else {
            if (mCallback != null) {
                if (mCallback.handleMessage(msg)) {
                    return;
                }
            }
            handleMessage(msg);
        }
    }
    //直接调用其run()
    private static void handleCallback(Message message) {
        message.callback.run();
    }
    //钩子方法
    public void handleMessage(Message msg) {}
从该方法来看,处理消息优先级是: message.callback.run() -> mCallback.handleMessage(msg) -> handleMessage(msg);
1) 首先来看看message.callback.run(): callback是Runnable对象,我们生成Message对象时,有一个生成方法会传入callback(Runnable), 另外需要注意的:
static Message obtain(Handler h, Runnable callback)2) 对于 mCallback, 则在Handler实例对象时,进行传入:
public Handler(Callback callback)
public Handler(Looper looper, Callback callback)

// Handler.java
public interface Callback {
    public boolean handleMessage(Message msg);
}
3) handleMessage(msg)在Handler中空方法,需要用户在创建Handler时进行重写 handlerMessage(Message msg)方法进行处理Message。
特点:
- Handler 可以在任意线程发送消息,这些消息会被添加到关联的MQ上
- Handler 是在它关联的looper线程中处理消息的。
通过这2个特点,就可以完美解决Android不能在其它非UI 线程更新UI的问题。Android的主线程有一个 Looper线程,在应用创建里, 就会自动创建一个Looper(稍后介绍), 也就是我们可以在其它非UI 线程 通过创建传入 UI 线程的Looper 的Handler: Handler(Context.getMainLooper()) 。 把子线程的更新UI操作 在Handler的 handlerMessage()中实现。 最后 handlerMessage() 的方法 会在UI 线程中进行调用, 从而实现 非UI线程 通过 Handler推送Message进行更新 UI.
UI线程是怎么创建 Looper?
Looper有专门为 UI 线程设计了对应的方法: prepareMainLooper() 和 getMainLooper()。 源代码如下:
  private static Looper sMainLooper;  // guarded by Looper.class
    /**
     * Initialize the current thread as a looper, marking it as an
     * application's main looper. The main looper for your application
     * is created by the Android environment, so you should never need
     * to call this function yourself.  See also: {@link #prepare()}
     */
   public static void prepareMainLooper() {
        prepare(false);//创建Looper对象,false表示该Looper不能被 调用quit()停止
        synchronized (Looper.class) {
            if (sMainLooper != null) {
                throw new IllegalStateException("The main Looper has already been prepared.");
            }
            //保存Looper对象
            sMainLooper = myLooper();
        }
    }

    /**
     * Returns the application's main looper, which lives in the main thread of the application.
     */
    public static Looper getMainLooper() {
        synchronized (Looper.class) {
            return sMainLooper;
        }
    }
在ActivityThread对象的 public static void main(String[] args)中进行调用 Looper.prepareMainLooper().
对于 Message对象的实例,虽然其有构造方法,但为了更好利用资源,请使用 obrain() 系列生成 Message对象, 那么Message是如何利用之前使用过的Message对象来防止内存消耗的?
基本原理
创建一个回收池(链表)来保存把使用过Mesage对象进行保存起来, 当需要创建Message时,就直接从其回收池中获取Message对象。
源代码实现
Message 持有的变量:
    // sometimes we store linked lists of these things
    // 使用该变量可实现一个持有头的链表
    /*package*/ Message next;
    //同步锁
    private static final Object sPoolSync = new Object();
    //回收池(其实为链表的表头)
    private static Message sPool;
    //当前的回收池里大小
    private static int sPoolSize = 0;
    //回收池的容量
    private static final int MAX_POOL_SIZE = 50;
当Message进行回收时,最后会调用 Message.recycleUnchecked()进行在回收池中插入当前Message对象,源代码如下:
    void recycleUnchecked() {

        ...

        synchronized (sPoolSync) {
            if (sPoolSize < MAX_POOL_SIZE) {
                next = sPool;//让当前下一个Message对象链接到回收池的表头
                sPool = this;//回收池的表头换成当前需要的Message
                sPoolSize++;
            }
        }
    }
那么Message的obtain()在生成 新的Message时更简单,如果回收池里已有废弃的Message, 直接将链表的表头清除里面相关信息后取出使用。 源代码如下:
   public static Message obtain() {
        synchronized (sPoolSync) {
            //这里有一个 Message池,
            if (sPool != null) {
                Message m = sPool;
                sPool = m.next;
                m.next = null;
                m.flags = 0; // clear in-use flag
                sPoolSize--;
                return m;//使用之前Message对象,
            }
        }
        return new Message();
    }
通过上面的学习,以后在内存优化项目上,可以通过创建回收池(链表)来管理对象,可一步的优化内存使用。


 3万+
3万+


 被折叠的 条评论
为什么被折叠?
被折叠的 条评论
为什么被折叠?
 到【灌水乐园】发言


