


1.Java重写(Override)与重载(Overload)
重写(Override):
重写是子类对父类的允许访问的方法的实现过程进行重新编写!返回值和形参都不能改变。即外壳不变,核心重写!
重写的好处在于子类可以根据需要,定义特定于自己的行为。
class Animal{

   public void move(){
      System.out.println("动物可以移动");
   }
}

class Dog extends Animal{

   public void move(){
      System.out.println("狗可以跑和走");
   }
}
方法的重写规则
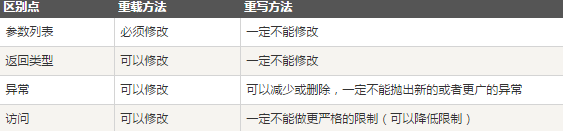
(1)参数列表必须完全与被重写方法的相同;
(2)返回类型必须完全与被重写方法的返回类型相同;
(3)访问权限不能比父类中被重写的方法的访问权限更高。例如:如果父类的一个方法被声明为public,那么在子类中重写该方法就不能声明为protected。
(4)父类的成员方法只能被它的子类重写。
(5)声明为final的方法不能被重写。声明为static的方法不能被重写,但是能够被再次声明。
(6)子类和父类在同一个包中,那么子类可以重写父类所有方法,除了声明为private和final的方法。
(7)子类和父类不在同一个包中,那么子类只能够重写父类的声明为public和protected的非final方法。
(8)重写的方法能够抛出任何非强制异常,无论被重写的方法是否抛出异常。但是,重写的方法不能抛出新的强制性异常,或者比被重写方法声明的更广泛的强制性异常,反之则可以。
(9)构造方法不能被重写。
(10)如果不能继承一个方法,则不能重写这个方法。
2.重载(Overload):
重载(overloading) 是在一个类里面,方法名字相同,而参数不同。返回类型呢?可以相同也可以不同。每个重载的方法(或者构造函数)都必须有一个独一无二的参数类型列表。
重载规则:
(1)被重载的方法必须改变参数列表;
(2)被重载的方法可以改变返回类型;
(3)被重载的方法可以改变访问修饰符;
(4)被重载的方法可以声明新的或更广的检查异常;
(5)方法能够在同一个类中或者在一个子类中被重载。
public class Overloading {

    public int test(){
        System.out.println("test1");
        return 1;
    }

    public void test(int a){
        System.out.println("test2");
    }

    //以下两个参数类型顺序不同
    public String test(int a,String s){
        System.out.println("test3");
        return "returntest3";
    }

    public String test(String s,int a){
        System.out.println("test4");
        return "returntest4";
    }

    public static void main(String[] args){
        Overloading o = new Overloading();
        System.out.println(o.test());
        o.test(1);
        System.out.println(o.test(1,"test3"));
        System.out.println(o.test("test4",1));
    }
}
重写与重载之间的区别:
3.类的创建、类与对象的关系
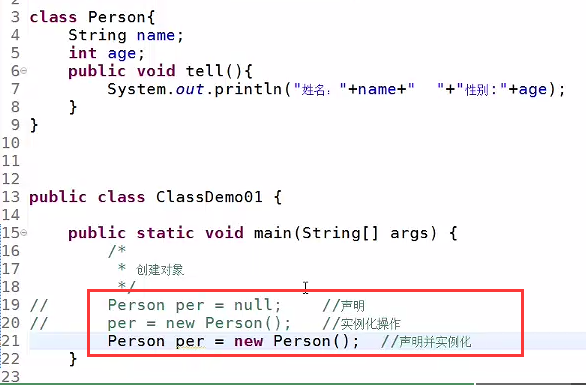
注:首先对类进行声明,通过Person类创建了一个对象per,然后实例化为其开辟空间。
关于对象创建过程中内存的划分:

4.一个.java文件中可以有很多类:
不过注意以下几点:
(1).public 权限的类只能有一个(也可以一个都没有,但最多只有1个。
(2).这个.java文件的文件名必须是public类的类名(一般的情况下,这里放置main方法是程序的入口。)
(3).若这个文件中没有public的类,则文件名随便是一个类的名字即可
(4).你用Javac 编译这个.java文件的时候,它会给每一个类生成一个.class文件
package com.jike.test;

class Person{

    private int age;
    private String name;

}

public class demo9 {

    public static void main(String[] args) {

    }

}
5.Java匿名对象的使用:
普通申明一个对象是这样的:
A a = new A();假设tell(){}是一个方法,他需要传递一个对象来作为参数,那么这个时候有2种方法:
方法1:
 A a =new A();
  a.tell();
方法2:
new A().tell;方法2中new A()就是一个匿名对象,他没有名字。
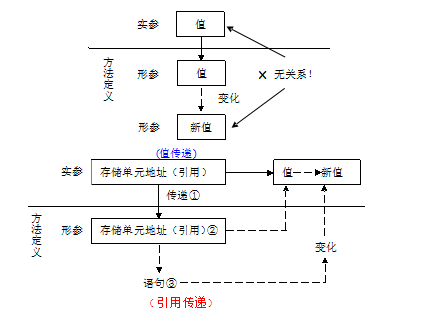
6.引用传递
值传递:(形式参数类型是基本数据类型):方法调用时,实际参数把它的值传递给对应的形式参数,形式参数只是用实际参数的值初始化自己的存储单元内容,是两个不同的存储单元,所以方法执行中形式参数值的改变不影响实际参数的值。
引用传递:(形式参数类型是引用数据类型参数):也称为传地址。方法调用时,实际参数是对象(或数组),这时实际参数与形式参数指向同一个地址,在方法执行中,对形式参数的操作实际上就是对实际参数的操作,这个结果在方法结束后被保留了下来,所以方法执行中形式参数的改变将会影响实际参数。
Java中有人分为值传递和址传递。引用传递也就是址传递。
比如下列的方法
public void add(int a) {
  int b = a;
}
这个可以看作是值传递,a是基本数据类型,他把他的值传给了b
public void add(Object obj) {
 Object objTest = obj;
}
这个可以看作是址传递,obj是引用数据类型,是把他栈中指向堆中的对象的地址值赋值给了objTest.这时候就同时有两个引用指向了堆中的某个Object对象。
其实这样看来,java应该只有值传递的。如果是基本数据类型,传递的就是实际的值.
如果是引用数据类型,传递的就是该引用的地址值.
或者参考下面资料:
http://guhanjie.iteye.com/blog/1683637
7.this、static、final和super关键字
this关键字:
(1)表示类中的属性和调用方法
class People{

    private String name;
    private int age;

    public People(String name,int age){

        this.name = name;
        this.age = age;

    }

}
(2)调用本类中的构造方法
class People{

    private String name;
    private int age;
    public People(String name,int age){
        this();//调用无参的构造方法,而且this()必须放在首行
        this.name = name;
        this.age = age;
    }
    public People(){
        System.out.println("无参数构造方法");
    }
}
(3)表示当前对象
static关键字
1.使用static声明属性
static声明全局属性
2.使用static声明方法
直接通过类名调用
3.注意点:
使用static方法的时候,只能访问static声明的属性和方法,而非static声明的属性和方法是不能进行访问的。
public class test{

    private **static** int i = 10;
    public static void main(String args[]){
        System.out.println(i);
        tell();//
    }
    public **static** void tell(){
        System.out.println("hello");
    }

}
super关键字:
当需要在子类中调用父类的被重写方法时,要使用super关键字。
class Animal{

   public void move(){
      System.out.println("动物可以移动");
   }
}

class Dog extends Animal{

   public void move(){
      super.move(); // 应用super类的方法
      System.out.println("狗可以跑和走");
   }
}
注:子类构造方法前一般是省略了super(),super会调用父类的构造方法。
final关键字:
final关键字在java中被称为完结器,表示最终的意思。
final能声明类、方法、属性:
(1)使用final声明的类不能被继承
(2)使用final声明的方法不能被重写
(3)使用final声明的变量变成常量,常量是不可以被修改的
注:使用final修饰的常量,常量名要大写。final String NAME = “yangyang”;
8.类的继承的实现:
package com.jike.test;

class Person{

    private int age;
    private String name;
    public int getAge() {
        return age;
    }
    public void setAge(int age) {
        this.age = age;
    }
    public String getName() {
        return name;
    }
    public void setName(String name) {
        this.name = name;
    }

    public void say(){
        System.out.println("姓名:"+getName()+"年龄:"+getAge());
    }

}

class Student extends Person{

    private int score;

    public int getScore() {
        return score;
    }

    public void setScore(int score) {
        this.score = score;
    }


    public void tell(){
        System.out.println("得分是:"+getScore());
    }

}

public class demo9 {

    public static void main(String[] args) {

        Student student = new Student();
        student.setAge(10);
        student.setName("Xyy");
        student.setScore(150);
        student.say();
        student.tell();

    }

}
注:子类继承父类,子类实例化的实例可以继承父类所有的方法和属性,但是无法使用 private(私有) 的方法和属性,这保障了父类的封装性,但是可以通过set和get方法获取。
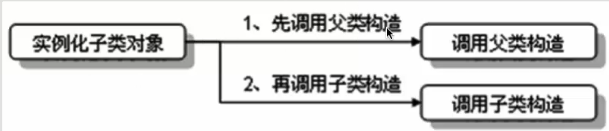
9.子类对象的实例化:
在子类对象实例化之前,必须先调用父类中的构造方法,之后调用子类对象方法。
package com.jike.test;

class Father{

    public Father() {
        System.out.println("父类构造方法");
    }

}

class Son extends Father{

    public Son() {
        System.out.println("子类构造方法");
    }
    public void tell() {
        System.out.println("tell方法");
    }
}

public class demo10 {

    public static void main(String[] args) {

        Son s = new Son();
        s.tell();

    }
}
注:因为会在子类构造方法里面省略了super();,所以会调用父类构造方法。
输出结果:
10.Java抽象类:
抽象类:包含一个抽象方法的类就是抽象类。
抽象方法:声明而未被实现的方法,抽象方法必须使用abstract关键字。
注:抽象类不能直接被实例化,只能通过子类实例化,而且子类必须重写抽象类中所有的抽象方法。不是抽象类的话,不是必须重写。
定义格式:
abstract class className{
    属性
    方法
    抽象方法
}
package com.jike.test;
abstract class Abs{
//抽象方法
**public abstract void say();**
}
class Abs1 extends Abs{
@Override
public void say() {
System.out.println("重写的say方法");
}
}
public class demo13 {
public static void main(String[] args) {
Abs1 abs1 = new Abs1();
abs1.say();
}
}抽象类的使用:
package com.jike.test;

abstract class Pers{
    private int age;
    private String name;
    public Pers(int age,String name) {

        this.age = age;
        this.name = name;
    }
    public int getAge() {
        return age;
    }
    public void setAge(int age) {
        this.age = age;
    }
    public String getName() {
        return name;
    }
    public void setName(String name) {
        this.name = name;
    }
    //抽象方法
    public abstract void want();

}

class Stud extends Pers{

    public Stud(int age, String name,int score) {
        super(age, name);
        this.score = score;
    }

    private int score;

    public int getScore() {
        return score;
    }

    public void setScore(int score) {
        this.score = score;
    }

    @Override
    public void want() {
        System.out.println("姓名:"+getName()+"年龄:"+getAge()+"分数:"+getScore());
    }

}

class Worker extends Pers{

    private int money;

    public int getMoney() {
        return money;
    }

    public void setMoney(int money) {
        this.money = money;
    }

    public Worker(int age, String name,int money) {
        super(age, name);
        this.money = money;
    }

    @Override
    public void want() {
        System.out.println("姓名:"+getName()+"年龄:"+getAge()+"工资:"+getMoney());
    }

}

public class demo17 {

    public static void main(String[] args) {
        Stud student = new Stud(18, "xyy", 150);
        student.want();
        Worker worker = new Worker(18, "xyy", 15000);
        worker.want();
    }

}
11.Java接口:
接口可以理解为一种特殊的类,里面全部是由全局常量和公共的抽象方法所组成。
接口的格式:
interface interfaceName{
    全局常量
    抽象方法
}接口的实现也必须通过子类,而且重写接口中所有的抽象方法。,使用关键字implements,而且接口是可以多实现的。
package com.jike.test;

interface Inter{
    public static final int AGE = 100; //全局变量
    public abstract void tell() ; //公共的抽象方法
}

class Per implements Inter{

    @Override
    public void tell() {
        System.out.println("重写接口中的抽象方法");
    }

}

public class demo14 {

    public static void main(String[] args) {
        Per p = new Per();
        p.tell();
    }

}
继承接口和类:
package com.jike.test;

interface Inter{
    public static final int AGE = 100; //全局变量
    public abstract void tell() ; //公共的抽象方法
}

abstract class Abs3{
    public abstract void say();
}

class Per extends Abs3 implements Inter{

    @Override
    public void tell() {
        System.out.println("重写接口中的抽象方法");
    }

    @Override
    public void say() {
        System.out.println("重写抽象类中的抽象方法");
    }

}

public class demo14 {

    public static void main(String[] args) {
        Per p = new Per();
        p.tell();
        p.say();
    }

}
注;抽象类和接口里面的方法都是抽象方法,只定义未实现。要通过子类继承实现,而且必须要重写所有的抽象方法。
一个接口不能继承一个抽象类,但是却可以通过extends关键字同时继承多个接口,实现接口的多继承。
interface Inter{
    public static final int AGE = 100; //全局变量
    public abstract void tell() ; //公共的抽象方法
}
interface Inter1{
    public static final int AGE1 = 100; //全局变量
    public abstract void tell() ; //公共的抽象方法
}
interface Inter2 extends Inter ,Inter1 {
    public static final int AGE2 = 100; //全局变量
    public abstract void tell() ; //公共的抽象方法
}
接口的应用:
package com.jike.test;

interface USB{
    //因为接口只能存在公共的抽象方法,所以public和abstract可以省略
    void start();
    void stop();
}

class Computer{
    public static void work(USB u) {//传递USB参数
        u.start();
        System.out.println("工作中");
        u.stop();
    }
}

class USBDisk implements USB{

    @Override
    public void start() {
        System.out.println("U盘开始工作");
    }

    @Override
    public void stop() {
        System.out.println("U盘停止工作");
    }

}

class Printer implements USB{

    @Override
    public void start() {
        System.out.println("打印机开始工作");
    }

    @Override
    public void stop() {
        System.out.println("打印机停止工作");
    }

}

public class demo18 {

    public static void main(String[] args) {
            Computer.work(new USBDisk());
            Computer.work(new Printer());
    }

}
12.对象的多态性:
1.多态性的体现:
方法的重载和重写
对象的多态性
2.对象的多态性:
向上转型:程序会自动完成
父类 父类对象 = 子类实例
向下转型:强制类型转换
子类 子类对象 = (子类)父亲实例
package com.jike.test;

class A{
    public void tell1() {
        System.out.println("A--tell1");
    }
    public void tell2() {
        System.out.println("A--tell2");
    }
}

class B extends A{
    public void tell1() {
        System.out.println("B--tell1");
    }
    public void tell3() {
        System.out.println("B--tell3");
    }
}

public class demo15 {

    public static void main(String[] args) {
        /*//向上转型
        B b = new B();
        A a = b;
        a.tell1();//这个tell1调用的是子类中的tell1方法
        a.tell2();//tell3不能被调用
         */

        //向下转型
        A a = new B();//注向上转型必须先向下转型
        B b = (B)a;//强制向下转型
        b.tell1();
        b.tell2();
        b.tell3();

    }

}
注:多态性的解释:
面向对象的三大特性:封装、继承、多态。从一定角度来看,封装和继承几乎都是为多态而准备的。这是我们最后一个概念,也是最重要的知识点。
多态的定义:指允许不同类的对象对同一消息做出响应。即同一消息可以根据发送对象的不同而采用多种不同的行为方式。(发送消息就是函数调用)
实现多态的技术称为:动态绑定(dynamic binding),是指在执行期间判断所引用对象的实际类型,根据其实际的类型调用其相应的方法。
多态的作用:消除类型之间的耦合关系。
现实中,关于多态的例子不胜枚举。比方说按下 F1 键这个动作,如果当前在 Flash 界面下弹出的就是 AS 3 的帮助文档;如果当前在 Word 下弹出的就是 Word 帮助;在 Windows 下弹出的就是 Windows 帮助和支持。同一个事件发生在不同的对象上会产生不同的结果。
多态性的应用:
package com.jike.test;

class A1{
    public void tell1() {
        System.out.println("A--tell1");
    }
}

class B1 extends A1{
    public void tell2() {
        System.out.println("B--tell2");
    }
}

class C1 extends A1{
    public void tell3() {
        System.out.println("C--tell3");
    }
}

public class demo16 {

    public static void main(String[] args) {
        say(new B1());
        say(new C1());
    }
    public static void say(A1 a) {
        a.tell1();
    }

}
多态性应用:
package com.jike.test;

abstract class Pers{
    private int age;
    private String name;
    public Pers(int age,String name) {

        this.age = age;
        this.name = name;
    }
    public int getAge() {
        return age;
    }
    public void setAge(int age) {
        this.age = age;
    }
    public String getName() {
        return name;
    }
    public void setName(String name) {
        this.name = name;
    }
    //抽象方法
    public abstract void want();

}

class Stud extends Pers{

    public Stud(int age, String name,int score) {
        super(age, name);
        this.score = score;
    }

    private int score;

    public int getScore() {
        return score;
    }

    public void setScore(int score) {
        this.score = score;
    }

    @Override
    public void want() {
        System.out.println("姓名:"+getName()+"年龄:"+getAge()+"分数:"+getScore());
    }

}

class Worker extends Pers{

    private int money;

    public int getMoney() {
        return money;
    }

    public void setMoney(int money) {
        this.money = money;
    }

    public Worker(int age, String name,int money) {
        super(age, name);
        this.money = money;
    }

    @Override
    public void want() {
        System.out.println("姓名:"+getName()+"年龄:"+getAge()+"工资:"+getMoney());
    }

}

public class demo17 {

    public static void main(String[] args) {
        Stud student = new Stud(18, "xyy", 150);
        student.want();
        Worker worker = new Worker(18, "xyy", 15000);
        worker.want();
    }

}
注:instance of关键字是用来判断a是不是A的一个实例。
13.Java泛型:
泛型是在类声明的时候通过一个标识表示类中某个属性的类型或者是某个方法的返回值及参数类型。
格式:
访问权限 class 类名称<泛型,泛型>{
                    属性
                    方法
    }
对象的创建:
类名称<具体类型> 对象名称 = new 类名称<具体类型>();package com.jike.test;
class Point<T>{
private T x;
private T y;
public T getX() {
return x;
}
public void setX(T x) {
this.x = x;
}
public T getY() {
return y;
}
public void setY(T y) {
this.y = y;
}
}
public class demo20 {
public static void main(String[] args) {
Point<String> p = new Point<String>();
p.setX("精度");
p.setY("纬度");
}
}构造方法使用泛型:
构造方法可以为类中的属性初始化,那么如果类中的属性通过泛型指定,而又需要通过构造方法设置属性内容的时候,你们构造方法的定义与之前并无不同,不需要像声明类那样指定泛型。
package com.jike.test;

class Cont<T>{
    private T value;

    public Cont(T value) {
        this.value = value;
    }

    public T getValue() {
        return value;
    }
    public void setValue(T value) {
        this.value = value;
    }

}

public class demo22 {

    public static void main(String[] args) {

        Cont<String> con = new Cont<String>("yangyang");
        System.out.println(con.getValue());

    }

}
指定多个泛型:
设置多个泛型直接在<>中添加多个泛型就可以了。
package com.jike.test;

class Gen<K,T>{

    private T take;
    private K key;
    public T getTake() {
        return take;
    }
    public void setTake(T take) {
        this.take = take;
    }
    public K getKey() {
        return key;
    }
    public void setKey(K key) {
        this.key = key;
    }


}

public class demo21 {

    public static void main(String[] args) {

        Gen<String, Integer> g = new Gen<String, Integer>();
        g.setKey("yangyang");
        g.setTake(150);
        System.out.println(g.getKey()+" "+g.getTake());
    }

}
Java通配符:
package com.jike.test;

class Info<T>{

    private T key;

    public T getKey() {
        return key;
    }

    public void setKey(T key) {
        this.key = key;
    }

    @Override
    public String toString() {
        return this.getKey().toString();
    }


}

public class demo23 {

    public static void main(String[] args) {
            Info<String> i = new Info<String>();
            i.setKey("yangyang");
            tell(i);
    }
    public static void tell(Info<?> i) {
        System.out.println(i);
    }

}
Java泛型接口:
在JDK1.5之后,不仅仅可以声明泛型类,也可以声明泛型接口,声明泛型接口和声明泛型类的语法类似,也是在接口名称后面加上。
格式:
interface 接口名称<泛型标识>{

    }
package com.jike.test;
interface GenInter<T>{
public void say() ;
}
class Gin implements GenInter<String>{
private String info;
public Gin(String info) {
this.info = info;
}
public String getInfo() {
return info;
}
public void setInfo(String info) {
this.info = info;
}
@Override
public void say() {
System.out.println("重写接口的say方法");
}
}
public class demo24 {
public static void main(String[] args) {
Gin g = new Gin("yangyang");
System.out.println(g.getInfo());
}
}
这样方式是在继承接口的时候指定数据类型。
也可以在实例化时候再指定。
package com.jike.test;

interface GenInter<T>{
    public void say() ;
}

class Gin<T> implements GenInter<T>{

    private String info;
    public Gin(String info) {
        this.info = info;
    }

    public String getInfo() {
        return info;
    }
    public void setInfo(String info) {
        this.info = info;
    }

    @Override
    public void say() {
        System.out.println("重写接口的say方法");
    }

}

public class demo24 {

    public static void main(String[] args) {
        Gin<String> g = new Gin<String>("yangyang");
        System.out.println(g.getInfo());
    }

}
泛型方法:
泛型方法中可以定义泛型参数,此时,参数的类型就是传入数据类型。
格式:
访问权限 <泛型标识> 泛型标识 方法名称 ([泛型标识 参数名称])
package com.jike.test;

class Gener{
    public <T>T tell(T t) {
        return t;
    }
}

public class demo25 {

    public static void main(String[] args) {
        Gener g = new Gener();
        String str = g.tell("yangyang");
        System.out.println(str);
        int i = g.tell(150);
        System.out.println(i);
    }
Java泛型数组:
在使用泛型方法的时候,也可以传递或返回一个泛型数组。
package com.jike.test;

public class demo26 {

    public static void main(String[] args) {
        String arr[] = {"www","baidu","com"};
        tell(arr);
    }

    public static <T>void tell(T arr[]) {
        for (int i = 0; i < arr.length; i++) {
            System.out.println(arr[i]);
        }
    }

}
14.Java集合类:
集合可以理解为一个动态对象数组,不同的是集合中的对象内容可以任意扩充。
Java集合就是提供一组通用接口的,管理大量数据的数据结构实现。
集合类是将多个元素组成一个单元的对象。集合类的作用是用于储存、检索和操纵数据,以及将数据从一个方法传输至另一个方法。
Java集合类是存储对象用的,例如,你要打印出今天 10点 访问你服务器所有人的 ip 用户名 密码 等信息,那么用户肯定是一个对象,你就要定义一个集合,每当有一个访问你就把 这个对象放在你的集合里面,当过了10点之后遍历这个集合取出来就行了集合的数据放在内存中。说白了集合类就是用来存储临时数据的。
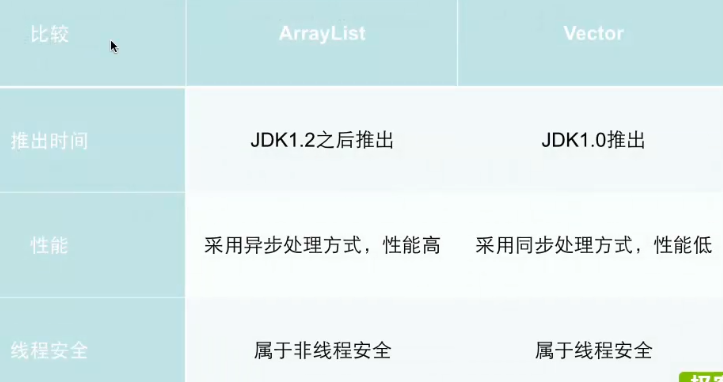
List接口:
List接口常用子类:
ArrayList
Vector
常用操作:
判断集合是否为空:boolean isEmpty()
查找指定的对象是否存在:int indexOf(Object o)
ArrayList
package com.jike.test;

import java.util.ArrayList;
import java.util.List;

public class demo27 {

    public static void main(String[] args) {
        //List是接口,所以不能直接实例化,只能通过子类进行实例化
        List<String> lists = new ArrayList<String>();
        lists.add("a");
        lists.add("b");
        for (int i = 0; i < lists.size(); i++) {
            System.out.println(lists.get(i));
        }
        lists.remove(0);
        System.out.println("删除————————");
        for (int i = 0; i < lists.size(); i++) {
            System.out.println(lists.get(i));
        }
        System.out.println("集合是否为空"+lists.isEmpty());
        //判断lists中是否存在b
        System.out.println("B是否存在:"+lists.indexOf("b"));
    }
}
Vector
package com.jike.test;

import java.util.List;
import java.util.Vector;

public class demo27 {

    public static void main(String[] args) {
        //List是接口,所以不能直接实例化,只能通过子类进行实例化
        List<String> lists = new Vector<String>();
        lists.add("a");
        lists.add("b");
        for (int i = 0; i < lists.size(); i++) {
            System.out.println(lists.get(i));
        }

    }

}
Iterator接口:
集合输出的标准操作:
标准做法,使用Iterator接口
操作原理:
Iterator是专门的迭代输出接口,迭代输出就是将元素一个个进行判断,判断是否有内容,如果有内容则把内容取出。

package com.jike.test;

import java.util.ArrayList;
import java.util.Iterator;
import java.util.List;

public class demo28 {

    public static void main(String[] args) {
        List<String> lists = new ArrayList<String>();
        lists.add("A");
        lists.add("B");
        lists.add("C");
        lists.add("D");
        lists.add("E");
        lists.add("F");

        Iterator<String> iter = lists.iterator();
        while (iter.hasNext()) {
            // hasNext 如果仍有元素可以迭代,则返回true
            // next 返回迭代的下一个元素
            System.out.println(iter.next());
        }
    }

}
注:在迭代输出时,不能用lists.remove( )方法。
Map接口:
保存形式:
key-value的方式
常用子类:
HashMap:无序存放,key不允许重复。
Hashtable:无序存放,key不允许重复。
package com.jike.test;

import java.util.Collection;
import java.util.Collections;
import java.util.HashMap;
import java.util.Iterator;
import java.util.Map;
import java.util.Set;

public class demo29 {

    public static void main(String[] args) {
        Map<String, String> map = new HashMap<String,String>();
        map.put("key1", "xie1");
        map.put("key2", "xie2");
        map.put("key3", "xie3");
        map.put("key4", "xie4");
        map.put("key5", "xie5");
        map.put("key6", "xie6");
        //根据key获取value
        String str = map.get("key1");
        System.out.println(str);
        if (map.containsKey("key1")) {
            System.out.println("判断key是否存在");
        }else {
            System.out.println("key不存在");
        }
        if (map.containsValue("xie1")) {
            System.out.println("判断value是否存在");
        }
        //获取全部的key
        Set<String> s = map.keySet();
        Iterator<String> i = s.iterator();
        while (i.hasNext()) {
            System.out.println(i.next());
        }
        //获取全部的value
        Collection<String> c = map.values();
        Iterator<String> i1 = c.iterator();
        while (i1.hasNext()) {
            System.out.println(i1.hasNext());
        }
    }

}
15.Java文件类:
文件类的基本操作:
文件的创建、删除和重命名
package com.jike.test;

import java.io.File;
import java.io.IOException;

public class demo30 {

    public static void main(String[] args) {
        File file = new File("hello.txt");
        //是否存在
        if (file.exists()) {
            //文件(判断是否是文件)
            System.out.println(file.isFile());
            //路径(文件夹)(判断是否是路径/文件夹)
            System.out.println(file.isDirectory());
            //文件删除方法
            //file.delete();
            //文件重命名
            /*File nameto = new File("new Hello.txt");
            file.renameTo(nameto);*/
            //文件的重命名也可以是跨目录的,但是必须属于同一个分区,比如D盘和E盘就不属于一个分区
            File nameto = new File("src/new Hello.txt");
            file.renameTo(nameto);
        }else {
            System.out.println("文件不存在");
            try {
                file.createNewFile();
                System.out.println("文件创建成功");
            } catch (IOException e) {
                System.out.println("文件无法被创建");
            }
        }

    }

}
文件夹的创建、删除和重命名:
package com.jike.test;

import java.io.File;

public class demo31 {

    public static void main(String[] args) {
        /*//创建文件夹
        File folder = new File("my new folder");
        if (folder.mkdir()) { //创建多重目录结构就要用mkdirs()方法了。
            System.out.println("文件夹创建成功");
        }else {
            if (folder.exists()) {
                System.out.println("文件夹已经存在不用创建");
            }else {
                System.out.println("文件夹创建失败");
            }

        }*/


        /*//文件夹的重命名,重命名必须处于同一个分区
        File folder = new File("my new folder");
        File newfolder = new File("my new folder-new");
        if (folder.renameTo(newfolder)) {
            System.out.println("文件夹重命名成功");
        }else {
            System.out.println("文件夹重命名失败");
        }*/

        //文件夹的删除,注意,空文件夹才可以删除,研究生文件夹的下没有文件和其他文件夹才可以删除
        File folder = new File("my new folder");
        if (folder.delete()) {
            System.out.println("文件夹删除成功");
        }else {
            System.out.println("文件夹删除失败");
        }

    }

}
文件属性的读取和设置:
package com.jike.test;

import java.io.File;

public class demo32 {

    public static void main(String[] args) {
            /*//文件属性的读取和设置
            File file = new File("text.txt");
            //判断文件是否存在
            System.out.println(file.exists());
            //读取文件名称
            System.out.println(file.getName());
            //读取文件路径
            System.out.println(file.getPath());
            //读取文件绝对路径
            System.out.println(file.getAbsolutePath());
            //读取文件父级路径
            System.out.println(new File(file.getAbsolutePath()).getParent());
            //读取文件大小
            System.out.println(file.length());
            //判断文件是否被隐藏
            System.out.println(file.isHidden());
            //判断文件是否可读
            System.out.println(file.canRead());
            //判断文件是否可写
            System.out.println(file.canWrite());
            //判断文件是否为文件夹
            System.out.println(file.isDirectory());*/

            //文件属性的设置
            File file = new File("text.file");
            if (file.exists()) {
                //将文件设置为可读
                file.setReadable(true);
                //将文件设置为可读
                file.setWritable(true);
                //将文件设置为只读
                file.setReadOnly();

            }
    }
}
遍历文件夹:
package com.jike.test;

import java.io.File;

public class demo33 {

    public static void main(String[] args) {
        printFiles(new File("../com.jike.test"),1);
    }
    //遍历文件夹
    //设置tab目的是遍历文件夹时候,下一级目录会多缩进一个"|--",这样方便观察
    public static void printFiles(File dir,int tab) {
        if (dir.isDirectory()) {
            File next[] = dir.listFiles();//返回File对象的数组,包含子文件和子文件夹
            for (int i = 0; i < next.length; i++) {
                for (int j = 0; j < tab; j++) {
                    System.out.print("|--");
                }
                //在下一级目录可能是文件夹或者文件
                System.out.println(next[i].getName());//输出文件夹或是文件名称
                if (next[i].isDirectory()) {
                    printFiles(next[i],tab+1);//如果是文件夹,循环遍历
                }
            }
        }
    }

}
文件的简单读写:
package com.jike.test;

import java.io.BufferedReader;
import java.io.BufferedWriter;
import java.io.File;
import java.io.FileInputStream;
import java.io.FileNotFoundException;
import java.io.FileOutputStream;
import java.io.IOException;
import java.io.InputStreamReader;
import java.io.OutputStreamWriter;
import java.io.UnsupportedEncodingException;

public class demo35 {

    public static void main(String[] args) {
        File file = new File("text.txt");
        if (file.exists()) {
            System.out.println("exist");
            try {
                //读取文件内容
                FileInputStream fis = new FileInputStream(file);
                InputStreamReader isr = new InputStreamReader(fis,"UTF-8");//字节流转字符流要指定编码,不然容易出现乱码
                BufferedReader br = new BufferedReader(isr);

                String line;
                while ((line=br.readLine())!=null) {
                    System.out.println(line);
                }
                br.close();
                isr.close();
                fis.close();

            } catch (FileNotFoundException e) {
                e.printStackTrace();
            } catch (UnsupportedEncodingException e) {
                e.printStackTrace();
            } catch (IOException e) {
                e.printStackTrace();
            }
        }


        try {
            File newfile = new File("newtext.txt");

            FileOutputStream fos = new FileOutputStream(newfile);
            OutputStreamWriter osw = new OutputStreamWriter(fos, "UTF-8");
            BufferedWriter bw = new BufferedWriter(osw);

            //写出数据
            bw.write("少壮不努力,\n");
            bw.write("老大徒伤悲.\n");

            bw.close();
            osw.close();
            fos.close();

            System.out.println("写入完成");

        } catch (FileNotFoundException e) {
            e.printStackTrace();
        } catch (UnsupportedEncodingException e) {
            e.printStackTrace();
        } catch (IOException e) {
            e.printStackTrace();
        }

    }

}
16.Java的IO操作:
字节流和字符流:
字节流可以处理所有类型的数据,如MP3、图片、文字、商品等。在读取时,读到一个字节就返回一个字节。在Java中对应的类都以“Stream”结尾。
字符流仅能够处理纯文本数据,如txt文本等。在读取时,读到一个或者多个字节,先查找指定的编码表,然后将查到的字符返回。在Java中对应的类都以“Reader”或“Writer”结尾。
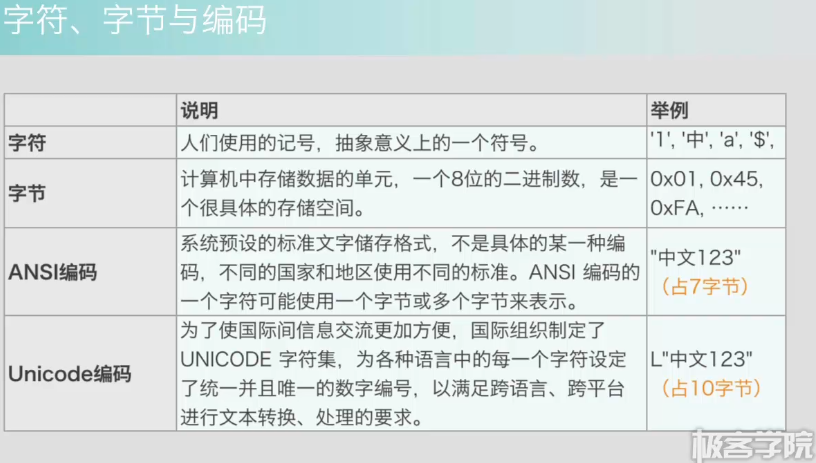
字符、字节、编码:
字节是通过网络传输信息或在硬盘或内存中存储信息的单位,是计算机信息技术用于计算存储容量和传输容量的一种计量单位。1个字节等于8位二进制,即一个8位的二进制数,是一个很具体的存储空间。
字符是人们使用的记号,抽象意义上的一个符号。如‘1’、‘中’、‘a’、‘¥’、‘¥’等。
字符集:字符集也称作编码。各个国家和地区制定的不同ANSI编码标准中,都只规定了各自语言所需的“字符”。比如:汉字标准(GB2312)中没有规定韩国字符怎样存储。
这些ANSI编码标准所规定的内容包含两层含义:
1.使用哪些字符。也就是说哪些汉字,字母和字符会被收入标准中。所含“字符”的集合就叫做“字符集”。
2.规定每个“字符”分别用一个字节还是多个字节存储,用哪些字节来存储,这个规定叫做”编码”。
各个国家和地区在制定编码标准的时候,”字符的集合”和”编码”一般都是同时制定的。因此,平时我们所说的”字符集”,比如:GB2312,GBK,JIS等,除了有”字符集”这层含义外,同时也包含了”编码”的含义。
ANSI:
字符串在内存中,如果”字符”是以ANSI编码形式存在的,一个字符可能使用一个字节或多个字节来表示,那么我们称这种字符串为ANSI字符串或者多字节字符串。不同额ANSI编码所规定的标准是不相同的,因此,对于一个给定的多字节字符串,我们必须知道是哪一种编码规则,才能够知道它包含了哪些”字符”.
UNICODE:
字符串在内存中,如果”字符”是以在UNICODE中的序号存在的,那么我们称这种字符串为UNICODE字符串或者宽字节字符串。对于UNICODE字符串来说,不管在什么环境下,它所代表的”字符”内容总是不变得。用来给UNICODE字符集编码的标准有很多,比如:UTF-8、UTF-7、UTF-16、UnicodeLittle、UnicodeBig等。
使用字节流读取数据:
数据的读取
package com.jike.test;
import java.io.FileInputStream;
import java.io.FileNotFoundException;
import java.io.IOException;

public class demo49 {

    public static void main(String[] args) {

        try {
            //读取文件的字节流
            FileInputStream fis = new FileInputStream("text.txt");
            //读取数据
            byte inputp[] = new byte[20];
            fis.read(inputp);
            fis.close();

            String inpuString = new String(inputp,"UTF-8");
            System.out.println(inpuString);


        } catch (FileNotFoundException e) {
            e.printStackTrace();
        } catch (IOException e) {
            e.printStackTrace();
        }

    }

}
数据的写入:
package com.jike.test;
import java.io.FileNotFoundException;
import java.io.FileOutputStream;
import java.io.IOException;
import java.io.UnsupportedEncodingException;

public class demo50 {

    public static void main(String[] args) {

        try {
            FileOutputStream fos = new FileOutputStream("text1.txt");

            String outString = "write 123456写出数据";
            byte output[] = outString.getBytes("UTF-8");

            fos.write(output);
            fos.close();

            System.out.println("写入成功");


        } catch (FileNotFoundException e) {
            e.printStackTrace();
        } catch (UnsupportedEncodingException e) {
            e.printStackTrace();
        } catch (IOException e) {
            e.printStackTrace();
        }

    }

}
使用带有缓冲的字节流读写数据:
package com.jike.test;
import java.io.BufferedInputStream;
import java.io.BufferedOutputStream;
import java.io.FileInputStream;
import java.io.FileNotFoundException;
import java.io.FileOutputStream;
import java.io.IOException;

public class demo52 {

    public static void main(String[] args) {

        try {
            FileInputStream fis = new FileInputStream("movie.mp4");
            //带有缓冲区的字节流
            BufferedInputStream bis = new BufferedInputStream(fis);

            FileOutputStream fos = new FileOutputStream("movie1.mp4");
            BufferedOutputStream bos = new BufferedOutputStream(fos);

            byte input[] = new byte[100];

            int count = 0;
            //文件的复制(文件的读取和写入)
            while (bis.read(input)!=-1) {
                count++;
                bos.write(input);
            }
            bis.close();
            fis.close();
            bos.close();
            fos.close();

            System.out.println(count);


        } catch (FileNotFoundException e) {
            e.printStackTrace();
        } catch (IOException e) {
            e.printStackTrace();
        }


    }

}
使用字符流读写数据:
package com.jike.test;
import java.io.File;
import java.io.FileInputStream;
import java.io.FileNotFoundException;
import java.io.FileOutputStream;
import java.io.IOException;
import java.io.InputStreamReader;
import java.io.OutputStreamWriter;
import java.io.UnsupportedEncodingException;

public class demo53 {

    public static void main(String[] args) {

        try {
            //创建一个文件对象
            //File file = new File("text.txt");
            FileInputStream fis = new FileInputStream("text.txt");
            InputStreamReader isr = new InputStreamReader(fis,"UTF-8");//字节流转成字符流

            FileOutputStream fos = new FileOutputStream("text2.txt");
            OutputStreamWriter osw = new OutputStreamWriter(fos,"UTF-8");

            int l = 0;
            char input[] = new char[100];

            if ((l=isr.read(input))!=-1) {
                //reda方法返回的是The number of characters read,
                //new String(a,b,c)三个参数的意思
                //bytes The bytes to be decoded into characters
                //offset The index of the first byte to decode 开始的起点
                //length The number of bytes to decode 数组的长度
                //System.out.println(new String(input, 0, l);
                osw.write(input,0,l);
            }
            osw.close();
            fos.close();
            isr.close();
            fis.close();


        } catch (FileNotFoundException e) {
            e.printStackTrace();
        } catch (UnsupportedEncodingException e) {
            e.printStackTrace();
        } catch (IOException e) {
            e.printStackTrace();
        }

    }

}
使用带有缓冲的字符流读写数据:
package com.jike.test;
import java.io.BufferedReader;
import java.io.BufferedWriter;
import java.io.File;
import java.io.FileInputStream;
import java.io.FileNotFoundException;
import java.io.FileOutputStream;
import java.io.IOException;
import java.io.InputStreamReader;
import java.io.OutputStreamWriter;
import java.io.PrintWriter;
import java.io.UnsupportedEncodingException;

public class demo53 {

    public static void main(String[] args) {

        try {
            //创建一个文件对象
            //File file = new File("text.txt");
            FileInputStream fis = new FileInputStream("text.txt");
            InputStreamReader isr = new InputStreamReader(fis,"UTF-8");//字节流转成字符流
            BufferedReader br = new BufferedReader(isr);//带有缓冲的字符流


            FileOutputStream fos = new FileOutputStream("text2.txt");
            OutputStreamWriter osw = new OutputStreamWriter(fos,"UTF-8");
            //BufferedWriter bw = new BufferedWriter(osw);
            PrintWriter pw = new PrintWriter(osw,true);//设置为true时自动flush

            String input;
            while ((input=br.readLine())!=null) {//读取出来,到input中
                //bw.write(input);BufferedWriter不能读取换行符
                //我们换成PrintWriter
                pw.print(input);

            }
            //pw.flush();
            pw.close();
            //bw.close();
            osw.close();
            fos.close();
            br.close();
            isr.close();
            fis.close();


        } catch (FileNotFoundException e) {
            e.printStackTrace();
        } catch (UnsupportedEncodingException e) {
            e.printStackTrace();
        } catch (IOException e) {
            e.printStackTrace();
        }

    }

}
FileReader与FileWriter :
package com.jike.test;
import java.io.BufferedReader;
import java.io.BufferedWriter;
import java.io.FileNotFoundException;
import java.io.FileReader;
import java.io.FileWriter;
import java.io.IOException;

public class demo55 {
    //文件写入写出
    public static void main(String[] args) {
        try {
            FileReader fr = new FileReader("text.txt");//FileReader主要用于读取字符文件(character Files)
            //如果是原生字节流(streams of raw bytes)则建议使用FileInputStream
            BufferedReader br = new BufferedReader(fr);

            FileWriter fw = new FileWriter("text2.txt");
            BufferedWriter bw = new BufferedWriter(fw);

            String line;
            while ((line=br.readLine())!=null) {
                bw.write(line+"\n");//缺少换行符,手动添加

            }

            bw.flush();

            bw.close();
            fw.close();
            br.close();
            fr.close();

        } catch (FileNotFoundException e) {
            e.printStackTrace();
        } catch (IOException e) {
            e.printStackTrace();
        }

    }

}
APache IO操作IO与文件 :
package com.jike.test;

import java.io.File;
import java.io.IOException;

import org.apache.commons.io.FileUtils;

public class test56 {

    public static void main(String[] args) {

        File file = new File("text.txt");
        File file2 = new File("text2.txt");

        try {

            //读取
            String input = FileUtils.readFileToString(file,"UTF-8");
            System.out.println(input);
            //复制
            FileUtils.copyDirectory(file, file2);


        } catch (IOException e) {
            e.printStackTrace();
        }

    }

}
17.Java多线程:
Java多线程:
线程:程序中单独顺序的控制流。
线程本身依靠程序进行运行。
线程是程序中的顺序控制流,只能使用分配给程序的资源和环境。
进程:执行中的程序
线程的实现:
在Java中,线程的实现有2种:
继承Thread类
实现Runnable接口
Thread类:
Thread类是在java.lang包中定义的,继承Thread类必须重写run()方法。
定义格式:
class className extends Thread{
run(){};
}
线程的实现:
package com.jike.test;
public class demo39 extends Thread {

    private String name;

    public demo39(String name) {
        this.name = name;
    }

    @Override
    public void run() {
        for (int i = 0; i < 10; i++) {
            System.out.println(name+":"+i);
        }
        super.run();
    }

}
线程的调用:
package com.jike.test;
public class demo38 {

    public static void main(String[] args) {
            demo39 de = new demo39("A");
            demo39 mo = new demo39("B");
            de.start();
            mo.start();
    }

}
Runnable接口:
线程的实现:
package com.jike.test;
public class demo39 implements Runnable {

    private String name;

    public demo39(String name) {
        this.name = name;
    }

    @Override
    public void run() {
        for (int i = 0; i < 10; i++) {
            System.out.println(name+":"+i);
        }

    }

}
线程的调用:
package com.jike.test;
public class demo38 {

    public static void main(String[] args) {
            demo39 de = new demo39("A");
            demo39 mo = new demo39("B");
            //通过runnable还是要通过Thread来启动线程
            Thread t1 = new Thread(de);
            Thread t2 = new Thread(de);
            t1.start();
            t2.start();
    }

}
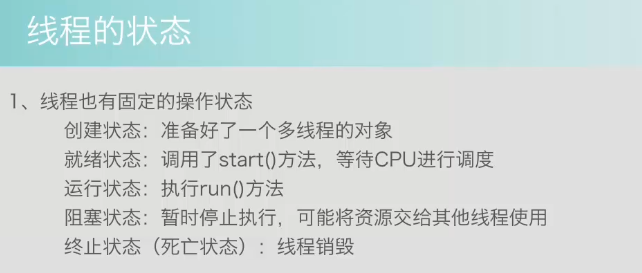
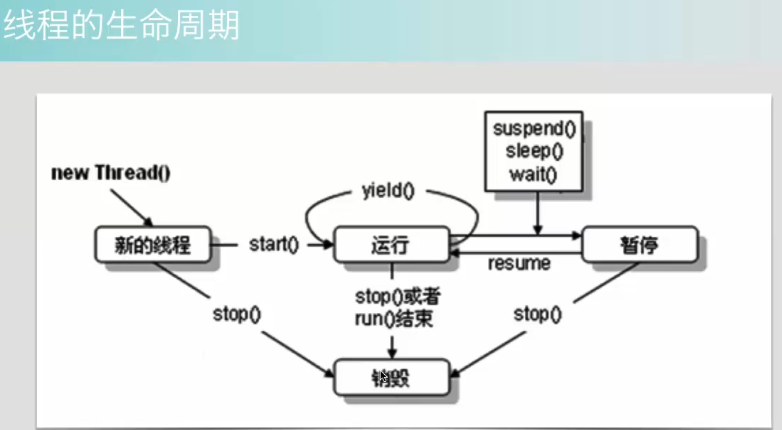
线程的状态:
线程的常用方法:
1.取得线程名称
getName()
2.取得当前线程对象
currentThread()
3.判断线程是否启动
isAlive()
4.线程强行运行
join()
5.线程的休眠
sleep()
6.线程的礼让
yield()
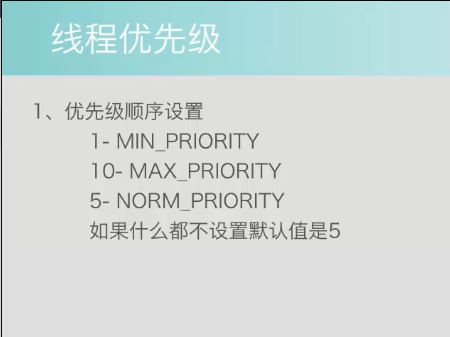
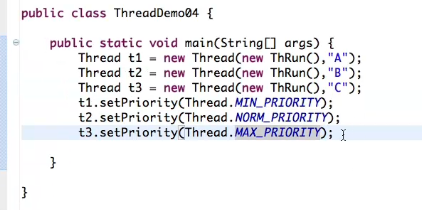
线程的优先级:
使用实例:
同步与死锁:
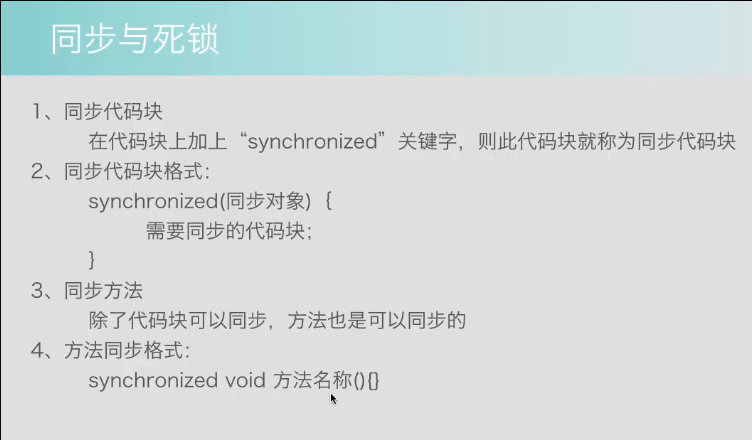
同步代码块:

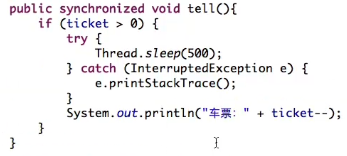
同步方法:
线程的生命周期:
18.String类:
StringBuilder的使用:
如果程序对附加字符串的需求很频繁,不建议使用+来进行字符串的串联,而应该使用java.lang.StringBuilder类,从而使效率大大提高。
public class Test{

    public static void main(String args[]){
       StringBuffer sBuffer = new StringBuffer(" test");
       sBuffer.append(" String Buffer");
       System.out.println(sBuffer);
   }
}
注:trim()方法; 去除字符串两边的空格,并返回一个新的字符串。
19.HTTP学习:
使用HTTP的Get方法读取数据
package com.jike.test;
import java.io.BufferedReader;
import java.io.IOException;
import java.io.InputStream;
import java.io.InputStreamReader;
import java.net.MalformedURLException;
import java.net.URL;
import java.net.URLConnection;

public class demo42 {

    public static void main(String[] args) {

        new ReadByGet().start();

    }

}

class ReadByGet extends Thread{

    @Override
    public void run() {
        try {
            URL url = new URL("http://fanyi.youdao.com/openapi.do?keyfrom=yangyang1994&key=1831305403&type=data&doctype=xml&version=1.1&q=welcome");
            URLConnection connection = url.openConnection();//打开链接

            InputStream is = connection.getInputStream();//获取网络连接的输入流
            InputStreamReader isr = new InputStreamReader(is,"UTF-8");//字节流转到字符流
            BufferedReader br = new BufferedReader(isr);
            //读取数据
            String line;
            StringBuilder builder = new StringBuilder();
            while ((line=br.readLine())!=null) {//表示内容没有结束
                builder.append(line);
            }
            //文件读取完要关闭
            br.close();
            isr.close();
            is.close();

            System.out.println(builder.toString());


        } catch (MalformedURLException e) {
            e.printStackTrace();
        } catch (IOException e) {
            e.printStackTrace();
        }
    }
}
使用HTTP的Post方法与网络交互通信
package com.jike.test;
import java.io.BufferedReader;
import java.io.BufferedWriter;
import java.io.IOException;
import java.io.InputStream;
import java.io.InputStreamReader;
import java.io.OutputStream;
import java.io.OutputStreamWriter;
import java.net.HttpURLConnection;
import java.net.MalformedURLException;
import java.net.URL;

public class demo43 {

    public static void main(String[] args) {
        new ReadByPost().start();
    }

}

class ReadByPost extends Thread{

    @Override
    public void run() {
        try {
            URL url = new URL("http://fanyi.youdao.com/openapi.do");
            HttpURLConnection connection = (HttpURLConnection) url.openConnection();//使用post方式时要使用HttpURLConnection
            //设置连接的参数
            connection.addRequestProperty("encoding", "UTF-8");
            connection.setDoInput(true);//设置为true就可以从网络获取数据
            connection.setDoOutput(true);//设置为true就可以从网络传输数据
            connection.setRequestMethod("POST");

            //建立连接之后获取输出流
            OutputStream os = connection.getOutputStream();
            OutputStreamWriter osw = new OutputStreamWriter(os);
            BufferedWriter bw = new BufferedWriter(osw);
            //向服务器传输的数据
            bw.write("keyfrom=yangyang1994&key=1831305403&type=data&doctype=xml&version=1.1&q=welcome");
            bw.flush();

            //建立连接之后获取输入流
            InputStream is = connection.getInputStream();
            InputStreamReader isr = new InputStreamReader(is);
            BufferedReader br = new BufferedReader(isr);
            //从输入流中获取数据
            String line;
            StringBuilder builder = new StringBuilder();
            while ((line = br.readLine())!=null) {
                builder.append(line);
            }

            bw.close();
            osw.close();
            os.close();
            br.close();
            isr.close();
            is.close();

            System.out.println(builder.toString());

        } catch (MalformedURLException e) {
            e.printStackTrace();
        } catch (IOException e) {
            e.printStackTrace();
        }
    }

}
使用HttpClient进行Get方式通信:
package com.jike.test;
import java.io.IOException;

import org.apache.http.HttpEntity;
import org.apache.http.HttpResponse;
import org.apache.http.client.ClientProtocolException;
import org.apache.http.client.HttpClient;
import org.apache.http.client.methods.HttpGet;
import org.apache.http.impl.client.HttpClients;
import org.apache.http.util.EntityUtils;

public class demo44 {

    public static void main(String[] args) {

        new Get().start();
    }

}


class Get extends Thread{

    //使用静态方法生产一个实例
    HttpClient client = HttpClients.createDefault();

    @Override
    public void run() {
        HttpGet get = new HttpGet("http://www.baidu.com");

        try {

            HttpResponse response = client.execute(get);
            HttpEntity entity = response.getEntity();
            //将entity返回为String类型
            String result = EntityUtils.toString(entity, "UTF-8");

            System.out.println(result);

        } catch (ClientProtocolException e) {
            e.printStackTrace();
        } catch (IOException e) {
            e.printStackTrace();
        }

    }

}
使用HttpClient进行Post方式通信:
package com.jike.test;

import java.io.IOException;
import java.util.ArrayList;
import java.util.List;

import org.apache.http.HttpEntity;
import org.apache.http.HttpResponse;
import org.apache.http.client.ClientProtocolException;
import org.apache.http.client.HttpClient;
import org.apache.http.client.entity.UrlEncodedFormEntity;
import org.apache.http.client.methods.HttpGet;
import org.apache.http.client.methods.HttpPost;
import org.apache.http.impl.client.HttpClients;
import org.apache.http.message.BasicNameValuePair;
import org.apache.http.util.EntityUtils;

public class demo45 {

    public static void main(String[] args) {

        new Post().start();
    }

}

class Post extends Thread{

    //使用静态方法生产一个实例
    HttpClient client = HttpClients.createDefault();

    @Override
    public void run() {
        HttpPost post = new HttpPost("http://fanyi.youdao.com/openapi.do");

        try {
            //keyfrom=yangyang1994&key=1831305403&type=data&doctype=xml&version=1.1&q=welcome
            List<BasicNameValuePair> parameters = new ArrayList<>();
            parameters.add(new BasicNameValuePair("keyfrom", "yangyang1994"));
            parameters.add(new BasicNameValuePair("key", "1831305403"));
            parameters.add(new BasicNameValuePair("type", "data"));
            parameters.add(new BasicNameValuePair("doctype", "xml"));
            parameters.add(new BasicNameValuePair("version", "1.1"));
            parameters.add(new BasicNameValuePair("q", "welcome"));

            post.setEntity(new UrlEncodedFormEntity(parameters, "UTF-8"));
            HttpResponse response = client.execute(post);
            HttpEntity entity = response.getEntity();
            //将entity返回为String类型
            String result = EntityUtils.toString(entity, "UTF-8");

            System.out.println(result);

        } catch (ClientProtocolException e) {
            e.printStackTrace();
        } catch (IOException e) {
            e.printStackTrace();
        }

    }

}
20.JSON学习:
JSON语法是JavaScript对象表示法语法的子集。
数据在名称/值对中
数据由逗号分隔
花括号保存对象
方括号保存数组
JSON值可以是:
数字(整数或浮点数)
字符串(在双引号中)
逻辑值(true或false)
数组(在方括号中)
对象(在花括号中)
null
JSON对象在花括号中书写,对象可以包含多个名称/值对:
{“firstNmae”:”John”,”lastNmae”:”Doe”}
JSON数组在方括号中书写,数组可包含多个对象:
最外层{}表示这是一个整体的JSON数据。”employees”是键,对应于一个JSON数组。
这一个数组中包含了3个JSON对象。
{
“employees”:[
{“firstNmae”:”John”,”lastNmae”:”Doe”}
{“firstNmae”:”John”,”lastNmae”:”Doe”}
{“firstNmae”:”John”,”lastNmae”:”Doe”}
]
}
使用Java读取JSON数据:
首先添加google-gson外部库。
package com.jike.test;
import java.io.FileNotFoundException;
import java.io.FileReader;

import com.google.gson.JsonArray;
import com.google.gson.JsonIOException;
import com.google.gson.JsonObject;
import com.google.gson.JsonParser;
import com.google.gson.JsonSyntaxException;

public class demo40 {

    public static void main(String[] args) {
        try {

            //创建JSON解释器,之后就可以解析字符串或者输入流了
            JsonParser parser = new JsonParser();
            JsonObject object = (JsonObject) parser.parse(new FileReader("test.json"));
            System.out.println("cat:"+object.get("cat").getAsString());
            System.out.println("pop:"+object.get("pop").getAsBoolean());
            //读取JSON数组
            JsonArray array = object.get("languages").getAsJsonArray();
            for (int i = 0; i < array.size(); i++) {
                JsonObject subObject = array.get(i).getAsJsonObject();
                System.out.print("id="+subObject.get("id").getAsString()+" ");
                System.out.print("ide="+subObject.get("ide").getAsString()+" ");
                System.out.println("name="+subObject.get("name").getAsString());
            }

        } catch (JsonIOException e) {
            e.printStackTrace();
        } catch (JsonSyntaxException e) {
            e.printStackTrace();
        } catch (FileNotFoundException e) {
            e.printStackTrace();
        }
    }

}
读取的JSON数据:
 {
        "cat":"it",
        "languages":[
            {"id":"1","ide":"Eclipse","name":"Java"},
            {"id":"2","ide":"Xcode","name":"Swift"},
            {"id":"3","ide":"Visual","name":"C#"}
        ],
        "pop":true
  }
使用Java创建JSON数据:
package com.jike.test;

import com.google.gson.JsonArray;
import com.google.gson.JsonObject;

public class demo41 {

    public static void main(String[] args) {
        //创建JSON数据
        JsonObject object = new JsonObject();
        object.addProperty("cat", "it");

        JsonArray array = new JsonArray();

        JsonObject lan1 = new JsonObject();
        lan1.addProperty("id", "1");
        lan1.addProperty("ide", "Eclipse");
        lan1.addProperty("name", "Java");
        JsonObject lan2 = new JsonObject();
        lan1.addProperty("id", "2");
        lan1.addProperty("ide", "Xcode");
        lan1.addProperty("name", "Swift");
        JsonObject lan3 = new JsonObject();
        lan1.addProperty("id", "3");
        lan1.addProperty("ide", "Visual");
        lan1.addProperty("name", "C#");

        array.add(lan1);
        array.add(lan2);
        array.add(lan3);
        //JSON添加一个数组对象
        object.add("lanuage", array);

        object.addProperty("pop", true);
        //将JSON数据转换为字符串
        System.out.println(object.toString());
    }

}
21.XML学习:
XML简介:
XML是一种可扩展标记语言(Extensible Markup Language),一种用于标记电子文件使其具有结构性的标记语言。它可以用来标记数据、定义数据类型,是一种允许用户对自己的标记语言进行定义的源语言。它非常适合万维网传输,提供统一的方法来描述和交互独立于应用程序或供应商的结构化数据。
XML特点:
XML是一种标记语言,很类似于HTML
XML的设计宗旨是传输数据,而非显示数据
XML标签没有被预定义,你需要自定义标签
XML被设计为具有自我描述性
XML是W3C的推荐标准
XML与HTML的对比:
XML被设计为传输和存储数据,其焦点是数据的内容。
HTML被设计用来显示数据,其焦点是数据的外观。
HTML旨在显示数据,而XML旨在传输数据。
XML仅仅是纯文本
XML没有预定义的标签(XML允许创作者定义自己的标签和自己的文档结构)
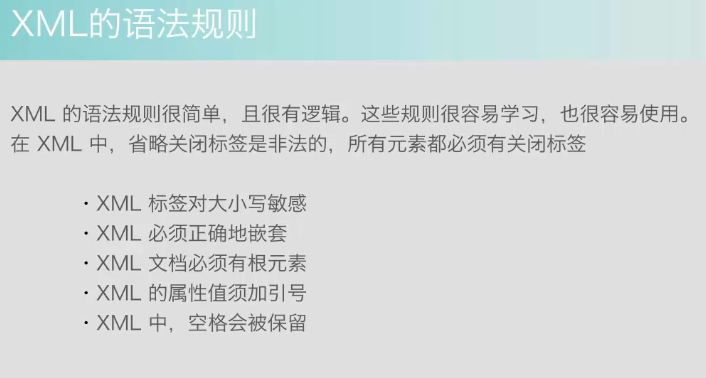
XML的语法规则:
XML中,省略标签是非法,所有元素必须有关闭标签
XML标签对大小写敏感
XML文档必须有根元素
XML的属性值必须加引号
XML中,空格会被保留
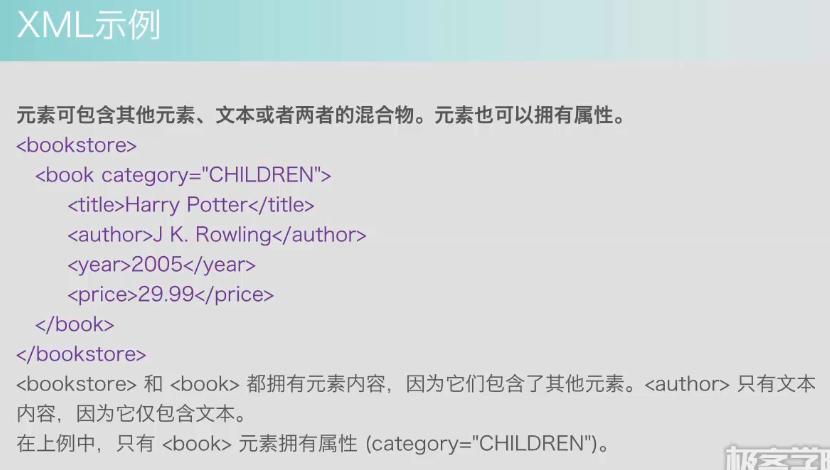
XML实例:
元素可包含其他元素、文本或者两者的混合物。元素也可以拥有属性。
<bookstore>
    <book category="CHILDREN">
        <title>Harry Potter</title>
        <author>JK.Rowling</author>
        <year>2005</year>
        <price>29.99</price>
    </book>
</bookstore>
使用Java读取XML数据:
package com.jike.test;
import java.io.File;
import java.io.IOException;

import javax.xml.parsers.DocumentBuilder;
import javax.xml.parsers.DocumentBuilderFactory;
import javax.xml.parsers.ParserConfigurationException;

import org.w3c.dom.Document;
import org.w3c.dom.Element;
import org.w3c.dom.Node;
import org.w3c.dom.NodeList;
import org.xml.sax.SAXException;

public class test58 {

    public static void main(String[] args) {

        try {
            //通过newInstance方法获取新的实例
            DocumentBuilderFactory factory = DocumentBuilderFactory.newInstance();
            //创建一个新的DocumentBuilder
            DocumentBuilder builder = factory.newDocumentBuilder();

            //读取language.xml文件
            Document document = builder.parse(new File("language.xml"));
            //读取XML文件根元素包含内容(获取<language></language>之间的元素)
            Element root = document.getDocumentElement();
            System.out.println(root.getAttribute("cat"));
            //通过标签名称获取元素
            NodeList list = root.getElementsByTagName("lan");
            //使用for循环打印内部的值
            for (int i = 0; i < list.getLength(); i++) {

                //循环获取lan下面的数据
                Element lan = (Element) list.item(i);
                System.out.println("--------------");
                //获取lan下面数据中的id
                System.out.println("id="+lan.getAttribute("id"));

                //获取lan下面的两个子节点数据(类似根节点)

                /* 第一种方法
                 * Element nameElement = (Element) lan.getElementsByTagName("name").item(0);
                 * 获取当前节点的数据
                 * System.out.println("name="+nameElement.getTextContent());
                 */

                NodeList clist = lan.getChildNodes();
                for (int j = 0; j < clist.getLength(); j++) {
                    Node c = clist.item(j);
                    if (c instanceof Element) {//只有c是Element对象时才进行输出
                        System.out.println(c.getNodeName()+"="+c.getTextContent());
                    }

                }

                /*
                 * 第二种方法(使用getChildNodes获取下面所有的子节点)
                 *
                 */
            }

        } catch (ParserConfigurationException e) {
            e.printStackTrace();
        } catch (SAXException e) {
            e.printStackTrace();
        } catch (IOException e) {
            e.printStackTrace();
        }

    }

}
使用Java创建XML数据:
package com.jike.test;
import java.io.StringWriter;

import javax.xml.parsers.DocumentBuilder;
import javax.xml.parsers.DocumentBuilderFactory;
import javax.xml.parsers.ParserConfigurationException;
import javax.xml.transform.Transformer;
import javax.xml.transform.TransformerConfigurationException;
import javax.xml.transform.TransformerException;
import javax.xml.transform.TransformerFactory;
import javax.xml.transform.dom.DOMSource;
import javax.xml.transform.stream.StreamResult;

import org.w3c.dom.Document;
import org.w3c.dom.Element;

public class demo59 {

    public static void main(String[] args) {

        try {
            //通过newInstance方法获取新的实例
            DocumentBuilderFactory factory = DocumentBuilderFactory.newInstance();
            //创建一个新的DocumentBuilder
            DocumentBuilder builder = factory.newDocumentBuilder();

            //创建一个新的document对象
            Document document = builder.newDocument();
            //创建根元素
            Element root = document.createElement("language");
            root.setAttribute("cat", "it");

            //添加根元素下面的内容

            Element lan1 = document.createElement("lan");
            lan1.setAttribute("id", "1");
            Element name1 = document.createElement("name");
            name1.setTextContent("Java");
            Element ide1 = document.createElement("ide");
            ide1.setTextContent("Eclipse");
            //把name1和ide1添加到lan1节点下
            lan1.appendChild(name1);
            lan1.appendChild(ide1);

            //lan2和lan3同理,可由上面得到,然后都添加到root下

            //把lan1添加到root节点下
            root.appendChild(lan1);
            //把根节点添加到document节点下
            document.appendChild(root);

            //-------------输出创建的XML内容
            TransformerFactory transformerFactory = TransformerFactory.newInstance();
            Transformer transformer = transformerFactory.newTransformer();
            //Transformer就是把XML转化为其他格式

            StringWriter writer = new StringWriter();
            transformer.transform(new DOMSource(document), new StreamResult(writer));

            //然后就可以输出了
            System.out.println(writer.toString());

        } catch (ParserConfigurationException e) {
            e.printStackTrace();
        } catch (TransformerConfigurationException e) {
            e.printStackTrace();
        } catch (TransformerException e) {
            e.printStackTrace();
        }

    }

}
使用Dom4j操作XML数据:
package com.jike.test;
import org.dom4j.Document;
import org.dom4j.DocumentException;
import org.dom4j.DocumentHelper;


public class demo60 {

    public static void main(String[] args) {

        try {
            String xmlString = "<root><people>Acely</people></root>";
            Document document = DocumentHelper.parseText(xmlString);

            //将document转换成字符串对象
            System.out.println(document.asXML());


        } catch (DocumentException e) {
            e.printStackTrace();
        }

    }

}
22.SOCKET学习:


 1万+
1万+

 被折叠的 条评论
为什么被折叠?
被折叠的 条评论
为什么被折叠?
 到【灌水乐园】发言


