


一、文件存储
文件存储是 Android 中最基本的一种数据存储方式,它不对存储的内容进行任何的格式化处理,所有数据都是原封不动地保存到文件当中的,因而它比较适合用于存储一些简单的文本数据或二进制数据。
Context 类中提供了一个 openFileOutput ()方法,可以用于将数据存储到指定的文件中。
参数:文件名,操作模式
操作模式主要有两类:
MODE_PRIVATE 是默认的操作模式,表示当指定同样文件名的时候,所写入的内容将会覆盖原文件中的内容MODE_APPEND 则表示如果该文件已存在就往文件里面追加内容,不存在就创建新文件。
核心代码:
FileOutputStream out = null;
out = context.openFileOutput(filename, Context.MODE_***);
out.write(filecontent.getBytes("UTF-8"));
out.close();
示例(获取输入到editText中的内容并输入到textView中):
<?xml version="1.0" encoding="utf-8"?>
<RelativeLayout xmlns:android="http://schemas.android.com/apk/res/android"
    xmlns:tools="http://schemas.android.com/tools"
    android:layout_width="match_parent"
    android:layout_height="match_parent"
    android:paddingBottom="@dimen/activity_vertical_margin"
    android:paddingLeft="@dimen/activity_horizontal_margin"
    android:paddingRight="@dimen/activity_horizontal_margin"
    android:paddingTop="@dimen/activity_vertical_margin"
    tools:context="com.example.liming.myapplication.MainActivity">

    <EditText
        android:layout_width="wrap_content"
        android:layout_height="wrap_content"
        android:id="@+id/editText"
        android:layout_marginTop="35dp"
        android:layout_alignParentTop="true"
        android:layout_centerHorizontal="true" />
    <TextView
        android:layout_width="wrap_content"
        android:layout_height="wrap_content"
        android:text="Hello World!"
        android:id="@+id/textView"
        android:layout_marginTop="63dp"
        android:layout_below="@+id/editText"
        android:layout_centerHorizontal="true" />

    <Button
        android:layout_width="wrap_content"
        android:layout_height="wrap_content"
        android:text="SaveData"
        android:id="@+id/button"
        android:layout_marginTop="64dp"
        android:layout_below="@+id/textView"
        android:layout_centerHorizontal="true" />

    <Button
        android:layout_width="wrap_content"
        android:layout_height="wrap_content"
        android:text="GetData"
        android:id="@+id/button2"
        android:layout_below="@+id/button"
        android:layout_centerHorizontal="true" />

</RelativeLayout>
Activity:
public class MainActivity extends AppCompatActivity implements View.OnClickListener{

    private EditText editText;
    private TextView textView;
    private Button saveData;
    private Button getData;
    @Override
    protected void onCreate(Bundle savedInstanceState) {
        super.onCreate(savedInstanceState);
        setContentView(R.layout.activity_main);
        saveData = (Button)findViewById(R.id.button);
        saveData.setOnClickListener(this);
        getData = (Button)findViewById(R.id.button2);
        getData.setOnClickListener(this);
        editText = (EditText)findViewById(R.id.editText);
        textView = (TextView)findViewById(R.id.textView);
    }

    public void save() {
        String data = editText.getText().toString();
        FileOutputStream out = null;
        BufferedWriter writer = null;
        try {
            out = openFileOutput("horizon", Context.MODE_PRIVATE);
            writer = new BufferedWriter(new OutputStreamWriter(out));
            writer.write(data);
        } catch (IOException e) {
            e.printStackTrace();
        } finally {
            try {
                if (writer != null) {
                    writer.close();
                }
            } catch (IOException e) {
                e.printStackTrace();
            }
        }
    }

    public void get(){
        String data = null;
        FileInputStream in = null;
        BufferedReader reader = null;
        StringBuilder content = new StringBuilder();
        try {
            in = openFileInput("horizon");
            reader = new BufferedReader(new InputStreamReader(in));
            String line = "";
            while ((line = reader.readLine()) != null) {
                content.append(line);
            }
        } catch (FileNotFoundException e) {
            e.printStackTrace();
        } catch (IOException e) {
            e.printStackTrace();
        }finally {
            if (reader != null) {
                try {
                    reader.close();
                } catch (IOException e) {
                    e.printStackTrace();
                }
            }
        }
    textView.setText(content.toString());
    }


    @Override
    public void onClick(View v) {
        if(v.getId() == R.id.button){
            save();
        }else{
            get();
        }
    }
}
截图:
注意利用openFileOutput获取的路径,默认是/data/data/<packagename>/files/ 目 录 。
此外,Activity还提供了getCacheDir()和getFilesDir()方法:
getCacheDir()方法用于获取/data/data/<package name>/cache目录
getFilesDir()方法用于获取/data/data/<package name>/files目录
二、外部存储
在使用SDCard存储前,必须确认外部存储媒体已挂载且可读/写
Android提供了对应的比对接口
MEDIA_MOUNTED 存储媒体已经挂载,并且挂载点可读/写。
Environment.getExternalStorageState()用以获取存储媒体状态
这里我给出存储的示例:
public void SDSave() {
        FileOutputStream out = null;
        BufferedWriter writer = null;
        String data = "墓王之王会是什么鬼?";
        if (Environment.getExternalStorageState().equals(Environment.MEDIA_MOUNTED)) {
            File file = new File(Environment.getExternalStorageDirectory(), "data.txt");
            try {
                out = new FileOutputStream(file);
                writer = new BufferedWriter(new OutputStreamWriter(out));
                writer.write(data);
            } catch (FileNotFoundException e) {
                e.printStackTrace();
            } catch (IOException e) {
                e.printStackTrace();
            }finally {
                try {
                    writer.close();
                } catch (IOException e) {
                    e.printStackTrace();
                }
            }
        }
    }
三、SharedPreferences存储
不同于文件的存储方式,SharedPreferences是使用键值对的方式来存储数据的。
1. Context 类中的 getSharedPreferences()方法
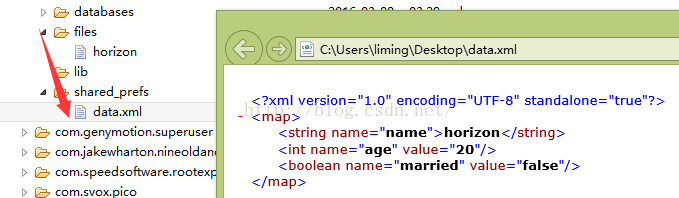
此方法接收两个参数,第一个参数用于指定 SharedPreferences 文件的名称,如果指定的文件不存在则会创建一个,SharedPreferences 文件都是存放在/data/data/<packagename>/shared_prefs/目录下的。第二个参数用于指定操作模式,主要有两种模式可以选择,MODE_PRIVATE 和 MODE_MULTI_PROCESS。
2. Activity 类中的 getPreferences()方法
这个方法和 Context 中的 getSharedPreferences()方法很相似,不过它只接收一个操作模式参数,因为使用这个方法时会自动将当前活动的类名作为 SharedPreferences 的文件名。
3. PreferenceManager 类中的 getDefaultSharedPreferences()方法
这是一个静态方法,它接收一个 Context 参数,并自动使用当前应用程序的包名作
为前缀来命名 SharedPreferences 文件。
得到了 SharedPreferences 对象之后, 就可以开始向 SharedPreferences 文件中存储数据了.
1. 调用 SharedPreferences 对象的 edit()方法来获取一个 SharedPreferences.Editor 对象。
2. 向 SharedPreferences.Editor 对象中添加数据,比如添加一个布尔型数据就使用
putBoolean 方法,添加一个字符串则使用 putString()方法,以此类推。
3. 调用 commit()方法将添加的数据提交,从而完成数据存储操作。
这里给出第一种方式的示例:
layout部分:
<?xml version="1.0" encoding="utf-8"?>
<LinearLayout xmlns:android="http://schemas.android.com/apk/res/android"
    android:layout_width="match_parent"
    android:layout_height="match_parent"
    android:orientation="vertical"
    android:gravity="center">
    <Button
        android:id="@+id/save_data"
        android:layout_width="match_parent"
        android:layout_height="wrap_content"
        android:text="Save_data"
        />
    <Button
        android:id="@+id/get_data"
        android:layout_width="match_parent"
        android:layout_height="wrap_content"
        android:text="get_data"
        />
</LinearLayout>
public class MainActivity extends AppCompatActivity {
private Button saveData;
private Button getData;
@Override
protected void onCreate(Bundle savedInstanceState) {
super.onCreate(savedInstanceState);
setContentView(R.layout.activity_main);
saveData = (Button) findViewById(R.id.save_data);
saveData.setOnClickListener(new View.OnClickListener() {
@Override
public void onClick(View v) {
//创建文件并存入数据
SharedPreferences.Editor editor = getSharedPreferences("data",
MODE_PRIVATE).edit();
editor.putString("name", "horizon");
editor.putInt("age", 20);
editor.putBoolean("married", false);
editor.commit();
}
});
getData = (Button)findViewById(R.id.get_data);
getData.setOnClickListener(new View.OnClickListener() {
@Override
public void onClick(View v) {
//获取对应文件
SharedPreferences pref = getSharedPreferences("data", MODE_PRIVATE);
String name = pref.getString("name", "");
int age = pref.getInt("age", 0);
boolean married = pref.getBoolean("married",false);
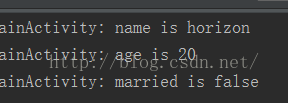
Log.d("MainActivity", "name is " + name);
Log.d("MainActivity", "age is " + age);
Log.d("MainActivity", "married is " + married);
}
});
}
}截图
save(ddms)
get


 813
813


 被折叠的 条评论
为什么被折叠?
被折叠的 条评论
为什么被折叠?
 到【灌水乐园】发言


