


转载出处:http://blog.csdn.net/guolin_blog/article/details/11952435
相信大多数朋友对Service这个名词都不会陌生,没错,一个老练的Android程序员如果连Service都没听说过的话,那确实也太逊了。Service作为android四大组件之一,在每一个应用程序中都扮演着非常重要的角色。它主要用于在后台处理一些耗时的逻辑,或者去执行某些需要长期运行的任务。必要的时候我们甚至可以在程序退出的情况下,让Service在后台继续保持运行状态。
不过,虽然Service几乎被每一个Android程序员所熟知,但并不是每个人都已经将Service的各个知识点都掌握得非常透彻。那么今天我就将带着大家对Service进行一次全面、深入的探究,希望每个人在读完本篇文章后都能对Service有更深一层的理解。
Service的基本用法
关于Service最基本的用法自然就是如何启动一个Service了,启动Service的方法和启动Activity很类似,都需要借助Intent来实现,下面我们就通过一个具体的例子来看一下。
新建一个Android项目,项目名就叫ServiceTest,这里我选择使用4.0的API。
然后新建一个MyService继承自Service,并重写父类的onCreate()、onStartCommand()和onDestroy()方法,如下所示:
- public class MyService extends Service {
- public static final String TAG = “MyService”;
- @Override
- public void onCreate() {
- super.onCreate();
- Log.d(TAG, ”onCreate() executed”);
- }
- @Override
- public int onStartCommand(Intent intent, int flags, int startId) {
- Log.d(TAG, ”onStartCommand() executed”);
- return super.onStartCommand(intent, flags, startId);
- }
- @Override
- public void onDestroy() {
- super.onDestroy();
- Log.d(TAG, ”onDestroy() executed”);
- }
- @Override
- public IBinder onBind(Intent intent) {
- return null;
- }
- }
public class MyService extends Service {public static final String TAG = "MyService";
@Override
public void onCreate() {
super.onCreate();
Log.d(TAG, "onCreate() executed");
}
@Override
public int onStartCommand(Intent intent, int flags, int startId) {
Log.d(TAG, "onStartCommand() executed");
return super.onStartCommand(intent, flags, startId);
}
@Override
public void onDestroy() {
super.onDestroy();
Log.d(TAG, "onDestroy() executed");
}
@Override
public IBinder onBind(Intent intent) {
return null;
}
}
可以看到,我们只是在onCreate()、onStartCommand()和onDestroy()方法中分别打印了一句话,并没有进行其它任何的操作。
然后打开或新建activity_main.xml作为程序的主布局文件,代码如下所示:
- <LinearLayout xmlns:android=”http://schemas.android.com/apk/res/android”
- android:layout_width=“match_parent”
- android:layout_height=“match_parent”
- android:orientation=“vertical” >
- <Button
- android:id=“@+id/start_service”
- android:layout_width=“match_parent”
- android:layout_height=“wrap_content”
- android:text=“Start Service” />
- <Button
- android:id=“@+id/stop_service”
- android:layout_width=“match_parent”
- android:layout_height=“wrap_content”
- android:text=“Stop Service” />
- </LinearLayout>
<LinearLayout xmlns:android="http://schemas.android.com/apk/res/android"
android:layout_width="match_parent"
android:layout_height="match_parent"
android:orientation="vertical" ><Button android:id="@+id/start_service" android:layout_width="match_parent" android:layout_height="wrap_content" android:text="Start Service" /> <Button android:id="@+id/stop_service" android:layout_width="match_parent" android:layout_height="wrap_content" android:text="Stop Service" /></LinearLayout>
我们在布局文件中加入了两个按钮,一个用于启动Service,一个用于停止Service。
然后打开或新建MainActivity作为程序的主Activity,在里面加入启动Service和停止Service的逻辑,代码如下所示:
- public class MainActivity extends Activity implements OnClickListener {
- private Button startService;
- private Button stopService;
- @Override
- protected void onCreate(Bundle savedInstanceState) {
- super.onCreate(savedInstanceState);
- setContentView(R.layout.activity_main);
- startService = (Button) findViewById(R.id.start_service);
- stopService = (Button) findViewById(R.id.stop_service);
- startService.setOnClickListener(this);
- stopService.setOnClickListener(this);
- }
- @Override
- public void onClick(View v) {
- switch (v.getId()) {
- case R.id.start_service:
- Intent startIntent = new Intent(this, MyService.class);
- startService(startIntent);
- break;
- case R.id.stop_service:
- Intent stopIntent = new Intent(this, MyService.class);
- stopService(stopIntent);
- break;
- default:
- break;
- }
- }
- }
可以看到,在Start Service按钮的点击事件里,我们构建出了一个Intent对象,并调用startService()方法来启动MyService。然后在Stop Serivce按钮的点击事件里,我们同样构建出了一个Intent对象,并调用stopService()方法来停止MyService。代码的逻辑非常简单,相信不需要我再多做解释了吧。public class MainActivity extends Activity implements OnClickListener {private Button startService; private Button stopService; @Override protected void onCreate(Bundle savedInstanceState) { super.onCreate(savedInstanceState); setContentView(R.layout.activity_main); startService = (Button) findViewById(R.id.start_service); stopService = (Button) findViewById(R.id.stop_service); startService.setOnClickListener(this); stopService.setOnClickListener(this); } @Override public void onClick(View v) { switch (v.getId()) { case R.id.start_service: Intent startIntent = new Intent(this, MyService.class); startService(startIntent); break; case R.id.stop_service: Intent stopIntent = new Intent(this, MyService.class); stopService(stopIntent); break; default: break; } }}
另外需要注意,项目中的每一个Service都必须在AndroidManifest.xml中注册才行,所以还需要编辑AndroidManifest.xml文件,代码如下所示:
- <?xml version=“1.0” encoding=“utf-8”?>
- <manifest xmlns:android=”http://schemas.android.com/apk/res/android”
- package=“com.example.servicetest”
- android:versionCode=“1”
- android:versionName=“1.0” >
- <uses-sdk
- android:minSdkVersion=“14”
- android:targetSdkVersion=“17” />
- <application
- android:allowBackup=“true”
- android:icon=“@drawable/ic_launcher”
- android:label=“@string/app_name”
- android:theme=“@style/AppTheme” >
- ……
- <service android:name=“com.example.servicetest.MyService” >
- </service>
- </application>
- </manifest>
<?xml version="1.0" encoding="utf-8"?>
<manifest xmlns:android="http://schemas.android.com/apk/res/android"
package="com.example.servicetest"
android:versionCode="1"
android:versionName="1.0" ><uses-sdk android:minSdkVersion="14" android:targetSdkVersion="17" /> <application android:allowBackup="true" android:icon="@drawable/ic_launcher" android:label="@string/app_name" android:theme="@style/AppTheme" > …… <service android:name="com.example.servicetest.MyService" > </service> </application></manifest>
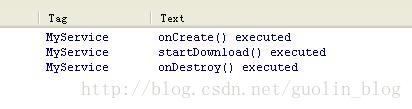
这样的话,一个简单的带有Service功能的程序就写好了,现在我们将程序运行起来,并点击一下Start Service按钮,可以看到LogCat的打印日志如下:
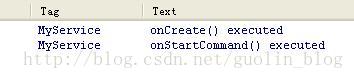
也就是说,当启动一个Service的时候,会调用该Service中的onCreate()和onStartCommand()方法。
那么如果我再点击一次Start Service按钮呢?这个时候的打印日志如下:

可以看到,这次只有onStartCommand()方法执行了,onCreate()方法并没有执行,为什么会这样呢?这是由于onCreate()方法只会在Service第一次被创建的时候调用,如果当前Service已经被创建过了,不管怎样调用startService()方法,onCreate()方法都不会再执行。因此你可以再多点击几次Start Service按钮试一次,每次都只会有onStartCommand()方法中的打印日志。
我们还可以到手机的应用程序管理界面来检查一下MyService是不是正在运行,如下图所示:
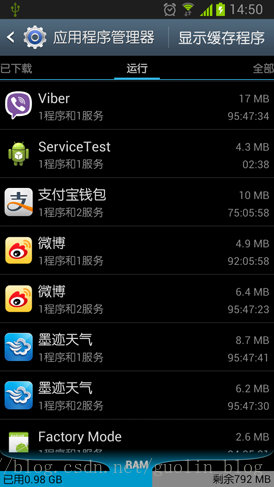
恩,MyService确实是正在运行的,即使它的内部并没有执行任何的逻辑。
回到ServiceTest程序,然后点击一下Stop Service按钮就可以将MyService停止掉了。
Service和Activity通信
上面我们学习了Service的基本用法,启动Service之后,就可以在onCreate()或onStartCommand()方法里去执行一些具体的逻辑了。不过这样的话Service和Activity的关系并不大,只是Activity通知了Service一下:“你可以启动了。”然后Service就去忙自己的事情了。那么有没有什么办法能让它们俩的关联更多一些呢?比如说在Activity中可以指定让Service去执行什么任务。当然可以,只需要让Activity和Service建立关联就好了。
观察MyService中的代码,你会发现一直有一个onBind()方法我们都没有使用到,这个方法其实就是用于和Activity建立关联的,修改MyService中的代码,如下所示:
- public class MyService extends Service {
- public static final String TAG = “MyService”;
- private MyBinder mBinder = new MyBinder();
- @Override
- public void onCreate() {
- super.onCreate();
- Log.d(TAG, ”onCreate() executed”);
- }
- @Override
- public int onStartCommand(Intent intent, int flags, int startId) {
- Log.d(TAG, ”onStartCommand() executed”);
- return super.onStartCommand(intent, flags, startId);
- }
- @Override
- public void onDestroy() {
- super.onDestroy();
- Log.d(TAG, ”onDestroy() executed”);
- }
- @Override
- public IBinder onBind(Intent intent) {
- return mBinder;
- }
- class MyBinder extends Binder {
- public void startDownload() {
- Log.d(”TAG”, “startDownload() executed”);
- // 执行具体的下载任务
- }
- }
- }
public class MyService extends Service {public static final String TAG = "MyService"; private MyBinder mBinder = new MyBinder(); @Override public void onCreate() { super.onCreate(); Log.d(TAG, "onCreate() executed"); } @Override public int onStartCommand(Intent intent, int flags, int startId) { Log.d(TAG, "onStartCommand() executed"); return super.onStartCommand(intent, flags, startId); } @Override public void onDestroy() { super.onDestroy(); Log.d(TAG, "onDestroy() executed"); } @Override public IBinder onBind(Intent intent) { return mBinder; } class MyBinder extends Binder { public void startDownload() { Log.d("TAG", "startDownload() executed"); // 执行具体的下载任务 } }}
这里我们新增了一个MyBinder类继承自Binder类,然后在MyBinder中添加了一个startDownload()方法用于在后台执行下载任务,当然这里并不是真正地去下载某个东西,只是做个测试,所以startDownload()方法只是打印了一行日志。
然后修改activity_main.xml中的代码,在布局文件中添加用于绑定Service和取消绑定Service的按钮:
- <LinearLayout xmlns:android=”http://schemas.android.com/apk/res/android”
- android:layout_width=“match_parent”
- android:layout_height=“match_parent”
- android:orientation=“vertical” >
- <Button
- android:id=“@+id/start_service”
- android:layout_width=“match_parent”
- android:layout_height=“wrap_content”
- android:text=“Start Service” />
- <Button
- android:id=“@+id/stop_service”
- android:layout_width=“match_parent”
- android:layout_height=“wrap_content”
- android:text=“Stop Service” />
- <Button
- android:id=“@+id/bind_service”
- android:layout_width=“match_parent”
- android:layout_height=“wrap_content”
- android:text=“Bind Service” />
- <Button
- android:id=“@+id/unbind_service”
- android:layout_width=“match_parent”
- android:layout_height=“wrap_content”
- android:text=“Unbind Service”
- />
- </LinearLayout>
接下来再修改MainActivity中的代码,让MainActivity和MyService之间建立关联,代码如下所示:<LinearLayout xmlns:android="http://schemas.android.com/apk/res/android"
android:layout_width="match_parent"
android:layout_height="match_parent"
android:orientation="vertical" ><Button android:id="@+id/start_service" android:layout_width="match_parent" android:layout_height="wrap_content" android:text="Start Service" /> <Button android:id="@+id/stop_service" android:layout_width="match_parent" android:layout_height="wrap_content" android:text="Stop Service" /> <Button android:id="@+id/bind_service" android:layout_width="match_parent" android:layout_height="wrap_content" android:text="Bind Service" /> <Button android:id="@+id/unbind_service" android:layout_width="match_parent" android:layout_height="wrap_content" android:text="Unbind Service" /></LinearLayout>
- public class MainActivity extends Activity implements OnClickListener {
- private Button startService;
- private Button stopService;
- private Button bindService;
- private Button unbindService;
- private MyService.MyBinder myBinder;
- private ServiceConnection connection = new ServiceConnection() {
- @Override
- public void onServiceDisconnected(ComponentName name) {
- }
- @Override
- public void onServiceConnected(ComponentName name, IBinder service) {
- myBinder = (MyService.MyBinder) service;
- myBinder.startDownload();
- }
- };
- @Override
- protected void onCreate(Bundle savedInstanceState) {
- super.onCreate(savedInstanceState);
- setContentView(R.layout.activity_main);
- startService = (Button) findViewById(R.id.start_service);
- stopService = (Button) findViewById(R.id.stop_service);
- bindService = (Button) findViewById(R.id.bind_service);
- unbindService = (Button) findViewById(R.id.unbind_service);
- startService.setOnClickListener(this);
- stopService.setOnClickListener(this);
- bindService.setOnClickListener(this);
- unbindService.setOnClickListener(this);
- }
- @Override
- public void onClick(View v) {
- switch (v.getId()) {
- case R.id.start_service:
- Intent startIntent = new Intent(this, MyService.class);
- startService(startIntent);
- break;
- case R.id.stop_service:
- Intent stopIntent = new Intent(this, MyService.class);
- stopService(stopIntent);
- break;
- case R.id.bind_service:
- Intent bindIntent = new Intent(this, MyService.class);
- bindService(bindIntent, connection, BIND_AUTO_CREATE);
- break;
- case R.id.unbind_service:
- unbindService(connection);
- break;
- default:
- break;
- }
- }
- }
public class MainActivity extends Activity implements OnClickListener {private Button startService; private Button stopService; private Button bindService; private Button unbindService; private MyService.MyBinder myBinder; private ServiceConnection connection = new ServiceConnection() { @Override public void onServiceDisconnected(ComponentName name) { } @Override public void onServiceConnected(ComponentName name, IBinder service) { myBinder = (MyService.MyBinder) service; myBinder.startDownload(); } }; @Override protected void onCreate(Bundle savedInstanceState) { super.onCreate(savedInstanceState); setContentView(R.layout.activity_main); startService = (Button) findViewById(R.id.start_service); stopService = (Button) findViewById(R.id.stop_service); bindService = (Button) findViewById(R.id.bind_service); unbindService = (Button) findViewById(R.id.unbind_service); startService.setOnClickListener(this); stopService.setOnClickListener(this); bindService.setOnClickListener(this); unbindService.setOnClickListener(this); } @Override public void onClick(View v) { switch (v.getId()) { case R.id.start_service: Intent startIntent = new Intent(this, MyService.class); startService(startIntent); break; case R.id.stop_service: Intent stopIntent = new Intent(this, MyService.class); stopService(stopIntent); break; case R.id.bind_service: Intent bindIntent = new Intent(this, MyService.class); bindService(bindIntent, connection, BIND_AUTO_CREATE); break; case R.id.unbind_service: unbindService(connection); break; default: break; } }}
可以看到,这里我们首先创建了一个ServiceConnection的匿名类,在里面重写了onServiceConnected()方法和onServiceDisconnected()方法,这两个方法分别会在Activity与Service建立关联和解除关联的时候调用。在onServiceConnected()方法中,我们又通过向下转型得到了MyBinder的实例,有了这个实例,Activity和Service之间的关系就变得非常紧密了。现在我们可以在Activity中根据具体的场景来调用MyBinder中的任何public方法,即实现了Activity指挥Service干什么Service就去干什么的功能。
当然,现在Activity和Service其实还没关联起来了呢,这个功能是在Bind Service按钮的点击事件里完成的。可以看到,这里我们仍然是构建出了一个Intent对象,然后调用bindService()方法将Activity和Service进行绑定。bindService()方法接收三个参数,第一个参数就是刚刚构建出的Intent对象,第二个参数是前面创建出的ServiceConnection的实例,第三个参数是一个标志位,这里传入BIND_AUTO_CREATE表示在Activity和Service建立关联后自动创建Service,这会使得MyService中的onCreate()方法得到执行,但onStartCommand()方法不会执行。
然后如何我们想解除Activity和Service之间的关联怎么办呢?调用一下unbindService()方法就可以了,这也是Unbind Service按钮的点击事件里实现的逻辑。
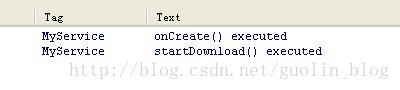
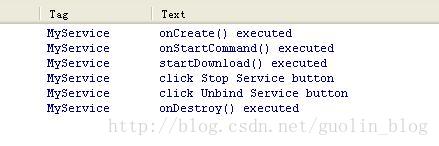
现在让我们重新运行一下程序吧,在MainActivity中点击一下Bind Service按钮,LogCat里的打印日志如下图所示:
另外需要注意,任何一个Service在整个应用程序范围内都是通用的,即MyService不仅可以和MainActivity建立关联,还可以和任何一个Activity建立关联,而且在建立关联时它们都可以获取到相同的MyBinder实例。
如何销毁Service
在Service的基本用法这一部分,我们介绍了销毁Service最简单的一种情况,点击Start Service按钮启动Service,再点击Stop Service按钮停止Service,这样MyService就被销毁了,可以看到打印日志如下所示:
那么如果我们是点击的Bind Service按钮呢?由于在绑定Service的时候指定的标志位是BIND_AUTO_CREATE,说明点击Bind Service按钮的时候Service也会被创建,这时应该怎么销毁Service呢?其实也很简单,点击一下Unbind Service按钮,将Activity和Service的关联解除就可以了。
先点击一下Bind Service按钮,再点击一下Unbind Service按钮,打印日志如下所示:
以上这两种销毁的方式都很好理解。那么如果我们既点击了Start Service按钮,又点击了Bind Service按钮会怎么样呢?这个时候你会发现,不管你是单独点击Stop Service按钮还是Unbind Service按钮,Service都不会被销毁,必要将两个按钮都点击一下,Service才会被销毁。也就是说,点击Stop Service按钮只会让Service停止,点击Unbind Service按钮只会让Service和Activity解除关联,一个Service必须要在既没有和任何Activity关联又处理停止状态的时候才会被销毁。
为了证实一下,我们在Stop Service和Unbind Service按钮的点击事件里面加入一行打印日志:
- public void onClick(View v) {
- switch (v.getId()) {
- case R.id.start_service:
- Intent startIntent = new Intent(this, MyService.class);
- startService(startIntent);
- break;
- case R.id.stop_service:
- Log.d(”MyService”, “click Stop Service button”);
- Intent stopIntent = new Intent(this, MyService.class);
- stopService(stopIntent);
- break;
- case R.id.bind_service:
- Intent bindIntent = new Intent(this, MyService.class);
- bindService(bindIntent, connection, BIND_AUTO_CREATE);
- break;
- case R.id.unbind_service:
- Log.d(”MyService”, “click Unbind Service button”);
- unbindService(connection);
- break;
- default:
- break;
- }
- }
public void onClick(View v) {
switch (v.getId()) {
case R.id.start_service:
Intent startIntent = new Intent(this, MyService.class);
startService(startIntent);
break;
case R.id.stop_service:
Log.d("MyService", "click Stop Service button");
Intent stopIntent = new Intent(this, MyService.class);
stopService(stopIntent);
break;
case R.id.bind_service:
Intent bindIntent = new Intent(this, MyService.class);
bindService(bindIntent, connection, BIND_AUTO_CREATE);
break;
case R.id.unbind_service:
Log.d("MyService", "click Unbind Service button");
unbindService(connection);
break;
default:
break;
}
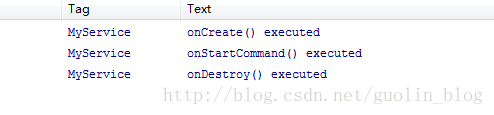
}然后重新运行程序,先点击一下Start Service按钮,再点击一下Bind Service按钮,这样就将Service启动起来,并和Activity建立了关联。然后点击Stop Service按钮后Service并不会销毁,再点击一下Unbind Service按钮,Service就会销毁了,打印日志如下所示:
我们应该始终记得在Service的onDestroy()方法里去清理掉那些不再使用的资源,防止在Service被销毁后还会有一些不再使用的对象仍占用着内存。
Service和Thread的关系
不少Android初学者都可能会有这样的疑惑,Service和Thread到底有什么关系呢?什么时候应该用Service,什么时候又应该用Thread?答案可能会有点让你吃惊,因为Service和Thread之间没有任何关系!
之所以有不少人会把它们联系起来,主要就是因为Service的后台概念。Thread我们大家都知道,是用于开启一个子线程,在这里去执行一些耗时操作就不会阻塞主线程的运行。而Service我们最初理解的时候,总会觉得它是用来处理一些后台任务的,一些比较耗时的操作也可以放在这里运行,这就会让人产生混淆了。但是,如果我告诉你Service其实是运行在主线程里的,你还会觉得它和Thread有什么关系吗?让我们看一下这个残酷的事实吧。
在MainActivity的onCreate()方法里加入一行打印当前线程id的语句:
- Log.d(“MyService”, “MainActivity thread id is ” + Thread.currentThread().getId());
Log.d("MyService", "MainActivity thread id is " + Thread.currentThread().getId());- Log.d(“MyService”, “MyService thread id is ” + Thread.currentThread().getId());
Log.d("MyService", "MyService thread id is " + Thread.currentThread().getId());现在重新运行一下程序,并点击Start Service按钮,会看到如下打印日志:
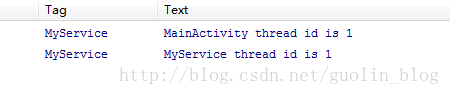
可以看到,它们的线程id完全是一样的,由此证实了Service确实是运行在主线程里的,也就是说如果你在Service里编写了非常耗时的代码,程序必定会出现ANR的。
你可能会惊呼,这不是坑爹么!?那我要Service又有何用呢?其实大家不要把后台和子线程联系在一起就行了,这是两个完全不同的概念。Android的后台就是指,它的运行是完全不依赖UI的。即使Activity被销毁,或者程序被关闭,只要进程还在,Service就可以继续运行。比如说一些应用程序,始终需要与服务器之间始终保持着心跳连接,就可以使用Service来实现。你可能又会问,前面不是刚刚验证过Service是运行在主线程里的么?在这里一直执行着心跳连接,难道就不会阻塞主线程的运行吗?当然会,但是我们可以在Service中再创建一个子线程,然后在这里去处理耗时逻辑就没问题了。
额,既然在Service里也要创建一个子线程,那为什么不直接在Activity里创建呢?这是因为Activity很难对Thread进行控制,当Activity被销毁之后,就没有任何其它的办法可以再重新获取到之前创建的子线程的实例。而且在一个Activity中创建的子线程,另一个Activity无法对其进行操作。但是Service就不同了,所有的Activity都可以与Service进行关联,然后可以很方便地操作其中的方法,即使Activity被销毁了,之后只要重新与Service建立关联,就又能够获取到原有的Service中Binder的实例。因此,使用Service来处理后台任务,Activity就可以放心地finish,完全不需要担心无法对后台任务进行控制的情况。
一个比较标准的Service就可以写成:
- @Override
- public int onStartCommand(Intent intent, int flags, int startId) {
- new Thread(new Runnable() {
- @Override
- public void run() {
- // 开始执行后台任务
- }
- }).start();
- return super.onStartCommand(intent, flags, startId);
- }
- class MyBinder extends Binder {
- public void startDownload() {
- new Thread(new Runnable() {
- @Override
- public void run() {
- // 执行具体的下载任务
- }
- }).start();
- }
- }
@Override
public int onStartCommand(Intent intent, int flags, int startId) {
new Thread(new Runnable() {
@Override
public void run() {
// 开始执行后台任务
}
}).start();
return super.onStartCommand(intent, flags, startId);
}class MyBinder extends Binder {
public void startDownload() { new Thread(new Runnable() { @Override public void run() { // 执行具体的下载任务 } }).start(); }}
创建前台Service
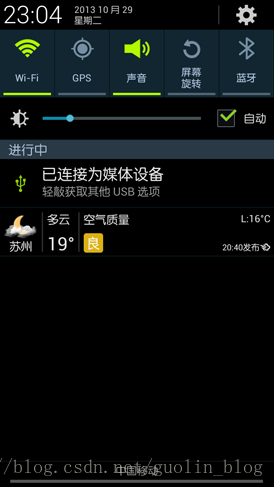
Service几乎都是在后台运行的,一直以来它都是默默地做着辛苦的工作。但是Service的系统优先级还是比较低的,当系统出现内存不足情况时,就有可能会回收掉正在后台运行的Service。如果你希望Service可以一直保持运行状态,而不会由于系统内存不足的原因导致被回收,就可以考虑使用前台Service。前台Service和普通Service最大的区别就在于,它会一直有一个正在运行的图标在系统的状态栏显示,下拉状态栏后可以看到更加详细的信息,非常类似于通知的效果。当然有时候你也可能不仅仅是为了防止Service被回收才使用前台Service,有些项目由于特殊的需求会要求必须使用前台Service,比如说墨迹天气,它的Service在后台更新天气数据的同时,还会在系统状态栏一直显示当前天气的信息,如下图所示:
那么我们就来看一下如何才能创建一个前台Service吧,其实并不复杂,修改MyService中的代码,如下所示:
- public class MyService extends Service {
- public static final String TAG = “MyService”;
- private MyBinder mBinder = new MyBinder();
- @Override
- public void onCreate() {
- super.onCreate();
- Notification notification = new Notification(R.drawable.ic_launcher,
- ”有通知到来”, System.currentTimeMillis());
- Intent notificationIntent = new Intent(this, MainActivity.class);
- PendingIntent pendingIntent = PendingIntent.getActivity(this, 0,
- notificationIntent, 0);
- notification.setLatestEventInfo(this, “这是通知的标题”, “这是通知的内容”,
- pendingIntent);
- startForeground(1, notification);
- Log.d(TAG, ”onCreate() executed”);
- }
- ………
- }
public class MyService extends Service {public static final String TAG = "MyService"; private MyBinder mBinder = new MyBinder(); @Override public void onCreate() { super.onCreate(); Notification notification = new Notification(R.drawable.ic_launcher, "有通知到来", System.currentTimeMillis()); Intent notificationIntent = new Intent(this, MainActivity.class); PendingIntent pendingIntent = PendingIntent.getActivity(this, 0, notificationIntent, 0); notification.setLatestEventInfo(this, "这是通知的标题", "这是通知的内容", pendingIntent); startForeground(1, notification); Log.d(TAG, "onCreate() executed"); } .........}
这里只是修改了MyService中onCreate()方法的代码。可以看到,我们首先创建了一个Notification对象,然后调用了它的setLatestEventInfo()方法来为通知初始化布局和数据,并在这里设置了点击通知后就打开MainActivity。然后调用startForeground()方法就可以让MyService变成一个前台Service,并会将通知的图片显示出来。
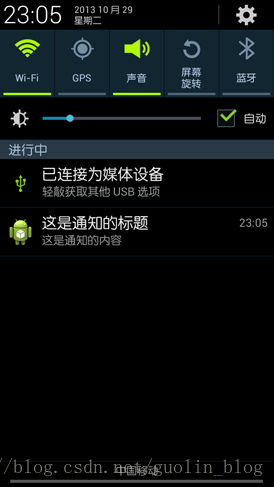
现在重新运行一下程序,并点击Start Service或Bind Service按钮,MyService就会以前台Service的模式启动了,并且在系统状态栏会弹出一个通栏图标,下拉状态栏后可以看到通知的详细内容,如下图所示。
好了,由于篇幅的原因,本篇文章就先写到这里。目前我们已经把关于Service的很多重要知识点都梳理完了,下一篇文章会承接这篇文章,介绍Android Service中剩下的一个非常重要且复杂的知识点 —— 远程Service的使用。


 416
416

 被折叠的 条评论
为什么被折叠?
被折叠的 条评论
为什么被折叠?
 到【灌水乐园】发言


