


I know you don't have time to read a manual with dozens of pages (Neither I had time to write them). So here is the shortest manual for Googlipse :-)

Alternatively, you can right click a module file and select Run As -> GWT Hosted Mode Application, to run the module.
Requirements:
Googlipse requires Eclipse 3.2 with WebTools Platform 1.5 running on a Java 1.5 VM. You need to separately install Google Web Toolkit.Installation:
- Drop the com.googlipse.gwt_ .jar file in your eclipse/plugins folder
- Open Eclipse. Select Window->Preferences->Googlipse and set GWT home to the directory where you have installed the Google Web Toolkit.
- You are all set to code.
Adding Googlipse to your project:
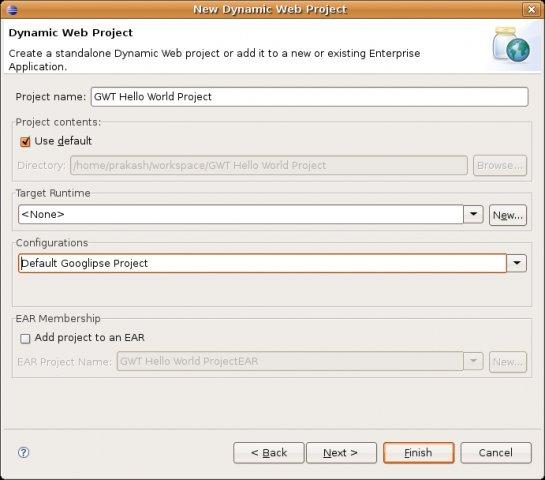
Googlipse is implemented as a WTP Facet. When creating a new Dynamic Web Project, select Googlipse in the Project Facets page. If you already have a Dynamic Web Project, you can add Googlipse facet by selecting Project->Properties->Project Facets(Please make sure you don't have gwt-user.jar in your classpath). In case you didn't like Googlipse, you can remove the facet.
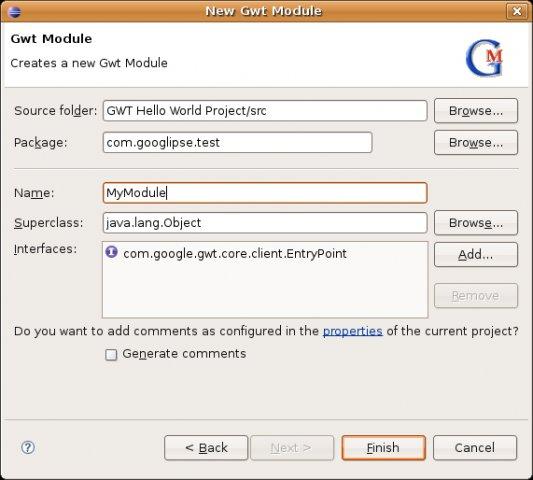
Creating a Module:
Once you have a Dynamic Web Project with Googlipse facet, you can add a new module by File->New->Other->Googlipse->Gwt Module. Type the name of the module and select(or type) the package where you want to create. Click Finish, you will have all the artifacts for the module will be generated.
Adding a Remote Service:
You can select File->New->Other->Googlipse->Gwt Remote Service. Select the module where you want to the RemoteService. Type the name and uri for the service and click Finish. Now the artifacts for the remote service will be generated. Entries are added to web.xml and gwt.xml
Adding a Remote Service method:
You can open the RemoteService interface and add/change/delete methods in it. You need to provide the implementation of those methods in RemoteServiceImpl class, but thanks to Googlipse, you don't have to do anything in RemoteServiceAsync. Googlipse will automatically update the corresponding Async file whenever a RemoteService interface is changed.Calling a method using Remote Service:
The utility class in the Remote service should help you in making the remote call.
MyRemoteServiceAsync async = MyRemoteService.Util.getInstance();
async.makeRemoteCall(param1, param2, callback);
async.makeRemoteCall(param1, param2, callback);
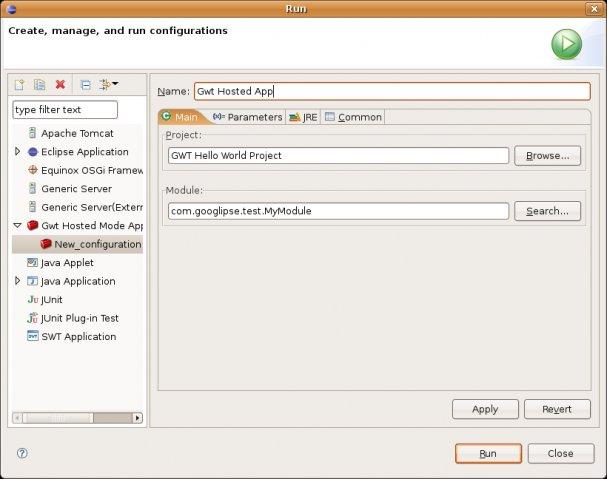
Running/Debugging a Gwt Application:
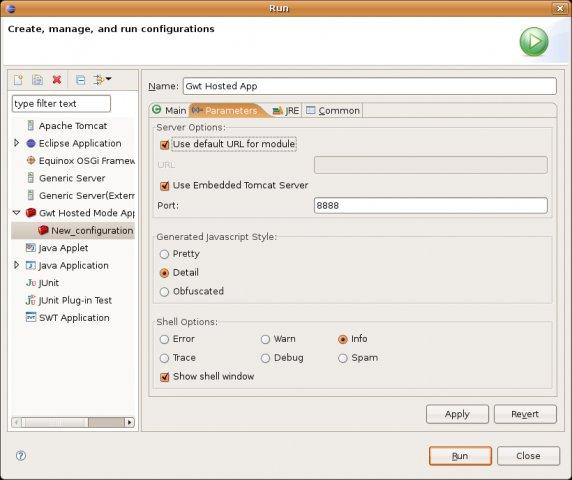
Select Run->Run/Debug to activate the Lauch configuration dialog box. Double Click "Gwt Application". In the main page, you can select the Project & Module you want to run. In the parameters page you can select the parameters such as port and log level. Click Run to execute the GwtShell & bring up your application. The laucher will add the jar files & all the source folders in the project to your application.Alternatively, you can right click a module file and select Run As -> GWT Hosted Mode Application, to run the module.
Deploying in external servers:
You have to launch GWT app in the hosted mode, as said above, and click 'Compile/Browse' button to do the compilation. After than, you can add the project to any external server configured ing the Server's view, just as the way you used to deploy the normal Dynamic Web Application.Creating a war:
Compile the module as said in the above step. Select File->Export->Export as war. Follow the wizard. No more ant tasks :-)Questions/Bugs/Suggestions?
Drop a mail to googlipse-users{at}lists.sourceforge.net
注意:
Dynamic Web Project是eclipse官方的web开发插件WTP的“新建”向导.....
下载地址:http://www.eclipse.org/webtools/


 3204
3204

 被折叠的 条评论
为什么被折叠?
被折叠的 条评论
为什么被折叠?
 到【灌水乐园】发言


