


方式一:自定义Cell,重写setFrame:方法,在调用父类方法[super setFrame:fame];之前减掉cell的高度:frame.size.height -= 10;减去的值即为分隔线的宽度;
方式二:自定义使用UIView作为分隔线;
方式三:设置iOS8中的tableView中的分隔线内边距separatorInset为Zero,cell的布局外边距layoutMargins为Zero;
方式一:万能方式(推荐使用该方式:重写Cell的setFrame方法)
1. 取消系统自带的分隔线
2. 设置tabView的backgroundColor等于分隔线的颜色
3. 重写cell类的setFrame方法,修改cell的高度
self.tableView.separatorStyle = UITableViewCellSeparatorStyleNone;
self.tableView.backgroundColor = RGB(220, 220, 221);

// CustomCell.m
- (void)setFrame:(CGRect)frame {
    frame.size.height -= 10;    // 减掉的值就是分隔线的高度
    [super setFrame:frame];
}
实现原理:
想办法在[tableView addSubview:cell]之前修改cell.frame,只要能让下个cell和上个cell保持一个间距,那么这个间距就可以被看做分隔线;为了让cell之间保持一个小间隙有两种做法,一种是调整cell.origin.y的值,将纵坐标的值稍微调大些,另一种是y值保持不变,减少cell的高度,由于y值不变,高度变小了,间隙就空出来了。
要确定cell.frame: 首先x, width的值是固定的x=0; width = ScreenWidth; 只有y的值和height的值是动态变化的,而y的值由height决定,因系统首先会调用tableView的代理方法heightForRowAtIndexPath,拿到每个Cell对应的高度,这样高度就确定了,y值也就能确定了,cell.frame = CGRectMake(0, y, ScreenWidth, 代理方法heightForRowAtIndexPath获取);
如果使用调整cell的高度方式注意需要在heightForRowAtIndexPath中返回的高度出来cell本身的高度还要再加上间隙的高度,这样在setFrame中又减去了分隔线的高度,这样就保证了cell的高度不变;
减小Cell的高度方式核心思想是:因在代理方法heightForRowAtIndexPath中返回值为:cell.height + separatorHeight= 100 + 10; 高度确定了,该cell的y坐标就确定了,因y坐标的计算是相对于100 + 10 = 110的,此时如果不调整cell.height出现的效果是cell的高度110,每个cell间是紧密相连,中间没有任何空隙。如果此时减小高度了,因y的值是相对于110计算的,此时就会有个10的间隙。
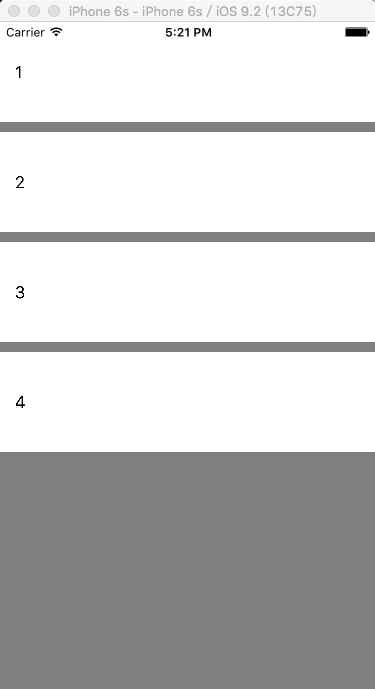
例如正常情况下:
Cell1:{(0, 0), (375, 110)} ; Cell2:{(0, 110), (375, 110)}
中间间隙=cell2.origin.y - cell1.size.height = 110 - 110 = 0;
减小cell的高度情况下:
Cell1:{(0, 0), (375, 100)}; Cell2:{(0, 110), (375, 100)}
中间间隙=cell2.origin.y - cell1.size.height = 110 - 100 = 10; 上下cell之间就有个10的间隙可以被看做cell的分隔线
Demo:
#import "ViewController.h"
#import "XXTableViewCell.h"

@interface ViewController () <UITableViewDataSource, UITableViewDelegate>
@property (strong, nonatomic) NSArray *dataSource;
@end

@implementation ViewController

- (void)viewDidLoad {
    [super viewDidLoad];
    UITableView *tableView = [[UITableView alloc] initWithFrame:CGRectMake(0, 0, [UIScreen mainScreen].bounds.size.width, [UIScreen mainScreen].bounds.size.height) style:UITableViewStylePlain];
    tableView.separatorStyle = UITableViewCellSeparatorStyleNone;
    tableView.backgroundColor = [UIColor grayColor];
    tableView.delegate = self;
    tableView.dataSource = self;
    [tableView registerClass:[XXTableViewCell class] forCellReuseIdentifier:NSStringFromClass([self class])];
    [self.view addSubview:tableView];
}

- (NSInteger)tableView:(UITableView *)tableView numberOfRowsInSection:(NSInteger)section {
    return self.dataSource.count;
}

- (UITableViewCell *)tableView:(UITableView *)tableView cellForRowAtIndexPath:(NSIndexPath *)indexPath {
    XXTableViewCell *cell = [tableView dequeueReusableCellWithIdentifier:NSStringFromClass([self class])];
    cell.textLabel.text = self.dataSource[indexPath.row];


    return cell;
}

- (NSArray *)dataSource {
    if (_dataSource == nil) {
        _dataSource = @[@"1", @"2", @"3", @"4"];
    }

    return _dataSource;
}


- (CGFloat)tableView:(UITableView *)tableView heightForRowAtIndexPath:(NSIndexPath *)indexPath {
    return 100 + 10;  // cell.height + spearatorHeight
}
@end
#import "XXTableViewCell.h"
@implementation XXTableViewCell
- (void)setFrame:(CGRect)frame {
frame.size.height -= 10;
NSLog(@"%@", NSStringFromCGRect(frame));
[super setFrame:frame];
}
@end
方式二:取消系统自带的分隔闲,自定义分隔线,使用UIView,将高度设置为1
方式三:使用iOS8.0系统属性
首先设置分隔线的内边距为0
self.tableView.separatorInset = UIEdgeInsetsZero;其次在自定义的cell中设置自动布局的约束边距为0
- (void)awakeFromNib {
    self.layoutMargins = UIEdgeInsetsZero;
}
这样分隔线的宽度就和屏幕一样宽了


 376
376


 被折叠的 条评论
为什么被折叠?
被折叠的 条评论
为什么被折叠?
 到【灌水乐园】发言


