


项目开发好以后,通常要在多个环境部署,像我曾经呆过的公司最多达5种环境:本机环境(local)、(开发小组内自测的)开发环境(dev)、(提供给测试团队的)测试环境(sit)、预发布环境(pre)、正式生产环境(prod),每种环境都有各自的配置参数,比如:数据库连接、远程调用的ws地址等等。如果每个环境build前手动修改这些参数,显然太不fashion.
maven早就考虑到了这些问题,看下面的pom片段:
- <profiles>
- <profile>
- <!-- 本地环境 -->
- <id>local</id>
- <properties>
- <jdbc.url>jdbc:oracle:thin:@localhost:1521:orcl</jdbc.url>
- <jdbc.username>***</jdbc.username>
- <jdbc.password>***</jdbc.password>
- </properties>
- </profile>
- <profile>
- <!-- 开发环境 -->
- <id>dev</id>
- <properties>
- <jdbc.url>jdbc:oracle:thin:@172.21.129.51:1521:orcl</jdbc.url>
- <jdbc.username>***</jdbc.username>
- <jdbc.password>***</jdbc.password>
- </properties>
- <!-- 默认激活本环境 -->
- <activation>
- <activeByDefault>true</activeByDefault>
- </activation>
- </profile>
- </profiles>
profiles节点中,定义了二种环境:local、dev(默认激活dev环境),可以在各自的环境中添加需要的property值,接下来修改build节点,参考下面的示例:
- <build>
- <resources>
- <resource>
- <directory>src/main/resources</directory>
- <filtering>true</filtering>
- </resource>
- </resources>
- <plugins>
- <plugin>
- <groupId>org.apache.maven.plugins</groupId>
- <artifactId>maven-compiler-plugin</artifactId>
- <version>2.3</version>
- <configuration>
- <source>1.7</source>
- <target>1.7</target>
- <encoding>utf-8</encoding>
- </configuration>
- </plugin>
- </plugins>
- </build>
resource节点是关键,它表明了哪个目录下的配置文件(不管是xml配置文件,还是properties属性文件),需要根据profile环境来替换属性值。
通常配置文件放在resources目录下,build时该目录下的文件都自动会copy到class目录下
- <?xml version="1.0" encoding="UTF-8"?>
- <beans xmlns="http://www.springframework.org/schema/beans"
- xmlns:xsi="http://www.w3.org/2001/XMLSchema-instance"
- xmlns:context="http://www.springframework.org/schema/context"
- xmlns:jee="http://www.springframework.org/schema/jee"
- xsi:schemaLocation="
- http://www.springframework.org/schema/beans http://www.springframework.org/schema/beans/spring-beans.xsd>
- <bean id="dataSource" class="org.apache.commons.dbcp.BasicDataSource" destroy-method="close">
- <property name="driverClassName" value="oracle.jdbc.driver.OracleDriver" />
- <property name="url" value="${jdbc.url}" />
- <property name="username" value="${jdbc.username}" />
- <property name="password" value="${jdbc.password}" />
- </bean>
- </beans>
各属性节点的值,用占位符"${属性名}"占位,maven在package时,会根据profile的环境自动替换这些占位符为实际属性值。
默认情况下:
maven package
将采用默认激活的profile环境来打包,也可以手动指定环境,比如:
maven package -P dev
将自动打包成dev环境的部署包(注:参数P为大写)
这时候很多人会有一个疑问,生产环境,通常是在webserver(比如weblogic上),它配置的一个JNDI数据源,你这显然不适用啊,客官别急,我将会给两种方案用来解决问题。
第一种,简单暴力的
- <?xml version="1.0" encoding="UTF-8"?>
- <beans xmlns="http://www.springframework.org/schema/beans"
- xmlns:xsi="http://www.w3.org/2001/XMLSchema-instance"
- xmlns:jee="http://www.springframework.org/schema/jee"
- xsi:schemaLocation="
- http://www.springframework.org/schema/beans http://www.springframework.org/schema/beans/spring-beans.xsd
- http://www.springframework.org/schema/jee http://www.springframework.org/schema/jee/spring-jee.xsd">
- <bean id="${db-source-jdbc}" class="org.apache.commons.dbcp.BasicDataSource" destroy-method="close">
- <property name="driverClassName" value="oracle.jdbc.driver.OracleDriver" />
- <property name="url" value="${jdbc.url}" />
- <property name="username" value="${jdbc.username}" />
- <property name="password" value="${jdbc.password}" />
- </bean>
- <jee:jndi-lookup id="${db-source-jndi}" jndi-name="${jndi.name}" />
- </beans>
POM文件
- <profiles>
- <profile>
- <!-- 本地环境 -->
- <id>local</id>
- <properties>
- <db-source-jdbc>dataSource</db-source-jdbc>
- <db-source-jndi>NONE</db-source-jndi>
- <db-url>jdbc:oracle:thin:@localhost:1521:XE</db-url>
- <db-username>***</db-username>
- <db-password>***</db-password>
- </properties>
- <!-- 默认激活本环境 -->
- <activation>
- <activeByDefault>true</activeByDefault>
- </activation>
- </profile>
- <profile>
- <!-- 开发环境 -->
- <id>pro</id>
- <properties>
- <db-source-jdbc>NONE</db-source-jdbc>
- <db-source-jndi>dataSource</db-source-jndi>
- <jndi.name>somnus</jndi.name>
- </properties>
- </profile>
- </profiles>
mvn clean package -P local打包本地开发环境时,将生成
- <?xml version="1.0" encoding="UTF-8"?>
- <beans xmlns="http://www.springframework.org/schema/beans"
- xmlns:xsi="http://www.w3.org/2001/XMLSchema-instance"
- xmlns:jee="http://www.springframework.org/schema/jee"
- xsi:schemaLocation="
- http://www.springframework.org/schema/beans http://www.springframework.org/schema/beans/spring-beans.xsd
- http://www.springframework.org/schema/jee http://www.springframework.org/schema/jee/spring-jee.xsd">
- <bean id="dataSource" class="org.apache.commons.dbcp.BasicDataSource" destroy-method="close">
- <property name="driverClassName" value="oracle.jdbc.driver.OracleDriver" />
- <property name="url" value="jdbc:oracle:thin:@localhost:1521:orcl" />
- <property name="username" value="***" />
- <property name="password" value="***" />
- </bean>
- <jee:jndi-lookup id="NONE" jndi-name="${jndi.name}" />
- </beans>
mvn clean package -P pro打包本地开发环境时,将生成
- <?xml version="1.0" encoding="UTF-8"?>
- <beans xmlns="http://www.springframework.org/schema/beans"
- xmlns:xsi="http://www.w3.org/2001/XMLSchema-instance"
- xmlns:jee="http://www.springframework.org/schema/jee"
- xsi:schemaLocation="
- http://www.springframework.org/schema/beans http://www.springframework.org/schema/beans/spring-beans.xsd
- http://www.springframework.org/schema/jee http://www.springframework.org/schema/jee/spring-jee.xsd">
- <bean id="NONE" class="org.apache.commons.dbcp.BasicDataSource" destroy-method="close">
- <property name="driverClassName" value="oracle.jdbc.driver.OracleDriver" />
- <property name="url" value="${jdbc.url}" />
- <property name="username" value="${jdbc.username}" />
- <property name="password" value="${jdbc.password}" />
- </bean>
- <jee:jndi-lookup id="dataSource" jndi-name="somnus" />
- </beans>
当bean的id为NONE意味着什么就不要我多说了吧
第二种,高级优美的
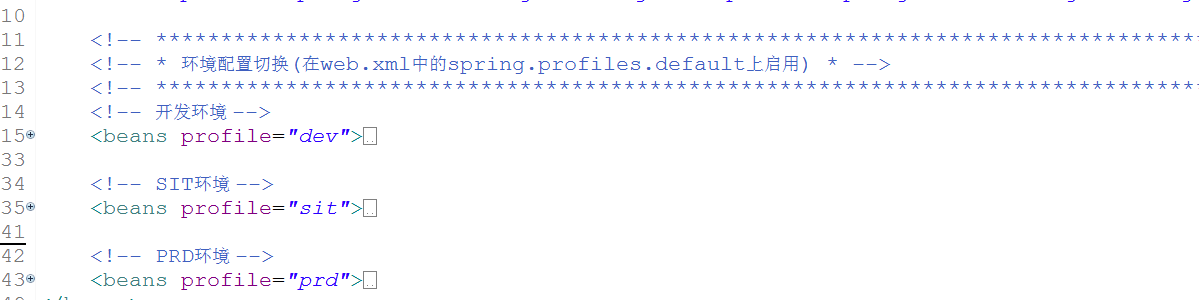
我们将利用Spring的profile配置,把我们需要的环境全部配置好,最终由web.xml中的spring.profiles.default决定调用哪个环境配置
先给出bean的配置
- <?xml version="1.0" encoding="UTF-8"?>
- <beans xmlns="http://www.springframework.org/schema/beans"
- xmlns:xsi="http://www.w3.org/2001/XMLSchema-instance"
- xmlns:context="http://www.springframework.org/schema/context"
- xmlns:jee="http://www.springframework.org/schema/jee"
- xsi:schemaLocation="
- http://www.springframework.org/schema/beans http://www.springframework.org/schema/beans/spring-beans.xsd
- http://www.springframework.org/schema/context http://www.springframework.org/schema/context/spring-context.xsd
- http://www.springframework.org/schema/jee http://www.springframework.org/schema/jee/spring-jee.xsd">
- <!-- ************************************************************************************************* -->
- <!-- * 环境配置切换(在web.xml中的spring.profiles.default上启用) * -->
- <!-- ************************************************************************************************* -->
- <!-- 开发环境 -->
- <beans profile="dev">
- <context:property-placeholder
- ignore-unresolvable="true" location="classpath:/env/configurations-dev.properties" />
- <!-- 数据源配置-DBCP数据库连接池 -->
- <bean id="dataSource" class="org.apache.commons.dbcp.BasicDataSource"
- destroy-method="close">
- <property name="driverClassName" value="${jdbc.driverClassName}" />
- <property name="url" value="${jdbc.url}" />
- <property name="username" value="${jdbc.username}" />
- <property name="password" value="${jdbc.password}" />
- <property name="initialSize" value="${jdbc.initialSize}" />
- <property name="maxActive" value="${jdbc.maxActive}" />
- <property name="maxIdle" value="${jdbc.maxIdle}" />
- <property name="minIdle" value="${jdbc.minIdle}" />
- <property name="maxWait" value="${jdbc.maxWait}" />
- <property name="defaultAutoCommit" value="false" />
- </bean>
- </beans>
- <!-- SIT环境 -->
- <beans profile="sit">
- <context:property-placeholder
- ignore-unresolvable="true" location="classpath:/env/configurations-sit.properties" />
- <!-- 数据源配置,使用应用服务器的数据库连接池 -->
- <jee:jndi-lookup id="dataSource" jndi-name="${jndi.name}" />
- </beans>
- <!-- PRD环境 -->
- <beans profile="prd">
- <context:property-placeholder
- ignore-unresolvable="true" location="classpath:/env/configurations-prd.properties" />
- <!-- 数据源配置,使用应用服务器的数据库连接池 -->
- <jee:jndi-lookup id="dataSource" jndi-name="${jndi.name}" />
- </beans>
- </beans>
现在是至关重要的web.xml文件
- <?xml version="1.0" encoding="UTF-8"?>
- <web-app version="3.0" xmlns="http://java.sun.com/xml/ns/javaee" xmlns:xsi="http://www.w3.org/2001/XMLSchema-instance"
- xsi:schemaLocation="http://java.sun.com/xml/ns/javaee http://java.sun.com/xml/ns/javaee/web-app_3_0.xsd">
- <!-- spring配置文件位置 -->
- <context-param>
- <param-name>contextConfigLocation</param-name>
- <param-value>classpath:/spring-basic.xml</param-value>
- </context-param>
- <context-param>
- <param-name>spring.profiles.default</param-name>
- <param-value>${profiles.active}</param-value>
- </context-param>
- <!-- spring监听器 -->
- <listener>
- <listener-class>org.springframework.web.context.ContextLoaderListener</listener-class>
- </listener>
- </web-app>
POM文件配置,主要看maven-war-plugin插件的配置
- <project xmlns="http://maven.apache.org/POM/4.0.0" xmlns:xsi="http://www.w3.org/2001/XMLSchema-instance"
- xsi:schemaLocation="http://maven.apache.org/POM/4.0.0 http://maven.apache.org/maven-v4_0_0.xsd">
- <modelVersion>4.0.0</modelVersion>
- <build>
- <plugins>
- <!-- 打war包插件 -->
- <plugin>
- <artifactId>maven-war-plugin</artifactId>
- <configuration>
- <packagingExcludes>
- WEB-INF/classes/logback-test.xml
- </packagingExcludes>
- <webResources>
- <resource>
- <!-- 是否过滤文件,也就是是否启动auto-config的功能 -->
- <filtering>true</filtering>
- <!-- 元配置文件的目录,相对于pom.xml文件的路径 -->
- <directory>${basedir}/src/main/webapp/WEB-INF</directory>
- <targetPath>WEB-INF</targetPath>
- <!-- 包括以下文件夹下的文件 -->
- <includes>
- <exclude>**/web.xml</exclude>
- </includes>
- </resource>
- </webResources>
- <warSourceDirectory>${basedir}/src/main/webapp</warSourceDirectory>
- <webXml>${basedir}/src/main/webapp/WEB-INF/web.xml</webXml>
- </configuration>
- </plugin>
- </plugins>
- </build>
- <profiles>
- <profile>
- <id>dev</id>
- <activation>
- <activeByDefault>true</activeByDefault>
- </activation>
- <properties>
- <profiles.active>dev</profiles.active>
- </properties>
- </profile>
- <profile>
- <id>sit</id>
- <properties>
- <profiles.active>sit</profiles.active>
- </properties>
- </profile>
- <profile>
- <id>prd</id>
- <properties>
- <profiles.active>prd</profiles.active>
- </properties>
- </profile>
- </profiles>
- </project>
package打包运行完,你将看到
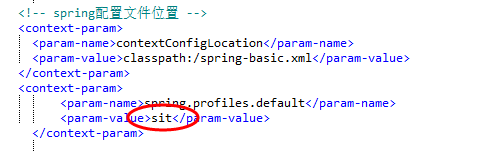
圈红的地方将不再是占位符,那么我们启动的时候web项目将会根据此配置直接去激活sit的配置,现在是不是觉得很简单了呢。
然而还没有完,如果只是到此,你只是能打包(mvn package),才能用上这么方便的东西,那如果我想在本地tomcat开发环境直接运行呢,
不管是采用tomcat直接启动,还是 mvn tomcat7:run 的方式,你会发现占位符反而会坑了项目,
由于内置tomcat是直接编译源码然后放到指定的位置去加载 ,所以上述的方法对于在内置tomcat运行是行不通的。
那就要另觅他法了,下面介绍一种探索出的一个方法:
首先在main目录下新建一个profile文件夹,将WEB-INF下面的web.xml复制过来一份
然后将WEB-INF下面的web.xml中的占位符修改成默认的配置(即没有占位符的,在本地测试用的profile值,如dev)
profile文件夹下用保留占位符的web.xml配置
然后对上述所描述的pom文件再做进一步修改,如下
- <project xmlns="http://maven.apache.org/POM/4.0.0" xmlns:xsi="http://www.w3.org/2001/XMLSchema-instance"
- xsi:schemaLocation="http://maven.apache.org/POM/4.0.0 http://maven.apache.org/maven-v4_0_0.xsd">
- <modelVersion>4.0.0</modelVersion>
- <build>
- <plugins>
- <!-- 打war包插件 -->
- <plugin>
- <artifactId>maven-war-plugin</artifactId>
- <configuration>
- <packagingExcludes>
- WEB-INF/classes/logback-test.xml
- </packagingExcludes>
- <webResources>
- <resource>
- <!-- 是否过滤文件,也就是是否启动auto-config的功能 -->
- <filtering>true</filtering>
- <!-- 元配置文件的目录,相对于pom.xml文件的路径 -->
- <directory>${basedir}/src/main/profile</directory>
- <targetPath>WEB-INF</targetPath>
- <!-- 包括以下文件夹下的文件 -->
- <includes>
- <exclude>**/web.xml</exclude>
- </includes>
- </resource>
- </webResources>
- <warSourceDirectory>${basedir}/src/main/webapp</warSourceDirectory>
- <webXml>${basedir}/src/main/webapp/WEB-INF/web.xml</webXml>
- </configuration>
- </plugin>
- </plugins>
- </build>
- <profiles>
- <profile>
- <id>dev</id>
- <activation>
- <activeByDefault>true</activeByDefault>
- </activation>
- <properties>
- <profiles.active>dev</profiles.active>
- </properties>
- </profile>
- <profile>
- <id>sit</id>
- <properties>
- <profiles.active>sit</profiles.active>
- </properties>
- </profile>
- <profile>
- <id>prd</id>
- <properties>
- <profiles.active>prd</profiles.active>
- </properties>
- </profile>
- </profiles>
- </project>
最后见证奇迹
执行命令 tomcat7:run ,完美解决,启动成功
后面我再补充一个小知识点,既然Spring给我们提供了,这么好的配置
web项目,靠web.xml可以激活任一数据源,那如果是单元测试,我将如何激活呢
这点Spring当然考虑到了,不过版本必须是Spring3.0以上 ,重要的事情说三遍,3.0 3.0 3.0啊 亲!!!
- /**
- * @author Somnus
- * @version 1.0
- * @Description 后台单元测试基类
- * @date 2012-11-19
- */
- @RunWith(SpringJUnit4ClassRunner.class)
- @ContextConfiguration(locations = "classpath:spring-basic.xml")
- @ActiveProfiles("dev")
- public abstract class AbstractTestSupport {
- protected transient Logger log = LoggerFactory.getLogger(this.getClass());
- @Rule
- public TestName name = new TestName();
- @Before
- public void setUp() {
- log.info("调用测试方法: {}", new Object[]{name.getMethodName()});
- }
- @After
- public void tearDown() {
- }
- }
留心 @ActiveProfiles("dev") ,想用哪个数据源,就用哪个数据源


 5521
5521

 被折叠的 条评论
为什么被折叠?
被折叠的 条评论
为什么被折叠?
 到【灌水乐园】发言


