


springboot整合Swagger2,实现对接口的版本管理
1. 需求
测试同学有需求,对于接口,之前的版本是1.0,现在是1.1版本,我想要知道1.1新增了什么接口,或者说修改了什么接口,怎么办?
2. 细化需求
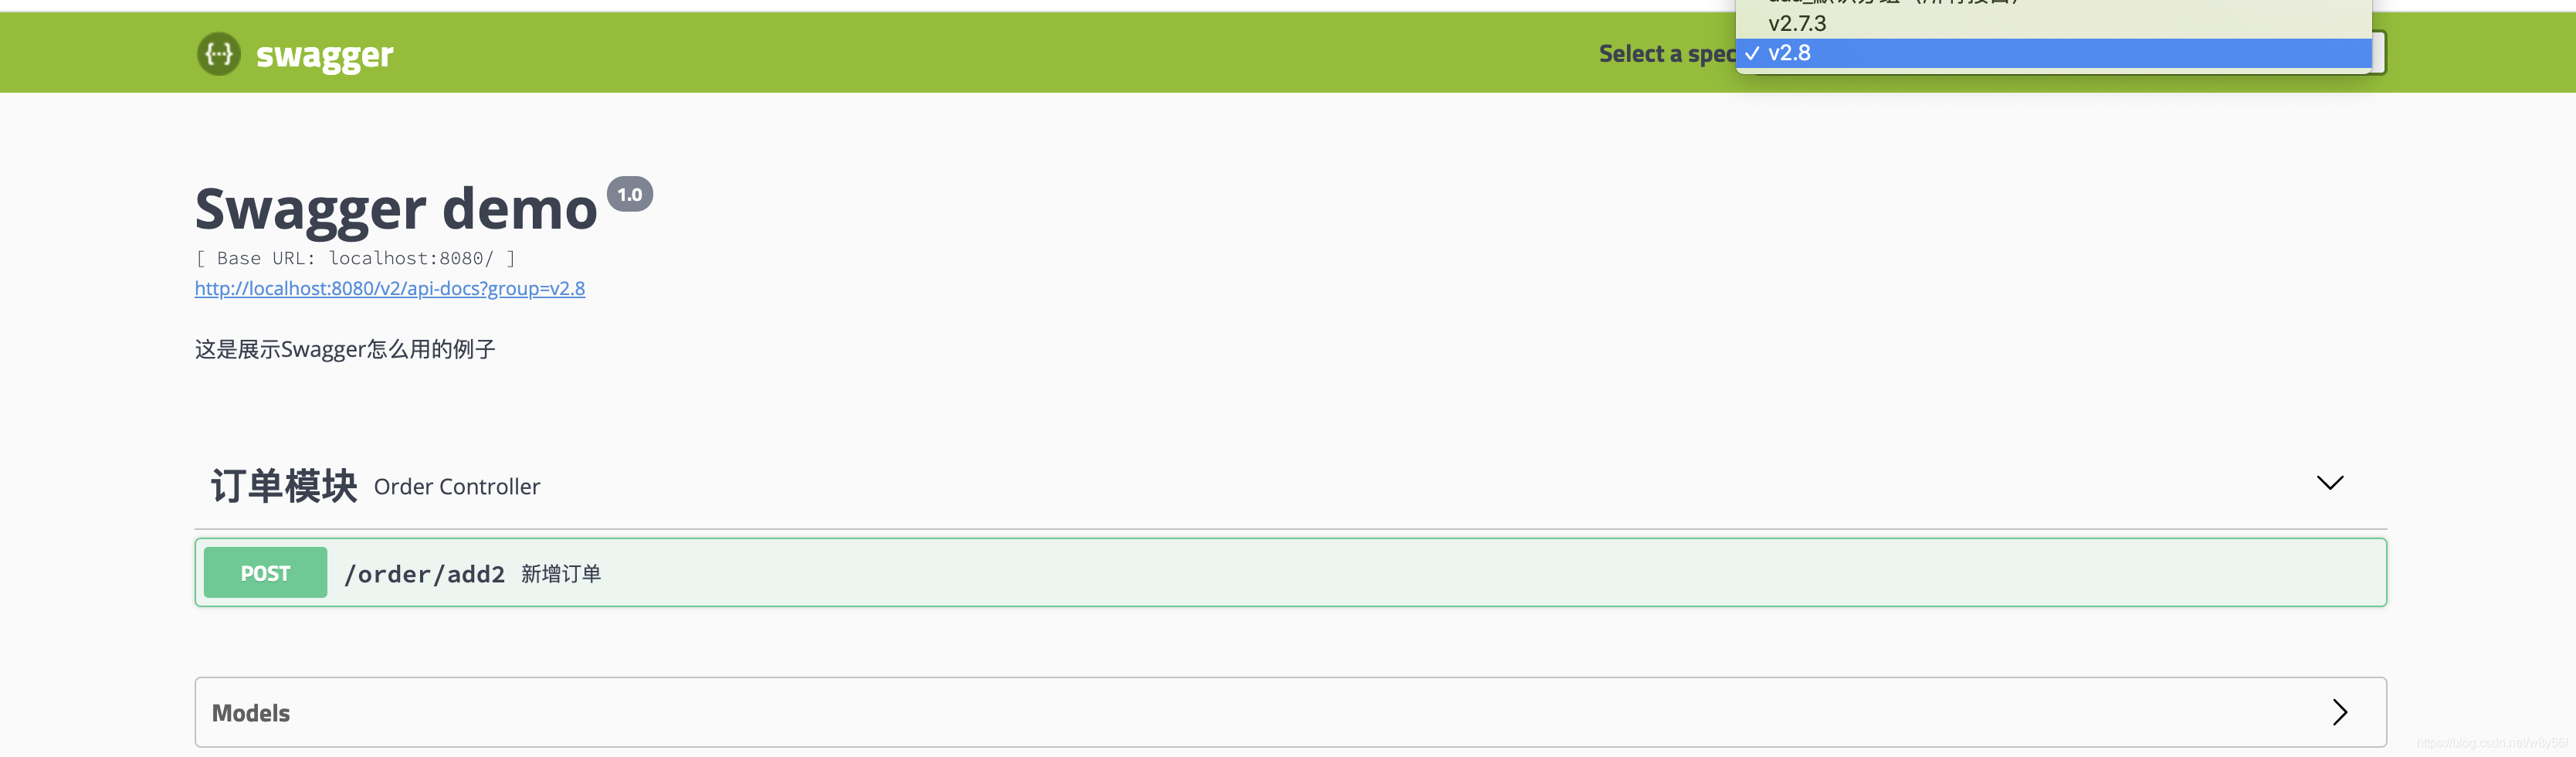
我们用分组来实现,分组在代码里就是 Docket,如图

- 我们希望有一个默认的分组,所有的接口都放在这里,并且是排在最前面的
- 被标记的接口能归类到 v2.7.3里
- 一个接口可以同时被归类到多个地方,比如同时属于默认、v2.7.3、v2.8
- 用于标记的注解,可以放在方法上,相当于全部接口都标注了;有可以单独标注在某个方法;标注在方法具有较高的优先级
3. 如何实现
3.1 如何共存多套UI
其实是可以共存多个UI的,实际测试可行。注意有时候会发现其中一个UI能刷出来另外一个不行,可以稍微等一等再试,或者调换下一下两个UI的顺序再试下。总之我遇到过 “其中一个UI可以另外一个不行” 的情况,但是最终发现 “两个UI可以并存”
3.2 步骤
-
新建springboot项目,或者在已有项目,在pom.xml中增加
<!-- Swagger2 BEGIN --> <!-- swagger2包中swagger-models版本有bug,example为空串会爆出NumberFormatException,需要排除并引入高版本 排除时将 swagger-models 和 swagger-annotations 整一对排除 --> <dependency> <groupId>io.springfox</groupId> <artifactId>springfox-swagger2</artifactId> <version>2.9.2</version> <exclusions> <exclusion> <groupId>io.swagger</groupId> <artifactId>swagger-models</artifactId> </exclusion> <exclusion> <groupId>io.swagger</groupId> <artifactId>swagger-annotations</artifactId> </exclusion> </exclusions> </dependency> <dependency> <groupId>io.swagger</groupId> <artifactId>swagger-models</artifactId> <version>1.6.0</version> </dependency> <dependency> <groupId>io.swagger</groupId> <artifactId>swagger-annotations</artifactId> <version>1.6.0</version> </dependency> <!-- 不满意可以注释掉换其他UI,可以同时开启多个UI --> <!-- 官方UI,请求路径 http://{host}:{port}/swagger-ui.html --> <dependency> <groupId>io.springfox</groupId> <artifactId>springfox-swagger-ui</artifactId> <version>2.9.2</version> </dependency> <!-- bootstrap-ui,请求路径:http://{host}:{port}/doc.html,觉得是最好的UI --> <!--<dependency> <groupId>com.github.xiaoymin</groupId> <artifactId>swagger-bootstrap-ui</artifactId> <version>1.9.6</version> </dependency>--> <!-- ui-layer,请求路径:http://{host}:{port}/docs.html,觉得没比原生的好 --> <!--<dependency> <groupId>com.github.caspar-chen</groupId> <artifactId>swagger-ui-layer</artifactId> <version>1.1.3</version> </dependency>--> <!-- Swagger2 END --> -
写一个注解,用于标注
@Retention(RetentionPolicy.RUNTIME) @Target({ElementType.METHOD, ElementType.TYPE}) public @interface ApiVersion { /** * 分组名(即版本号),可以传入多个 * * @return */ String[] value(); } -
写一个版本常量类,有新版本就在这里加
public interface ApiVersionConstant { String VERSION_2_7_3 = "v2.7.3"; String VERSION_2_8 = "v2.8"; } -
写Swagger的配置类
package com.wyf.test.swagger2springboot.config.swagger; import org.springframework.beans.factory.InitializingBean; import org.springframework.beans.factory.annotation.Autowired; import org.springframework.beans.factory.config.AutowireCapableBeanFactory; import org.springframework.beans.factory.support.AbstractBeanDefinition; import org.springframework.beans.factory.support.BeanDefinitionBuilder; import org.springframework.beans.factory.support.DefaultListableBeanFactory; import org.springframework.context.ApplicationContext; import org.springframework.context.annotation.Bean; import org.springframework.context.annotation.Configuration; import springfox.documentation.builders.ApiInfoBuilder; import springfox.documentation.builders.PathSelectors; import springfox.documentation.builders.RequestHandlerSelectors; import springfox.documentation.service.ApiInfo; import springfox.documentation.spi.DocumentationType; import springfox.documentation.spring.web.plugins.Docket; import springfox.documentation.swagger2.annotations.EnableSwagger2; import java.lang.reflect.Field; import java.util.Arrays; /** * Swagger配置 * * @author Stone * @version V1.0.0 * @date 2020/3/12 */ @Configuration @EnableSwagger2 public class Swagger2Config implements InitializingBean { @Autowired private ApplicationContext applicationContext; // 默认版本的分组 @Bean public Docket docket() { // basePackage 需要扫描注解生成文档的路径 return new Docket(DocumentationType.SWAGGER_2) // 分组名用aaa开头以便排在最前面 .groupName("aaa_默认分组(所有接口)") .apiInfo(apiInfo()) .select() .apis(RequestHandlerSelectors.basePackage("com.wyf.test.swagger2springboot")) .paths(PathSelectors.any()) .build(); } private ApiInfo apiInfo() { return new ApiInfoBuilder() .title("Swagger demo") .description("这是展示Swagger怎么用的例子") .version("1.0").build(); } private Docket buildDocket(String groupName) { return new Docket(DocumentationType.SWAGGER_2) .apiInfo(apiInfo()) .groupName(groupName) .select() .apis(method -> { // 每个方法会进入这里进行判断并归类到不同分组,**请不要调换下面两段代码的顺序,在方法上的注解有优先级** // 该方法上标注了版本 if (method.isAnnotatedWith(ApiVersion.class)) { ApiVersion apiVersion = method.getHandlerMethod().getMethodAnnotation(ApiVersion.class); if (apiVersion.value() != null && apiVersion.value().length != 0) { if (Arrays.asList(apiVersion.value()).contains(groupName)) { return true; } } } // 方法所在的类是否标注了? ApiVersion annotationOnClass = method.getHandlerMethod().getBeanType().getAnnotation(ApiVersion.class); if (annotationOnClass != null) { if (annotationOnClass.value() != null && annotationOnClass.value().length != 0) { if (Arrays.asList(annotationOnClass.value()).contains(groupName)) { return true; } } } return false; }) .paths(PathSelectors.any()) .build(); } /** * 动态得创建Docket bean * * @throws Exception */ @Override public void afterPropertiesSet() throws Exception { // ApiConstantVersion 里面定义的每个变量会成为一个docket Class<ApiVersionConstant> clazz = ApiVersionConstant.class; Field[] declaredFields = clazz.getDeclaredFields(); // 动态注入bean AutowireCapableBeanFactory autowireCapableBeanFactory = applicationContext.getAutowireCapableBeanFactory(); if (autowireCapableBeanFactory instanceof DefaultListableBeanFactory) { DefaultListableBeanFactory capableBeanFactory = (DefaultListableBeanFactory) autowireCapableBeanFactory; for (Field declaredField : declaredFields) { // 要注意 "工厂名和方法名",意思是用这个bean的指定方法创建docket AbstractBeanDefinition beanDefinition = BeanDefinitionBuilder .genericBeanDefinition() .setFactoryMethodOnBean("buildDocket", "swagger2Config") .addConstructorArgValue(declaredField.get(ApiVersionConstant.class)).getBeanDefinition(); capableBeanFactory.registerBeanDefinition(declaredField.getName(), beanDefinition); } } } } -
需要放在特别的分组的方法,用@ApiVersion标记,如
// 放在方法上,可以有多个版本 @ApiOperation("新增订单") @PostMapping("/order/add2") @ApiVersion({ApiVersionConstant.VERSION_2_7_3, ApiVersionConstant.VERSION_2_8}) public ResponseDTO<OrderRespDTO> addOrder2( @ApiParam(value = "订单信息", required = true) @Valid OrderReqDTO orderReqDTO ) // 放在类上,则所有接口都生效 @RestController @Api(tags = "用户模块") @ApiVersion(ApiVersionConstant.VERSION_2_7_3) public class UserController { ... } -
效果,切换分组仅显示分组所包含的接口


 572
572


 被折叠的 条评论
为什么被折叠?
被折叠的 条评论
为什么被折叠?
 到【灌水乐园】发言


