


(来自慕课网凯子哥讲课内容)
http://www.imooc.com/learn/484
一、为什么进行屏幕是适配
因为Android系统的开放性,导致了Android设备的多样性。
这是国外网站统计的数据(截止2014,现在也没更新。不用翻墙):
http://opensignal.com/reports/2014/android-fragmentation/
下面是来自友盟官网的截图:
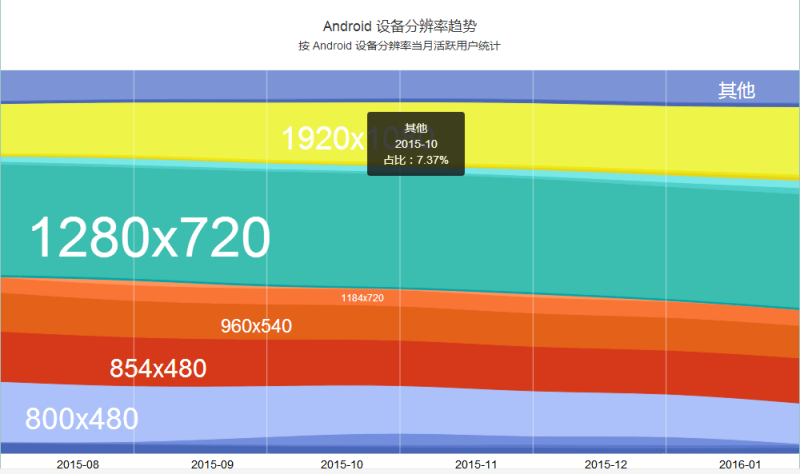
http://www.umindex.com/devices/android_resolutions
虽然设备繁多,但从上图可以看出,主要的只有6种,只要适配好这六种就能解决大部分用户的问题。
二、核心概念
屏幕尺寸:是指显示器屏幕对角线的尺寸,一般用英寸来表示。1英寸=2.54厘米
屏幕分辨率:就是屏幕上显示的像素个数,单位为px。1px = 1像素点。分辨率160×128的意思是纵向含有像素数为160个,横向像素数128个。屏幕尺寸一样的情况下,分辨率越高,显示效果就越精细和细腻。
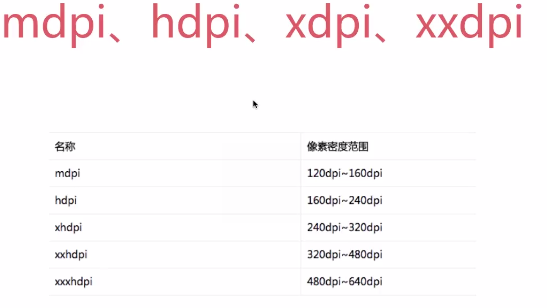
屏幕像素密度:每英寸屏幕所拥有的像素数,像素密度越大,显示画面细节就越丰富。单位为dip(dot per inch)。它与屏幕尺寸和屏幕分辨率有关。
px:构成图像的最小单位
sp:可以根据文字大小首选项进行缩放。谷歌推荐12、14、18、22sp。不要使用小数,有可能造成精度的丢失
这里附上Android Design中文的地址,包括各种设计规范。很好的学习网站:
http://www.apkbus.com/design/index.html
三、解决支持各种屏幕尺寸的方案
1、使用wrap_content:
wrap_content表示包裹内容,随着内容进行伸缩。
2、使用weight:
是LinearLayout里面用到的。
首先说明weight的计算方式:
Weight
计算出的宽度= 原来宽度+剩余空间所占百分比的宽度
当为水平线性水平布局时:
指定layout_width=”match_parent”时,设置layout_weight:
<?xml version="1.0" encoding="utf-8"?>
<LinearLayout xmlns:android="http://schemas.android.com/apk/res/android"
    android:layout_width="match_parent"
    android:layout_height="match_parent"
    android:orientation="horizontal">

    <Button
        android:layout_width="match_parent"
        android:layout_height="wrap_content"
        android:layout_weight="1"
        android:text="button1" />

    <Button
        android:layout_width="match_parent"
        android:layout_height="wrap_content"
        android:layout_weight="2"
        android:text="button2" />

</LinearLayout>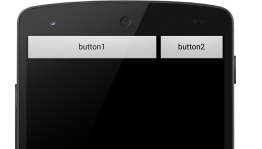
会发现并不是传说中1/3,2/3。而是反过来了。
假设屏幕宽度为 L,
Button1:
2/3L = L +(L-2L)*1/3 = L-1/3L=2/3L
Button2:
1/3L = L+(L-2L)*2/3 = L-2/3L= 1/3L
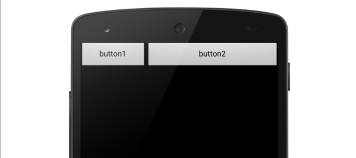
当指定layout_width=”0dp”时:
1/3L = 0 +L*1/3 = 1/3L
还有一种用法是表示优先级:当想要一个属性为match_parent的View不影响其他控件时,给他的weight设置一个比0大的数就可以了,但注意其它View不能再设置weight。
3、使用相对布局,禁用绝对布局
使用相对布局,不管在大屏幕上还是小屏幕上,都能很好的显示其相对关系
4、使用large限定符(3.2之前)
这个主要解决平板设备适配问题,解决方案就是使用不同的large限定符,在不同文件夹下创建相同名字的不同布局,系统会根据设备大小加载不同的布局。
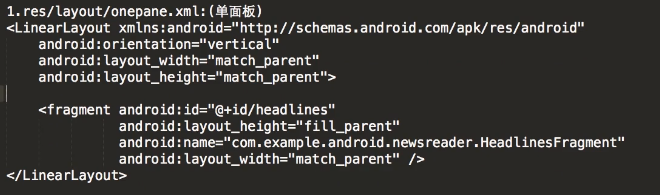
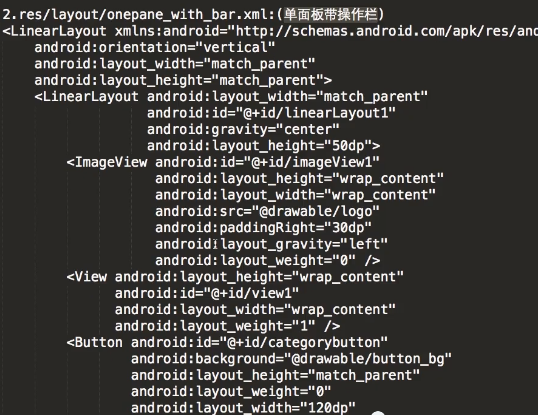
单面板:
<LinearLayout xmlns:android="http://schemas.android.com/apk/res/android"
android:orientation="vertical"
android:layout_width="match_parent"
android:layout_height="match_parent">
<fragment android:id="@+id/headlines"
android:layout_height="fill_parent"
android:name="com.example.android.newsreader.HeadlinesFragment"
android:layout_width="match_parent" />
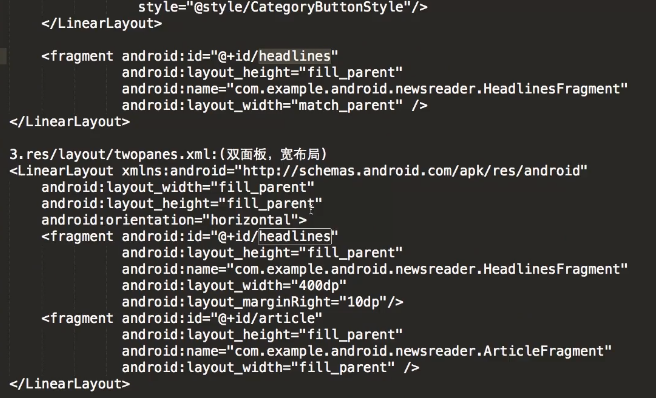
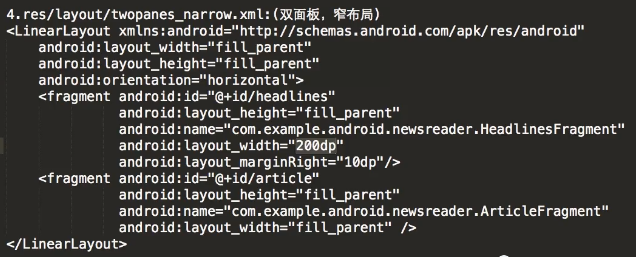
</LinearLayout>双面板:
<LinearLayout xmlns:android="http://schemas.android.com/apk/res/android"
android:layout_width="fill_parent"
android:layout_height="fill_parent"
android:orientation="horizontal">
<fragment android:id="@+id/headlines"
android:layout_height="fill_parent"
android:name="com.example.android.newsreader.HeadlinesFragment"
android:layout_width="400dp"
android:layout_marginRight="10dp"/>
<fragment android:id="@+id/article"
android:layout_height="fill_parent"
android:name="com.example.android.newsreader.ArticleFragment"
android:layout_width="fill_parent" />
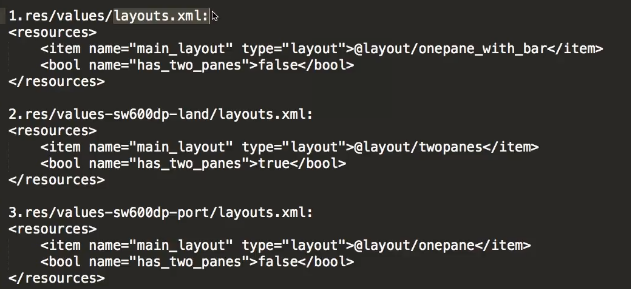
</LinearLayout>5、最小宽度限定符(3.2之后)
使用layout-sw600dp,这样明确说明设备大小的区分度。
双面板布局: Small Width 最小宽度。
布局和之前双面板布局一样。
1920x1080的换算成dpi是445dip。所以对于600dp,屏幕已经不小了。
如果需要兼容3.2之前,就需要三套布局,这样很容易出错,而且同样兼容平板却需要两套布局,所以解决这个问题就可以使用布局别名:
res/layout/main.xml: 单面板布局
res/layout-large/main.xml: 多面板布局
res/layout-sw600dp/main.xml: 多面板布局
平板布局整合成一套,需要另起名字:
res/layout/main.xml 单面板布局
res/layout/main_twopanes.xml 双面板布局
默认布局
res/values/layout.xml:
<resources>
    <item name="main" type="layout">@layout/main</item>
</resources>
Android3.2之前的平板布局
res/values-large/layout.xml:
<resources>
    <item name="main" type="layout">@layout/main_twopanes</item>
</resources>
Android3.2之后的平板布局
res/values-sw600dp/layout.xml:
<resources>
    <item name="main" type="layout">@layout/main_twopanes</item>
</resources>
特别需要注意的是在Activity中这样引用:
setContentView(R.layout.main);6、方向限定符
平板设备的屏幕也会旋转,这时就需要准备横纵向布局:
横向:
res/values-sw600dp-land/layouts.xml:
比如使用双面板:
<resources>
    <item name="main" type="layout">@layout/main_twopanes</item>
</resources>
纵向:
res/values-sw600dp-port/layouts.xml:
比如使用单面板:
<resources>
    <item name="main" type="layout">@layout/main</item>
</resources>
7、使用示例
比如要适配下面这些设备:
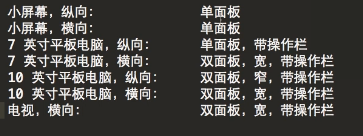
< /resourses>
bool表示系统动态的判断用户当前设备是单面板还是双面板,如果是双面板则为true。
8、使用.9图
想必很多人都知道.9图,这里再简单的说明用法:
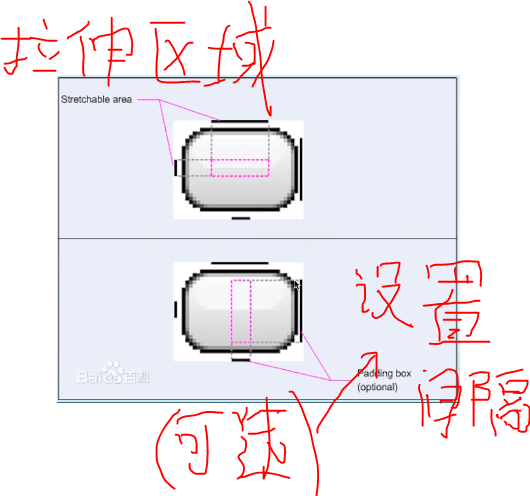
Android studio内置了.9图编辑器,可以直接双击图片打开进行编辑。
比如下面这张图

在图中红点处点三个点就可以了,点所在的线即为拉伸区域,去除点使用快捷键Shift + 左键,点完之后效果:
至于间隔区域,其实就是控制内容填充区域

之所以叫间隔区域,其实就是内容区域离边缘的间隔。更确切的说就是padding,所以设置间隔区域不是必选的,可以在代码中使用5种padding方法控制间隔距离。
四、解决支持各种屏幕密度的方案
1、使用百分比布局
屏幕的宽度和dp之间并没有什么关系,所以使用dp进行布局势必会导致在一些设备上出现预期之外的效果。
所以一个库可以完美解决这个问题:
https://github.com/hongyangAndroid/AndroidAutoLayout
至于用法参考鸿洋大神的博客:
Android AutoLayout全新的适配方式 堪称适配终结者
http://blog.csdn.net/lmj623565791/article/details/49990941
2、提供备用位图
这个很好理解,比如软件图标,放在不同文件夹下,根据需要自动加载不同的图标。
需要注意的是,在Android studio中,除了图标放在mipmap下,其他图片资源放在drawable文件夹下。这个谷歌官方有介绍:
(著作权归作者所有。商业转载请联系作者获得授权,非商业转载请注明出处。作者:狄方方。链接:https://www.zhihu.com/question/29265243/answer/43746950
来源:知乎)
drawable/
For bitmap files (PNG, JPEG, or GIF), 9-Patch image files, and XML files that describe Drawable shapes or Drawable objects that contain multiple states (normal, pressed, or focused). See the Drawable resource type.
mipmap/
For app launcher icons. The Android system retains the resources in this folder (and density-specific folders such as mipmap-xxxhdpi) regardless of the screen resolution of the device where your app is installed. This behavior allows launcher apps to pick the best resolution icon for your app to display on the home screen. For more information about using the mipmap folders, see Managing Launcher Icons as mipmap Resources.
3、关于Drawable
同样一张图片放在不同的Drawable在xxhdpi屏幕上运行所耗用的内存:
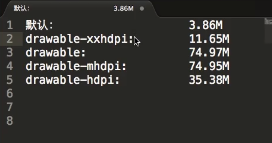
所以在开发时不能只切一张图,而是针对不同分辨率切多张图片,使得程序耗用内存尽可能少。
五、实施自适应用户界面流程
这部分最好看原视频对谷歌官方Demo的讲解。
http://www.imooc.com/video/9371
以下内容来自简书:
http://www.jianshu.com/p/ad563d169871
1、确定当前布局
要确定当前设备使用的布局,可以通过布局是否显示出来做出判断。
public class NewsReaderActivity extends FragmentActivity {
  boolean mIsDualPane;

  @Override
  public void onCreate(Bundle savedInstanceState) {
      super.onCreate(savedInstanceState);
      setContentView(R.layout.main_layout);

      View articleView = findViewById(R.id.article);
      mIsDualPane = articleView != null &&
                      articleView.getVisibility() == View.VISIBLE;
  }
}
在对某些组件执行操作前先查看它们是否可用,比如菜单按钮,在api11以上用actionbar中的按钮代替了。
Button catButton = (Button) findViewById(R.id.categorybutton);
OnClickListener listener = /* create your listener here */;
if (catButton != null) {
  catButton.setOnClickListener(listener);
}
2、根据当前布局做出响应
例如,在单面板模式下,用户点击了新闻标题,我们要打开一个新的activity来显示新闻详细信息;在双面板模式下,用户点击了新闻标题,我们要在右边面板上显示详细信息。
@Override
public void onHeadlineSelected(int index) {
    mArtIndex = index;
    if (mIsDualPane) {
        /* display article on the right pane */
        mArticleFragment.displayArticle(mCurrentCat.getArticle(index));
    } else {
        /* start a separate activity */
        Intent intent = new Intent(this, ArticleActivity.class);
        intent.putExtra("catIndex", mCatIndex);
        intent.putExtra("artIndex", index);
        startActivity(intent);
    }
}
同样,如果该应用处于双面板模式下,就应设置带导航标签的操作栏;但如果该应用处于单面板模式下,就应使用下拉菜单设置导航栏。因此我们的代码还应确定哪种情况比较合适:
final String CATEGORIES[] = { "热门报道", "政治", "经济", "Technology" };

public void onCreate(Bundle savedInstanceState) {
    ....
    if (mIsDualPane) {
        /* use tabs for navigation */
        actionBar.setNavigationMode(android.app.ActionBar.NAVIGATION_MODE_TABS);
        int i;
        for (i = 0; i < CATEGORIES.length; i++) {
            actionBar.addTab(actionBar.newTab().setText(
                CATEGORIES[i]).setTabListener(handler));
        }
        actionBar.setSelectedNavigationItem(selTab);
    }
    else {
        /* use list navigation (spinner) */
        actionBar.setNavigationMode(android.app.ActionBar.NAVIGATION_MODE_LIST);
        SpinnerAdapter adap = new ArrayAdapter(this,
                R.layout.headline_item, CATEGORIES);
        actionBar.setListNavigationCallbacks(adap, handler);
    }
}
3、重复使用其他活动中的片段
比如菜单视图和内容视图可以在平板和手机之间互用。
4、处理屏幕配置变化
详情请参看凯子哥博客:
Android屏幕适配全攻略(最权威的官方适配指导)
还有鸿洋大神的博客:
Android AutoLayout全新的适配方式堪称适配终结者


 3302
3302

 被折叠的 条评论
为什么被折叠?
被折叠的 条评论
为什么被折叠?
 到【灌水乐园】发言


