


硬件:FRDM_K64F
软件:Freescale_MQX_4_1_1
实现目的:通过SPI接口发送数据
步骤:
1)mqx中SPI例子里只有Twr板的,所以这里参考spi_twrk64f120m例子。可以先复制一份出来,将其更名为spi_frdmk64f120m,然后打开此工程。注意Twr_K64和FRDM_K64的默认printf串口不一样,所以对复制后的工程要做修改一下。
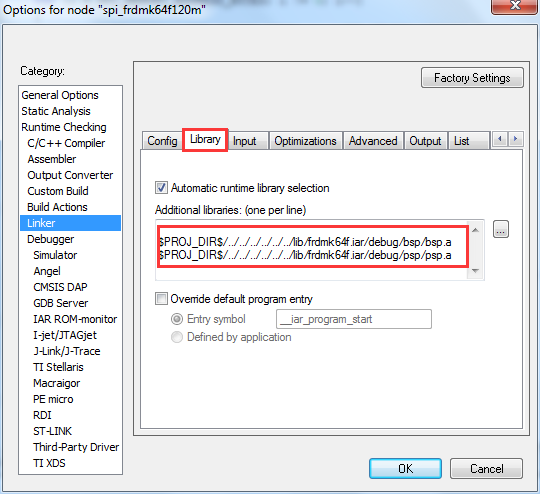
这样spi的例子就可以直接跑在frdm_k64上了。打开串口调试助手,可以显示出相关信息。
当然原来的twr-k64是配置twr-mem一起使用的,因为操作的是spi flash,用frdm-k64的话就没法实现这个功能了。
我这里为了方便,在原hellworld的代码基础上加入spi的部分。
2)user_config.h文件中将BSPCFG_ENABLE_SPI0 定义为1
#define BSPCFG_ENABLE_SPI0 1 // wenxue 0->1 20151020 for SPI test on frdm_k64f这个定义为1的话,那么就会:
#if BSPCFG_ENABLE_SPI0
    _io_spi_install("spi0:", &_bsp_spi0_init);
#endif
3)修改hello.c 加入spi部分:
/*HEADER**********************************************************************
*
* Copyright 2008 Freescale Semiconductor, Inc.
* Copyright 1989-2008 ARC International
*
* This software is owned or controlled by Freescale Semiconductor.
* Use of this software is governed by the Freescale MQX RTOS License
* distributed with this Material.
* See the MQX_RTOS_LICENSE file distributed for more details.
*
* Brief License Summary:
* This software is provided in source form for you to use free of charge,
* but it is not open source software. You are allowed to use this software
* but you cannot redistribute it or derivative works of it in source form.
* The software may be used only in connection with a product containing
* a Freescale microprocessor, microcontroller, or digital signal processor.
* See license agreement file for full license terms including other
* restrictions.
*****************************************************************************
*
* Comments:
*
* This file contains the source for the hello example program.
*
*
*END************************************************************************/
#include <mqx.h>
#include <bsp.h>
#include <fio.h>
#if ! BSPCFG_ENABLE_IO_SUBSYSTEM
#error This application requires BSPCFG_ENABLE_IO_SUBSYSTEM defined non-zero in user_config.h. Please recompile BSP with this option.
#endif
#ifndef BSP_DEFAULT_IO_CHANNEL_DEFINED
#error This application requires BSP_DEFAULT_IO_CHANNEL to be not NULL. Please set corresponding BSPCFG_ENABLE_TTYx to non-zero in user_config.h and recompile BSP with this option.
#endif
#if ! BSPCFG_ENABLE_SPI0
#error This application requires BSPCFG_ENABLE_SPI0 defined non-zero in user_config.h. Please recompile kernel with this option.
#else
#define TEST_CHANNEL "spi0:"
#endif
/* Task IDs */
#define HELLO_TASK 5
extern void hello_task(uint32_t);
const TASK_TEMPLATE_STRUCT MQX_template_list[] =
{
/* Task Index, Function, Stack, Priority, Name, Attributes, Param, Time Slice */
{ HELLO_TASK, hello_task, 1500, 8, "hello", MQX_AUTO_START_TASK, 0, 0 },
{ 0 }
};
/*TASK*-----------------------------------------------------
*
* Task Name : hello_task
* Comments :
* This task prints " Hello World "
*
*END*-----------------------------------------------------*/
void hello_task
(
uint32_t initial_data
)
{
(void)initial_data; /* disable 'unused variable' warning */
MQX_FILE_PTR spifd;
uint32_t param,result;
uint8_t buffer[]={0x55,0x02};
printf("Hello World\n");
printf ("\n-------------- SPI driver example --------------\n\n");
printf ("This example application demonstrates usage of SPI driver.\n");
/* Open the SPI driver */
spifd = fopen (TEST_CHANNEL, NULL);
if (NULL == spifd)
{
printf ("Error opening SPI driver!\n");
_time_delay (200L);
_task_block ();
}
/* Display baud rate */
printf ("Current baud rate ... ");
if (SPI_OK == ioctl (spifd, IO_IOCTL_SPI_GET_BAUD, ¶m))
{
printf ("%d Hz\n", param);
}
else
{
printf ("ERROR\n");
}
/* Set a different rate */
param = 500000;
printf ("Changing the baud rate to %d Hz ... ", param);
if (SPI_OK == ioctl (spifd, IO_IOCTL_SPI_SET_BAUD, ¶m))
{
printf ("OK\n");
}
else
{
printf ("ERROR\n");
}
/* Display baud rate */
printf ("Current baud rate ... ");
if (SPI_OK == ioctl (spifd, IO_IOCTL_SPI_GET_BAUD, ¶m))
{
printf ("%d Hz\n", param);
}
else
{
printf ("ERROR\n");
}
while(1)
{
/* Write instruction */
result = fwrite (buffer, 1, 1, spifd);
_time_delay(100);
}
_task_block();
}
/* EOF */
4)spi0 用具体哪几个引脚,可以在init_gpio.c文件的_bsp_dspi_io_init()函数中修改:
_mqx_int _bsp_dspi_io_init
(
    uint32_t dev_num
)
{
    SIM_MemMapPtr   sim = SIM_BASE_PTR;
    PORT_MemMapPtr  pctl;

    switch (dev_num)
    {
        case 0:
            /* Configure GPIOD for DSPI0 peripheral function */
            pctl = (PORT_MemMapPtr)PORTD_BASE_PTR;

            pctl->PCR[0] = PORT_PCR_MUX(2);     /* DSPI0.PCS0   */
            pctl->PCR[1] = PORT_PCR_MUX(2);     /* DSPI0.SCK    */
            pctl->PCR[2] = PORT_PCR_MUX(2);     /* DSPI0.SOUT   */
            pctl->PCR[3] = PORT_PCR_MUX(2);     /* DSPI0.SIN    */

            /* Enable clock gate to DSPI0 module */
            sim->SCGC6 |= SIM_SCGC6_SPI0_MASK;
            break;

        case 1: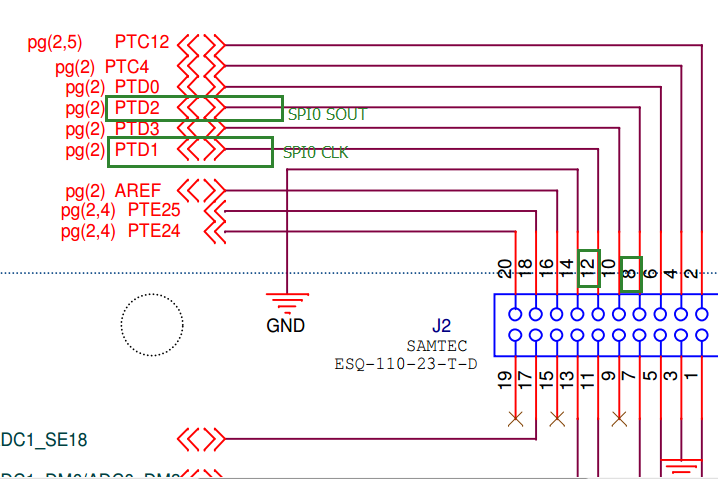
实验现象如下:

常见问题总结:
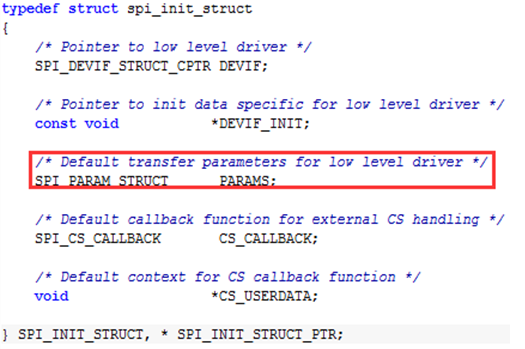
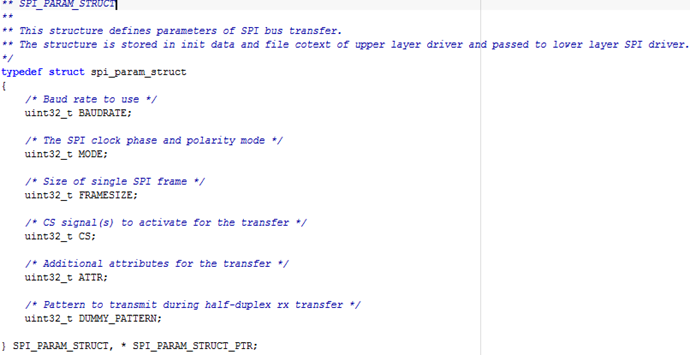
1)SPI 默认的参数在哪里设置?
此数据结构的定义在spi.h中
2)如何设置波特率?
通过ioctl IO_IOCTL_SPI_SET_BAUD命令即可。注意执行ioctl后并不是立刻就更改了波特率配置,而是在调用的spi发送函数里才做的修改。
调用_dspi_dma_setparam()这个函数
if (dev_data->PARAMS_DIRTY)
    {
        error_code = driver_data->DEVIF->SETPARAM(driver_data->DEVIF_DATA, &(dev_data->PARAMS));
        if (error_code != MQX_OK)
        {
            _task_set_error(error_code);
            return IO_ERROR;
        }
        dev_data->PARAMS_DIRTY = FALSE;
    }
3)如何修改SPI 极性和相位
通过ioctl IO_IOCTL_SPI_SET_MODE 命令即可,参数如下:
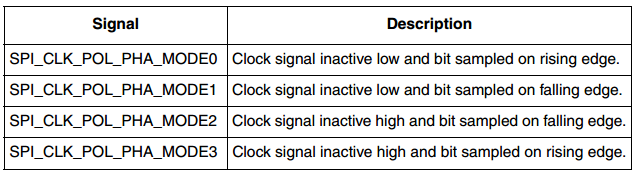
比如设置为SPI_CLK_POL_PHA_MODE1,波形如下:

4)ioctl IO_IOCTL_SPI_SET_ENDIAN 作用是什么?
用来控制数据时MSB first还是LSB first。

ATTR :0 表示大端 1表示小端
_dspi_dma_setparam()->_dspi_ctar_params()
 /* Endianess */
    if ((params->ATTR & SPI_ATTR_ENDIAN_MASK) == SPI_ATTR_LITTLE_ENDIAN)
        ctar |= DSPI_CTAR_LSBFE_MASK;
5)SPI 和eDMA关系?
在frdmk64f.h中,我们可以看到
#ifndef BSPCFG_DSPI0_USE_DMA
    #define BSPCFG_DSPI0_USE_DMA                1
#endif
注意对SPI1和SPI2
#ifndef BSPCFG_DSPI1_USE_DMA
    #define BSPCFG_DSPI1_USE_DMA                0
#endif

#ifndef BSPCFG_DSPI2_USE_DMA
    #define BSPCFG_DSPI2_USE_DMA                0
#endif
所以:
#if BSPCFG_DSPI0_USE_DMA
static const DSPI_DMA_INIT_STRUCT _bsp_dspi0_init = {
0, /* SPI channel */
CM_CLOCK_SOURCE_BUS, /* Relevant module clock source */
BSP_DSPI0_DMA_RX_CHANNEL, /* DMA channel for RX */
BSP_DSPI0_DMA_TX_CHANNEL, /* DMA channel for TX */
BSP_DSPI0_DMA_RX_SOURCE, /* Source to be used with RX channel */
BSP_DSPI0_DMA_TX_SOURCE /* Source to be used with TX channel */
};
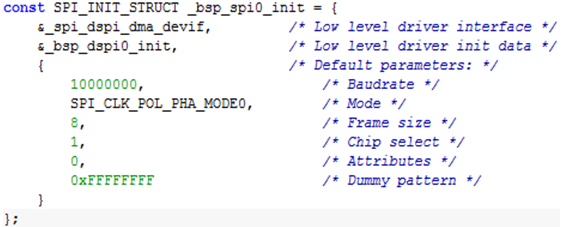
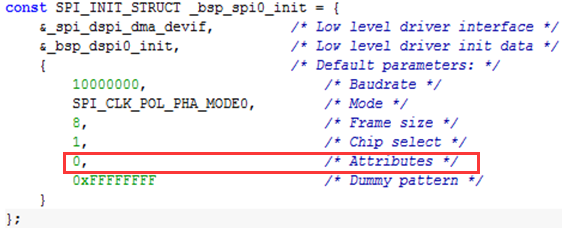
const SPI_INIT_STRUCT _bsp_spi0_init = {
&_spi_dspi_dma_devif, /* Low level driver interface */
&_bsp_dspi0_init, /* Low level driver init data */
{ /* Default parameters: */
10000000, /* Baudrate */
SPI_CLK_POL_PHA_MODE0, /* Mode */
8, /* Frame size */
1, /* Chip select */
0, /* Attributes */
0xFFFFFFFF /* Dummy pattern */
}
};
#else /* BSPCFG_DSPI0_USE_DMA */
static const DSPI_INIT_STRUCT _bsp_dspi0_init = {
0, /* SPI channel */
CM_CLOCK_SOURCE_BUS /* Relevant module clock source */
};
const SPI_INIT_STRUCT _bsp_spi0_init = {
&_spi_dspi_devif, /* Low level driver interface */
&_bsp_dspi0_init, /* Low level driver init data */
{ /* Default parameters: */
10000000, /* Baudrate */
SPI_CLK_POL_PHA_MODE0, /* Mode */
8, /* Frame size */
1, /* Chip select */
DSPI_ATTR_USE_ISR, /* Attributes */
0xFFFFFFFF /* Dummy pattern */
}
};
#endif /* DSPI0_USE_DMA */如果不使用eDMA,可以在user_config.h 中
#define BSPCFG_DSPI0_USE_DMA 0另外当SPI使用eDMA时,如果eDMA还用作其他功能,那么可能出错。

关于这个问题的讨论可以参考:https://community.freescale.com/thread/323538
6)是否支持SLAVE模式?
在_dspi_setparam()或者_dspi_dma_setparam()函数中:
会判断是否为MASTER模式,所以不支持SLAVE模式
 /* Transfer mode */
    if ((params->ATTR & SPI_ATTR_TRANSFER_MODE_MASK) != SPI_ATTR_MASTER_MODE)
        return SPI_ERROR_TRANSFER_MODE_INVALID;

    /* Set master mode */
    dspi_ptr->MCR |= DSPI_MCR_MSTR_MASK;
在MQX_Release_Notes.pdf中也说了:

如果想在MQX里使用SPI Slave模式,可以有两种方法:1)使用spi_legacy driver;2)Write your own driver for spi slave using direct accesses to DSPI module registers and call it from an MQX task. 自己直接操作寄存器去写驱动
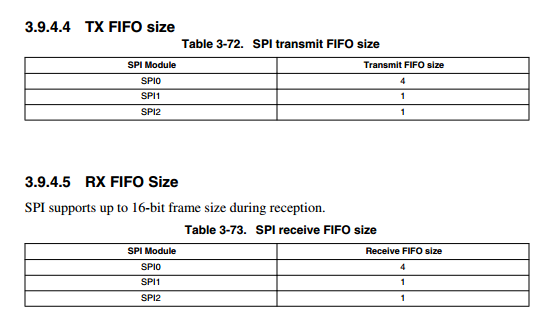
7)SPI FIFO设置问题

对K64 SPI FIFO


 959
959


 被折叠的 条评论
为什么被折叠?
被折叠的 条评论
为什么被折叠?
 到【灌水乐园】发言


