


UITableView掌握点
设置UITableView的dataSource、delegate
UITableView多组数据和单组数据的展示
UITableViewCell的常见属性
UITableView的性能优化(cell的循环利用)
自定义Cell
如何展示数据
UITableView需要一个数据源(dataSource)来显示数据
UITableView会向数据源查询一共有多少行数据以及每一行显示什么数据等
没有设置数据源的UITableView只是个空壳
凡是遵守UITableViewDataSource协议的OC对象,都可以是UITableView的数据源
UITableViewUITableViewDataSource
@property (nonatomic, assign) id <UITableViewDataSource> dataSource;
//调用数据源的下面方法得知一共有多少组数据
- (NSInteger)numberOfSectionsInTableView:(UITableView *)tableView;

//调用数据源的下面方法得知每一组有多少行数据
- (NSInteger)tableView:(UITableView *)tableView numberOfRowsInSection:(NSInteger)section;

//调用数据源的下面方法得知每一行显示什么内容
- (UITableViewCell *)tableView:(UITableView *)tableView cellForRowAtIndexPath:(NSIndexPath *)indexPath;
MVC设计思想
MVC是一种设计思想,贯穿于整个iOS开发中,需要积累一定的项目经验,才能深刻体会其中的含义和好处
MVC中的三个角色
//M:Model,模型数据
//V:View,视图(界面)
//C:Control,控制中心
MVC的几个明显的特征和体现:
View上面显示什么东西,取决于Model
只要Model数据改了,View的显示状态会跟着更改
Control负责初始化Model,并将Model传递给View去解析展示
UITableViewCell简介
UITableView的每一行都是一个UITableViewCell,通过dataSource的tableView:cellForRowAtIndexPath:方法来初始化每一行
UITableViewCell内部有个默认的子视图:contentView,contentView是UITableViewCell所显示内容的父视图,可显示一些辅助指示视图
辅助指示视图的作用是显示一个表示动作的图标,可以通过设置UITableViewCell的accessoryType来显示,默认是UITableViewCellAccessoryNone(不显示辅助指示视图),其他值如下:
UITableViewCellAccessoryDisclosureIndicator
UITableViewCellAccessoryDetailDisclosureButton
UITableViewCellAccessoryCheckmark
还可以通过cell的accessoryView属性来自定义辅助指示视图(比如往右边放一个开关)
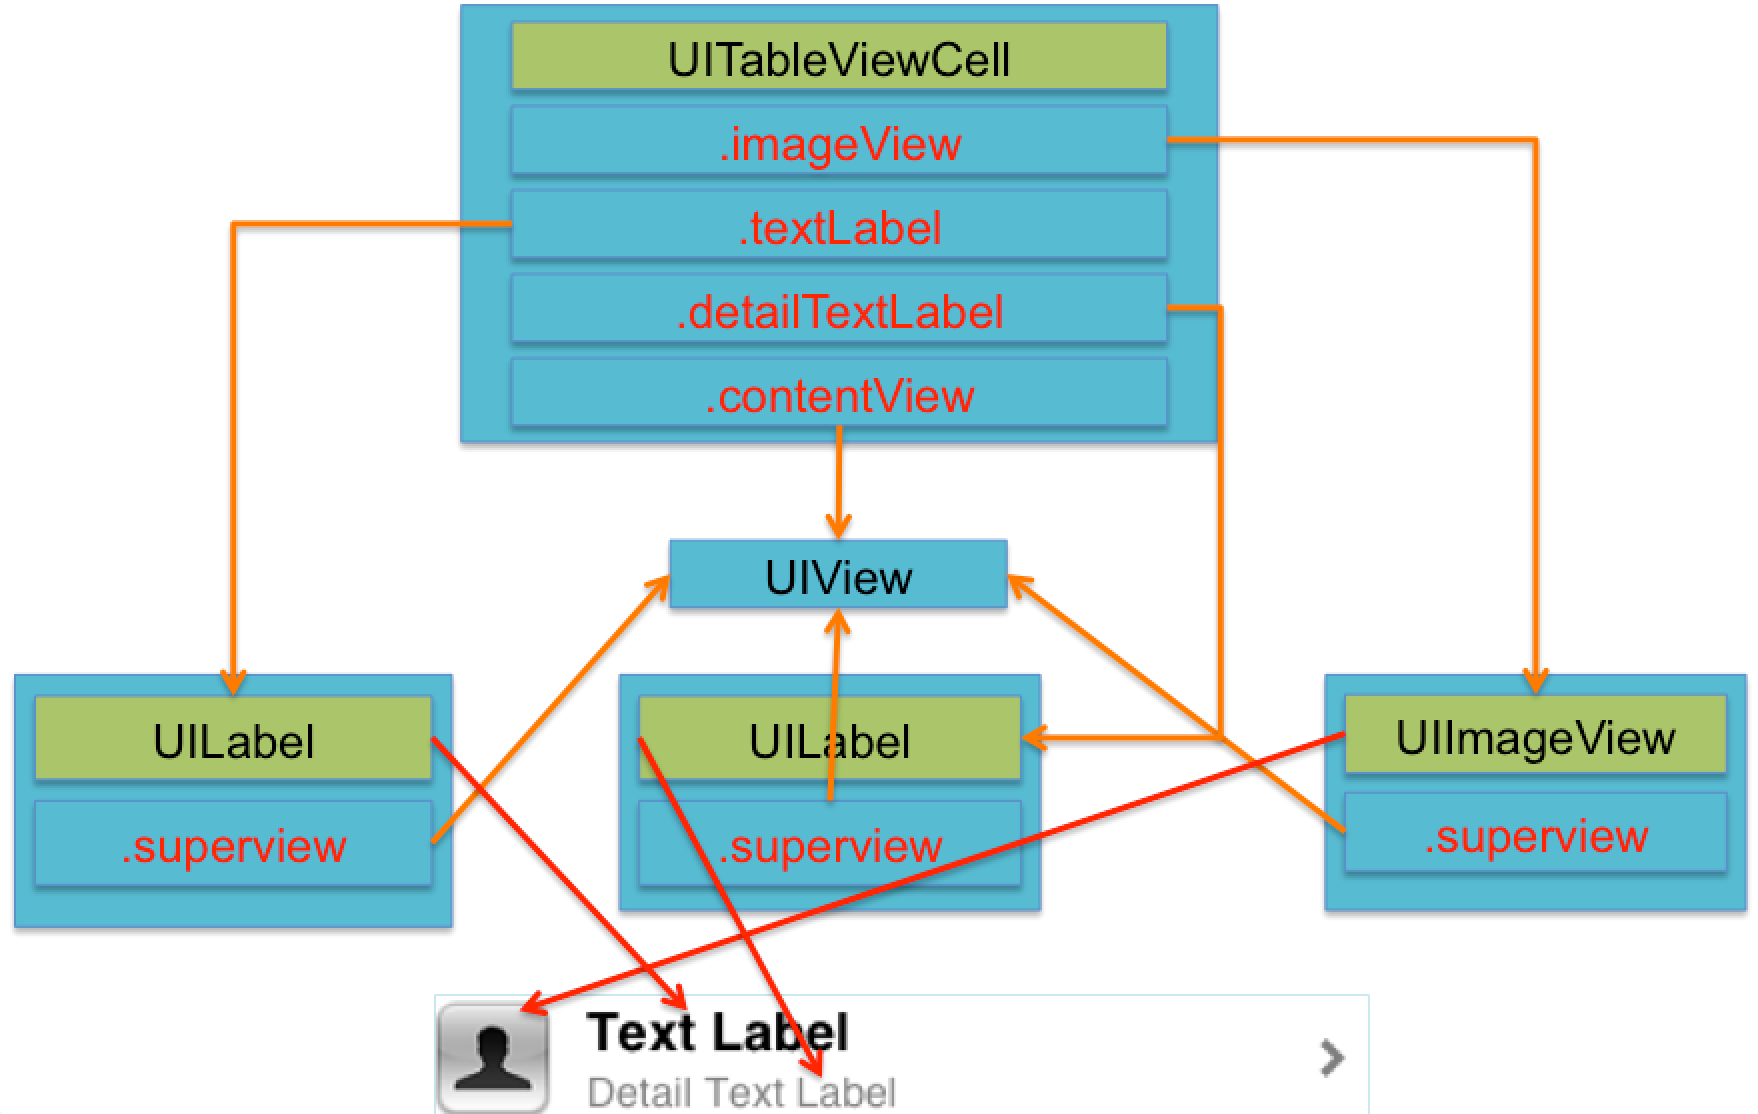
UITableViewCell的contentView
contentView下默认有3个子视图
其中2个是UILabel(通过UITableViewCell的textLabel和detailTextLabel属性访问)
第3个是UIImageView(通过UITableViewCell的imageView属性访问)
UITableViewCell还有一个UITableViewCellStyle属性,用于决定使用contentView的哪些子视图,以及这些子视图在contentView中的位置
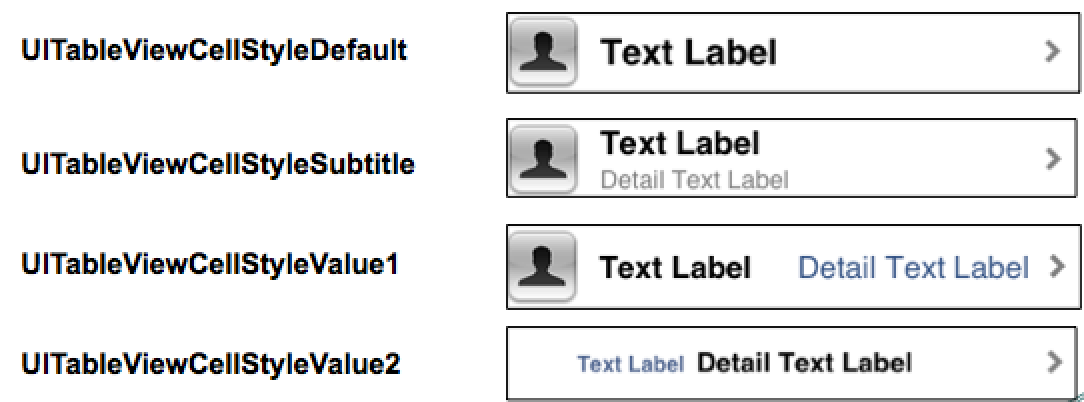
UITableViewCell结构
Cell的重用原理
iOS设备的内存有限,如果用UITableView显示成千上万条数据,就需要成千上万个UITableViewCell对象的话,那将会耗尽iOS设备的内存。要解决该问题,需要重用UITableViewCell对象
重用原理:当滚动列表时,部分UITableViewCell会移出窗口,UITableView会将窗口外的UITableViewCell放入一个对象池中,等待重用。当UITableView要求dataSource返回UITableViewCell时,dataSource会先查看这个对象池,如果池中有未使用的UITableViewCell,dataSource会用新的数据配置这个UITableViewCell,然后返回给UITableView,重新显示到窗口中,从而避免创建新对象
还有一个非常重要的问题:有时候需要自定义UITableViewCell(用一个子类继承UITableViewCell),而且每一行用的不一定是同一种UITableViewCell,所以一个UITableView可能拥有不同类型的UITableViewCell,对象池中也会有很多不同类型的UITableViewCell,那么UITableView在重用UITableViewCell时可能会得到错误类型的UITableViewCell
解决方案:UITableViewCell有个NSString *reuseIdentifier属性,可以在初始化UITableViewCell的时候传入一个特定的字符串标识来设置reuseIdentifier(一般用UITableViewCell的类名)。当UITableView要求dataSource返回UITableViewCell时,先通过一个字符串标识到对象池中查找对应类型的UITableViewCell对象,如果有,就重用,如果没有,就传入这个字符串标识来初始化一个UITableViewCell对象
Cell的重用代码
- (UITableViewCell *)tableView:(UITableView *)tableView cellForRowAtIndexPath:(NSIndexPath *)indexPath
{
    // 1.定义一个cell的标识
      static NSString *ID = @"mjcell";

    // 2.从缓存池中取出cell
      UITableViewCell *cell = [tableView dequeueReusableCellWithIdentifier:ID];

    // 3.如果缓存池中没有cell
      if (cell == nil) {
        cell = [[UITableViewCell alloc] initWithStyle:UITableViewCellStyleSubtitle reuseIdentifier:ID];
    }

    // 4.设置cell的属性...

      return cell;
}
使用xib封装一个view的步骤
- 新建一个xib文件描述一个view的内部结构(假设叫做XXXCell.xib)
- 新建一个自定义的类 (自定义类需要继承自系统自带的view, 继承自哪个类, 取决于xib根对象的Class)
- 新建类的类名最好跟xib的文件名保持一致(比如类名就叫做XXXTgCell)
- 将xib中的控件 和 自定义类的.m文件 进行连线
- 提供一个类方法返回一个创建好的自定义view(屏蔽从xib加载的过程)
- 提供一个模型属性让外界传递模型数据
- 重写模型属性的setter方法,在这里将模型数据展示到对应的子控件上面
Delegate的使用场合
对象A内部发生了一些事情,想通知对象B
对象B想监听对象A内部发生了什么事情
对象A想在自己的方法内部调用对象B的某个方法,并且对象A不能对对象B有耦合依赖
对象A想传递数据给对象B
……
以上情况,结果都一样:对象B是对象A的代理(delegate)
先搞清楚谁是谁的代理(delegate)
定义代理协议,协议名称的命名规范:控件类名 + Delegate
定义代理方法
代理方法一般都定义为@optional
代理方法名都以控件名开头
代理方法至少有1个参数,将控件本身传递出去
设置代理(delegate)对象 (比如myView.delegate = xxxx;)
代理对象遵守协议
代理对象实现协议里面该实现的方法
在恰当的时刻调用代理对象(delegate)的代理方法,通知代理发生了什么事情
(在调用之前判断代理是否实现了该代理方法)
通过代码自定义cell(cell的高度不一致)
1.新建一个继承自UITableViewCell的类
2.重写initWithStyle:reuseIdentifier:方法
添加所有需要显示的子控件(不需要设置子控件的数据和frame, 子控件要添加到contentView中)
进行子控件一次性的属性设置(有些属性只需要设置一次, 比如字体\固定的图片)
3.提供2个模型
数据模型: 存放文字数据\图片数据
frame模型: 存放数据模型\所有子控件的frame\cell的高度
4.cell拥有一个frame模型(不要直接拥有数据模型)
5.重写frame模型属性的setter方法: 在这个方法中设置子控件的显示数据和frame
6.frame模型数据的初始化已经采取懒加载的方式(每一个cell对应的frame模型数据只加载一次)
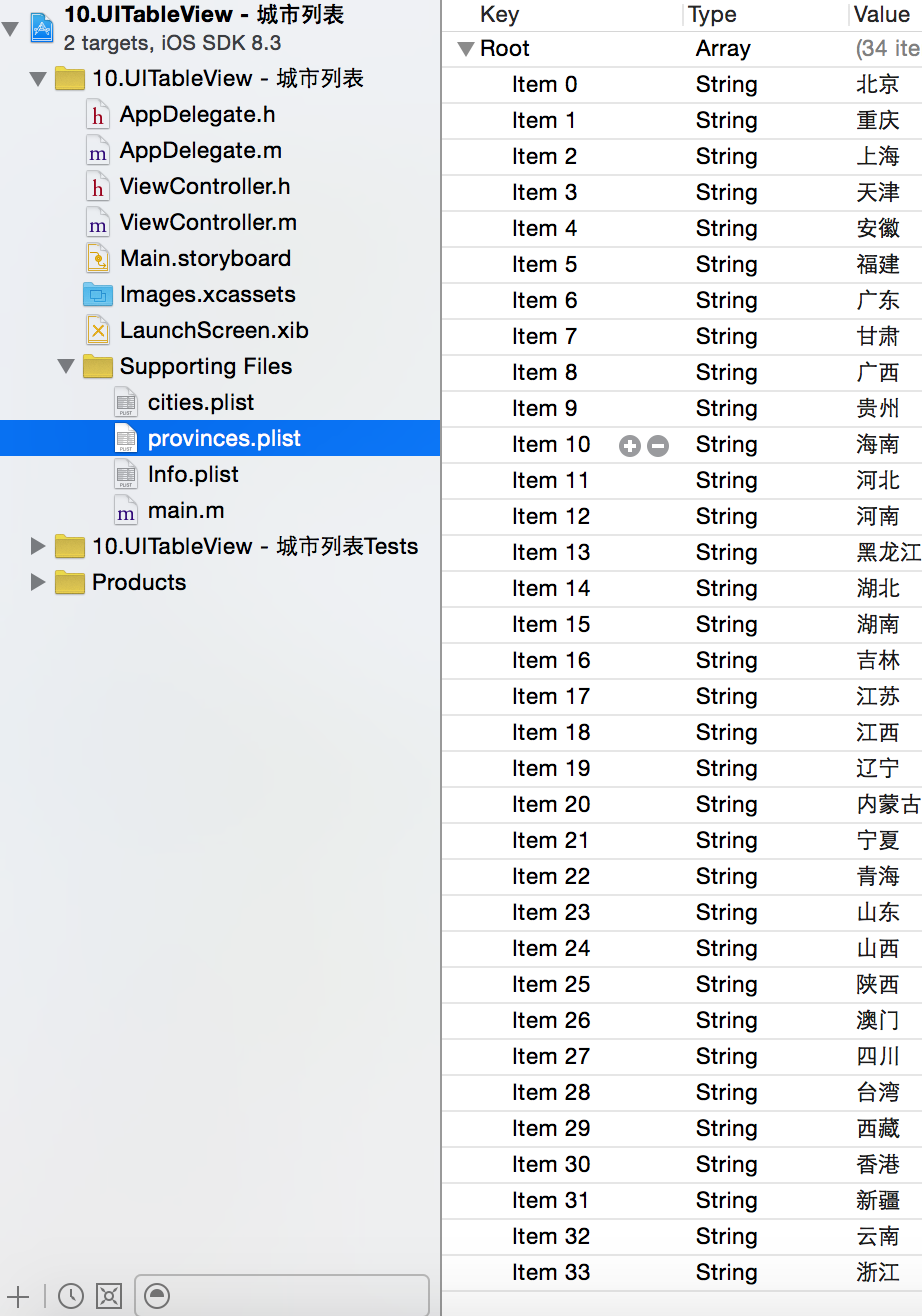
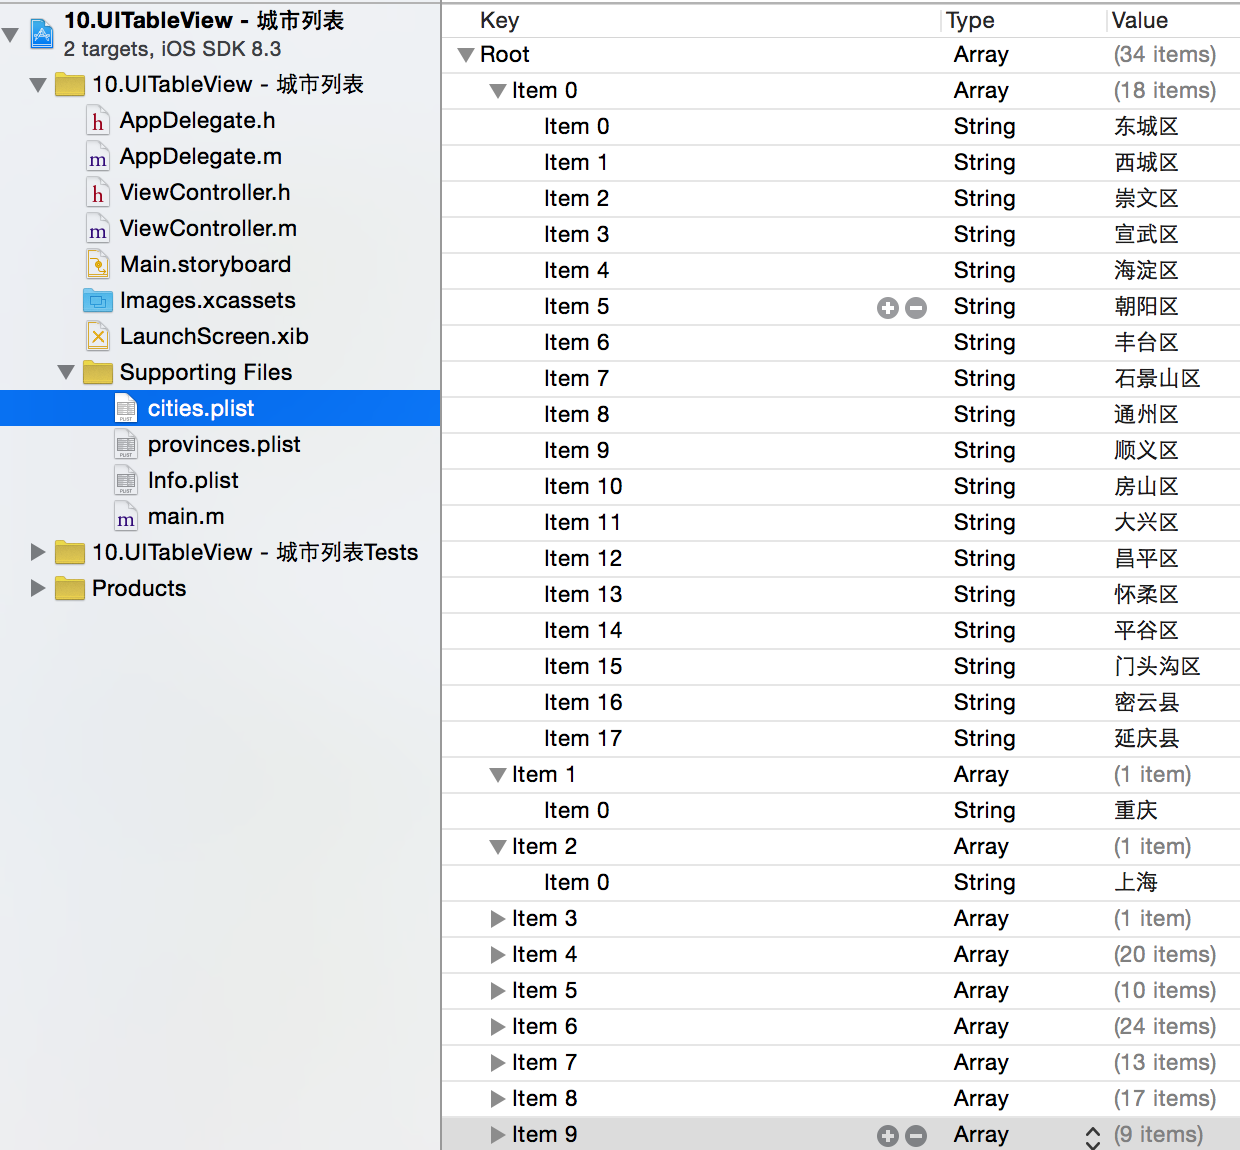
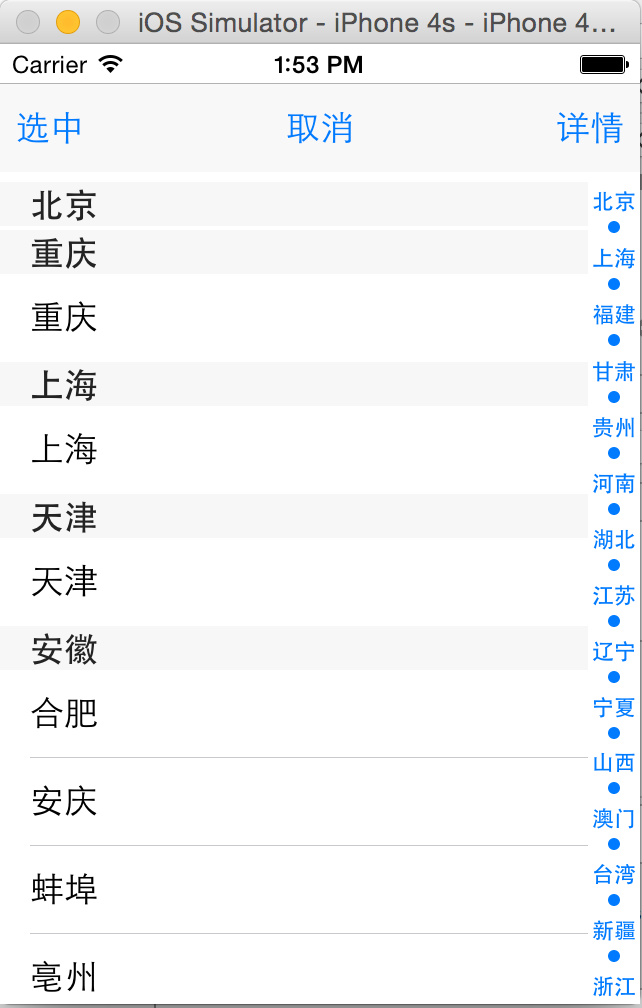
UITableView实例一: 城市列表的展示
数据源plist文件:
#import "ViewController.h"@interface ViewController ()<UITableViewDataSource,UITableViewDelegate>
@property (weak, nonatomic) IBOutlet UITableView *tableView;
@property (weak, nonatomic) IBOutlet UIToolbar *toolBar;
@property NSArray *provinces;
@property NSArray *cities;
@end
@implementation ViewController

- (void)viewDidLoad
{
    [super viewDidLoad];

    // 载入数据
    NSBundle *mainbundle = [NSBundle mainBundle];
    //如果类型不给,需要在resource参数中给出后缀名
    self.provinces = [NSArray arrayWithContentsOfFile:[mainbundle pathForResource:@"provinces.plist" ofType:nil]];
    self.cities =[NSArray arrayWithContentsOfFile:[mainbundle pathForResource:@"cities.plist" ofType:nil]];

    //处理toolBar的按钮事件绑定
    NSArray *items=self.toolBar.items;
    for (UIBarButtonItem *item in items) {
        if (item.title) {
            NSLog(@"当前的item: %@",item.title);
            [item setAction:@selector(toolBarItemClick:)];
        }
    }
}


#pragma mark -  UITableViewDataSouce 数据源方法
/**
 *  Section的个数,一共有多少组数据

 */
-(NSInteger) numberOfSectionsInTableView:(UITableView *)tableView
{
    return self.provinces.count;
}

/**
 *  第section组有多少行
 */
-(NSInteger)tableView:(UITableView *)tableView numberOfRowsInSection:(NSInteger)section
{
    return [self.cities[section] count];

}

/**
 *  每一行显示的内容(cell)
 */
-(UITableViewCell*)tableView:(UITableView *)tableView cellForRowAtIndexPath:(NSIndexPath *)indexPath
{
    NSLog(@"TableView来获取内容:section:%d,row:%d",indexPath.section,indexPath.row);

    UITableViewCell *cell =[[UITableViewCell alloc]initWithStyle:UITableViewCellStyleDefault reuseIdentifier:nil];
    //取cities中的城市数组
    NSArray *city = self.cities[indexPath.section];

    cell.textLabel.text =city[indexPath.row];
    [cell setSelectionStyle:UITableViewCellSelectionStyleNone];


    //如果当前的cell是被选中的,则设置其选中的accessoryType
    NSArray *selpaths =[tableView indexPathsForSelectedRows];
    if ([selpaths containsObject:indexPath]) {
        cell.accessoryType = UITableViewCellAccessoryCheckmark;

    }
    return cell;

}

/**
 *  添加索引
 */
- (NSArray *)sectionIndexTitlesForTableView:(UITableView *)tableView
{
    return self.provinces;
}

/**
 *  显示第section组的头部标题
 */
-(NSString*) tableView:(UITableView *)tableView titleForHeaderInSection:(NSInteger)section
{
    return self.provinces[section];//每个省的名称
}


#pragma mark - UITableViewDelegate 代理方法
/**
 *  即将被选中时调用
 */
-(NSIndexPath *) tableView:(UITableView *)tableView willSelectRowAtIndexPath:(NSIndexPath *)indexPath
{
    NSLog(@"section:%d,row:%d即将被选中",indexPath.section,indexPath.row);
    return indexPath;

}

/**
 *  当前行已经被选中时调用
 */
-(void)tableView:(UITableView *)tableView didSelectRowAtIndexPath:(NSIndexPath *)indexPath
{

    NSLog(@"section:%d,row:%d已经被选中",indexPath.section,indexPath.row);

    //设置其accessoryType 为CheckMark
    UITableViewCell *cell=[tableView cellForRowAtIndexPath:indexPath];
    [cell setAccessoryType:UITableViewCellAccessoryCheckmark];
}

/**
 *  当前行即将被取消选中时调用
 */
-(NSIndexPath *)tableView:(UITableView *)tableView willDeselectRowAtIndexPath:(NSIndexPath *)indexPath
{
    NSLog(@"section:%d,row:%d即将被取消被选中",indexPath.section,indexPath.row);

    return indexPath;
}

/**
 *  当前行被取消选中时调用
 */
-(void)tableView:(UITableView *)tableView didDeselectRowAtIndexPath:(NSIndexPath *)indexPath
{
    UITableViewCell *cell = [tableView cellForRowAtIndexPath:indexPath];
    [cell setAccessoryType:UITableViewCellAccessoryNone];
    NSLog(@"section:%d,row:%d已经被取消被选中",indexPath.section,indexPath.row);
}


#pragma mark - 事件方法
/**
 *  点击按钮
 */
- (void)toolBarItemClick:(UIBarButtonItem *)sender
{
    NSLog(@"按钮: %@被点击了",sender.title);
    if (sender.tag==3) {
        NSArray * selIndexLst = [self.tableView indexPathsForSelectedRows];
        NSLog(@"selIndex:%@",selIndexLst);
        return;
    }
}


@end
效果图:
UITableView实例二: 单组数据模型展示
数据源plist文件:
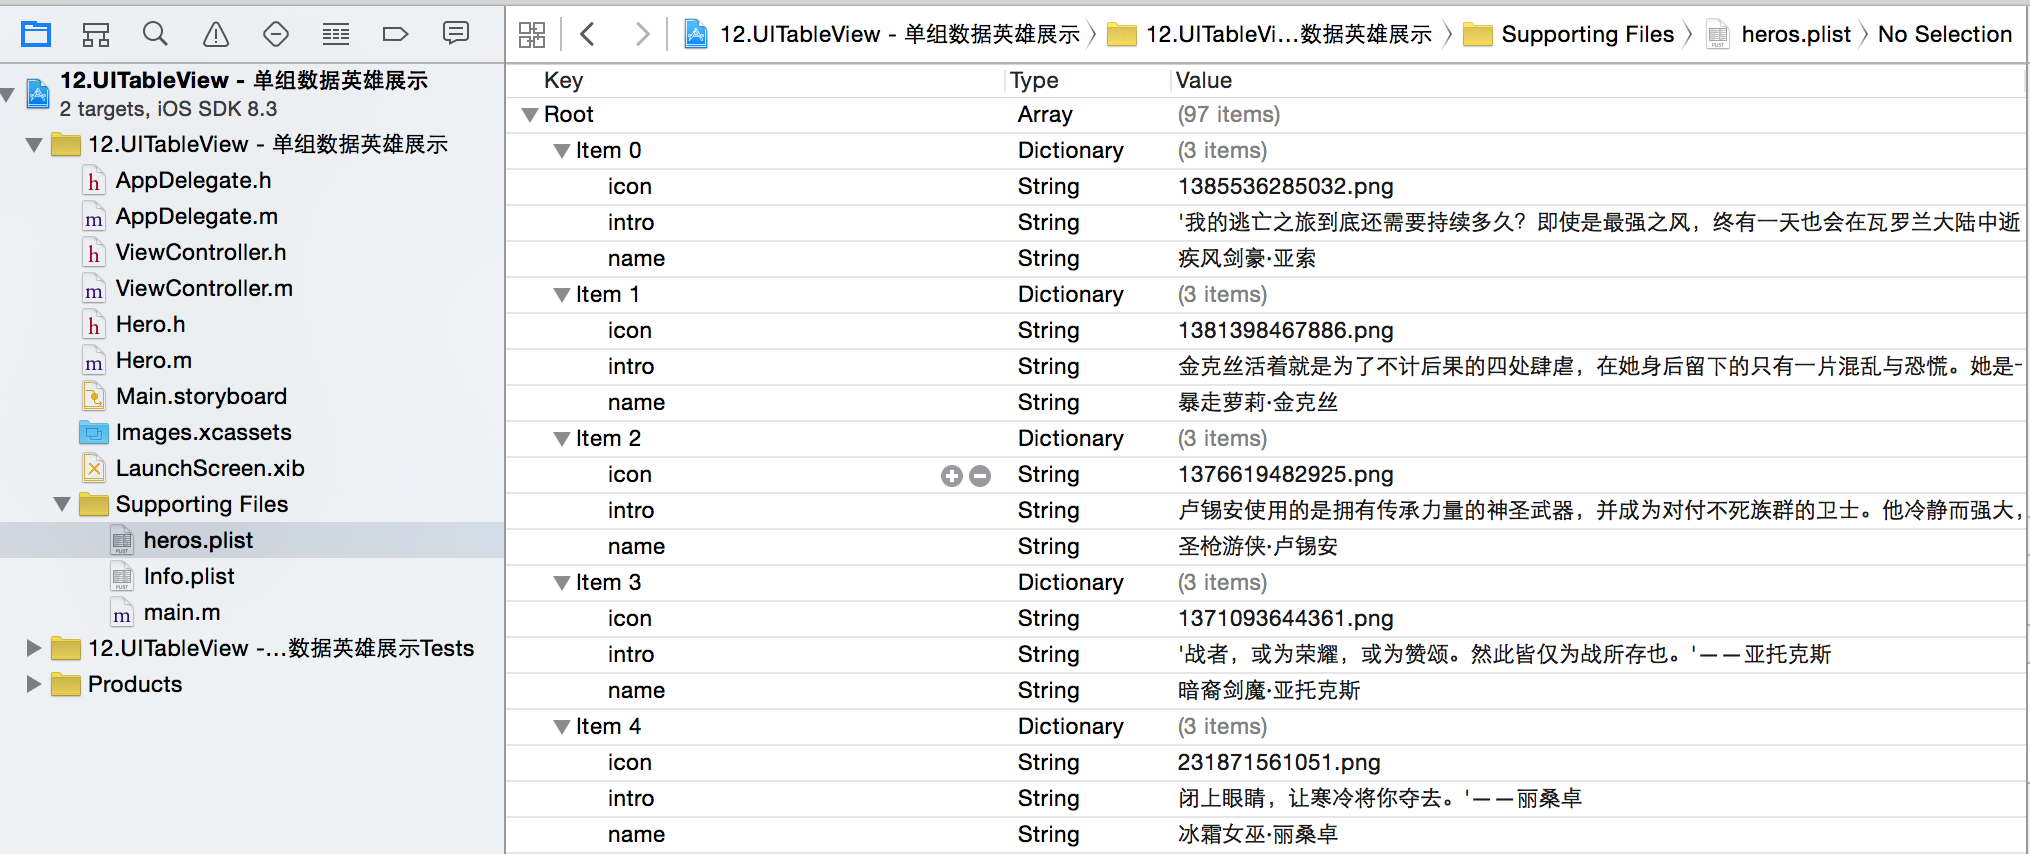
//模型类
#import <Foundation/Foundation.h>

@interface Hero : NSObject
@property(nonatomic,copy) NSString * name;
@property(nonatomic,copy) NSString * icon;
@property(nonatomic,copy) NSString * intro;
+ (instancetype)heroWithDict:(NSDictionary *)dict;
- (instancetype)initWithDict:(NSDictionary *)dict;

@end
#import "Hero.h"

@implementation Hero

+ (instancetype)heroWithDict:(NSDictionary *)dict
{
    return [[self alloc]initWithDict:dict];
}

- (instancetype)initWithDict:(NSDictionary *)dict
{
    if (self==[super init]) {
        [self setValuesForKeysWithDictionary:dict];
    }
    return self;
}

@end
#import "ViewController.h"
#import "Hero.h"
@interface ViewController ()<UITableViewDataSource,UITableViewDelegate,UIAlertViewDelegate>

@property(nonatomic,strong) NSArray* heros;

@property (weak, nonatomic) IBOutlet UITableView *tableView;

@end
@implementation ViewController
- (void)viewDidLoad {
[super viewDidLoad];
}
/**
* 隐藏标题栏
*/
- (BOOL)prefersStatusBarHidden
{
return YES;
}
//初始化
- (NSArray *)heros
{
if (_heros==nil) {
//1.获得plist的全路径
NSString * path=[[NSBundle mainBundle]pathForResource:@"heros.plist" ofType:nil];
//2.加载数组
NSArray * dictArray=[NSArray arrayWithContentsOfFile:path];
//3.将dictArray里面的所有字典转成模型对象,放到新的数组中
NSMutableArray *heroArray=[NSMutableArray array];
for (NSDictionary *dict in dictArray) {
//3.1创建模型对象
Hero *hero=[Hero heroWithDict:dict];
//3.2添加模型对象到数组中
[heroArray addObject:hero];
}
//4.赋值
_heros=heroArray;
}
return _heros;
}
#pragma mark - 数据源方法
- (NSInteger)tableView:(UITableView *)tableView numberOfRowsInSection:(NSInteger)section
{
return self.heros.count;
}
/**
* 知识点一: cell的性能优化
* 1.通过一个标识去缓存池中寻找可循环利用的cell
* 2.如果缓存池找不到可循环利用的cell,就会创建一个新的cell,给cell贴个标识
* 3.给cell设置新的数据
*/
/**
* 每当有一个cell进入视野范围内,就会调用
*/
- (UITableViewCell *)tableView:(UITableView *)tableView cellForRowAtIndexPath:(NSIndexPath *)indexPath
{
//static修饰局部变量:可以保证局部变量只分配一次存储空间(只初始化一次)
static NSString * ID=@"hero";
//1.通过一个标识去缓存池中寻找可循环利用的cell,dequeue:出列(查找)
UITableViewCell * cell=[tableView dequeueReusableCellWithIdentifier:ID];
//2.如果没有可循环利用cell
if (cell==nil) {
cell=[[UITableViewCell alloc]initWithStyle:UITableViewCellStyleSubtitle reuseIdentifier:ID];
NSLog(@"------缓存池中找不到,所以创建了cell- %ld",(long)indexPath.row);
}
//3.取出模型
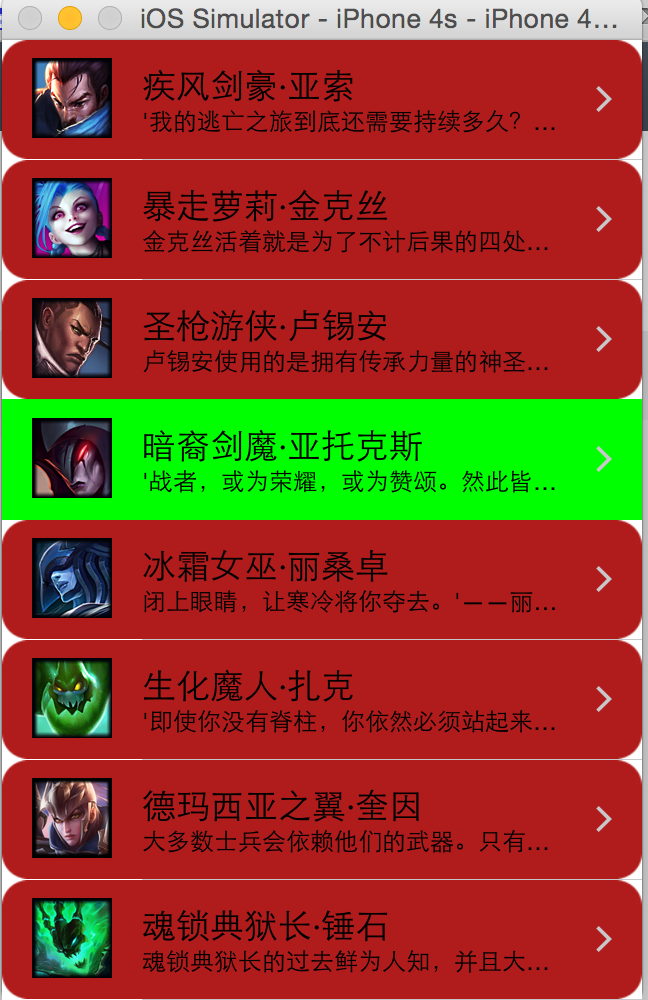
Hero *hero=self.heros[indexPath.row];
//设置cell的数据
cell.textLabel.text=hero.name;
cell.detailTextLabel.text=hero.intro;
cell.imageView.image=[UIImage imageNamed:hero.icon];
//设置cell右边指示器的类型
cell.accessoryType=UITableViewCellAccessoryDisclosureIndicator;
//设置图片背景
UIImageView *bgView=[[UIImageView alloc]init];
bgView.image=[UIImage imageNamed:@"buttondelete"];
cell.backgroundView=bgView;
//设置选中背景
UIView *selectedbgView=[[UIView alloc]init];
selectedbgView.backgroundColor=[UIColor greenColor];
cell.selectedBackgroundView=selectedbgView;
return cell;
}
#pragma mark - 代理方法
//控制与状态栏之间的高度
- (CGFloat)tableView:(UITableView *)tableView heightForRowAtIndexPath:(NSIndexPath *)indexPath
{
return 60;
}
- (void)tableView:(UITableView *)tableView didSelectRowAtIndexPath:(NSIndexPath *)indexPath
{
//1.取得被点击这行对应的模型
Hero *hero=self.heros[indexPath.row];
//弹框
UIAlertView *alert=[[UIAlertView alloc]initWithTitle:@"数据展示" message:nil delegate:self cancelButtonTitle:@"取消" otherButtonTitles:@"确定", nil];
//设置对话框的类型
alert.alertViewStyle=UIAlertViewStylePlainTextInput;
//取得唯一的那个文本框,显示英雄的名称
[alert textFieldAtIndex:0].text=hero.name;
[alert show];
//绑定行号到alertView上
alert.tag=indexPath.row;
}
//- (void)tableView:(UITableView *)tableView didDeselectRowAtIndexPath:(NSIndexPath *)indexPath
//{
// // Deselect : 取消选中
// NSLog(@"取消选中了第%d行", indexPath.row);
//}
#pragma mark - alertView的代理方法
- (void)alertView:(UIAlertView *)alertView clickedButtonAtIndex:(NSInteger)buttonIndex
{
if (buttonIndex==0) return;
//1.取得文本框最后的文字
NSString *name=[alertView textFieldAtIndex:0].text;
//2.修改模型属性
int row=alertView.tag;
Hero *hero=self.heros[row];
hero.name=name;
/**
* 知识点二: 数据的刷新
* reloadData:tableView会向数据源重新请求数据,重新调用数据源的相应方法取得数据
* 重新调用数据源的tableView:numberOfRowsInSection:获得行数
* 重新调用数据源的tableView:cellForRowAtIndexPath:得知每一行显示怎样的cell
*/
//3.让tableView重新加载模型数据
//全部刷新
//[self.tableView reloadData];
//局部刷新
NSIndexPath *path=[NSIndexPath indexPathForItem:row inSection:0];
[self.tableView reloadRowsAtIndexPaths:@[path] withRowAnimation:UITableViewRowAnimationBottom];
}
@end
效果图:


 3639
3639


 被折叠的 条评论
为什么被折叠?
被折叠的 条评论
为什么被折叠?
 到【灌水乐园】发言


