


参考:
1、http://scikit-image.org/docs/stable/
2、http://scikit-image.org/docs/stable/user_guide.html
1、Getting started
>>> from skimage import data
>>> camera = data.camera()

>>> type(camera)
<type 'numpy.ndarray'>
>>> # An image with 512 rows and 512 columns
>>> camera.shape
(512, 512)


>>> coins = data.coins()
>>> from skimage import filters
>>> threshold_value = filters.threshold_otsu(coins)
>>> threshold_value
107

>>> import os
>>> filename = os.path.join(skimage.data_dir, 'moon.png')
>>> from skimage import io
>>> moon = io.imread(filename)
2、A crash course on NumPy for images
>>> from skimage import data
>>> camera = data.camera()
>>> type(camera)
<type 'numpy.ndarray'>

>>> camera.shape
(512, 512)
>>> camera.size
262144

>>> camera.min(), camera.max()
(0, 255)
>>> camera.mean()
118.31400299072266
NumPy indexing
>>> # Get the value of the pixel on the 10th row and 20th column
>>> camera[10, 20]
153
>>> # Set to black the pixel on the 3rd row and 10th column
>>> camera[3, 10] = 0

>>> # Set to black the ten first lines
>>> camera[:10] = 0

>>> mask = camera < 87
>>> # Set to "white" (255) pixels where mask is True
>>> camera[mask] = 255

>>> inds_r = np.arange(len(camera))
>>> inds_c = 4 * inds_r % len(camera)
>>> camera[inds_r, inds_c] = 0

>>> nrows, ncols = camera.shape
>>> row, col = np.ogrid[:nrows, :ncols]
>>> cnt_row, cnt_col = nrows / 2, ncols / 2
>>> outer_disk_mask = ((row - cnt_row)**2 + (col - cnt_col)**2 >(nrows / 2)**2)
>>> camera[outer_disk_mask] = 0

>>> lower_half = row > cnt_row
>>> lower_half_disk = np.logical_and(lower_half, outer_disk_mask)
>>> camera = data.camera()
>>> camera[lower_half_disk] = 0
Color images
>>> cat = data.chelsea()
>>> type(cat)
<type 'numpy.ndarray'>
>>> cat.shape
(300, 451, 3)

>>> cat[10, 20]
array([151, 129, 115], dtype=uint8)
>>> # set the pixel at row 50, column 60 to black
>>> cat[50, 60] = 0
>>> # set the pixel at row 50, column 61 to green
>>> cat[50, 61] = [0, 255, 0] # [red, green, blue]

>>> from skimage import data
>>> cat = data.chelsea()
>>> reddish = cat[:, :, 0] > 160
>>> cat[reddish] = [0, 255, 0]
>>> plt.imshow(cat)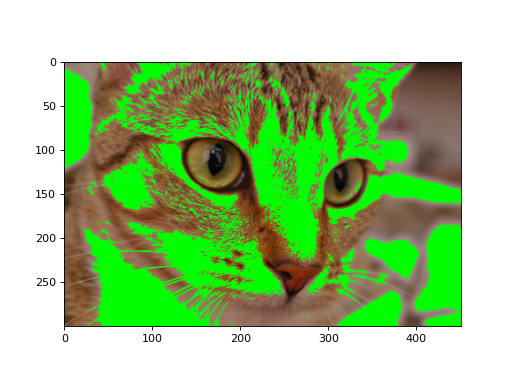
Coordinate conventions
Dimension name and order conventions in scikit-image
| Image type | coordinates |
|---|---|
| 2D grayscale | (row, col) |
| 2D multichannel (eg. RGB) | (row, col, ch) |
| 3D grayscale | (pln, row, col) |
| 3D multichannel | (pln, row, col, ch) |
>>> im3d = np.random.rand(100, 1000, 1000)
>>> from skimage import morphology
>>> from scipy import ndimage as ndi
>>> seeds = ndi.label(im3d < 0.1)[0]
>>> ws = morphology.watershed(im3d, seeds)

>>> from skimage import segmentation
>>> slics = segmentation.slic(im3d, spacing=[5, 1, 1], multichannel=False)

>>> from skimage import filters
>>> edges = np.zeros_like(im3d)
>>> for pln, image in enumerate(im3d):
...     # iterate over the leading dimension (planes)
...     edges[pln] = filters.sobel(image)
数组顺序的注意事项
>>> def in_order_multiply(arr, scalar):
...     for plane in list(range(arr.shape[0])):
...         arr[plane, :, :] *= scalar
...
>>> def out_of_order_multiply(arr, scalar):
...     for plane in list(range(arr.shape[2])):
...         arr[:, :, plane] *= scalar
...
>>> import time
>>> im3d = np.random.rand(100, 1024, 1024)
>>> t0 = time.time(); x = in_order_multiply(im3d, 5); t1 = time.time()
>>> print("%.2f seconds" % (t1 - t0))
0.14 seconds
>>> im3d_t = np.transpose(im3d).copy() # place "planes" dimension at end
>>> im3d_t.shape
(1024, 1024, 100)
>>> s0 = time.time(); x = out_of_order_multiply(im3d, 5); s1 = time.time()
>>> print("%.2f seconds" % (s1 - s0))
1.18 seconds
>>> print("Speedup: %.1fx" % ((s1 - s0) / (t1 - t0)))
Speedup: 8.6x
A note on time
>>> for timepoint in image5d:
...     # each timepoint is a 3D multichannel image
...     do_something_with(timepoint)
Addendum to dimension names and orders in scikit-image
| Image type | coordinates |
|---|---|
| 2D color video | (t, row, col, ch) |
| 3D multichannel video | (t, pln, row, col, ch) |
3、图像数据类型及其含义
| Data type | Range |
|---|---|
| uint8 | 0 to 255 |
| uint16 | 0 to 65535 |
| uint32 | 0 to 232 |
| float | -1 to 1 or 0 to 1 |
| int8 | -128 to 127 |
| int16 | -32768 to 32767 |
| int32 | -231 to 231 - 1 |
>>> from skimage import img_as_float
>>> image = np.arange(0, 50, 10, dtype=np.uint8)
>>> print(image.astype(np.float)) # These float values are out of range.
[  0.  10.  20.  30.  40.]
>>> print(img_as_float(image))
[ 0.          0.03921569  0.07843137  0.11764706  0.15686275]
输入类型
| Function name | Description |
|---|---|
| img_as_float | Convert to 64-bit floating point. |
| img_as_ubyte | Convert to 8-bit uint. |
| img_as_uint | Convert to 16-bit uint. |
| img_as_int | Convert to 16-bit int. |
>>> from skimage import img_as_ubyte
>>> image = np.array([0, 0.5, 1], dtype=float)
>>> img_as_ubyte(image)
WARNING:dtype_converter:Possible precision loss when converting from
float64 to uint8
array([  0, 128, 255], dtype=uint8)
上下文管理器可以忽略警告:
>>> import warnings
>>> image = np.array([0, 0.5, 1], dtype=float)
>>> with warnings.catch_warnings():
...     warnings.simplefilter("ignore")
...     img_as_ubyte(image)
array([  0, 128, 255], dtype=uint8)
>>> from skimage import data
>>> from skimage.transform import rescale
>>> image = data.coins()
>>> image.dtype, image.min(), image.max(), image.shape
(dtype('uint8'), 1, 252, (303, 384))
>>> rescaled = rescale(image, 0.5)
>>> (rescaled.dtype, np.round(rescaled.min(), 4),
... np.round(rescaled.max(), 4), rescaled.shape)
(dtype('float64'), 0.0147, 0.9456, (152, 192))
>>> rescaled = rescale(image, 0.5, preserve_range=True)
>>> (rescaled.dtype, np.round(rescaled.min()),
... np.round(rescaled.max()), rescaled.shape
(dtype('float64'), 4.0, 241.0, (152, 192))输出类型
>>> from skimage import img_as_uint
>>> out = img_as_uint(sobel(image))
>>> plt.imshow(out)
使用OpenCV
将BGR转换为RGB,反之亦然
>>> image = image[:, :, ::-1]使用OpenCV与skimage的图像
>>> from skimage import img_as_float
>>> image = img_as_float(any_opencv_image)
在OpenCV中使用来自skimage的图像
>>> from skimage import img_as_ubyte
>>> cv_image = img_as_ubyte(any_skimage_image)
图像处理管道
>>> from skimage import img_as_float
>>> image = img_as_float(func1(func2(image)))
>>> processed_image = custom_func(image)
>>> def custom_func(image):
... image = img_as_float(image)
... # do something
...
>>> processed_image = custom_func(func1(func2(image)))重新调整强度值
>>> from skimage import exposure
>>> image = exposure.rescale_intensity(img10bit, in_range=(0, 2**10 - 1))

>>> image = exposure.rescale_intensity(img10bit, in_range='uint10')
注意负值
>>> image = exposure.rescale_intensity(img_int32, out_range=(0, 2**31 - 1))
>>> img_uint8 = img_as_ubyte(image)
4、图像调整:转换图像内容
颜色操纵
颜色模型之间的转换
>>> # bright saturated red
>>> red_pixel_rgb = np.array([[[255, 0, 0]]], dtype=np.uint8)
>>> color.rgb2hsv(red_pixel_rgb)
array([[[ 0.,  1.,  1.]]])
>>> # darker saturated blue
>>> dark_blue_pixel_rgb = np.array([[[0, 0, 100]]], dtype=np.uint8)
>>> color.rgb2hsv(dark_blue_pixel_rgb)
array([[[ 0.66666667,  1.        ,  0.39215686]]])
>>> # less saturated pink
>>> pink_pixel_rgb = np.array([[[255, 100, 255]]], dtype=np.uint8)
>>> color.rgb2hsv(pink_pixel_rgb)
array([[[ 0.83333333,  0.60784314,  1.        ]]])
从RGBA转换为RGB - 通过alpha混合去除Alpha通道
>>> from skimage.color import rgba2rgb
>>> from skimage import data
>>> img_rgba = data.logo()
>>> img_rgb = rgba2rgb(img_rgba)
颜色和灰度值之间的转换
>>> from skimage.color import rgb2gray
>>> from skimage import data
>>> img = data.astronaut()
>>> img_gray = rgb2gray(img)

>>> red_pixel = np.array([[[255, 0, 0]]], dtype=np.uint8)
>>> color.rgb2gray(red_pixel)
array([[ 0.2125]])
>>> green_pixel = np.array([[[0, 255, 0]]], dtype=np.uint8)
>>> color.rgb2gray(green_pixel)
array([[ 0.7154]])
图像反转
>>> from skimage import util
>>> img = data.camera()
>>> inverted_img = util.invert(img)
用标签绘制图像

对比和曝光
>>> image = np.array([[1, 3], [1, 1]])
>>> exposure.histogram(image)
(array([3, 0, 1]), array([1, 2, 3]))
>>> from skimage import exposure
>>> text = data.text()
>>> text.min(), text.max()
(10, 197)
>>> better_contrast = exposure.rescale_intensity(text)
>>> better_contrast.min(), better_contrast.max()
(0, 255)>>> moon = data.moon()
>>> v_min, v_max = np.percentile(moon, (0.2, 99.8))
>>> v_min, v_max
(10.0, 186.0)
>>> better_contrast = exposure.rescale_intensity(
... moon, in_range=(v_min, v_max))
5、I / O插件基础设施
6、处理视频文件
解决方法:将视频转换为图像序列
ffmpeg -i "video.mov" -f image2 "video-frame%05d.png"PyAV
import av
v = av.open('path/to/video.mov')
for packet in container.demux():
for frame in packet.decode():
if frame.type == 'video':
img = frame.to_image() # PIL/Pillow image
arr = np.asarray(img) # numpy array
# Do something!Adding Random Access to PyAV
import pims
v = pims.Video('path/to/video.mov')
v[-1]  # a 2D numpy array representing the last frame

# pip install pims
MoviePy
from moviepy.editor import VideoFileClip
myclip = VideoFileClip("some_video.avi")

# pip install moviepy
Imageio
import imageio
filename = '/tmp/file.mp4'
vid = imageio.get_reader(filename,  'ffmpeg')

for num, image in vid.iter_data():
    print(image.mean())

metadata = vid.get_meta_data()

# pip install imageio
OpenCV
cap=cv2.VideoCapture.open(filename)
cap=cv2.VideoCapture.open(device)

ret,frame = cap.read()
9、Image Viewer
Quick Start
from skimage import data
from skimage.viewer import ImageViewer

image = data.coins()
viewer = ImageViewer(image)
viewer.show()
from skimage.viewer.plugins.lineprofile import LineProfile
viewer = ImageViewer(image)
viewer += LineProfile(viewer)
overlay, data = viewer.show()[0]from skimage import data
from skimage.viewer import ImageViewer
# from skimage.filters import denoise_tv_bregman
from skimage.restoration import denoise_tv_bregman
from skimage.viewer.plugins.base import Plugin
from skimage.viewer.widgets import Slider
from skimage.viewer.widgets.history import SaveButtons
image = data.coins()
denoise_plugin = Plugin(image_filter=denoise_tv_bregman)
denoise_plugin += Slider('weight', 0.01, 0.5, update_on='release')
denoise_plugin += SaveButtons()
viewer = ImageViewer(image)
viewer += denoise_plugin
denoised = viewer.show()[0][0]


 1万+
1万+

 被折叠的 条评论
为什么被折叠?
被折叠的 条评论
为什么被折叠?
 到【灌水乐园】发言


