


前言:
springboot所需要的:
JDK 1.8 or later
Gradle 4+ or Maven 3.2+
本文使用Eclipse来构建
开始构建:
一.Eclipse需要安装spring tools插件
菜单栏-->Help--->Eclipse MarketPlace -->输入spring tool , 点击install安装

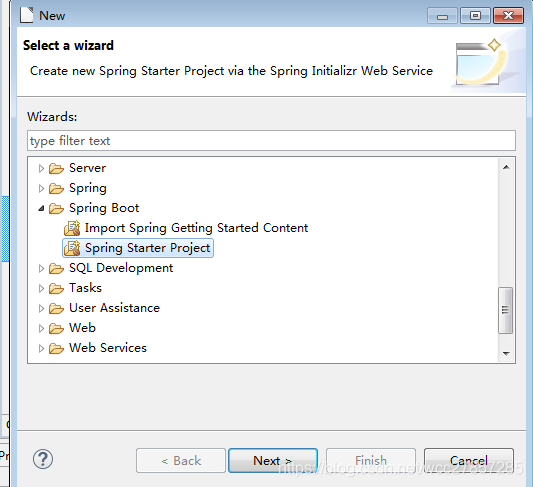
二.创建Spring Boot工程
安装了spring tool插件之后,就可以在项目列表中找到spring的相关选项了
File--> New--> Spring Boot-->Spring Start Project
点击Next-->Next,一路默认即可
在选择dependencies的选项卡中,勾上Web->Web
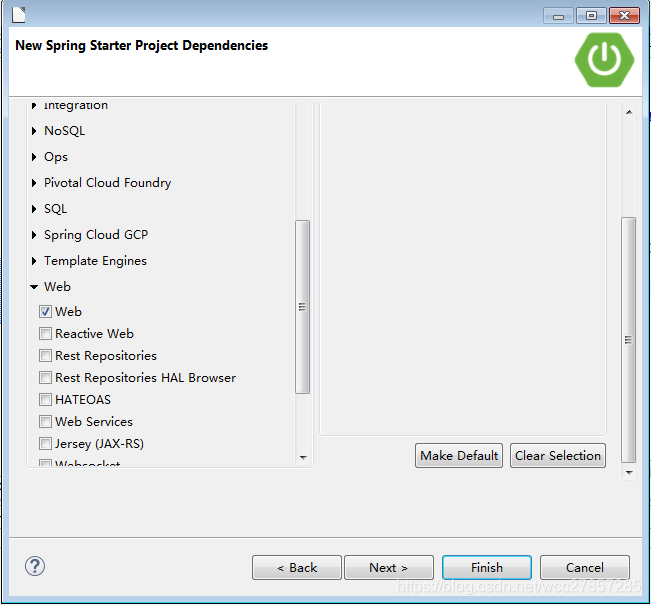
点击finish,完成!
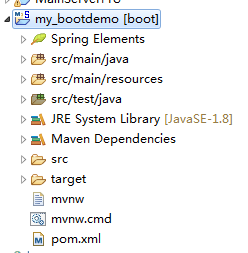
项目结构图如下:
三.测试
在默认的com.example.demo下面新建一个helloworldController类
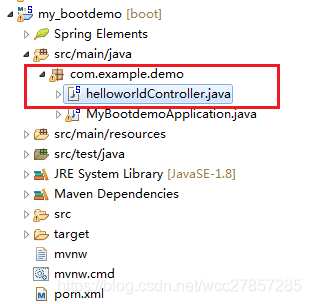
helloworldController.java:
package com.example.demo;

import org.springframework.web.bind.annotation.RequestMapping;
import org.springframework.web.bind.annotation.ResponseBody;
import org.springframework.web.bind.annotation.RestController;

@RestController
public class helloworldController {

   @RequestMapping("/hello")
    public String hello(){
        return "Welcome to start the Boot!";
    }
}
@RestController注解相当于@ResponseBody + @Controller合在一起的作用
选择MyBootdemoApplication,右键Run As-->Spring boot app
然后访问:localhost:8080/hello

成功了
PS:由于spring boot是默认内置了tomcat,所以默认端口是8080
四.构建restful服务
参考官网文档:https://spring.io/guides/gs/rest-service/
我们对刚刚的helloworldcontroller.java稍作修改
package com.example.demo;

import org.springframework.web.bind.annotation.RequestMapping;
import org.springframework.web.bind.annotation.ResponseBody;
import org.springframework.web.bind.annotation.RestController;
import java.util.concurrent.atomic.AtomicLong;
import org.springframework.web.bind.annotation.RequestParam;

@RestController
public class helloworldController {

   @RequestMapping("/hello")
    public String hello(){
        return "Welcome to start the Boot!";
    }

   private static final String template = "Hello, %s!";
   private final AtomicLong counter = new AtomicLong();

   @RequestMapping("/greeting")
   public Greeting greeting(@RequestParam(value="name", defaultValue="World") String name) {
       return new Greeting(counter.incrementAndGet(),
                           String.format(template, name));
   }
}


 class Greeting {

    private final long id;
    private final String content;

    public Greeting(long id, String content) {
        this.id = id;
        this.content = content;
    }

    public long getId() {
        return id;
    }

    public String getContent() {
        return content;
    }
}
这里我偷懒不想新建一个pojo类了,直接把Greeting Class写在了下面
OK,代码很简单,通过@RequestMapping("/greeting") 拦截greeting,然后获取url中name参数,不传的话默认为“World”
传入递增的长整型id和name属性,然后构造生成pojo类Greeting, 将对象转化成json格式返回给浏览器
试一下,访问:http://localhost:8080/greeting?name=abc
一个简单的springboot服务搭建完成!
未完待续。。。。。。


 1138
1138


 被折叠的 条评论
为什么被折叠?
被折叠的 条评论
为什么被折叠?
 到【灌水乐园】发言


