


链路状态避免抖动的方法是
A Flutter package reactivestore which helps developers in managing the state of their apps and creating reactive components/widgets with less boiler plate code. Check it in pub.dev here.
Flutter软件包的reactivestore ,可帮助开发人员管理其应用程序的状态并创建具有更少样板代码的React式组件/小工具。 检查它在pub.dev 这里 。
入门 (Getting Started)
This package was inspired by the medium post i wrote here on Dialog State Management in Flutter — using Providers and Change Notifiers.
该软件包的灵感来自于我在此处写的有关Flutter中的对话框状态管理的中篇文章-使用提供者和变更通知者。
用法 (Usage)
To use this package :
要使用此软件包:
add the dependency to your pubspec.yaml file.
将依赖项添加到您的pubspec.yaml文件中。
dependencies:
     flutter:
       sdk:flutter
     reactivestore:
如何使用 (How to Use)
The reactivestore package has two classes :
reactstore包有两个类:
The ReactiveStore class is an ancestor class that provides an instance of changes to all its descendants. The ReactiveStore takes a child widget as the root ancestor widget see example below.
ReactiveStore类是一个祖先类,它为其所有后代提供更改的实例。 ReactiveStore将一个子小部件作为根祖先小部件,请参见下面的示例。
@override
Widget build(BuildContext context) {
  return ReactiveStore(
    child: MaterialApp(
      title: 'Reactive Store App',
      theme: ThemeData(
        primarySwatch: Colors.blue,
        visualDensity: VisualDensity.adaptivePlatformDensity,
      ),
      home: MyHomePage(title: 'Reactive Store'),
    )
  );
}
In the example above all descendants of the MyHomePage will be monitored for changes in their states.
在上面的示例中,将监视MyHomePage的所有后代的状态变化。
The UpdateUI is the Consumer Widget for those who are familiar with the provider package. The widget is used to update the UI of our application whenever there is a change in state in our application tree. The UpdateUI widget takes a builder function. The Builder function has three arguments :
对于那些熟悉提供程序包的用户, UpdateUI是Consumer Widget。 每当我们的应用程序树中的状态发生更改时,该小部件就会用于更新我们的应用程序的UI。 UpdateUI小部件具有构建器功能。 Builder函数具有三个参数:
new UpdateUI(
  builder: (BuildContext, StoreModel, Widget)=>child
)
The BuildContext is the current context of your widget, StoreModel is the name of the store(you can give it any name) and the Widget is the child. See example below:
BuildContext是小部件的当前上下文,StoreModel是商店的名称(您可以给它命名),而Widget是子级。 请参见下面的示例:
new Padding(
  padding: EdgeInsets.all(10.0),
  child: UpdateUI(
    builder: (context,consumerModel,child)=>consumerModel.itemsList !=null?Text(
      consumerModel.totalItems.toString(),
      style: TextStyle(fontWeight: FontWeight.w500,fontSize: 25.0, color: Colors.green),):null,
  ),
),
商店ADT (The Store ADT)
The above example introduced us to the final piece of our reactivestore which is the StoreModel Abstract Data Type (ADT). The StoreModel is the store which stores the data. The StoreModel listens for changes in state in our app and notifies the Widgets wrapped by the UpdateUI widget. The StoreModel is essentially an Observable class.
上面的示例向我们介绍了React存储的最后一部分,即StoreModel抽象数据类型(ADT)。 StoreModel是存储数据的商店。 StoreModel侦听我们应用程序中状态的变化,并通知由UpdateUI小部件包装的小部件。 StoreModel本质上是一个Observable类。
The data in the store is accessed using the of method in the StoreModel . To access the data without necessarily changing the UI you use it with a listen parameter set to false as follows.
使用StoreModel中的of方法可以访问存储中的数据。 要访问数据而不必更改UI,请按如下所示将其与listen参数设置为false一起使用。
final model  = StoreModel(); //Instantiating the Observable StoreModel class
final x = model.of(context, false);  //initialize an instance that access the data without rebuilding UI.
The StoreModel is a List implmented ADT with the following operations:
StoreModel是列表实现的ADT,具有以下操作:
final obj = StoreModel(); //initializing the StoreModel
进口货 (Imports)
After installing the reactivestore package remember the imports
安装reactstore软件包后,请记住导入
import 'package:reactivestore/model/store_model.dart';
import 'package:reactivestore/reactivestore.dart';
例 (Example)
See full example here
在此处查看完整示例
In this Example i will show you how you can easily manage the state of your app using a Dialog as a descendant class.
在本示例中,我将向您展示如何使用Dialog作为后代类轻松管理应用程序的状态。
import 'package:flutter/material.dart';
import 'package:reactivestore/model/store_model.dart';
import 'package:reactivestore/reactivestore.dart';


void main() {
  runApp(MyApp());
}


class MyApp extends StatelessWidget {
  // This widget is the root of your application.
  @override
  Widget build(BuildContext context) {
    return ReactiveStore(
      child: MaterialApp(
        title: 'Reactive Store App',
        theme: ThemeData(
          primarySwatch: Colors.blue,
          visualDensity: VisualDensity.adaptivePlatformDensity,
        ),
        home: MyHomePage(title: 'Reactive Store'),
      )
    );

  }
}
In the above snippet i have imported the reactivestore. I have wrapped the root MaterialApp with a ReactiveStore Widget.
在上面的代码片段中,我已经导入了reactstore 。 我已经用ReactiveStore小部件包装了根MaterialApp。
class MyHomePage extends StatefulWidget {
  MyHomePage({Key key, this.title}) : super(key: key);
  final String title;


  @override
  _MyHomePageState createState() => _MyHomePageState();
}


class _MyHomePageState extends State<MyHomePage> {
  @override
  Widget build(BuildContext context) {
    TextStyle titleStyle = Theme.of(context).textTheme.subtitle1;
    return Scaffold(
      appBar: AppBar(
        title: Text(widget.title),
      ),
      body: new Column(
        children: <Widget>[
          new Padding(
              padding: EdgeInsets.all(10.0),
            child: Row(
              mainAxisAlignment: MainAxisAlignment.spaceBetween,
              children: <Widget>[
                new Padding(
                  padding: EdgeInsets.all(10.0),
                  child: Text("Total Members:",style: TextStyle(fontWeight: FontWeight.w300,fontSize: 22.0),textAlign: TextAlign.left,),
                ),


                new Padding(
                    padding: EdgeInsets.all(10.0),
                    child: UpdateUI(
                      builder: (context,consumerModel,child)=>consumerModel.itemsList !=null?Text(
                        consumerModel.totalItems.toString(),
                        style: TextStyle(fontWeight: FontWeight.w500,fontSize: 25.0, color: Colors.green),):null,
                    )
                )
              ],
            ),
          ),
          UpdateUI(
              builder: (context,customerModel,child)=>Expanded(
                child: new ListView.builder(
                  itemCount: customerModel.itemsList !=null? customerModel.totalItems:0,
                    itemBuilder: (BuildContext context, int index){
                      return new Padding(
                          padding: EdgeInsets.only(left: 5.0,right: 5.0),
                        child: Card(
                          elevation: 5.0,
                          child: ListTile(
                            leading: CircleAvatar(
                              backgroundColor: Colors.blue,
                              child: Icon(Icons.person_outline),
                            ),
                            title: Text(customerModel.itemsList[index]['name'], style: titleStyle,),
                            subtitle: Text('\$ ${customerModel.itemsList[index]['salary'].toString()}.00',style: titleStyle,),
                            trailing: new GestureDetector(
                              child: new Icon(Icons.delete, color: Colors.red,),
                              onTap: (){
                                _showAlertDialog('Status', 'Are you sure you want to delete ${customerModel.itemsList[index]['name'].toUpperCase()}',index);
                              },
                            ),
                          ),
                        ),
                      );
                    }
                ),


            ),
          )


        ],
      ),
      floatingActionButton: FloatingActionButton(
        onPressed: (){
          showDialog(context: context, builder: (_) => MyCustomDialog());
        },
        child: Icon(Icons.person_add),
      ),
    );
  }
   void _showAlertDialog(String title, String message, int index){
    final model = StoreModel(); //Model is the Observable
    final x = model.of(context, true); //Use of method in model with context and listen set to true. To update UI


    AlertDialog alertDialog = AlertDialog(
      title: new Icon(Icons.warning, size: 80.0, color: Colors.amber,),
      content: Text(message),
      actions: <Widget>[
        FlatButton(
          child: Text('YES',style: TextStyle(color: Colors.red),),
          onPressed: () {
            x.remove(index);
            Navigator.of(context).pop();
          },
        ),


        FlatButton(
          child: Text('CANCEL'),
          onPressed: () {
            Navigator.of(context).pop();
          },
        ),
      ],
    );
    showDialog(
        context: context,
        builder: (_)=>alertDialog
    );
  }
}
In the above code notice how we are tracking for changes in state using the UpdateUI widget.
在上面的代码中,请注意我们如何使用UpdateUI小部件跟踪状态变化。
...
...
new Padding(
  padding: EdgeInsets.all(10.0),
  child: UpdateUI(
    builder: (context,consumerModel,child)=>consumerModel.itemsList !=null?Text(
      consumerModel.totalItems.toString(),
      style: TextStyle(fontWeight: FontWeight.w500,fontSize: 25.0, color: Colors.green),):null,
  ),
),
...
...
The UpdateUI will rebuild whenever something is added to our store.
只要将任何东西添加到我们的商店中, UpdateUI就会重建。
Nb The builder in UpdateUI takes three arguments(BuildContext, StoreModel, Widget). You can name the the StoreModel however you want as long as you are using the name to access the data in store. eg consumerModel as above.
Nb UpdateUI中的构建器采用三个参数(BuildContext,StoreModel,Widget)。 您可以使用所需的名称来命名StoreModel,只要使用该名称来访问存储中的数据即可。 例如上面的consumerModel。
...
...
UpdateUI(
  builder: (context,customerModel,child)=>Expanded(
    child: new ListView.builder(
      itemCount: customerModel.itemsList !=null? customerModel.totalItems:0,
        itemBuilder: (BuildContext context, int index){
          return new Padding(
              padding: EdgeInsets.only(left: 5.0,right: 5.0),
            child: Card(
              elevation: 5.0,
              child: ListTile(
                leading: CircleAvatar(
                  backgroundColor: Colors.blue,
                  child: Icon(Icons.person_outline),
                ),
                title: Text(customerModel.itemsList[index]['name'], style: titleStyle,),
                subtitle: Text('\$ ${customerModel.itemsList[index]['salary'].toString()}.00',style: titleStyle,),
                trailing: new GestureDetector(
                  child: new Icon(Icons.delete, color: Colors.red,),
                  onTap: (){
                    _showAlertDialog('Status', 'Are you sure you want to delete ${customerModel.itemsList[index]['name'].toUpperCase()}',index);
                  },
                ),
              ),
            ),
          );
        }
    ),
  ),
)
...
...
In the above snipped notice how we are accessing the data using a list map conversion
在上面的片段中,请注意我们如何使用列表映射转换来访问数据
new Text('\$ ${customerModel.itemsList[index]['salary'].toString()}.00',style: titleStyle,),As described above remember to use the keyword itemsList to access the list data.
如上所述,请记住使用关键字itemsList来访问列表数据。
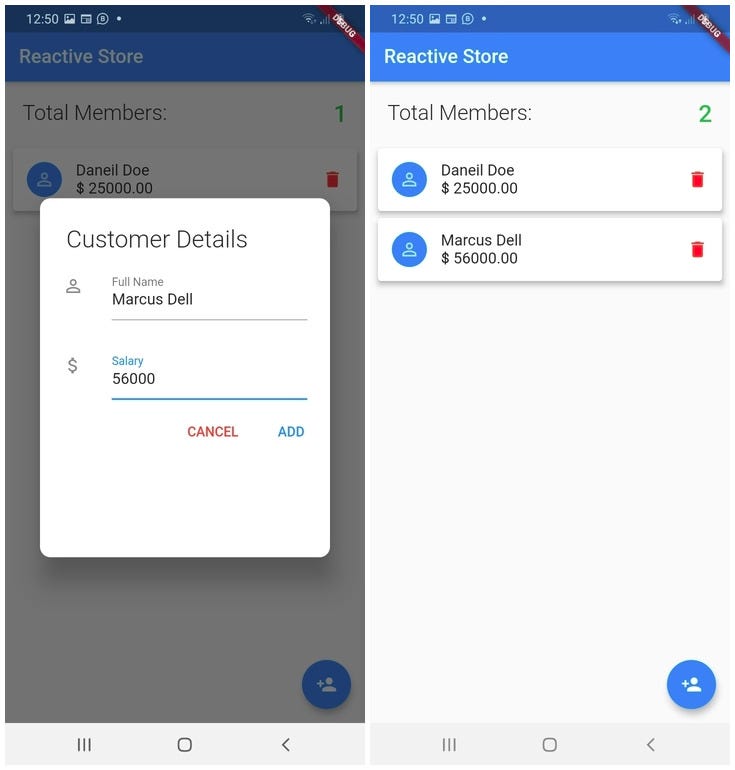
The result after the above implementation. Remember to comment out MyCustomDialog call in the floating action button since we haven't implemented it yet.
以上实施后的结果。 请记住在浮动操作按钮中注释掉MyCustomDialog调用,因为我们尚未实现它。

Now we need to implement the MyCustomDialog in the floating action button.
现在,我们需要在浮动操作按钮中实现MyCustomDialog。
class MyCustomDialog extends StatefulWidget {
  @override
  MyCustomDialogState createState() {
    return new MyCustomDialogState();
  }
}


class MyCustomDialogState extends State<MyCustomDialog> {
  final formKey = new GlobalKey<FormState>();
  Size deviceSize;


  String name, salary;


  @override
  Widget build(BuildContext context) {
    deviceSize = MediaQuery.of(context).size;
    return Dialog(
        shape: RoundedRectangleBorder(
          borderRadius: BorderRadius.circular(12.0),
        ),
        child: Container(
          height: deviceSize.height / 2.0,
          child: new Form(
            key: formKey,
            child: new Column(
              children: <Widget>[
                Flexible(
                    child: SingleChildScrollView(
                  child: Column(
                    mainAxisSize: MainAxisSize.min,
                    crossAxisAlignment: CrossAxisAlignment.start,
                    children: <Widget>[
                      new Padding(
                        padding: EdgeInsets.only(left: 30.0, top: 30.0),
                        child: new Text(
                          "Customer Details",
                          style: TextStyle(
                              fontWeight: FontWeight.w300, fontSize: 25.0),
                        ),
                      ),
                      new Padding(
                        padding: EdgeInsets.all(10.0),
                        child: new ListTile(
                          leading: const Icon(Icons.person_outline),
                          title: new TextFormField(
                            autofocus: false,
                            decoration: InputDecoration(
                              labelText: "Full Name",
                            ),
                            validator: (value) => value.isEmpty
                                ? "Fristname cant\'t be empty"
                                : null,
                            onSaved: (value) => name = value,
                          ),
                        ),
                      ),
                      new Padding(
                        padding: EdgeInsets.all(10.0),
                        child: new ListTile(
                          leading: const Icon(Icons.attach_money),
                          title: new TextFormField(
                            autofocus: false,
                            initialValue: this.salary,
                            keyboardType: TextInputType.numberWithOptions(),
                            decoration: InputDecoration(
                              labelText: "Salary",
                            ),
                            validator: (value) => value.isEmpty
                                ? "Amount No cant\'t be empty"
                                : null,
                            onSaved: (value) => salary = value,
                          ),
                        ),
                      ),
                      new Padding(
                        padding: EdgeInsets.only(right: 0.0),
                        child: new Row(
                          mainAxisAlignment: MainAxisAlignment.end,
                          children: <Widget>[
                            new FlatButton(
                                onPressed: () {
                                  Navigator.pop(context);
                                },
                                child: new Text(
                                  "CANCEL",
                                  style: TextStyle(color: Colors.red),
                                )),
                            new FlatButton(
                                onPressed: () {
                                  addCustomer();
                                },
                                child: new Text(
                                  "ADD",
                                  style: TextStyle(color: Colors.blue),
                                )),
                          ],
                        ),
                      )
                    ],
                  ),
                ))
              ],
            ),
          ),
        ));
  }


  bool validateAndSave() {
    final form = formKey.currentState;
    if (form.validate()) {
      form.save();
      return true;
    } else {
      return false;
    }
  }


  Future addCustomer() async {
    if (validateAndSave()) {
      final model = StoreModel(); //Mode is the Observable
      final x = model.of(context, true); //Use of method in model with context and listen set to true. To update UI
      x.add({'name': this.name, 'salary': this.salary});
      Navigator.pop(context);
    }
  }
}
The MyCustomDialog class is the descendant class of the ancestor ReactiveStore class Widget. Now lets take a look at the addCustomer method. The method will add our data into the store, in this case the name and salary. To access the data in our store you use the of method in the StoreModel. To access while notifying Widgets wrapped by the UpdateUI Widget we use the of method in the StoreModel with listen set to true. See code below:
MyCustomDialog类是祖先ReactiveStore类Widget的后代类。 现在,让我们看一下addCustomer方法。 该方法会将我们的数据添加到商店中,在这种情况下为名称和薪水。 要访问我们商店中的数据,请使用StoreModel中的of方法。 要在通知UpdateUI小部件包装的小部件的同时进行访问,我们使用StoreModel中的of方法, 并将 listen设置为true。 参见下面的代码:
...
...
Future addCustomer() async {
  if (validateAndSave()) {
    final model = StoreModel(); //Model is the Observable
    final x = model.of(context, true); //Use of method in model with context and listen set to true. To update UI
    x.add({'name': this.name, 'salary': this.salary});
    Navigator.pop(context);
  }
}
...
...
To add data in the store you use the add method in the StoreModel. If you want to access the data without necessarily rebuilding the UI (i.e rebuilding widgets wrapped by UpdateUI Widget) you set the listen parameter to false or directly use the instance of the StoreModel. See code below:
要在商店中添加数据,请使用StoreModel中的add方法。 如果要访问数据而不必重建UI(即重建UpdateUI Widget包装的窗口小部件),则将listen参数设置为false或直接使用StoreModel的实例。 参见下面的代码:
final model  = StoreModel();
final access = model.of(context, false);//these return the total number of items(items being Maps of data) in  the store without rebuilding the UI
int items = model.itemsList.length;
int items2 = access.itemsList.length;
NB Directly using the StoreModel instance object to access operations in the StoreModel does not the rebuild UI you need to pass the context and listen using the of method.
注意:直接使用StoreModel实例对象访问StoreModel中的操作并不需要重建UI,您无需传递上下文并使用of方法监听。
删除方法 (remove Method)
...
...


void _showAlertDialog(String title, String message, int index){
    final model = StoreModel(); //Model is the Observable
    final x = model.of(context, true); //Use of method in model with context and listen set to true. To update UI
    AlertDialog alertDialog = AlertDialog(
      title: new Icon(Icons.warning, size: 80.0, color: Colors.amber,),
      content: Text(message),
      actions: <Widget>[
        FlatButton(
          child: Text('YES',style: TextStyle(color: Colors.red),),
          onPressed: () {
            x.remove(index);
            Navigator.of(context).pop();
          },
        ),


        FlatButton(
          child: Text('CANCEL'),
          onPressed: () {
            Navigator.of(context).pop();
          },
        ),
      ],
    );
    showDialog(
        context: context,
        builder: (_)=>alertDialog
    );
  }


  ....
In the above method the _showAlertDialog in the MyHomePage in notice how the of method has its listen parameter set to true. This is such whenever we remove an data from our store we want to instantly rebuild the UI ie widgets wrapped by the UpdateUI class.
在上面的方法中,MyHomePage中的_showAlertDialog注意到of方法如何将其侦听参数设置为true。 每当我们从商店中删除数据时,我们都想立即重建UI,即由UpdateUI类包装的窗口小部件。

结论 (CONCLUSION)
Wrap ancestor widget with ReactiveStore Widget.
用ReactiveStore小部件包装祖先小部件。
Wrap descendant widget that you want to rebuild whenever there is a change in state with UpdateUI Widget
使用UpdateUI Widget更改状态时,包装要重建的后代 Widget
To access data and make updates to the store while rebuilding UI use of method in StoreModel with listen set to true.
要在重建UI的同时访问数据并更新商店,请使用StoreModel中的方法并将listen设置为true。
To access data without rebuilding UI use:
要访问数据而不重建UI,请使用:
a) Directly use the instance of StoreModel e.g.
a)直接使用StoreModel的实例,例如
final model = StoreModel();
最终模型= StoreModel();
print(model.itemsList.length);
打印(model.itemsList.length);
b) Use
b)使用
of method with listen set to false eg
设置为false 的方法的方法,例如
final model = StoreModel();
最终模型= StoreModel();
final access = model.of(context, false);
最终访问权限= model.of(context,false);
print(access.add({‘name’:’John’, ‘age’:7}));
print(access.add({'name':'John','age':7})));
!!END
!!结束
拉取请求 (Pull Requests)
I Welcome and i encourage all Pull Requests
我欢迎并鼓励所有请求请求
创建和维护者 (Created and Maintained by)
Author: Tafadzwa Lameck Nyamukapa :
Email: [tafadzwalnyamukapa@gmail.com]
电子邮件:[ tafadzwalnyamukapa@gmail.com ]
- Open for any colleboration and Remote Work!! 开放供任何合作和远程工作!
- Happy Fluttering!! 快乐飘飘!
翻译自: https://medium.com/swlh/simple-flutter-state-management-55451f73032c
链路状态避免抖动的方法是


 41
41


 被折叠的 条评论
为什么被折叠?
被折叠的 条评论
为什么被折叠?
 到【灌水乐园】发言


